1. Do not attempt to modify the unit, modifying the unit may cause an accident.
2. Installation or servicing of the unit by persons without training and experience in
electronic equipment and automotive accessories may be dangerous and could
expose you to the risk of electric shock or other hazards.
3. Stop the vehicle before carrying out any operation that could interfere with your
driving.
4. Keep the volume at a level which you could hear sounds from outside the vehicle.
5. Do not work in extremely high or low temperature. Be sure the temperature inside
the vehicle is between +60°C and -10°C before turning on your unit.
6. When replacing the fuse(s), the replacement must be of the same amperage as
shown on the fuse holder.
7. Do not block vents or radiator panels. Blocking them will cause heat to build up
inside and may result in re.
8. Using this unit without running the engine can result in battery drainage.
9. Use only in cars with a 12 volt negative ground.
10. After completing the installation or replacing the car battery, you need to RESET the
unit before using it. Remove the front panel and press RESET button on the base
with pointed object (such as ball-point pen) to reset the unit to its initial settings.
11. Before you install the unit, remove two screws on top of the unit absolutely.
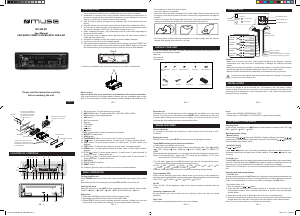
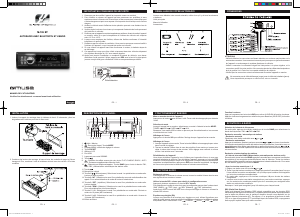
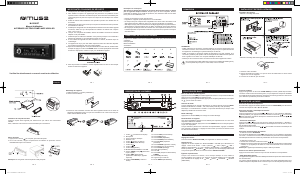
M-1228 BT
GB - 1
User Manual
CAR RADIO CD/MP3 PLAYER WITH USB & SD
Please read the instruction carefully
before operating the unit.
PRECAUTIONS
GB - 2 GB - 3
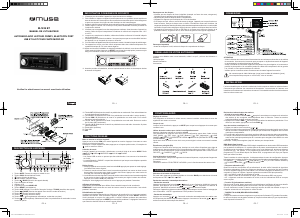
CONNECTION
Do not connect the ignition wire (red) and the battery wire (yellow), it may cause
a short circuit, even result in re.
GB - 4 GB - 5 GB - 6
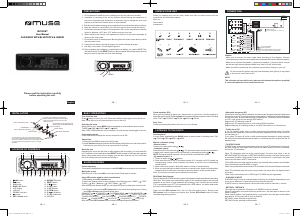
UNPACK YOUR UNIT
When you unpack your new car radio, make sure that you have removed all the
accessories and information papers:
Main unit
User manual
Accessories:
The unit is installed to be an anti-theft one. The chassis of the unit wears a sliding
metal housing. Please do the connection of the power. Speakers and antenna are
according to the requirement of the instruction book. Then install the sliding metal
housing in the car as follows:
INSTALLATION
GB - 7
BASIC OPERATION
English
• Do not attempt to load more than one disc.
• Only 12cm discs are compatible.
• New discs may have some roughness around the edges. Before load such disc into
the player, use a ball-point pen or the like to remove any roughness from the edge of
the disc.
• If there is a scratch, dirt or ngerprints on the disc, it may cause tracking error. Before
playing, clean the disc with a clean cloth. Wipe the disc from the center out.
• Don’t store discs in places with high temperatures or high humidity, they can become
warped. After playing, store the disc in its case.
7
Keys x2
Screw x1
2
3
Spring Washer x1
4
Hex Nut x1
5
Plain Washer x2
6
Outer Trim
Frame x1
Rear Mounting
Bolt x1
1
8 9
Steel Bar x1 Mounting sleeve x1
LOCATION OF CONTROLS
1. EJ (eject) button: To eject the disc from disc slot.
2. BND (BAND) button: To select band: FM1, FM2, FM3, MW1 or MW2.
3. MENU setting; volume adjusting knob
4. APS button
5. Built-in microphone
6. Disc slot
7. LCD display
8. USB port
9. button
10. button
11. REL (release) button: Press to release the front panel.
12. MOD/PTY (mode) button
13. SCAN button
14. POWER/MUTE button: To turn unit on /off; To mute or restore sound.
15. 1/ button: To select preset channel 1 in radio mode. To start or pause playback.
16. 2/INT button: To select preset channel 2 in radio mode. To start/ cancel intro
playback.
17. 3/RPT button: To select preset channel 3 in radio mode. To repeat playback.
18. 4/RDM button: To select preset channel 4 in radio mode. To start/ cancel random
playback.
19. 5/ -10/ button: To select preset channel 5 in radio mode; To skip backward 10
tracks (mp3 only). To hang up the call.
20. 6/ +10/ button: To select preset channel 6 in radio mode; To skip forward 10
tracks (mp3 only). To answer the phone.
21. AUX IN jack
22. SD/SDHC/MMC Card Slot
23. RESET button
24. Indicator Light: when the front panel is removed, the indicator ashes.
SOUND FEATURES
Reset the unit
Operating the unit for the rst time or after replacing the car battery, you must reset
the unit. To set the unit to initial status, press RESET button located on the base with
a pointed object. When some errors occur in display, you can also reset the unit, but it
will erase the clock setting and some memorized functions.
Volume adjusting:
To increase or decrease the sound level, rotate volume knob clockwise or anti-
clockwise.
Muting the sound
When the unit is ON, press MUTE to mute the sound. Press again to restore.
Using MENU/volume knob to select sound feature
1) Repeatedly press MENU/volume knob
To select the desired mode for sound setting in the following order: VOL “BASS”
“TRE” (Treble) “BAL” (Balance) “FAD” (Fader) PTY NONE/ PTY
NAME.
After selecting the desired mode, you can adjust the level by rotating the volume knob.
Noted: If corresponding PTY name exist, PTY name will be displayed. If PTY name
does not exist, “PTY NONE” appears.
2) In FM mode, press and hold MENU/volume knob, the unit will enter setting menu.
Shortly press MENU/volume knob will show below items:
IN VOL DSP BEEP TA VOL EON REG AF TA EQ
LOUD LOC MONO/ STEREO AREA
After that, rotate MENU/volume knob to choose corresponding setting desired.
Preset equalizer (EQ)
When you are listening to pop music, classic music or rock music, use the equalizer to
adjust the sound quality. Rotate volume knob to select different equalizer mode in following
order: FLAT CLASSIC POP ROCK EQ OFF.
IN VOL
When “IN VOL” will be displayed, rotate volume knob to preset a constant switch-on
volume.
Switching Loudness on/off
By this function, you can increase the low frequency, which can improve sound
sensitivity.
Beep Tone
Choosing corresponding status can turn on or turn off beep.
LISTENING TO THE RADIO
Selecting band
In tuner mode, repeatedly press BND button to select bands in following order: FM1
FM2 FM3 MW1 MW2.
Manual/automatic tuning
- Manual Tuning
Press and hold or button until “MANUAL” shows on display, then press or
continuously to select a station downward or upward. Press and hold or button to
tune the station with a faster speed.
- Automatic Tuning
By or button
Press or button once, the radio automatically searches a station upward or
downward respectively and plays when it nds a station. Press or again to stop
scanning.
By SCAN button
Press SCAN button once, the radio will automatically searches a station, the current station
will blink 5 seconds, then press SCAN button again to remain and playback the current
frequency. If no key is press within 5 seconds, the unit will scan continually.
Noted: If AF or TA function is on, the unit will automatically search a RDS signal station
only.
Scanning and memorizing stations
- By APS button.
In tuner mode, press and hold APS button for 3 seconds to start scanning for stations and
store them automatically in memory. All preset stations are scrolled during few seconds
under your selected band. To remain on a station, press again the APS button.
- By number button 1- 6
1. Tune to a station by or button.
2. Press and hold one of the 1- 6 number buttons for 2 seconds until LCD shows the
corresponding number, which indicates that station is stored in the corresponding
number button.
3. Under radio mode, press 1- 6 Number buttons to listen to stored stations.
4. When you are listening to a station stored on a number button, press and hold another
number button for more than 2 seconds to store the station on this number button.
Note: The unit can be stored up to 6 stations for each band.
Reset
Caution!
- Make sure to connect the color coded leads according to the diagram. Incorrect
connections may cause the unit to malfunction or damage the vehicle’s electrical
system.
- Make sure to connect the speaker (-) leads to the speaker (-) terminal. Never connect
the left and right channel speaker cables each other or to the vehicle body.
- Make sure all the connections are completely correct before turning on your unit.
Steel bar
To boost up the capability
of anti-jamming. Please fix
the steel bar on the metal
connected to the bottom
bracket of the car
Bend these claws outward
for a tight fit, if necessary
Main unit
Dash board
Mounting sleeve
To take out the main unit, insert
the two keys in the holes on each
side between the main unit and
mounting sleeve.
Outer trim frame
Detachable front panel
9
10
11 12 13 14 15 16 17 18 19 20 21
1 6 7 82 3 4 5
23 24 22
Noted:
- Please refer to BASIC OPERATION for “DSP”.
- Please refer to “LISTENING TO THE RADIO” for others items operation.
Turning on/off the unit
Press POWER button to turn on the unit. Press and hold this button again to turn off the
unit.
Note: When the unit is off, press any key except REL and EJ to turn on the unit.
Selecting the mode
When the unit is on, press MOD button repeatedly to select different source mode:
TUNER DISC CARD USB BT AUDIO (Bluetooth) AUX.
Adjust time:
1. Press and hold MENU/ Volume knob to enter into setting mode
2. Repeatedly press MENU/ Volume knob to select DSP mode.
3. Rotate MENU/ Volume knob clockwise and anti-clockwise to adjust the hour and
minute value. It will conrm your setting if no key is pressed within 5 seconds.
Notice on disc
Use such discs may cause malfunction or breakdown of the internal mechanism:
With large scratches; with irregular shape; cracked; with any cellophane tape or other
glue on it or with peeling off marks; with protection sheet; equipped with stabilizers, etc.
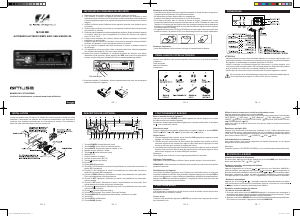
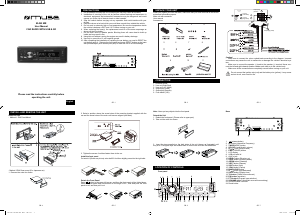
4 SPEAKER SYSTEM
Rear Left
speaker
Front Left
speaker
Front Right
speaker
Rear Right
speaker
(Green/Black)
(Green)
(White/ Black)
(White)
(Gray/ Black)
(Gray)
(Violet/ Black)
(Violet)
B1
B2
B3
B4
B5
B6
B7
B8
ANTENNA
SOCKET
LINE OUT
L-CH (WHITE)
R-CH (RED)
ISO CABLE
(NOT INCLUDED)
ISO CONNECTOR B
ISO CONNECTOR A
FUSE HOLDER (15A)
A8
A7
A5
A4
Ground wire (Black)
Ignition wire (Red)
Power Antenna Amplifier Turn on (Blue)
+12V Constant Power Supply (Yellow)
Bluetooth
Antenna Wire


Join the conversation about this product
Here you can share what you think about the Muse M-1228 BT Car Radio. If you have a question, first carefully read the manual. Requesting a manual can be done by using our contact form.