
IMPORTANT SAFEGUARDS
When using electrical appliances, basic safety precautions should always be followed to reduce the risk of
fire, electric shock, and/or injury to persons, including the following:
1. Read all instructions.
2. This appliance is not intended for use by
persons with reduced physical, sensory, or
mental capabilities, or lack of experience and
knowledge, unless they are closely supervised
and instructed concerning use of the appliance
by a person responsible for their safety.
3. This appliance shall not be used by children.
Keep the appliance and its cord out of reach of
children.
4. Close supervision is necessary when any
appliance is used near children. Children should
be supervised to ensure that they do not play
with the appliance.
5. To protect against risk of electrical shock, do not
put cord, plug, base, or motor in water or other
liquid.
6. Turn the appliance OFF ( ), then unplug from
outlet when not in use, before putting on or
taking off parts, and before cleaning. To unplug,
grasp the plug and pull from the outlet. Never
pull from the power cord.
7. Avoid any contact with moving parts.
8. Do not operate any appliance with a damaged
supply cord or plug, or after the appliance
malfunctions or has been dropped or damaged
in any manner. Supply cord replacement and
repairs must be conducted by the manufacturer,
its service agent, or similarly qualified persons
in order to avoid a hazard. Call the provided
customer service number for information on
examination, repair, or adjustment.
9. The use of attachments, including canning jars,
not recommended or sold by the appliance
manufacturer may cause a risk of injury to
persons.
10. Do not use outdoors.
11. Do not let cord hang over edge of table or
counter, or touch hot surfaces, including the
stove.
12. Do not place on or near a hot gas or electric
burner or in a heated oven.
13. Keep hands and utensils out of the jar and
away from the cutting blade while blending
or chopping food to reduce the risk of severe
personal injury and/or damage to the blender or
available attachments (attachments may not be
provided with blender). A rubber spatula may
be used but must be used only when blender is
not running.
14. Blades are sharp; handle carefully—especially
when assembling, disassembling, or cleaning
inside blender jar.
15. Do not use a broken, chipped, or cracked
blender jar.
16. Do not use broken, cracked, or loose cutting
blades.
17. Always operate blender with lid in place.
18. Ensure collar on base of blender jar and personal
jar is tight and secure. Injury can result if
moving blades accidentally become exposed.
19. Check that the appliance is OFF ( ) before
plugging cord into wall outlet. To disconnect,
turn the control to OFF ( ); then remove plug
from wall outlet. To unplug, grasp the plug and
pull from the outlet. Never pull from the power
cord.
20. Do not use appliance for other than intended
purpose.
21. Do not place blender jar in the freezer filled with
food or liquid.
22. Electronic push button control: Flashing light
indicates ready to operate. Avoid any contact
with blades or moveable parts.
23. Do not blend hot liquids in personal jar.
24. Be careful if hot liquid is poured into the
blender container as it can be ejected out of the
appliance due to a sudden steaming.
25. When blending hot liquids, remove filler-cap of
two-piece lid or open vent opening of lid with
mess-free spout, and close any lid openings
along the edge intended for pouring. Hot liquids
may push lid off jar during blending. To prevent
possible burns: Do not fill blender jar beyond the
3-cup (710-ml) level. With the protection of an
oven mitt or thick towel, place one hand on top
of lid. Keep exposed skin away from lid. Start
blending at lowest speed.
26. CAUTION! In order to avoid a hazard due to
inadvertent resetting of the thermal cut-out,
this appliance must not be supplied through an
external switching device, such as a timer, or
connected to a circuit that is regularly switched
on and off by the utility.
27. To reduce the risk of injury, never place cutting
blade assembly on base without blender jar or
personal jar attached.
28. If the jar should twist or rotate when motor is
switched ON (I), switch OFF ( ) immediately
and tighten jar in collar or on blender base.
29. Do not leave blender unattended while it is
operating.
30. Operating time cannot exceed 3 minutes for any
accessory or speed setting.
31. Keep hands and utensils away from moving
chopping/mixing blade and slicing/shredding
disc while processing food to reduce the risk
of severe personal injury and/or damage to the
food processor. A rubber scraper may be used
but ONLY when the food processor or chopper is
not running.
32. The chopping/mixing blade and slicing/shredding
disc are sharp. Handle carefully. Store out of
reach of children.
33. To reduce the risk of injury, never place
chopping/mixing blade or slicing/shredding disc
on the processor or chopper motor shaft without
bowl properly attached.
34. Be certain lid is securely locked in place before
operating food processor or chopper.
35. Never feed food into food chute by hand.
Always use the food pusher.
36. Do not attempt to defeat the processor or
chopper lid interlock mechanism.
37. Make sure the chopping/mixing blade and
slicing/shredding disc have come to a full stop
before removing processor or chopper lid.
38. Never use appliance for a longer period or with
a larger amount of ingredients other than that
recommended by appliance manufacturer.
SAVE THESE INSTRUCTIONS
Other Consumer Safety Information
This appliance is intended for household use only. Use for food or liquids only.
w WARNING
Electrical Shock Hazard:
This product is provided with a polarized plug (one
wide blade) to reduce the risk of electric shock. The
plug fits only one way into a polarized outlet. Do not
defeat the safety purpose of the plug by modifying
the plug in any way or by using an adapter. If the
plug does not fit fully into the outlet, reverse the
plug. If it still does not fit, have an electrician replace
the outlet.
The length of the cord used on this appliance was
selected to reduce the hazards of becoming tangled
in or tripping over a longer cord. If a longer cord is
necessary, an approved extension cord may be used.
The electrical rating of the extension cord must be
equal to or greater than the rating of the appliance.
Care must be taken to arrange the extension cord so
that it will not drape over the countertop or tabletop
where it can be pulled on by children or accidentally
tripped over.
To avoid an electrical circuit overload, do not use
another high-wattage appliance on the same circuit
with this appliance.
If the cutting unit blades lock and do not move, it
will damage the motor. Do not use. Call the provided
customer service number for information.
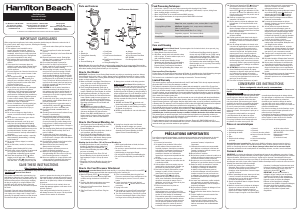
Parts and Features
1.
Lid
2.
Blender Jar
3.
Cutting Blade Assembly
4.
Collar
5.
Base
6.
Personal Blending Jar
7.
Food Pusher
8.
Food Chute
9.
Food Processor Attachment
Lid
10.
Food Processor Attachment
S-Blade
11.
Slicing/Shredding Disc
12.
Adapter
13.
Food Processor Bowl
14.
Food Processor Bowl Base
NOT SHOWN:
Cord Storage (back of Base)
Before first use: After unpacking Blender, wash everything except Base in hot, soapy water. Rinse and dry.
Wipe Base with a soft damp cloth or sponge. Do not immerse Base in water or other liquid. Care should be
taken when handling Cutting Blade Assembly as it is very sharp.
How to Use Blender
IMPORTANT: Your Blender Jar and Cutting Blade Assembly are subject to wear during normal use. Always
inspect Blender Jar for nicks, chips, or cracks. Always inspect Cutting Blade Assembly for broken, cracked,
or loose blades. If Blender Jar or Cutting Blade Assembly is damaged, do not use. Call our customer service
number to obtain replacement parts.
1. Make sure Blender is unplugged. Place Base on a
clean, dry surface to keep foreign particles from
being pulled up into motor during operation.
2. Place Cutting Blade Assembly, blade side up,
through opening in Blender Jar. Twist Collar onto
bottom of Blender Jar. Place Blender Jar on Base.
3. Add ingredients to Blender Jar. Plug into outlet.
4. Place Lid onto Blender Jar. Push desired function
button. Blender speed increases as buttons are
pushed left to right. When using PULSE button,
Blender will operate as long as button is pressed.
Remaining speed buttons will run Blender until
OFF ( ) is pressed.
IMPORTANT: Do not operate your Blender
continuously for long periods exceeding 3 minutes. If
you start to smell a burning odor, stop immediately
and remove the Blender Jar. Start and run the
Blender—Base ONLY with NO Blender Jar—on the
highest speed for 2 minutes. When trying similar
recipes in the future, reduce the total amount of
ingredients.
5. Always place one hand on Lid during operation.
w WARNING
Burn Hazard. When blending hot
liquids, remove filler-cap of two-piece lid or open vent
opening of lid with mess-free spout, and close any
lid openings along the edge intended for pouring. Hot
liquids may push lid off blender jar during blending. To
prevent possible burns: Do not fill blender jar beyond
the 3-cup (710-ml) level. With the protection of an
oven mitt or thick towel, place one hand on top of
Lid. Keep exposed skin away from Lid. Start blending
at lowest speed.
6. ALWAYS turn Blender OFF ( ) and wait until
blades have stopped rotating before removing jar.
7. To remove Blender Jar after blending is complete,
lift Blender Jar straight up.
8. NEVER replace Blender Jar onto unit while motor
is running.
How to Use Personal Blending Jar
1. Add ingredients to Personal Blending Jar. Carefully
place Cutting Blade Assembly and Collar onto
Personal Blending Jar.
2. Turn Personal Blending Jar upside down, shake to
mix ingredients, and place onto Base.
3. Plug in unit. Hold Personal Blending Jar in place
while blending. Press ON (I) and PULSE to blend
15 to 30 seconds or until smooth. Always operate
on a countertop or other supporting surface.
4. Unplug from electrical outlet. Hold Personal
Blending Jar and lift straight up to remove.
5. Turn bottom up; remove Collar and Cutting Blade
Assembly from Personal Blending Jar. Hand-
tighten Lid onto Personal Blending Jar.
Blending tips for the 20-oz. (591 ml) Personal Blending Jar
• If blending action does not start, stops during
blending, or ingredients stick to sides of the
Personal Blending Jar, turn Blender OFF ( ).
Remove Personal Blending Jar, shake contents,
and return to blending.
• For best performance in the 20-oz. (591 ml)
Personal Blending Jar, the minimum amount of
liquid needed per recipe is 3/4 cup (6 ounces
[177 ml]).
• When filling the Personal Blending Jar, place frozen
ingredients or ice into the Personal Blending Jar
first.
• When turned upside down to blend, the frozen
items will be on the top.
• Do not chop or process hard foods such as cheese,
crackers, or meat.
• Avoid bumping or dropping the Blender.
• Do not blend hot liquids in Personal Blending Jar.
• Do not fill Personal Blending Jar above MAX fill
line.
How to Use Food Processor Attachment
w WARNING
Laceration Hazard. Handle blade carefully; it is very sharp. Make sure unit is turned OFF ( )
and is unplugged. Always wait until blade has stopped moving before removing lid.
1. Make sure Blender is OFF ( ) and unplugged.
Then, place Food Processor Bowl straight down
on Base, turning clockwise to lock Bowl into
place.
2. Carefully slide blade straight down onto motor
shaft. Add food to Food Processor Bowl.
3. Place Lid on Food Processor Bowl. Rotate Lid
clockwise to lock.
4. Slide Food Pusher into Food Chute. Plug into
outlet.
5. Pulse is recommended when using the Food
Processor attachment. Press and hold one of the
Pulse settings to process. To turn off, release
button.
6. If other function is desired, pushj desired
buitton. Press OFF ( ) Button when finished
processing.
7. Unplug from outlet.
8. Pull straight up to remove Food Processor Bowl
with Collar still attached. Place on flat surface.
9. Turn Lid counterclockwise. Carefully lift up Food
Processor Attachment S-Blade or insert fingers
into finger holes on Slicing/Shredding Disc to
PRÉCAUTIONS IMPORTANTES
Pour utiliser un appareil électroménager, vous devez toujours prendre des mesures élémentaires de sécurité
pour réduire le risque d’incendie, d’électrocution et/ou de blessure corporelle, en particulier les mesures
suivantes :
1. Lire toutes les instructions.
2. Cet appareil n’est pas destiné à être utilisé
par des enfants ou des personnes dont les
capacités physiques, sensorielles ou mentales
sont réduites, ou manquant d’expérience et de
connaissance, sauf si elles sont étroitement
surveillées et instruites sur l’utilisation de
l’appareil par une personne responsable de leur
sécurité.
3. Cet appareil ne doit pas être utilisé par des
enfants. Garder l’appareil et son cordon hors de
la portée des enfants.
4. Une surveillance étroite est requise pour tout
appareil utilisé près des enfants. Surveiller que
les enfants ne jouent pas avec l’appareil.
5. Pour éviter les risques d’électrocution, ne pas
immerger le cordon, la fiche, la base ou le
moteur dans l’eau ou tout autre liquide.
6. Fermer l’appareil OFF ( /arrêt), puis le
débrancher de la prise lorsqu’il n’est pas
utilisé, avant d’assembler ou de désassembler
des pièces ou avant de le nettoyer. Pour le
débrancher, tenir la fiche et la retirer de la prise.
Ne jamais tirer sur le cordon.
7. Éviter tout contact avec les pièces en
mouvement.
8. Ne pas faire fonctionner un appareil
électroménager avec un cordon ou une fiche
endommagée, ou lorsque l’appareil ne fonctionne
pas bien ou a été échappé ou endommagé
d’une manière quelconque. Le remplacement et
la réparation du cordon d’alimentation doivent
être faits par le fabricant, son agent de service
ou toute personne qualifiée de façon à éviter
tout danger. Appeler le numéro de service à
la clientèle fourni pour des renseignements
concernant l’examen, la réparation ou
l’ajustement.
9. L’utilisation d’accessoires non recommandés
par le fabricant ou vendus par le fabricant de
l’appareil, incluant les boîtes de conserve, peut
provoquer des blessures
10. Ne pas utiliser à l’extérieur.
11. Ne pas laisser pendre le cordon de la table ou du
comptoir et éviter tout contact entre le cordon et
les surfaces chaudes incluant la cuisinière.
12. Ne placer pas sur ou à proximité d’un brûleur
électrique ou à gaz chaud ou dans un four chaud.
13.
Garder les mains et les ustensiles à l’extérieur
du récipient et éloignés de la lame pendant
le mélange ou le hachage des aliments afin
de réduire le risque de blessures graves et/
ou de bris du mélangeur et de ses accessoires
(certains accessoires ne sont pas fournis avec
ce mélangeur). Une spatule en caoutchouc peut
être utilisée seulement lorsque le mélangeur ne
fonctionne pas.
14. Les lames sont tranchantes; veuillez manipuler
avec précaution, en particulier lorsque vous
assemblez, désassemblez, videz ou nettoyez le
récipient du mélangeur.
15. Ne pas utiliser le récipient du mélangeur s’il est
brisé, ébréché ou fissuré.
16. Ne pas utiliser des lames brisées, fissurées ou
lâches.
17. Toujours installer le couvercle avant de faire
fonctionner l’appareil.
18. Serrer et sécuriser le collier de la base du
récipient et de la récipient personnel. Des
risques de blessures peuvent survenir si les
lames en mouvement sont accidentellement
exposées.
Read before use.
Lire avant utilisation.
Lea antes de usar.
For Questions: 1.800.851.8900
For recipes, tips, product
information and registration:
hamiltonbeach.com
Pour des questions : 1.800.267.2826
Pour des recettes, des conseils, des
renseignements sur le produit et
l’enregistrement: hamiltonbeach.ca
Para preguntas:
800 71 16 100
Para recetas, consejos, información
del producto y registro:
hamiltonbeach.com.mx
Le invitamos a leer cuidadosamente este instructivo antes de usar su aparato.
remove.
Care and Cleaning
w WARNING
Electrical Shock Hazard. To protect against risk of electrical shock, do not put cord, plug,
base, or motor in water or other liquid.
1. Unplug Blender from electrical outlet.
2. Wipe Base, control panel, and cord with a damp
cloth or sponge. To remove stubborn spots, use a
mild, nonabrasive cleanser.
3. Blender Jar and Personal Blending Jar are
dishwasher-safe. Blender Lid, Personal Blending
Jar lid, Food Processor Attachment Lid, Food
Processor Bowl, Food Processor Attachment
S-Blade, Slicing/Shredding Disc, Adapter, and
Food Processor Bowl Base should be placed in
the top rack only. DO NOT use the “SANI” setting
when washing in the dishwasher. “SANI” cycle
temperatures could damage your product. Parts
may also be washed with hot, soapy water.
Care should be taken when handling the Cutting
Blade Assembly as it is very sharp. Rinse and dry
thoroughly. Do not soak.
4. Store Blender with Lid ajar to prevent container
odor.
How to use Easy Clean function
To Easy Clean, pour 2 cups (473 ml) warm water in Blender Jar and add one drop liquid dishwashing detergent.
Run the Blender on EASY CLEAN for 10 seconds. Discard soapy water. Rinse with clean water.
This function is not a substitute for regular cleaning as instructed in “Care and cleaning.”
Limited Warranty
This warranty applies to products purchased and used in the U.S. and Canada. This is the only express warranty for
this product and is in lieu of any other warranty or condition.
This product is warranted to be free from defects in material and workmanship for a period of five (5) years from
the date of original purchase in Canada and three (3) years from the date of original purchase in the U.S. During this
period, your exclusive remedy is repair or replacement of this product or any component found to be defective, at
our option; however, you are responsible for all costs associated with returning the product to us and our returning a
product or component under this warranty to you. If the product or component is no longer available, we will replace
with a similar one of equal or greater value.
This warranty does not cover glass, filters, wear from normal use, use not in conformity with the printed directions,
or damage to the product resulting from accident, alteration, abuse, or misuse. This warranty extends only to the
original consumer purchaser or gift recipient. Keep the original sales receipt, as proof of purchase is required to make
a warranty claim. This warranty is void if the product is used for other than single-family household use or subjected
to any voltage and waveform other than as specified on the rating label (e.g., 120 V ~ 60 Hz).
We exclude all claims for special, incidental, and consequential damages caused by breach of express or implied
warranty. All liability is limited to the amount of the purchase price. Every implied warranty, including any statutory
warranty or condition of merchantability or fitness for a particular purpose, is disclaimed except to the extent
prohibited by law, in which case such warranty or condition is limited to the duration of this written warranty.
This warranty gives you specific legal rights. You may have other legal rights that vary depending on where you
live. Some states or provinces do not allow limitations on implied warranties or special, incidental, or consequential
damages, so the foregoing limitations may not apply to you.
To make a warranty claim, do not return this appliance to the store. Please call 1.800.851.8900 in the U.S. or
1.800.267.2826 in Canada or visit hamiltonbeach.com in the U.S. or hamiltonbeach.ca in Canada. For faster service,
locate the model, type, and series numbers on your appliance.
Food Processor Attachment
19. S’assurer que l’appareil est OFF ( /arrêt) avant
de brancher la fiche dans la prise de courant.
Pour débrancher, tourner la commande à et
mettre à OFF ( /arrêt) puis débrancher la fiche
de la prise de courant. Pour débrancher, saisir la
fiche et la retirer de la prise. Ne pas tirer sure le
cordon d’alimentation.
20. N’utiliser cet appareil que pour les fonctions
auxquelles il est destiné.
21. Ne pas mettre le récipient du mélangeur dans
le congélateur s’il est rempli d’aliments ou de
liquides.
22. Commande à bouton-poussoir électronique : Le
témoin cliqnotant indique que l’appareil est prêt
à fonctionner. Eviter tout contact avec les lames
et les pièces amovibles.
23. Ne pas mélanger de liquides chauds dans le
récipient individuel.
24. Prendre garde au liquide chaud versé dans le
mélangeur parce que ce dernier peut jaillir hors
de l’appareil à cause de la formation soudaine
de vapeur.
25.
Lors du mélange de liquides très chauds, retirer
le bouchon de remplissage du couvercle en deux
parties ou ouvrir l’évent du couvercle avec le
bec verseur antigoutte et fermer tous les becs
verseurs le long du bord. Les liquides chauds
peuvent pousser sur le couvercle pendant le
mélange. Pour prévenir les brûlures : Ne pas
remplir au-delà de la marque 710 ml (3 tasses) du
récipient. À l’aide d’un gant de cuisinier ou d’une
serviette épaisse, placer une main sur le dessus
du couvercle. Garder la peau exposée éloignée du
couvercle. Commencer à mélanger en utilisant la
vitesse minimale.
26. ATTENTION! Afin d’éviter un danger découlant
d’une réinitialisation accidentelle du rupteur
thermique, se dispositif ne doit pas être alimenté
par l’entremise d’un appareil de connexion
externe, comme une minuterie, ou connecté à
un circuit qui est régulièrement mis sous et hors
tension par le service public.
27. Pour éviter les risques de blessure, ne jamais
placer les lames sans avoir correctement avoir
sécurisé le récipient ou la récipient du de
mélange personnel sur la base.
28.
Si le récipient bouge ou tourne pendant que le moteur
est en marche (ON [I]), mettre immédiatement le
mélangeur hors tension (OFF [ ]) puis serrer le
collier au mélangeur ou à la base du mélangeur.
29. Ne pas laisser le mélangeur sans surveillance
pendant le fonctionnement.
30. Le temps de fonctionnement ne doit pas
dépasser 3 minutes, peu importe l’accessoire,
ou le réglage de vitesse.
31. Afin de réduire les risques de blessures
corporelles et/ou de dommages graves au
robot culinaire, tenir les mains et les ustensiles
éloignés de la lame à hacher/mélanger mobile
et du disque à trancher/râper mobile lors de
l’utilisation de l’appareil. Un racloir en plastique
peut être utilisé, mais UNIQUEMENT pendant
l’arrêt du robot culinaire ou hachoir.
32. La lame du hachoir/mélanger et le disque à
trancher/râper sont tranchants. Manipuler avec
soin. Rangez loin des enfants.
33. Pour réduire le risque de blessure, ne jamais
installer la lame à hacher/mélanger ou le disque
à trancher/râper sur l’arbre du moteur du robot
sans que bol y soit correctement raccordé.
34. S’assurer que le couvercle du robot ou hachoir
est solidement verrouillé en place avant de
l’utiliser.
35. Ne jamais introduire d’aliments dans l’entonnoir
avec les mains. Toujours utiliser les poussoirs.
36. Ne pas tenter d’outrepasser le mécanisme de
verrouillage du couvercle du robot ou hachoir.
37. S’assurer que la lame à hacher/mélanger et le
disque à trancher/râper se sont complètement
arrêtés avant de retirer le couvercle du robot ou
hachoir.
38. Ne jamais prolonger le temps de fonctionnement
de cet appareil ou utiliser des quantités
d’aliments supérieures aux recommandations du
fabricant.
CONSERVER CES INSTRUCTIONS
Autres consignes de sécurité pour le consommateur
Cet appareil est destiné à un usage domestique uniquement. Utiliser seulement pour les aliments et les
liquides.
w AVERTISSEMENT
Risque de choc électrique :
Cet appareil est fourni avec une fiche polarisée (une
broche large) pour réduire le risque d’électrocution.
Cette fiche n’entre que dans un seul sens dans
une prise polarisée. Ne contrecarrez pas l’objectif
sécuritaire de cette fiche en la modifiant de quelque
manière que ce soit ou en utilisant un adaptateur.
Si vous ne pouvez pas insérer complètement la
fiche dans la prise, inversez la fiche. Si elle refuse
toujours de s’insérer, faire remplacer la prise par un
électricien.
La longueur du cordon installé sur cet appareil
a été sélectionnée afin de réduire les risques
d’enchevêtrement ou de faux pas causés par un
fil trop long. L’utilisation d’une rallonge approuvée
est permise si le cordon est trop court. Les
caractéristiques électriques de la rallonge doivent
être équivalentes ou supérieures aux caractéristiques
de l’appareil. Prendre toutes les précautions
nécessaires pour installer la rallonge de manière
à ne pas la faire courir sur le comptoir ou sur une
table pour éviter qu’un enfant ne tire sur le cordon ou
trébuche accidentellement.
Pour éviter la surcharge du circuit électrique, ne pas
utiliser un autre appareil à haute puissance sur le
même circuit que cet appareil.
L’assemblage des lames qui se bloquent ou refusent
de bouger peuvent endommager le moteur. Ne pas
utiliser. Appeler le centre de service à la clientèle
fourni pour obtenir des renseignements.
Pièces et caractéristiques
1.
Couvercle
2.
Récipient du mélangeur
3.
Assemblage de lames
4.
Col
5.
Base
6.
Récipient du de mélange
personnel
7.
Poussoir
8.
Entonnoir
9.
Couvercle du robot culinaire
10.
Lame en forme de S du robot
culinaire
11.
Lame à trancher/râper
12.
Adaptuer
13.
Bol du robot culinaire
14.
Base du bol du robot culinaire
NON ILLUSTRÉ :
Rangement pour cordon
d’alimentation
(à l’arrière de la base)
Avant d’utiliser pour la première fois : Après avoir déballé le mélangeur, nettoyer toutes les pièces, à
l’exception de la base, dans de l’eau chaude savonneuse. Rincer et sécher. Essuyer la base à l’aide d’un
chiffon ou d’une éponge douce et humide. Ne pas immerger la Base dans l’eau ou tout autre liquide.
Prendre des précautions lors de la manipulation de l’assemblage de lames, car celui-ci est très tranchant.
Comment utiliser
IMPORTANT : Le récipient du mélangeur et l’assemblage de lames de votre mélangeur sont sujets à l’usure
dans des conditions normales d’utilisation. Veuillez toujours inspecter le récipient du mélangeur pour confirmer
l’absence d’entailles, d’ébréchures ou de fissures. Veuillez toujours inspecter l’assemblage de lames pour
vérifier si elles sont brisées, fissurées ou mal fixées. Si le récipient du mélangeur ou l’assemblage de lames
du mélangeur sont brisés, ne pas utiliser l’appareil. Veuillez communiquer avec le numéro de notre service à la
clientèle pour obtenir des pièces de rechange.
1. Veuillez vous assurer que le mélangeur est
débranché. Placer la base sur une surface propre
et sèche afin d’empêcher que des particules
étrangères soient aspirées dans le moteur lorsque
l’appareil fonctionne.
2. Mettre l’assemblage de lames, lames vers le haut,
à travers l’ouverture du récipient du mélangeur
avant de serrer le col au bas du récipient. Mettre
le récipient du mélangeur sur la base.
3. Ajouter les ingrédients dans le récipient. Brancher
à la prise de courant.
4. Mettre le couvercle sur le récipient du mélangeur.
Appuyer sur le bouton de fonction souhaité. La
vitesse du mélangeur augmente lorsque l’on
appuie sur les boutons à partir de la gauche vers
la droite. Lorsque l’on appuie sur le bouton PULSE
(impulsion), le mélangeur fonctionnera tant que le
bouton est maintenu enfoncé. Les autres boutons
de vitesse fonctionneront jusqu’à ce que l’on
appuie sur le bouton OFF ( /arrêt).
IMPORTANT : Ne pas faire fonctionner le
mélangeur de façon continue pour des périodes
supérieures à 3 minutes. Si vous commencez à
sentir une odeur de brûlé, arrêter immédiatement
l’appareil et retirer le récipient du mélangeur.
Démarrer et faire fonctionner le mélangeur,
seulement la base, SANS le récipient du mélangeur,
à la vitesse la plus élevée pendant 2 minutes.
À l’avenir, lorsque vous essayerez des recettes
similaires, veuillez réduire la quantité totale
d’ingrédients.
Food Processing Techniques:
• Cut food into 1-inch (2.5-cm) pieces before processing with chopping/mixing S-blade.
• Do not use your food processor for the following: grinding grain, coffee beans, or spices; slicing frozen
meats; kneading dough; or crushing ice.
• When using S-Blade, do not exceed maximum (MAX.) amounts.
• When using disc attachment, do not process past the MAX LEVEL on the bowl.
ATTACHMENT FOODS
Chopping/Mixing S-Blade
Chop: Nuts, meat, vegetables, herbs, crackers (Max. 2 cups/ 473 ml)
Mix/Puree: Vegetables, fruit , soups, sauces, salad dressing
(Max. 2 cups/ 473 ml)
Grate: Cheese (chilled, Max. 5 oz. / 142 g)
Slicing Disc Vegetables, pepperoni, firm cheeses (chilled)
Shredding Disc Vegetables, pepperoni, firm cheeses (chilled)

Join the conversation about this product
Here you can share what you think about the Hamilton Beach 58176 Blender. If you have a question, first carefully read the manual. Requesting a manual can be done by using our contact form.