
D
CLOCK RE-SETTING
RESET OPERATION (DST=0, MAX=0, AVG=0, TM=0, CAL=0)
3
4
1. Replace the battery.
2. Be sure that the positive pole of the battery is facing
the battery cap.
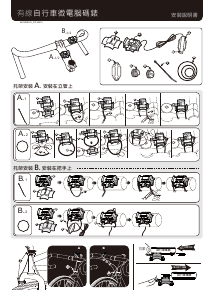
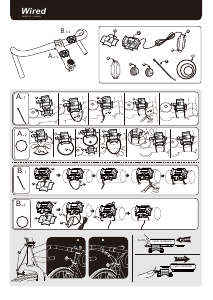
1. Refer to the setting procedure and complete the
adjustment.
2. Refer to Installations (Fig.C-a.) and readjust
position and gap correctly.
3. Refer to "Circumference Setting" and enter correct
value.
4. Refer to Installations (Fig.C-b.) to adjust distance or
angle between the main unit and the sensor.
5. Replace with a new battery.
6. Move away from the source of interference.
Refer to the "Main Unit Setup" and initiate the
computer again.
Place main unit in the shade to return to normal state.
No adverse effect on data.
Unit will return to normal state when the temperature
rises.
PROBLEM CHECK ITEMS REMEDY
Main unit No
display
No current
speed or
Incorrect
data
Irregular
display
LCD is black
Display is
slow
1. Is the battery dead?
2. Is there incorrect battery installation?
1. Is it at the MAIN UNIT SETUP or another
setting screen?
2. Are the relative positions and gap between
sensor and magnet correct?
3. Is the circumference correct?
4. Is the sensing distance too long or the
installation angle of the sensor incorrect?
5.
Is the sensor battery nearly exhausted?
6. Is any strong interference source nearby?
Did you leave main unit under direct sunlight
when not riding the bike for a long period of time?
Is the temperature below 0°C (32°F)?
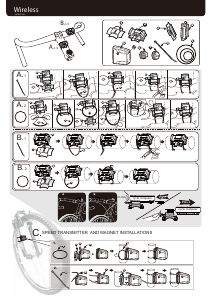
MAIN UNIT SETUP (Fig. 1)
INITIATE THE COMPUTER (ALL CLEAR)
1. A battery is already loaded in the main unit when purchased. Hold down the MODE button• and SET button„
simultaneously for more than 3 seconds to initiate the computer and clear all data. IMPORTANT: Be sure to
initiate the computer before it is be used, otherwise the computer may run
errors.
2. The LCD segments will be tested automatically after the unit is initiated.
3. Press the MODE button• to stop LCD test, then the flickering "KM/h".
UNIT SELECTION
Press MODE button• to choose KM/h or M/h (Mile/h). Press the SET button„ to recognize either as desired.
CIRCUMFERENCE DATA SETTING
1. It displays the “c2155”of the default value 2155mm. Measure the value for your wheel or refer to the quick table
provided in the manual for your bicycle.
2. Adjust the circumference data as described in the Data Setting Processes.(Fig. b)
WHEEL CIRCUMFERENCE
a). Precise Measurement (Fig. a-1)
Roll the wheel until the valve stem is at its lowest point close to the ground, then mark this first point on the
ground. Get on the bicycle and have a helper push you until the valve stem returns to its lowest point. Mark the
second point on the ground. Measure the distance between the marks. Enter this value to set the wheel
circumference.
b). Quick Table (Fig. a-2): Get a suitable circumference value from the table.
ODO DATA SETTING
The function is designed to re-key in former data of ODO when battery is replaced. A new user does not need to
set this data. Each press of the SET button„ skips one setting data process.
CLOCK SETTING
1. It displays the " " symbol at this clock setting.
2. 12H/AM, 12H/PM or 24H selection.
A quick press of the MODE button• to select 12H/AM, 12H/PM or 24H. Hold down the MODE button• for more
than 2 second to change to the clock setting screen.
3. Adjust the clock data according to the Data Setting Processes.(Fig. b)
BUTTON and OPERATIONS
MODE BUTTON
Quickly press this button to move in a loop sequence from one function screen to another.
SET BUTTON
Press this button to get in or out the setting screens when you want to re-set to bike circumference or the current
time of the " ".
RESET OPERATION (Fig. 3)
1. Hold down the MODE button• till the LCD digit is blanked, then release it. The computer will reset DST, MAX,
AVG, TM and CAL data from stored values to zero.
2. It cannot reset ODO and ,DST/D.
MAIN UNIT SLIDE ON/OFF DETECTION
The computer has a slide on detecting switch (patents pending) to avoid noise interference when the main unit is
removed from the bracket. The main unit can receive the wheel signal only when it is slid onto the bracket only.
AUTOMATIC START/STOP & POWER AUTO ON/OFF
The computer will automatically begin counting data upon riding and stop counting data when riding is stopped.
The flickering symbol " " indicates that the computer is at start status.
To preserve battery, this computer will automatically switch off and just displays the " " data when it has not
been used for about 30 minutes. The power will be turned on by pressing the MODE button• .
CIRCUMFERENCE, CLOCK RE-SETTING (Fig. 4)
1. Press the MODE button• to change to one of the following mode displays:
a). Change to ODO screen to set Circumference.
b). Change to screen to set Clock.
2. Press the SET button„ to enter to the relative setting screen.
3. Adjust the desired value according to the Data Setting Processes.(Fig. b)
4. Press the SET button„ to store the desired data and complete the current setting.
MAIN UNIT BATTERY CHANGE
a). The symbol " " will appear to indicate the battery is nearly exhausted.
b). Replace the battery with a new battery within a few days after the symbol was appeared.
c). All data will be cleared when battery is replaced, but this computer allows you to re-key in ODO which you had
rode after replacing battery, keeping record these data before you remove the old battery.
d). Replace with a new CR2032 battery and initiate the main unit.(Fig.1)
FUNCTIONS and SPECIFICATIONS
: Current Speed---------------------------------------------0.0 – 199.9 Km/h or 120.0 Mile/h +/- 1% (Typical)
1. The current speed is always displayed on the Lower display when riding. It displays current speed up to 199.9
KM/h or 120.0 M/h (for wheel diameters of over 24 inches).
2. When riding is stopped, the speed will continue to count 4 seconds for Bike to confirm that no more wheel signals
have been sent.
ODO: Odometer-------------------------------------------------------------------------0.0 – 99999.9 Km or Miles +/- 0.1%
1. The odometer cumulates the total distance as long as the bike is running.
2. The ODO data can not be cleared to zero by RESET operation.
TM: Riding Time----------------------------------------0M00.0S-59M59.9S, 1H00M00S-99H59M59S +/- 0.003%
The TM totals the riding time from the last RESET operation.
: 12HR AM/PM or 24HR Clock-------------------
1:00:00 – 12:59:59 AM/PM or 0:00:00 – 23:59:59 +/- 0.003%
It can display the current time in 12HR AM/PM or 24HR clock.
DST: Trip Distance---------------------------------------------------------------------0.00 – 999.99 Km or Miles +/- 0.1%
The DST function accumulates the distance data from the last RESET operation as long as the bike is being
ridden.
AVG: Average Speed--------------------------------------------------0.0 – 199.9 Km/h / 0.0 – 120.0Mile/h +/- 0.1%
1. It is calculated from the DST divided by the TM. The average data counted is from the last RESET to current point.
2. It displays "0.0" when TM is less than 4 sec., and is updated by about one second when TM is over 4 seconds.
3. It displays an "Err" symbol when either the TM is over 100 hours or the DST is over 1,000km (or miles). Reset the
unit in order to restart.
MAX: Maximum Speed--------------------------------------------------------0.0 – 199.9 Km/h or 120.0 Mile/h +/- 1%
It shows the highest speed from the last RESET operation.
DST/D: Distance Today -------------------------------------------------------------0.0 – 99999.9 Km or Miles +/- 0.1%
The DST/D function accumulates the distance data for one day rode. The data will be cleared at AM 12:00:00
(0:00:00) automatically.
/ : SPEED PACER
It flashes the " " speed pacer arrow while the current speed is higher than the average speed and the down
arrow " " flickers conversely.
CAL: Calorie mode
----- ----- ------------------------------------------------------------------------------------0.0 – 99999.9 kcal
Calculates the calories expended for the whole exercise process.
* Remarks: All functions’ data are updated about one second.
TROUBLE SHOOTING
PRECAUTIONS
1. Don’t leave the main unit exposed to direct sunlight when not riding the bike.
2. Don’t disassemble the main unit or its accessories.
3. Check relative position and gap of sensor, magnet and main unit periodically.
4. Don’t use thinner, alcohol or benzine to clean the main unit or its accessories when they become dirty.
5. Remember to pay attention to the road while riding.
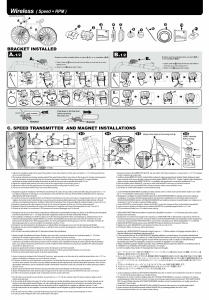
Sensor with Transmitter: No Contact Magnet sensor with Wireless Transmitter.
Suitable Fork Size: 12mm to 50mm (0.5" to 2.0") Forks.
Wireless Sensing Distance: 55cm (1.8 feet) between the transmitter and the main unit.
Cross-Talking Interference: Within 40 cm (15.8"), no interference by 2 bicycles carrying similar cycle
computers, even when ridden side by side.
Wheel Circumference Setting:1mm - 3999mm (1mm increment)
Operation Temperature: 0°C ~ 50°C (32°F ~ 122°F)
Storage Temperature: - 10°C ~ 60°C (14°F ~ 140°F)
Main Unit Battery Power: 3V battery x 1 (CR2032), battery operating life is about 2 years. (Based on an
average of 1.5 hours use per day)
Dimensions and Weigh Main Unit: 45.8 x 54 x 17.2mm/ 33.5g
* The specifications and designs may be changed without notice.
: MEANS PRESS BUTTON N MORE THAN 2 SECONDS.
: MEANS PRESS BUTTON N QUICKLY
{N=KEYNUMBER:
•
MODE Button.
„
SET Button. }
N
N
BATTERY CHANGE
INDEX:
1. Ist die Batterie leer?
2. Ist die Batterie falsch eingelegt?
1.Befinden Sie sich im Einstellungsmenü
des Hauptteil oder einem anderen
Einstellungsmenü ?
2. Ist die Position des Sensor und der
Abstand zwischen dem Magneten und
dem Sensor ordnungsgemäß?
3. Ist der Radumfang korrekt eingestellt?
4. Ist die Übertragungsdistanz zu groß
oder der eingestellte Winkel des
Sensors falsch?
5. Ist die Sensorbatterie fast verbraucht?
6. Gibt es eine starke, konfliktträchtige
Störquelle in der Nähe?
Hatten Sie das Hauptteil in der
prallen
Sonne gelassen, während Sie nicht
gefahren sind?
Is die Temperatur unter 0°C (32°F)?
Hauptein-heit
hat keine
Anzeige
Keine aktuelle
Geschwindig-
keitsanzeige
oder falsche
Daten
Irreguläre
Anzeige
Schwarze
LCD-Anzeige
Die Anzeige
ist langsam
PROBLEM ZU ÜBERPRÜFENDE TEILE LÖSUNG
FEHLERBESEITIGUNG
1. Ersetzen Sie die Batterie.
2. Versichern Sie sich, daß der Pluspol der
Batterie zum Verschlußdeckel zeigt.
1.
Lesen Sie in der Einstellungsanleitung die zu
vervollständigen Schritte nach.
2. Sehen Sie in der
ANBAU(
Fig.C-a.)
nach und
machen Sie die entsprechenden Korrekturen.
3.Sehen Sie unter der Radumfang -Einstellung nach
und geben Sie die korrekten Daten ein.
4.
Sehen Sie in
ANBAU(
Fig.C-b.)
nach und
machen
Sie die entsprechenden Längen-
oder
Winkelanpassungen
zwischen dem Hauptteil
und dem Sensor.
5. Ersetzen Sie die alte durch eine neue Batterie.
6. Bewegen Sie sich von der Störquelle fort.
Sehen Sie in den Einstellungen für das Hauptteil
nach und starten Sie den Computer
entsprechend neu.
Legen Sie das Hauptteil in den Schatten, bis die
normale Anzeige wieder erscheint. Die Daten
werden hiervon nicht beeinflußt.
Die Haupteinheit kehrt in den normalen Betrieb
zurück, sobald die Temperatur steigt.
VORSICHTSMAßNAHMEN
1. Lassen Sie, wenn Sie nicht am fahren sind, das Hauptteil nicht in der prallen Sonne liegen.
2. Bauen Sie nicht das Hauptteil oder anderes Zubehör auseinander.
3. Überprüfen Sie in regelmäßigen Zeitabständen die Befestigung und Größe der Lücke zwischen Magnet,
Haupteinheit und Sensor.
4. Benutzen Sie keine Lösungsmittel, Alkohol oder Benzin zum reinigen des Hauptteiles, falls es verschmutzt ist.
5. Denken Sie daran, auf den Straßenverkehr zu achten, während Sie Fahrrad fahren!
Sensor mit Übertragungseinheit: kontaktloser Magnetsensor mit kabelloser Übertragungseinheit.
passende Fahrradgabelgröße: 12 mm bis 50 mm& (0.5” bis 2.0”&) Fahrradgabel.
kabellose Übertragungsstrecke: 55 cm (1.8 Fuß) zwischen der Übertragungseinheit und dem Hauptteil.
Signalkonflikte: Bei einem Abstand von 40cm (15.8”) treten, sogar wenn Sie
nebeneinander fahren, keine Signalkonflikte zwischen zwei Fahrrädern mit
ähnlichen Fahrradcomputern auf.
Einstellungsdaten des Reifendurchmessers:
1 mm – 3999 mm (Zunahme um 1 mm).
Betriebstemperatur: 0°C ~ 50°C (32°F ~ 122°F).
Lagertemperatur: - 10°C ~ 60°C (14°F ~ 140°F).
Batterie der Haupteinheit: Eine 3V Batterie. Die Lebensdauer beträgt in etwa 2 Jahre (basierend auf
einem durchschnittlichen Gebrauch von 1.5 Stunden pro Tag).
Abmessung und Gewicht: Haupteinheit:
45.8 x 54 x 17.2mm/ 33.5g
* Die Spezifikation und das Design können jederzeit ohne Benachrichtigung geändert werden.
N
N
1. La batteria è scarica?
2. La batteria è stata installata in modo
corretto?
1. Si è allo schermo di regolazione dell’unità
principale o dell’orologio?
2. Le posizioni relative e la distanza tra
sensore e magnete sono corrette?
3. La circonferenza impostata è corretta?
4. La distanza di percezione è troppa o
l’angolo di installazione non è corretto?
5. La batteria del sensore è quasi esaurita?
6. C’è una fonte di interferenza nelle
vicinanze?
L’unità principale è stata esposta ai raggi
diretti del sole per un periodo in cui la
bicicletta non era in movimento?
La temperatura è inferiore a 0°C (32°F)?
Nessuna
indicazione sul
display
Non compare la
velocità di corsa o i
dati non sono
corretti
Visualizza-zione
irregolare
Il display è scuro
Il display è lento
PROBLEMA COSA CONTROLLARE RIMEDIO
1. Sostituire la batteria.
2. Assicurarsi che il polo positivo della batteria
sia rivolto verso il coperchio della batteria.
1.Fare riferimento alle istruzioni di effettuare le
operazioni in modo corretto.
2.Fare riferimento alle Installazioni (Fig.C-a.)
correggere posizione e distanza.
3.Fare riferimento al paragrafo “Circonferenza”
ed inserire il dato corretto.
4.
Fare riferimento alla Installazioni (Fig.C-b.) per regolare
distanza o angolo tra unità principale e sensore.
5. Sostituire la batteria.
6. Allontanarsi dalla fonte.
Fare riferimento al paragrafo “Preparazione
dell’unità principale” e riavviare il computer
Riporre l’unità principale all’ombra per
riportarla allo stato di normalità.
Questo fenomeno non compromette in alcun
modo i dati.
Ritornerà allo stato normale appena la
temperatura aumenta.
PREPARAZIONE DELL’ UNITA’ PRINCIPALE (Fig. 1)
Avvio del computer (azzeramento)
1. Al momento dell’acquisto l’unità principale è già dotata di una batteria. Premere contemporaneamente il
pulsante MODE
•
‚ e il pulsante SET
„
per oltre tre secondi per avviare il computer e cancellare tutti i dati.
IMPORTANTE: Accertarsi di eseguire le operazioni di avviamento del computer prima di utilizzarlo,
altrimenti potrà fornire risultati errati.
2. Quando si avvia l’unità, viene effettuato un test automatico dei segmenti del display a cristalli liquidi (LCD).
3. Premere il pulsante MODE
•
‚ per interrompere il test LCD. L’indicazione “kM/h” lampeggia.
SCELTA DELL’UNITA’ DI MISURA
Premere il pulsante MODE
•
‚ per selezionare km/h (chilometri all’ora) o Mile/h (miglia all’ora). Premere quindi
il pulsante SET
„
per confermare la scelta.
IMPOSTAZIONE DELLA CIRCONFERENZA
1. Il display visualizza "c2155" che sta per il valore 2155 mm. Misurare il valore della propria ruota o fare
riferimento alla tabella riportata nel manuale della bicicletta.
2. Regolare la misura della circonferenza in base alle
Procedura di impostazione Dati.
(Fig .b)
CIRCONFERENZA DELLA RUOTA
a).Misurazione precisa (Fig. a-1)
Posizionare la ruota di modo che la valvola si trovi nel punto più basso perpendicolare al terreno e segnare
per terra questo primo punto di contatto. Salire sulla bicicletta e farsi spingere leggermente in avanti finché
la ruota non compie un giro completo e la valvola non torna nel punto di partenza. Segnare questo secondo
punto di contatto sul terreno. Misurare la distanza tra i due punti in millimetri. Inserire questo valore come
circonferenza della ruota.
b).Tabella rapida (Fig. a-2): Rilevare la circonferenza adeguata dalla tabella di riferimento.
IMPOSTAZIONE DEI DATI ODO
La funzione è stata studiata per conservare i dati di ODO quando la batteria viene sostituita. Un nuovo
utilizzatore non ha bisogno di inserire questi dati. Ogni pressione del pulsante SET
„
avvia un processo di
impostazione dati.
IMPOSTAZIONE DELL’OROLOGIO
1. Viene visualizzato il simbolo " " sul display LCD.
2. Scelta delle opzioni 12H/AM, 12H/PM oppure 24H.
Premere velocemente il pulsante MODE
•
‚ per visualizzare l’orologio a 12 ore oppure 24 ore in sequenza.
Tenere premuto per oltre due secondi il pulsante MODE
•
‚ per passare alla procedura di regolazione
dell’orario.
3.Regolare l’orologio seguendo le
Procedura di impostazione Dati
.(Fig .b)
PULSANTI e OPERAZIONI NORMALI
PULSANTI MODE
•
Premere rapidamente questo pulsante per spostarsi in sequenza dal display di una funzione all’altro.
PULSANTE SET
„
Premere questo pulsante per entrare o uscire dagli schermi di regolazione quando si vuole reinserire la
circonferenza della ruota della bicicletta, il Promemoria di Lubrificazione, il Promemoria di Manutenzione
oppure si desidera regolare l’orologio " " per sincronizzarlo con l’ora esatta.
OPERAZIONE RESET (FIG.3)
1.Tenere premuto il pulsante MODE
•
‚ finché sullo schermo a cristalli liquidi non sarà visualizzato alcun dato,
quindi lasciare il pulsante. Il computer azzererà i dati memorizzati di
DST, MAX, AVG, TM e CAL .
2. Il pulsante RESET non può azzerare i dati ODO, , DST/D.
DISPOSITIVO DI ALLOGGIAMENTO ON/OFF DELL’UNITÀ PRINCIPALE
Questo computer è dotato di un dispositivo a scatto (brevettato) che accerta se l’unità principale è alloggiata
correttamente o meno nel supporto. Quando questa si trova fuori dal supporto, qualsiasi segnale di
interferenza senza fili viene disattivato. L’unità principale può ricevere il segnale (dalla ruota) solo quando è
correttamente alloggiata nel supporto.
START / STOP AUTOMATICO E ACCENSIONE/SPEGNIMENTO AUTOMATICO (ON/OFF)
Il computer comincerà automaticamente il suo conteggio nel momento in cui si inizia la corsa, mentre
smetterà di conteggiare appena ci si ferma. Il simbolo " " lampeggiante significa che il computer si trova
nello stato di START (avvio).
Per non consumare la batteria, il computer si spegne automaticamente e visualizza solo l’orologio" " quando non
viene utilizzato per circa 30 minuti. Si riaccenderà automaticamente premendo il pulsante MODE•.
REIMPOSTAZIONE DI CIRCONFERENZA, OROLOGIO (Fig. 4)
1. Premere il pulsante MODE
•
‚ per passare a una delle seguenti videate:
a). Passa alla videata ODO per inserire la circonferenza.
b). Passa aper regola per l’orologio.
2. Premere il pulsante SET
„
per accedere alla videata impostazioni.
3. Lo schermo visualizza il valore precedentemente impostato. Impostare il valore desiderato secondo le
Procedura di impostazione Dati
.
4. Premere il pulsante SET
„
per salvare i valori desiderati e completare l’impostazione.
SOSTITUZIONE DELLA BATTERIA
Sostituzione della batteria dell’unita’ principale
a). Il simbolo " " apparirà per indicare che la batteria è quasi esaurita.
b). Sostituire la batteria vecchia con una nuova entro pochi giorni da quando è comparso il suddetto simbolo.
c). Sostituzione della batteria
Questo computer consente di richiamare i dati ODO che sono stati precedentemente registrati, dopo che
la batteria è stata sostituita. Registrare comunque per sicurezza i dati ODO prima di rimuovere la batteria
vecchia.
d). Sostituire la batteria vecchia con una nuova batteria CR2032 . Avviare di nuovo l’unità principale. (Fig. 1)
FUNZIONI E SPECIFICHE
: CURRENT SPEED (VELOCITÀ DI CORSA)--------0.0 - 199.9 KM/H O 120.0 miglia/h +/- 1% (Tipo)
1. La velocità di corsa viene sempre visualizzata nella parte alta del display. Esso indica la velocità di corsa fino
ad un massimo di 199,9 km/h o 120 miglia/h (per ruote con un diametro superiore a 24 pollici).
2. Quando la corsa viene interrotta, il calcolo della velocità prosegue per 4 secondi attesa della conferma che
non sono stati inviati altri segnali dalla ruota.
ODO: ODOMETRO-----------------------------------------------------------------------0.0 - 99999.9 km o miglia +/- 0.1%
1. L’odometro misura la distanza totale percorsa dalla bicicletta.
2. Il dato ODO non può essere azzerato mediante l’operazione di RESET.
TM: RIDING TIME (TEMPO DI CORSA)--------0M00.0S-59M59.9S,1H00M00S-99H59M59S +/- 0.003%
TM misura il tempo di corsa dall’ultima operazione di RESET.
: OROLOGIO A 12 ORE O 24 ORE--------
1:00:00 – 12:59:59 AM/PM OR 0:00:00– 23:59:59 +/-0.003%
Visualizza l’ora esatta. Può essere impostato a 12 o 24 ore.
DST: TRIP DISTANCE (DISTANZA DEL PERCORSO)-----------------0.00 – 999.99 km o miglia +/- 0.1%
La funzione DST calcola la distanza dall’ultima operazione di RESET (azzeramento) fino a quando la
bicicletta non si ferma.
AVG:AVERAGE SPEED (VELOCITÀ MEDIA)-------------------0.0-199.9 km/h - 00-120.0 miglia/h +/-0.1%
1. La velocità media viene calcolata dividendo la DST (distanza del percorso) per TM. La media viene quindi
calcolata dall’ultima operazione di RESET (azzeramento) fino al punto attuale.
2. Quando TM è inferiore a 4 secondi, verrà visualizzato "0.0". Quando TM è superiore a 4 secondi, la funzione
viene aggiornata ogni secondo.
3. Quando TM è superiore alle 100 ore oppure DST è superiore a 1.000 km (o miglia), sul display compare il
simbolo "Err" (che significa Errore). Azzerare l’unità per ricominciare il conteggio.
MAX: MAXIMUM SPEED (VELOCITÀ MASSIMA)---------------0.0 – 199.9 Km/h o 120.0 miglia/h +/- 1%
La funzione MAX visualizza la velocità più elevata raggiunta dopo l’ultima operazione di RESET (azzeramento).
DST/D: DISTANZA ODIERNA ---------------------------------------------------0.00 – 999.99 km o miglia +/- 0.1%
La funzione DST/D calcola la distanza totale percorsa in un giorno. Il dato viene cancellato automaticamente
alle 12:00:00 AM (0:00:00).
/ : Speed Pacer: Indicatore di velocità
Mentre la bicicletta è in movimento, il simbolo " " lampeggia se la velocità del momento è superiore alla
velocità media mentre, al contrario, lampeggia il simbolo " " se la velocità del momento è inferiore a quella
media.
CAL ------------------------------------------------------------------------------------------------------da 0 a 9999.99 Kcal
Calcola le calorie consumate durante l'esercizio sulla base
.
* NOTA: Tutti i dati relativi alle funzioni vengono aggiornati ogni secondo.
IDENTIFICAZIOE DEI GUASTI
Sensore con trasmettitore: Sensore magnetico senza contatti con trasmettitore senza fili.
Dimensione della forcella: orcelle da 12 a 50 mm (da 0.5" a 2.0").
Distanza di percezione senza filo: 55 cm (1.8 piedi) tra il trasmettitore e l’unità principale
Interferenze: Fentro 40 cm (15.8"). Nessuna interferenza tra due biciclette
equipaggiate con ciclo-computer simili, quand’anche corressero l’una
affianco all’altra.
Regolazione circonferenza ruota: da 1 mm a 3999 mm (incrementi di 1 mm)
Temperatura operativa: da 0°C a 50° C (da 32°F a 122°F)
Temperatura di stoccaggio: da -10°C a 60°C (da 14°F a 140°F)
Batteria dell’unità principale: 1 batteria da 3 V (tipo CR2032). La durata media della batteria è circa
2 anni, considerato un uso di 1,5 ore al giorno.
Dimensioni e Peso: Unità principale: 45.8 x 54 x 17.2mm/ 33.5g
* Caratteristiche e modelli possono essere cambiati senza preavviso.
INDCE: SIGNIFICA: PREMERE IL PULSANTE N PER OLTRE 2 SECONDI
SIGNIFICA: PREMERE IL PULSANTE N RAPIDAMENTE
{N=NUMERO CHLIAVE: • Pulsante MODE.„ Pulsante SET. }
NDEX:
BEDEUTET DAS MAN DEN KNOPF N LÄNGER ALS 2 SEKUNDEN DRÜCKEN MUß.
BEDEUTET DAS MAN DEN KNOPF N SCHNELL DRÜCKEN MUß.
{ N= SCHLÜSSELNUMMER:
•
MODE-KNOPF. „ SET-KNOPF. }
PRECAUZIONI
1. Non lasciare l’unità principale sotto l’esposizione diretta dei raggi solari a meno che non si stia utilizzando la
bicicletta.
2. Non smontare l’unità principale o i suoi accessori.
3. Controllare periodicamente la posizione e la distanza tra sensore, magnete e unità principale.
4. Non utilizzare diluenti, alcool o benzina per pulire l’unità principale o i suoi accessori quando sono sporchi.
5. Ricordarsi di prestare attenzione alla strada durante la corsa.
N
2 sec
N
2 sec
ITALIANO
DEUTSCH
ENGLISH
EINSTELLUNG DES HAUPTTEILES(Abb. 1)
STARTEN DES COMPUTERS (ALLES LÖSEN)
1.Beim Kauf des Hauptteiles ist die Batterie bereits eingesetzt. Drücken Sie den Mode-Knopf
•
‚ und den Set-
Knopf
„
gleichzeitig mindestens 3 Sekunden lang, um den Computer zu starten und um alle Daten zu löschen.
Wichtig: Starten Sie den Computer auf diese Weise, bevor Sie ihn das erste Mal benutzen.
Andernfalls können Fehler auftreten.
2. Die LCD-Segmente werden automatisch nach dem Start getestet.
3. Drücken Sie den Mode-Knopf
•
‚
um den LCD-Test zu stoppen. Anschließend erscheint das flackernde "KM/h".
EINHEITSAUSWAHL
Drücken Sie den Mode-Knopf
•
‚ um zwischen km/h und M/h (Meilen/h) zu wählen. Um Ihre gewünschte
Einheit kenntlich zu machen und diese zu Speichern, drücken Sie den Set-Knopf
„
.
EINSTELLUNG DER UMFANGSDATEN (STANDARDWERT FAHRRAD 1)
1. Es wird "c2155" angezeigt für den eingestellten Standardwert von 2155 mm. Messen Sie den Umfang Ihres
Reifens oder entnehmen Sie ihn aus der Referenztabelle, welche den Unterlagen Ihres Fahrrades beigefügt war.
2.
Passen Sie die Umfangsdaten entsprechend der Beschreibung im Abschnitt Einstellungsverfahren der Werte an.
EINSTELLUNG DES RADUMFANGES
a).genaue Messung (Abb.a-1)
Drehen Sie das Rad so, daß sich das Ventil am untersten Punkt zum Boden befindet. Markieren Sie am Boden
diesen Punkt. Setzen Sie sich auf das Fahrrad und lassen Sie sich von einem Helfer soweit nach vorne
schieben bis das Ventil sich wieder am untersten Punkt am Boden befindet. Markieren sie diesen zweiten Punkt
ebenfalls. Messen Sie die Entfernung zwischen den beiden Punkten und geben Sie diesen Wert ein, um den
Radumfang zu bestimmen.
b).Referenztabelle (Abb.a-2)
Wählen Sie einen passenden Wert für Ihren Radumfang aus der Refernztabelle.
EINSTELLUNG VON ODO DATEN
Diese Funktion ist dafür entwickelt, um ODO nach einem Batteriewechsel wieder eingeben zu können. Der
Erstbenutzer braucht diese Daten nicht eingeben. Jedes drücken des Set-Knopfes überspringt eine der
Dateneingabe.
EINSTELLEN DER UHRZEIT
1. Das “ ” Symbol zeigt den Einstellungsbereich der Uhrzeit an.
2. Auswahl des Anzeigemodus 12 Stunden/AM, 12 Stunden/PM oder 24 Stunden:
Schnelles drücken des Mode-Knopfes
•
‚ läßt Sie zwischen der 12 Stunden/AM, 12 Stunden/PM oder der 24
Stunden Anzeige wählen. Halten Sie den Mode-Knopf
•
‚ länger als 2 Sekunden gedrückt um zu den
Uhrzeiteinstellungsbereich zu wechseln.
3. Geben Sie entsprechend des
Einstellungsverfahren der Werte
die Uhrzeit ein.
BEDIENKNÖPFE UND NORMALE OPERATIONEN
MODE-KNOPF
•
Schnelles drücken dieses Knopfes bringt Sie in einem Kreislauf in dem Sie alle Sequenzen der
Funktionsbildschirme nacheinander durchlaufen.
SET-KNOPF
„
Um in die Einstellungsmenüs zu gelangen oder diese zu verlassen drücken Sie diesen Knopf, wenn Sie den
Radumfang, den Erinnerungswert zum Ölen, den Erinnerungswert zum Schrauben nachziehen oder die
aktuelle Zeit des " " ändern oder erneut eingeben wollen.
RESET-OPTIONEN (Abb. 3)
1. Halten Sie den Mode -Knopf
•
‚ solange gedrückt, bis die LCD-Anzeige leer ist und lassen Sie ihn dann los.
Der Computer wird nun die bisher gespeicherten Werte von
DST, MAX, AVG, TM und CAL
mit Null ersetzen
2. Es können nicht die Werte von ODO, , DST/D.
EIN/AUS- SCHIEBESCHALTER DETEKTION DER HAUPTEINHEIT
Der Computer hat einen patentierten Schiebeschalter, der feststellt ob das Hauptteil auf die Halterung
geschoben ist oder nicht. Diese Funktion ist um zu verhindern das es zu Signalkonflikten kommt, wenn das
Hauptteil von der Halterung entfernt wird. Die Haupteinheit kann nur Signale vom Rad empfangen, wenn es
auf die Halterung geschoben ist.
START/STOP AUTOMATIK & AUTOMATISCHES EIN-/AUSSCHALTEN DER STROMZUFUHR
Der Computer beginnt automatisch zu zählen, sobald Sie Ihre Fahrt starten und hört zu zählen auf, wenn Sie
ihre Fahrt beenden. Das flackernde " " Symbol zeigt an, daß der Computer im Startmodus ist. Um die
Batterie zu schonen, schaltet sich der Computer automatisch aus und zeigt lediglich " " an, wenn er für
länger als 30 Minuten nicht benutzt wurde. Die Stromzufuhr wird durch drücken das Mode-Knopfes
•
‚ wieder
eingeschaltet.
NEUEINSTELLUNG DER UMFANGSDATEN, DER UHRZEIT (Abb. 4)
1.Drücken Sie den Mode-Knopf
•
‚ um zu einer der folgenden Anzeigen zu wechseln:
a). Wechseln Sie zur ODO-Anzeige um die Umfangsdaten einzugeben.
b). Wechseln Sie zur -Anzeige um die Uhrzeit einzustellen
2.Drücken Sie den Set-Knopf
„
um die gewünschte Anzeige auszuwählen.
3. Es wird der vorherige eingegebene Wert angezeigt. Passen Sie diesen auf den gewünschten Wert an, indem
Sie den Einstellungsverfahren der Werte folgen.
4. Drücken Sie den Set-Knopf
„um die gewünschten Daten zu speichern und die aktuellen Eingaben zu beenden.
WECHSEL DER BATTERIE DES HAUPTTEILES
Main Unit Battery Change
a). Das Symbol " " erscheint, um anzuzeigen, daß die Batterie fast verbraucht ist.
b). Ersetzen Sie die alte Batterie innerhalb weniger Tage, nachdem das Symbol erschienen ist.
c). Durch das Wechseln der Batterie werden die ganzen Daten gelöst. Dieser Computer ermöglicht Ihnen
jedoch, in ODO, die Wiedereingabe der Werte, die Sie gefahren sind. Notieren Sie sich diese Daten,
bevor Sie die alte Batterie ersetzen.
d). Ersetzen Sie die Batterie mit einer neuen CR2032 Batterie und starten Sie nun das Hauptteil erneut (Abb.1)
FUNKTIONEN
: AKTUELLE GESCHWINDIGKEIT---------------
0.0 – 199.9 km/h oder 120.0 meilen/h +/- 1% ( Typ)
1. Die aktuelle Geschwindigkeit wird während der Fahrt immer auf dem oberen Bereich der Anzeige angezeigt.
Es zeigt die aktuelle Geschwindigkeit bis zu 199.9 km/h oder 120.0 Meilen/h (bei Raddurchmessern von über
24 Inches) an.
2. Wenn Sie die Fahrt beenden, wird die Geschwindigkeit bei Fahrrad1 noch weitere 4 Sekunden gemessen
um sicherzustellen, daß keine weiteren Radsignale mehr gesendet werden.
ODO: KILOMETERZÄHLER------------------------------------------------0.0 – 99999.9 km oder meilen +/- 0.1%
1. Der Kilometerzähler akkumuliert die Gesamtstrecke solange Sie Fahrrad fahren.
2. Die ODO-Werte können nicht mit den Reset-Vorgang auf Null gesetzt werden.
TM: FAHRZEIT-------------------------------------0M00.0S-59M59.9S, 1H00M00S-99H59M59S +/- 0.003%
Die TM gibt die Fahrzeit vom letzen Reset-Vorgang an.
: 12 HR AM/PM oder 24 HR Uhr-----------
1:00:00 – 12:59:59 AM/PM oder 0:00:00 23:59:59 +/- 0.003%
Die aktuelle Uhrzeit kann entweder im 12-Stunden AM/PM oder 24-Stunden Modus angezeigt werden.
DST: FAHRSTRECKE---------------------------------------------------------0.00 – 999.99 km oder meilen +/- 0.1%
Die DST-Funktion akkumuliert die Daten der Fahrstrecke, die mit dem Fahrrad seit dem letzten Reset-
Vorgang gefahren wurden.
AVG: DURCHSCHNITTSGESCHWINDIGKEIT------------
0.0 – 199.9 km/h / 0.0 – 120.0 meilen/h +/- 0.1%
1. Die Durchschnittsgeschwindigkeit wird aus der DST geteilt durch die TM berechnet. Der Durchschnittswert
wird vom letzten Reset-Vorgang bis zum aktuellen Standort berechnet.
2. Die Anzeige "0.0" erscheint, wenn TM weniger als 4 Sekunden beträgt. Die Daten werden, sobald TM über 4
Sekunden ist, in etwa jede Sekunde aktualisiert.
3. Das Symbol "Err" erscheint entweder, wenn TM größer als 100 Stunden ist oder DST mehr als 1 000 km
(oder Meilen) beträgt. Betätigen Sie dann den Reset-Vorgang, um den Fahrradcomputer neu zu starten.
MAX: HÖCHSTGESCHWINDIGKEIT-------------------------------
0.0 – 199.9 km/h oder 120.0 meilen/h +/- 1%
Zeigt die höchste Geschwindigkeit an, welche seit dem letzten Reset-Vorgang gefahren wurde.
DST/D: Tagesstrecke -------------------------------------------------0.00 – 999.99 km oder meilen +/- 0.1%
Die DST/D-Funktion akkumuliert die Kilometeranzahl, die an einem Tag gefahren wurde. Die Werte werden
um 12.00 AM (00.00 Uhr) automatisch gelöscht.
/ : GESCHWINDIGKEITSANZEIGER
Es blinkt der " " -Geschwindigkeitsanzeiger auf, wenn die aktuelle Geschwindigkeit schneller als die
Durchschnittsgeschwindigkeit ist und der Pfeil " " blinkt im entgegengesetzten Fall auf.
CAL -----------------------------------------------------------------------------------------------------------------------bis 9999.99 Kcal
Berechnet verbrauchte Kalorien während des Trainings auf der Grundlage der eingegebenen persönlichen Daten.
*Bemerkung: Alle Funktionsdaten Werden In Etwa Jede Sekunde Akutalisiert.
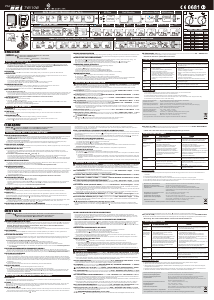
18 Inch 1436 mm ATB26x2.0(650B) 2099 mm
20x1.75 1564 700C TUBULAR 2117
20 Inch 1596 700x20C 2092
22 Inch 1759 700x25C 2124
ATB 24x1.75 1888 700x28C 2136
24 Inch 1916 27 Inch(700x32c) 2155
24x 13/8 1942 700x35C 2164
ATB 26x1.40 1995 700x38C 2174
ATB 26x1.50 2030 27.5 Inch 2193
ATB 26x1.75 2045 28 Inch (700B) 2234
26Inch (650A) 2073 28.6 Inch 2281
Wheel Size
Setting
Value
WHEEL SIZE CHART
Wheel Size
Setting
Value
1st
2nd
a-1.
a-2.
MODE
4
SET
2
3V
battery
CR2032
Coin
0681
WIRELESS COMPUTER
w4
D
DATA SETTING PROCESSES (621 741)
2s
2s
SET
MODE
ok!
3s
LCD
SEGMENTS
AUTO TEST
D
ALL CLEAR Unit Selection
Circumference Setting
ODO Setting
CLOCK SETTING
D
RIDING STATUS
2s
Circumference
Setting
CIRCUMFERENCE RE-SETTING
Clock
setting
b.
1.
DST/D
CAL
AVG
MAX
DST
TM
ODO
CLOCK
2.
2s
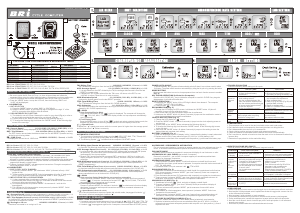
Data Setting Processes (621 731): (Fig. b)
a). The data is adjusted per each digit separately. The digit to be set flickers.
b). Press the MODE button• to increase the digital value by 1.
c). To change the setting digit by hold down the MODE button• for more than 2 seconds.
d). Press the SET button„ to store the data and change to the next setting.
Procedura di impostazione Dati (621 741): (Fig .b)
a). Ogni elemento (cifra) dei dati viene regolato separatamente. L’elemento da modificare lampeggia.
b). Premendo rapidamente il pulsante MODE
•
‚ la cifra da regolare avanza di un’unità.
c). Per passare alla regolazione della cifra successiva, premere il pulsante MODE
•
‚ per più di due secondi.
d).
Premere il pulsante SET
„
per memorizzare i dati e passare alla regolazione successiva o al normale utilizzo.
Einstellverfahren der Werte (621 741): (Abb. b.)
a). Jede Ziffer wird separat eingegeben. Die einzustellende Ziffer leuchtet auf.
b). Drücken Sie den Mode-knopf
•
‚ um den Wert der Zahl um eine Einheit zu erhöhen.
c). Um die Ziffer zu wechseln, müssen Sie den Mode-knopf
•
‚ länger als 2 Sekunden drücken.
d). Drücken Sie den Set-Knopf
„
um die Daten zu speichern und so in den nächsten Einstellungsbereich zu
wechseln.
4403003850_20060228


Join the conversation about this product
Here you can share what you think about the Echowell ECW4 Cycling Computer. If you have a question, first carefully read the manual. Requesting a manual can be done by using our contact form.