TM: Riding Time 0H00M00S-19H59M59S, 1 Second, +/- 0.05%
The TM totals the riding time from the last RESET operation.
AVG: Average Speed 0.0–199.9KM/h (120.0 M/h), 0.1KM/h (M/h), +/- 0.1%
1. It is calculated from the DST divided by the TM; the average data counted is from the last
RESET to current points.
2. It displays an "Err" symbol when either the TM is over 100 hours or the DST is over
1,000 km (or miles). Reset the unit in order to restart.
MAX: Maximum Speed 0.0–199.9KM/h (120.0 M/h), 0.1KM/h (M/h), +/- 1%
It shows the highest speed from the last RESET operation.
TTM: Total Riding Time 0H00M–1999H59M, 1 Minute, +/- 0.05%
The TTM totals the riding time from the last ALL CLEAR operation.
ODO: Odometer 0.0–19999.9Km (Miles), 0.1Km (Mile), +/- 0.1%
The ODO accumulates the total distance as long as the bike is moving. The ODO data can be
cleared by ALL CLEAR operation only.
: SCAN
1. Auto-Scanning Display Mode
Press the MODE button till the “ ” symbol is displayed. The computer will change the
DST, , TM, AVG, MAX, TTM and ODO display modes in a loop sequence automatically
every 6 seconds.
2. Fixed Display Mode
Press the MODE button to turn off the “ ” symbol and select a desired display mode; the
computer will stop the auto-scanning display operation and the display mode is set.
/ : Speed Pacer
It flashes the “ ” speed pacer arrow while the current speed is higher than the average speed
and the down arrow “ ” flickers conversely.
BUTTON AND OPERATIONS
AUTOMATIC START/STOP
1. The computer will automatically begin counting , ODO, DST, MAX, TTM, TM and AVG
data upon riding and stop counting data when riding is stopped.
2. The flickering symbol “ ” indicates that the computer is at START status.
4403005200_20070515#六文_N1
2s
2s 4s 6s
2s 4s 6s
DST CLOCK TM AVG MAX TTM ODO / ODO
6s
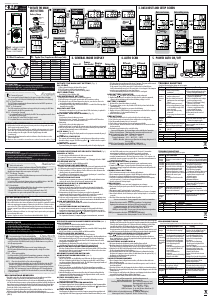
BRI-1 has 5 FUNCTIONS: SPD, DST, ODO, CLK, SCAN.
BRI-2 has 8 FUNCTIONS: SPD, DST, ODO, CLK, AVG, MAX, TM, SCAN.
BRI-3 has 10 FUNCTIONS: SPD, DST, ODO, CLK, AVG, MAX, TM, TTM, SCAN, SPEED PACER.
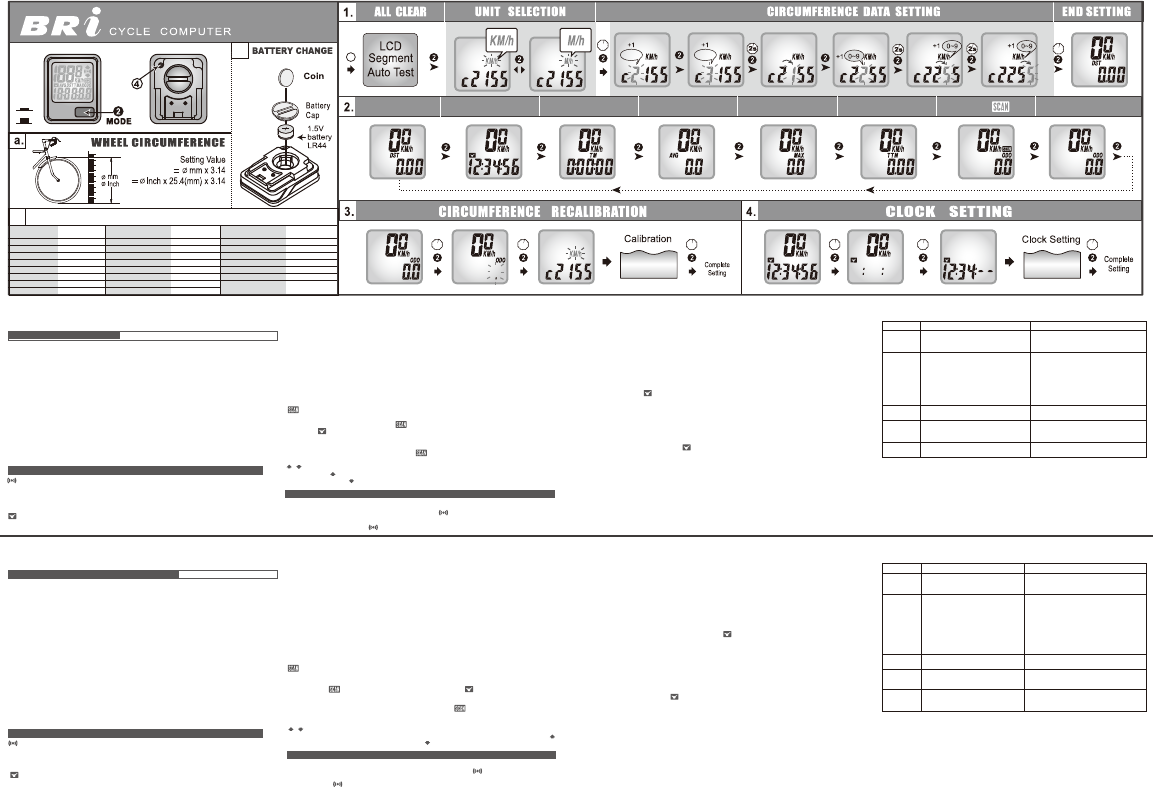
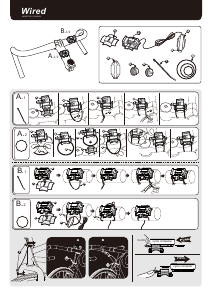
MAIN UNIT SETUP (Fig.1) English
INITIATE THE COMPUTER
1. Be sure to press the All Clear (AC) key
„ to clear all stored data and initiate the
computer before using it or when replacing battery. Otherwise the unit may malfunction.
2. The LCD segments will be tested automatically after the All Clear key is pressed.
3. Press the “MODE” button to stop the LCD test, then the flickering “KM/h” and
“c2155” will be displayed.
CALIBRATION
1. UNIT SELECTION
1). Press the “MODE” button to select “KM/h” or “M/h”(Mile/h).
2). Hold the “MODE” button till the flickering digit is changed to the digit “2” of the
c2155 to recognize either KM/h or M/h as desired.
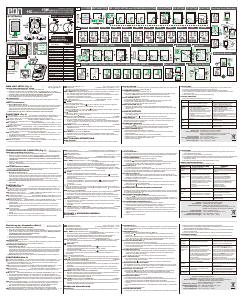
2. CIRCUMFERENCE DATA SETTING
1). The default is set at 2155mm. Measure the value for your wheel (Fig. a) or refer to
the quick table provided in the manual for your bicycle. (Fig. b)
2). A quick press of the “MODE” button advances the flickering digit by 1.
3). To change the flickering digit, hold down the “MODE” button till the flickering digit
moves to the next digit.
FUNCTIONS (Fig. 2)
: Current Speed 0.0–199.9KM/h (120.0 M/h), 0.1KM/h (M/h), +/- 1%
The current speed is always displayed on the 4 digits set when riding.
DST: Trip Distance 0.00–999.99Km (Miles), 0.01Km (Mile), +/- 0.01%
The DST function accumulates the distance data from the last RESET operation as long
as the bicycle is being ridden.
: 12HR Clock 1H00M00S-12H59M59S, 1 Second, +/- 0.05%
It displays the current time in 12HR clock.
POWER AUTO ON/OFF
To preserve battery, this computer will automatically switch off when it has not been used for about
10 minutes. The power will be turned on automatically by riding the bicycle or by pressing the button.
MODE BUTTON
Quickly press this button to move in a loop sequence from one basic function screen to another.
(Fig. 2)
ALL CLEAR OPERATION (Initiate the Computer)
Press the ALL CLEAR (AC)
„
key to initiate the computer or use ALL CLEAR if any irregular
data appears. It will clear all stored data.
RESET OPERATION
1. Hold down the “MODE” button till the LCD digit is blank, then release it. The computer
will RESET the DST, TM, AVG, MAX.
2. It cannot reset , TTM and ODO data.
RECALIBRATION (Fig. 3)
1. Change the LCD display to ODO screen, hold down the “MODE” button till (about 6
seconds) it jumps into the calibrating screen.
2. Refer to the main unit setup process to adjust the circumference.
3. Hold down the “MODE” button till (about 6 seconds) it jumps out the recalibration mode to
store the desired data and complete recalibration.
12HR CLOCK SETTING (Fig. 4)
1. Change the LCD display to “ ” screen.
2. Press the “MODE” button till (about 6 seconds) it jumps into the clock adjusting screen to
set the clock.
3. A quick press of the “MODE” button advances the flickering digit by 1.
4. To change the flickering digit, hold down the “MODE” button till the flickering digit moves
to the next digit.
5. Hold down the “MODE” button till (about 6 seconds) it jumps out the setting to store the
desired data and complete clock setting.
BATTERY CHANGE (Fig. c)
1. When the brightness of the LCD display is dim, it means that the battery is nearly exhausted.
2. Replace a new LR44 (Cross reference type A76, AG13 or V13GA) battery in the
compartment on the back of the computer with the positive (+) pole toward the battery cap.
TM: Riding time (Durata del percorso) 0H00M00S-19H59M59S, 1 Second, +/- 0.05%
La funzione TM calcola la durata del percorso dall’ultima operazione di RESET (azzeramento).
AVG: Average Speed (Velocità media) 0.0–199.9Km/h (120.0M/h), 0.1 Km/h (M/h), +/- 0.1%
1. La velocità media viene calcolata dividendo la DST (distanza del percorso) per TM (durata
del percorso). La media viene quindi calcolata dall’ultima operazione di RESET
(azzeramento) fino al punto attuale.
2. Quando TM è superiore alle 100 ore oppure DST è superiore a 1.000 km (o miglia), sul
display compare il simbolo "Err" (che significa Errore). Azzerare l’unità per ricominciare il
conteggio.
MAX: Maximum speed (velocità massima) 0.0–199.9Km/h (120.0M/h), 0.1Km/h (M/h), +/- 1%
La funzione MAX visualizza la velocità più elevata raggiunta dopo l’ultima operazione di
RESET (azzeramento).
TTM: Total Riding Time (Durata del percorso totale) 0H00M–1999H59M, 1 Minute, +/- 0.05%
La funzione totalizza la durata del percorso totale dall’ultima operazione ALL CLEAR (AC).
ODO: Odometro(contachilometri) 0.0–19999.9Km (miglia), 0.1Km (miglia), +/- 0.1%
La funzione ODO totalizza la distanza totale percorsa dalla bicicletta. Questi dati possono
essere cancellati solo con la funzione ALL CLEAR (AC).
: SCAN
1. Auto-scanning display Mode (display con scansione automatica)
Tenere premuto il pulsante “MODE” finché sullo schermo a cristalli liquidi non compare il
simbolo “ ”. Il computer visualizzerà le funzioni DST, , TM, AVG, MAX, TTM e ODO
automaticamente in successione ogni 6 secondi.
2. Fixed display mode (display fisso)
Premere il pulsante MODE per eliminare il simbolo “ ” e selezionare la funzione display
desiderata. Il computer interromperà la scansione automatica, mostrando solamente la
funzione selezionata.
/ : Speed Pacer (Indicatore di velocità)
Se la velocità istantanea è superiore rispetto alla velocità media, lampeggerà il simbolo “ ”.
Se invece è inferiore, lampeggerà il simbolo “ ”.
PULSANTI E OPERAZIONI
START / STOP AUTOMATICO
1. Il computer comincerà automaticamente il suo conteggio di , ODO, DST, MAX, TTM, TM
e AVG nel momento in cui si inizia la corsa, mentre smetterà di conteggiare appena ci si ferma.
2. Il simbolo “ ” lampeggiante significa che il computer si trova nello stato di START (avvio).
BRI-1 ha 5 funzioni: SPD, DST, ODO, CLK, SCAN.
BRI-2 ha 8 funzioni: SPD, DST, ODO, CLK, AVG, MAX, TM, SCAN.
BRI-3 ha 10 funzioni: SPD, DST, ODO, CLK, AVG, MAX, TM, TTM, SCAN, SPEED PACER (conta passi).
PREPARAZIONE DEL COMPUTER (Fig. 1) Italiano
AVVIO DEL COMPUTER (azzeramento)
1. Accertarsi che venga premuto il pulsante AC (All clear)
„ per cancellare tutti i dati e
che vengano effettuate tutte le operazioni di avviamento del computer prima di
utilizzarlo o quando si sostituisce la batteria, altrimenti l’unità potrà fornire risultati errati.
2. Quando si preme il pulsante AC, il computer effettua una scansione automatica dei
segmenti del display a cristalli liquidi.
3. Premere il pulsante “MODE” per interrompere la scansione. Di seguito compaiono le
scritte lampeggianti “KM/h” e “c2155”.
CALIBRATURA
1. SCELTA DELL’UNITA’ DI MISURA
1). Premere il pulsante “MODE” per selezionare “KM/h” (chilometri all’ora) o “M/h”
(miglia all’ora).
2). Tenere premuto il pulsante MODE finché a lampeggiare è la cifra “2” della scritta
c2155, quindi verificare la selezione desiderata "KM/h" o "M/h" (miglia/h").
2. IMPOSTAZIONE DELLA CIRCONFERENZA
1). Il valore standard della circonferenza è fissato a 2155 mm. Misurare la
circonferenza della vostra ruota (Fig. a) o consultare la tabella fornita dal manuale
d’istruzioni della vostra bicicletta. (Fig. b)
2). Una rapida pressione del pulsante “MODE” fa avanzare di 1 unità la cifra
lampeggiante.
3). Per cambiare la cifra lampeggiante, tenere premuto il pulsante “MODE” finché
non compare la cifra successiva.
FUNZIONI (Fig. 2)
: Current Speed
(velocità di corsa o istantanea)
0.0–199.9Km/h (120.0M/h), 0.1Km/h (M/h), +/- 1%
La velocità di corsa viene sempre visualizzata con quattro cifre durante la corsa.
DST: Trip distance (distanza del percorso)
0.00–999.99Km (miglia), 0.01Km (miglia), +/- 0.01%
La funzione DST calcola la distanza dall’ultima operazione di RESET (azzeramento) fino
a quando la bicicletta non si ferma.
: Orologio a 12 ore 1H00M00S-12H59M59S, 1 Second, +/- 0.05%
Visualizza l’ora esatta in un orologio a 12 ore.
ACCENSIONE / SPEGNIMENTO AUTOMATICO
Per non consumare la batteria, il computer si spegne quando non viene utilizzato per circa 10
minuti. Si accenderà automaticamente quando si riprende la corsa o si preme il pulsante.
PULSANTE MODE
Premere questo pulsante per spostarsi in sequenza dal display di una funzione a un altro.
OPERAZIONI AC (ALL CLEAR) (per avviare il computer)
Premere il pulsante AC
„ per avviare il computer oppure per cancellare qualsiasi dato
irregolare, se dovessero comparirne.
OPERAZIONE RESET (azzeramento)
1. Tenere premuto il pulsante “MODE” finché sullo schermo a cristalli liquidi non sarà
visualizzato alcun dato, quindi lasciare il pulsante. Il computer azzererà i dati memorizzati di
DST, TM, AVG, MAX.
2. Il pulsante RESET non può azzerare i dati , TTM e ODO.
RICALIBRATURE (Fig. 3)
1. Modificare lo schermo di visualizzazione a cristalli liquidi fino a posizionarsi sulla funzione
ODO, tenere premuto il pulsante “MODE” (per circa 6 secondi), finché non compare lo
schermo di calibratura.
2. Fare riferimento alla sezione D (Preparazione del computer) per regolare la circonferenza.
3. Tenere premuto il pulsante “MODE” (per circa 6 secondi) per uscire dallo schermo di
calibratura, memorizzare i dati desiderati e completare le calibrature.
OROLOGIO A 12 ORE (Fig. 4)
1. Visualizzare la funzione “ ” (clock, orologio) sul display a cristalli liquidi.
2. Premere il pulsante “MODE” (per circa 6 secondi) finché per accedere al display di
regolazione dell’orologio.
3. Premere velocemente il pulsante “MODE” per far avanzare di una unità il valore
lampeggiante.
4. Per cambiare la cifra lampeggiante, tenere premuto il pulsante “MODE” finché non
compare la cifra successiva.
5. Tenere premuto il pulsante “MODE” (per circa 6 secondi) per uscire dallo schermo di
calibratura, memorizzare i dati desiderati e completare la regolazione dell’orologio.
INDICATORE DI BATTERIA SCARICA (Fig. c)
1. Quando i caratteri del display LCD sono deboli, allora la batteria è quasi esaurita.
2. Sostituire la batteria vecchia con una nuova batteria LR44 (tipo A76, AG13 o V13GA) e
collocarla
nel vano situato nella parte posteriore del computer con il polo positivo (+) verso il
coperchio del vano.
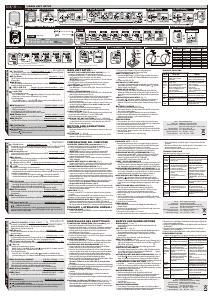
TROUBLE SHOOTING
Check the following before taking unit for repair.
PRECAUTIONS
1. This computer can be used in the rain but should not be used under water.
2. Don’t leave the main unit exposed to direct sunlight when not riding the bike.
3. Don’t disassemble the main unit or it’s accessories.
4. Check relative position and gap of sensor and magnet periodically.
5. Clean the contacts of the bracket and the bottom of the main unit periodically.
6. Don’t use thinner, alcohol or benzine to clean the main unit or its accessories when they
become dirty.
7. Remember to pay attention to the road while riding.
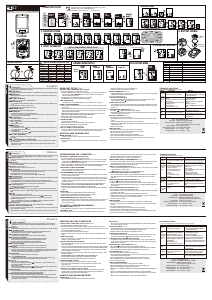
IDENTIFICAZIONE DEI GUASTI
Prima di portare l’unità a riparare, effettuare i seguenti controlli:
PRECAUZIONI
1. Questo computer può essere usato in caso di pioggia ma non dovrebbe essere utilizzato sott’acqua.
2. Non lasciare l’unità principale sotto l’esposizione diretta dei raggi solari a meno che non
si stia utilizzando la bicicletta.
3. Non smontare l’unità principale o i suoi accessori.
4. Controllare periodicamente la posizione e la distanza del sensore e del magnete.
5. Pulire periodicamente i contatti del supporto e la parte inferiore dell’unità principale.
6. Non fare uso di diluenti, alcool o benzina per pulire l’unità principale o i suoi accessori
quando sono sporchi.
7. Ricordarsi di prestare attenzione alla strada durante la corsa.
PROBLEM
CHECK ITEMS SOLUTION
1. Replace the battery.
2. Be sure that the positive pole of
the battery is facing the battery cap.
1. Refer to the adjusting procedure
and complete the adjustment.
2. Wipe contacts clean.
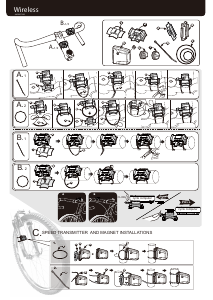
3. Refer to (Fig. B3) and (Fig. B4) and
readjust data correctly.
4. Repair or replace wire.
5. Refer to "CALIBRATION" and enter
correct value.
Refer to the "MAIN UNIT SETUP" and
initiate the computer again.
Place main unit in the shade to return
to normal state.
No adverse effect on data.
Unit will return to normal state when
the temperature rises.
1. Is the battery dead?
2. Is there incorrect battery
installation?
1. Is it at the recalibrating or 12HR
clock setting screen?
2. Are the contacts between the
main unit and the bracket poor?
3. Are the relative positions and gap
of sensor and magnet correct?
4. Is the wire broken?
5. Is the circumference correct?
Did you leave main unit under
direct sunlight when not riding
the bike for a long time?
Is the temperature below 0°C
(32°F)?
No display
No current
Speed or
incorrect
data
Irregular
display
LCD is
black
Display is
slow
Nessuna
indicazione
sul display
Non
compare
la velocità di
corsa o i
dati
non sono
corretti
Visualizzazio
ne irregolare
Il display è
scuro
La
visualizzazione
è troppo lenta
PROBLEMA COSA CONTROLLARE RIMEDIO
1. La batteria è scarica?
2. La batteria è stata installata in
modo corretto?
1. Si è allo schermo di regolazione
dell’unità principale odell’orologio?
2. I contatti tra l’unità principale e
il supporto sono deboli?
3. Le posizioni del magnete e del sensore
e la loro distanza sono corrette?
4. Il cavo è rotto?
5. La circonferenza impostata è
corretta?
L’unità principale è stata esposta ai
raggi diretti del sole per un periodo in
cui la bicicletta non era in movimento?
La temperatura è inferiore agli
0°C (32°F)?
1. Sostituire la batteria.
2. Assicurarsi che il polo positivo della batteria
sia rivolto verso il coperchio della batteria.
1. Fare riferimento alle istruzioni di
regola-zione ed effettuare le
operazioni in modo corretto.
2. Pulire i contatti.
3. Fare riferimento alle fig. B3 e B4 e
impostare i dati correttamente.
4. Riparare o sostituire il cavo.
5. Fare riferimento al paragrafo “CALIBRA-
TURA” ed inserire il dato corretto.
Fare riferimento al paragrafo riparazione
del “Computer” e riavviare il computer.
Riporre l’unità principale all’ombra per riportarla
allo stato di normalità. Questo fenomeno non
compromette in alcun modo i dati.
L’unità tornerà allo stato di normalità
quando la temperatura aumenta.
AC
4
c.
Tire Size
Circumference
Number
Tire Size
Circumference
Number
Tire Size
Circumference
Number
18 Inch 1436 mm
20x1.75 1564
20 Inch 1596
22 Inch 1759
ATB 24x1.75 1888
24 Inch 1916
24x 13/8 1942
ATB 26x1.40 1995
ATB 26x1.50 2030 mm
ATB 26x1.75 2045
26Inch (650A) 2073
ATB26x2.0(650B) 2099
700C TUBULAR 2117
700x20C 2092
700x25C 2124
700x28C 2136
POPULAR TIRE CIRCUMFERENCE REFERENCE TABLE
b.
27 Inch (700x32c) 2155 mm
700x35C 2164
700x38C 2174
27.5 Inch 2193
28 Inch (700B) 2234
28.6 Inch 2281
1~3~11~3~1


Join the conversation about this product
Here you can share what you think about the Echowell BRI-2 Cycling Computer. If you have a question, first carefully read the manual. Requesting a manual can be done by using our contact form.
reply | This was helpful (3) (Translated by Google)
reply | This was helpful (1) (Translated by Google)
reply | This was helpful (1)
reply | This was helpful (0) Read more (Translated by Google)
This was helpful (1) (Translated by Google)
reply | This was helpful (0) (Translated by Google)
reply | This was helpful (0)
reply | This was helpful (0) (Translated by Google)
reply | This was helpful (0)