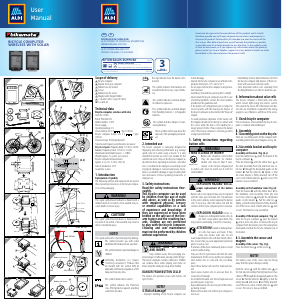
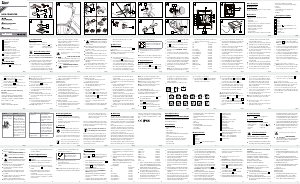
Description of the Buttons
You can operate your BIKEmate bicycle computer simply
and easily with three buttons.
Enter button S
Press and hold theSbutton for 2 seconds to start the
basic functions setup or to delete data in some particular
parts of the menu.
Press the S button in the stopwatch mode to start/stop
or to delete/reset the data of the stopwatch.
Mode buttonM-I
By pressing the Mode button M-I you can navigate
through the basic menu with the menu points CLOCK,
STW, TEMP°F, MNTEMP, MXTEMP, FAT and TIME +.
In the basic settings of the bicycle computer you can
confirm data and values by pressing M-I.
Mode-button M-II
By pressing the Mode button M-I you can navigate
through the second basic menu with the menu points
TRIP, RIDETM, AVGSPD, MAXSPD, ODO, CAL, KCAL, KM
+ and SCAN-Mode.
In the basic settings of the bicycle computer you can
activate settings of functions and options and you can
change values by pressing M-II.
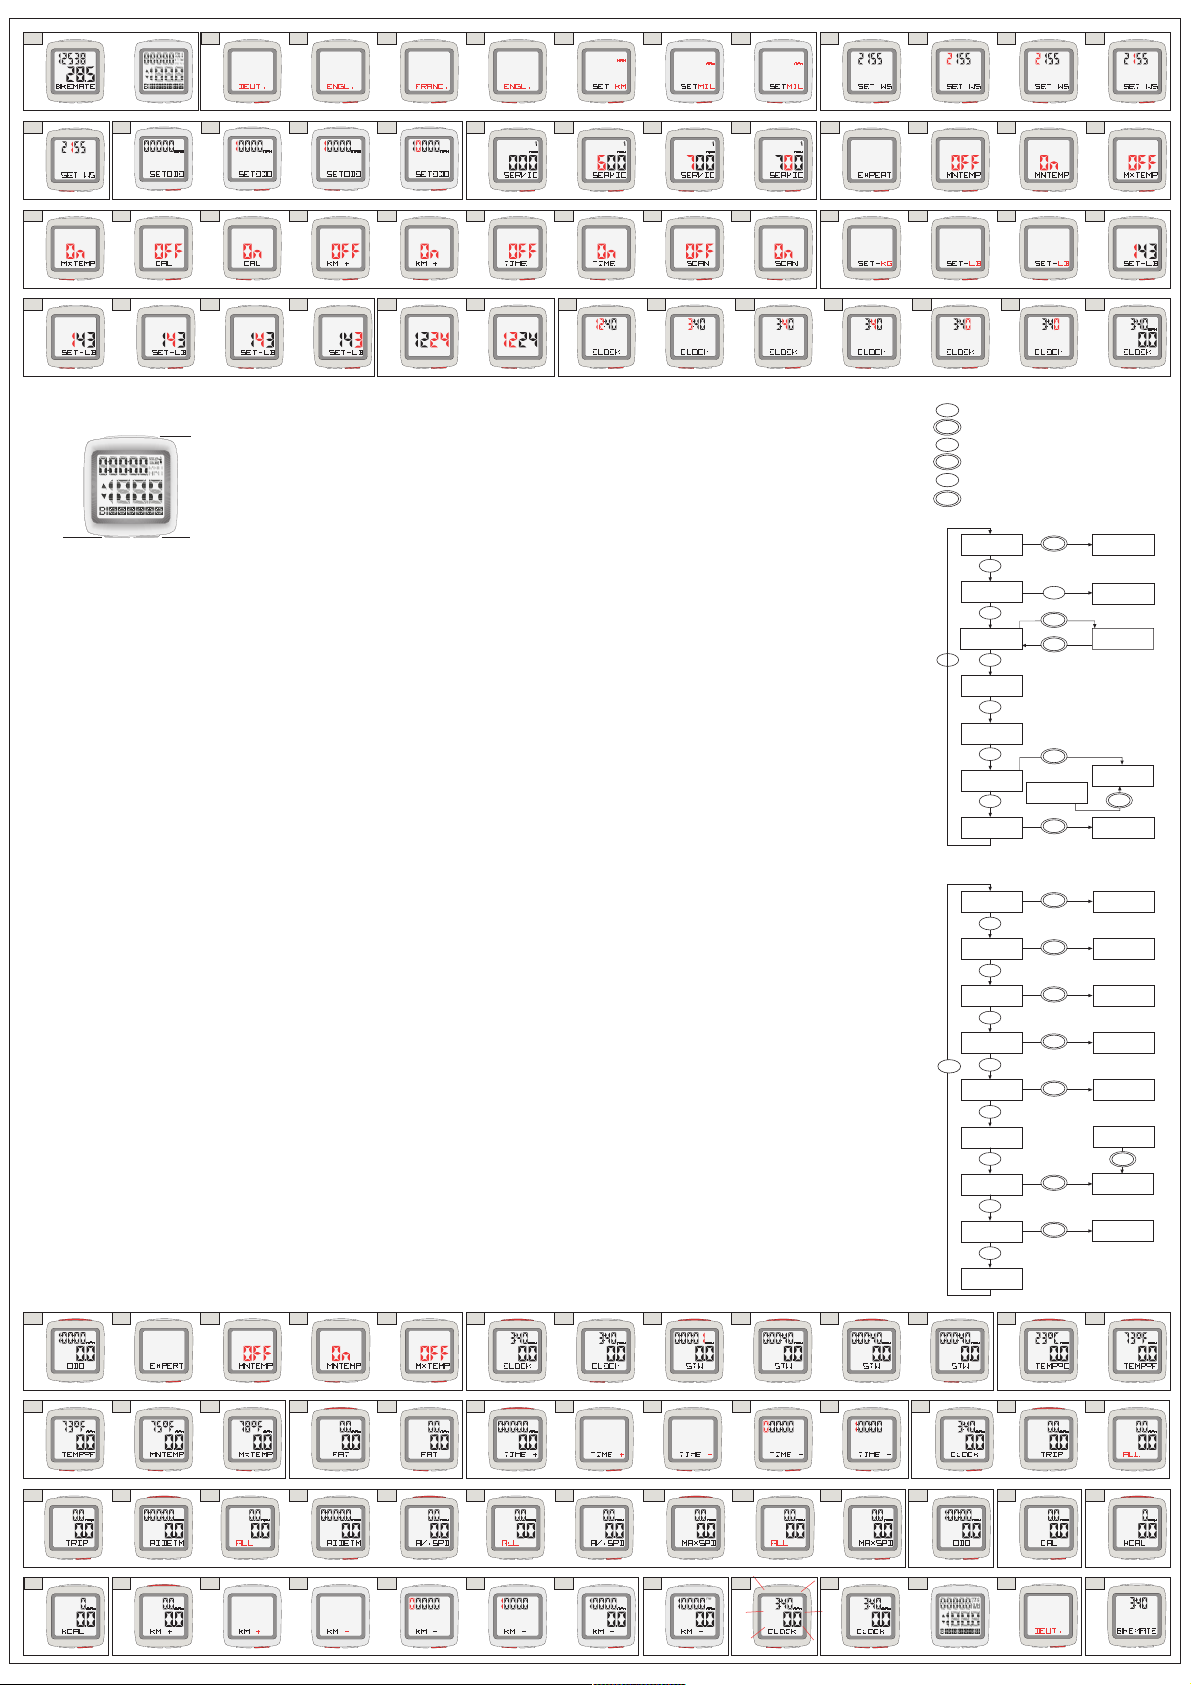
1.0 State of delivery- press any button.
2.0 - 2.2 Basic Settings Language Choose the
language withM-II.
2.3 Confirm the chosen language by pressingM-I.
2.4-2.5 You can switch between Kilometre and Miles
by pressingM-II.
2.6 Confirm by pressing theM-I button.
3.0 Basic Settings Wheel Size Press the M-II
button. Wheelsize (WS) needs to be set in milimeter.
3.1 Change the value of the first digit with M-II.
3.2 Confirm with M-I.
3.3 You can change the value of the second digit with
M-II.
3.4 Confirm with M-I. To set the value of the next two
digits please proceed in the same manner. Confirm with
M-I.
4.0 Basic Settings Odometer- Press M-IIto start
setting of Odometer.
4.1 Set the value of the first digit by pressing M-II.
4.2 Confirm with M-I.
4.3 To set the value of the next two digits please proceed
in the same manner.
5.0 Basic Settings Service- press M-IIto set the
service intervals.
5.1 Press M-IIagain to set the value of the first digit
(km/mile).
5.2 Confirm with M-I.
5.3 To set the value of the next two digits please proceed
in the same manner.
6.0 Additional Options (EXPERT)
Now you have the possibility to activate several additional
functions by pressing M-II.
MODE I MODE II
SET
2 sek.
MODE I MODE II
SET
MODE I MODE II
SET
17.0
1.0 2.0 2.1 2.2 2.3 2.4 2.5 2.6 3.2 3.33.13.0
11.0 11.210.5 11.1 11.3 11.4 11.5 12.0 12.1
13.1 14.1 14.2 14.314.0 14.4 15.0 15.1
15.3 15.4 15.6 15.7 15.9 15.12 16.0 18.0
5.0 5.1 5.2 5.3 6.0 6.1 6.2 6.3
6.4 6.5 6.6 6.7 6.8 6.9 6.10 7.0 7.27.16.11 6.12
7.4 7.5 7.6 7.7 8.0 8.1 9.0 9.1 9.49.39.2 9.5
19.0 19.1 19.2 19.3 19.4 19.5 20.0 21.0
10.1 10.2 10.3 10.4
12.3 12.412.2 13.0
6.1 MNTEMP.To activate the function Minimum
Temperature choose on (activated) by pressing M-II.
6.2 Confirm by pressing the M-I button.
6.3 MXTEMP.To activate the function Maximum
Temperature choose on (activated) by pressing M-II.
6.4 Confirm by pressing the M-Ibutton.
6.5 CAL.To activate the function Current Calorie choose
on (activated) by pressing M-II.
6.6 Confirm by pressing the M-Ibutton.
6.7 KM+.To activate the function Adjustable Trip
Distance choose on (activated) by pressing M-II.
6.8 Confirm by pressing the M-Ibutton.
6.9 TIME+.To activate the function Adjustable Timer
choose on (activated) by pressing M-II.
6.10 Confirm by pressing the M-Ibutton.
6.11 SCAN.To activate the function Scan choose on
(activated) by pressing M-II.
6.12 Confirm by pressing the M-Ibutton.
7.0 - 7.1 Basic Settings Body Weight choose
between Kilogram and Pounds by pressing M-II.
7.2 Confirm by pressing the M-Ibutton.
7.3 Change the value of the first digit with M-II.
7.4 Confirm by pressing the M-Ibutton.
7.5 Change the value of the second digit with M-II.
7.6 Confirm by pressing the M-Ibutton.
7.7 To set the value of the third digit proceed in the
same manner.
8.0 Basic Settings 12/24 Hour Format. Choose
between the 12 and 24 hour format by pressing M-II.
8.1 Confirm by pressing the M-I button.
9.0 Basic Settings Time - Change the hour by pressing
M-II.
9.1 Confirm by pressing the M-I button.
9.2 Change the Minutes by pressing M-II.
9.3 Confirm by pressing the M-Ibutton.
9.4 Change the Minutes by pressing M-II.
9.5 Confirm by pressing the M-Ibutton.
9.6 Now the bicycle computer is ready to go and displays
the time. Press M-Ior M-IIto choose between the
different points of the menu.
10.0 Basic Settings and Additional Options
(EXPERT)
- You can switch through the basic settings by pressing
the buttonsM-I andM-II.
10.1 In case you want to activate or deactivate additional
options hold down theS button in the Odometer mode.
Then go through the basic settings by pressing M-I until
you get to the point EXPERT.
10.2 PressM-IIto go to settings in the EXPERT mode.
There you can activate or deactivate functions.
10.3 If you want to add a function pressM-IIagain
untilON(activated) appears in the display. If you want
to deactivate a function choose OFF.
10.4 Confirm by pressing theM-Ibutton.
10.5 The following additional options can be added or
removed in the same manner. To skip options press M-I.
7.3
4.1
4.0
3.4
4.2 4.3
22.0
22.2
22.1
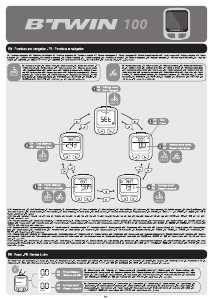
Quickguide
Press the Mode-I button momentarely.
Press and hold the Mode-I button for 2 seconds.
Press the Mode-II button momentarely.
Press and hold the Mode-II button for 2 seconds.
Press the S button momentarely.
Press and hold the S button for 2 seconds.
Main circle - MODE-I
Main circle - MODE-II
FUNKTION I FUNKTION II
EINGABE
FUNKTION I FUNKTION II
EINGABE
FUNKTION I FUNKTION II
EINGABE
FUNKTION I FUNKTION II
EINGABE
FUNKTION I FUNKTION II
EINGABE
FUNKTION I FUNKTION II
EINGABE
2 sek.
FUNKTION I FUNKTION II
EINGABE
M I
M I
M II
M II
S
S
15.2
15.5 15.8 15.1115.10
18.1
MODE I MODE II
SET
MODE I MODE II
SET
MODE I MODE II
SET
MODE I MODE II
SET
MODE I MODE II
SET
MODE I MODE II
SET
MODE I MODE II
SET
MODE I MODE II
SET
MODE I MODE II
SET
MODE I MODE II
SET
MODE I MODE II
SET
MODE I MODE II
SET
MODE I MODE II
SET
MODE I MODE II
SET
9.6
MODE I MODE II
SET
MODE I MODE II
SET
MODE I MODE II
SET
MODE I MODE II
SET
MODE I MODE II
SET
MODE I MODE II
SET
MODE I MODE II
SET
MODE I MODE II
SET
MODE I MODE II
SET
MODE I MODE II
SET
MODE I MODE II
SET
MODE I MODE II
SET
MODE I MODE II
SET
MODE I MODE II
SET
MODE I MODE II
SET
MODE I MODE II
SET
MODE I MODE II
SET
MODE I MODE II
SET
MODE I MODE II
SET
MODE I MODE II
SET
MODE I MODE II
SET
MODE I MODE II
SET
MODE I MODE II
SET
MODE I MODE II
SET
MODE I MODE II
SET
MODE I MODE II
SET
MODE I MODE II
SET
MODE I MODE II
SET
MODE I MODE II
SET
MODE I MODE II
SET
MODE I MODE II
SET
MODE I MODE II
SET
MODE I MODE II
SET
MODE I MODE II
SET
MODE I MODE II
SET
MODE I MODE II
SET
23.0
MODE I MODE II
SET
2 sek.
MODE I MODE II
SET
MODE I MODE II
SET
2 sek.
MODE I MODE II
SET
MODE I MODE II
SET
FUNKTION I FUNKTION II
EINGABE
FUNKTION I FUNKTION II
EINGABE
FUNKTION I FUNKTION II
EINGABE
MODE I MODE II
SET
MODE I MODE II
SET
2 sek.
2 sek.
FUNKTION I FUNKTION II
EINGABE
MODE I MODE II
SET
MODE I MODE II
SET
MODE I MODE II
SET
MODE I MODE II
SET
MODE I MODE II
SET
MODE I MODE II
SET
2 sek.
MODE I MODE II
SET
MODE I MODE II
SET
MODE I MODE II
SET
2 sek.
MODE I MODE II
SET
MODE I MODE II
SET
MODE I MODE II
SET
2 sek.
MODE I MODE II
SET
MODE I MODE II
SET
MODE I MODE II
SET
2 sek.
MODE I MODE II
SET
MODE I MODE II
SET
MODE I MODE II
SET
MODE I MODE II
SET
MODE I MODE II
SET
MODE I MODE II
SET
MODE I MODE II
SET
MODE I MODE II
SET
2 sek.
MODE I MODE II
SET
MODE I MODE II
SET
2 sek.
MODE I MODE II
SET
MODE I MODE II
SET
MODE I MODE II
SET
MODE I MODE II
SET
MODE I MODE II
SET
2 sek.
MODE I MODE II
SET
2 sek.
MODE I MODE II
SET
2 sek.
MODE I MODE II
SET
KCAL
SET
WEIGHT
CLOCK
STOPWATCH
TEMPERATURE
MINIMUM
TEMPERATURE
MAXIMUM
TEMPERATURE
FAT
SET
CLOCK
CHANGE BETW.
°C AND °F
STOPPWATCH
MODE
S
S
S
S
S
S
M I
M I
M IM I
M I
M I
M I
SET TIME+
TIME +
S
KILOMETER +
SCAN
SET
TRIP TIME
TRIP
RIDE TIME
AVERAGE
SPEED
MAXIMUM
SPEED
ODOMETER
CALORIE
CONSUMPT.
TOTAL
CALORIES
BASIC
SETTINGS
SET
WEIGHT
FAT-BURN
TOTAL
RESET
TOTAL
RESET
TOTAL
RESET
TOTAL
RESET
S
S
S
S
S
S
S
S
M II
M II
M II
M II
M II
M II
M II
M II
M II
SET
MODE I MODE II
MODE I MODE II
SET
10.6 If you activated all additional options the
menu circle is as follows :
Separate functions can be displayed by pressing M-I:
CLOCK -> STW -> TEMP°C -> MNTEMP -> MXTEMP -
> FAT - > TIME +
Separate functions can be showed by pressing M-II:
TRIP -> RIDETM -> AV.SPD -> MAXSPD -> ODO -> CAL
-> KCAL -> KM+ -> SCAN
11.0 Clock and Stopwatch Hold down the S button
in the clock mode to switch over to the setting of the
time. Now you can make changes to the setting of the
time if needed.
11.1 Press M-I in the clock mode to switch over to
the stopwatch mode.
11.2 Start the stopwatch by pressing S.
11.3 Stop the stopwatch by pressing S.
11.4 Hold down S for approx. 5 seconds to reset the
stopwatch to zero.
11.5 Press M-I to switch to the temperature mode.
12.0 -12.1 Menu Temperature Hold down S for
approx. 2 seconds to switch between Celsius (°C) and
Fahrenheit (F).
12.2 Press M-I again to display the Minimum
Temperature measured during the trip.
12.3 Press M-I again to display the Maximum
Temperature measured during the trip.
12.4 Press M-I again to switch to the menu Fatburn.
13.0 Menu Fatburn Hold down Sfor approx. 2
seconds to switch to the body weight setting. Now you
can make changes to the body weight setting.
13.1 Press M-I again to switch to the display of menu
Timer (+/-).
14.0 Menu Timer- Hold down S for approx. 2 seconds
to switch between Time + and Time . The Symbol
+ starts to blink.
14.1 Switch to Time by pressing M-II.
14.2 Confirm by pressing the M-Ibutton.
14.3 Set the Hour with M-II.
14.4 Confirm with M-I. To set Minutes and Seconds
proceed in the same manner.
Press M-I again to switch back to the clock mode.
15.0 Menu Trip distance and Riding time- Press
M-II in the clock mode to switch to the Tripdistance.
15.1 - 15.2 Holding down the S button for approx. 2
seconds deletes all data stored in the computer for the
current trip.
Beware : Please note that the delete function for this
data also affects the other data logged for the trip
(Tripdistance, Ridingtime, Average and Maximum Speed,
Calories, Fatburn, Maximum and Minimum Temperature).
15.3 Press M-II to display the riding time.
15.4 - 15.5 Holding down the S button for approx. 2
seconds deletes all data stored in the computer for the
current trip.
Beware : Please note that the delete function for this
data also affects the other data logged for the trip
(Tripdistance, Ridingtime, Average and Maximum speed,
Calories, Fatburn, Maximum and Minimum Temperature).
15.6 Press M-IIto switch to the display of average
speed.
15.7 - 15.8 Holding down the S button for approx. 2
seconds deletes all data stored in the computer for the
current trip.
Beware : Please note that the delete function for this
data also affects the other data logged for the trip
(Tripdistance, Ridingtime, Average and Maximum speed,
Calories, Fatburn, Maximum and Minimum Temperature).
15.9 Press M-IIto display the maximum speed of the
current trip.
15.10 - 15.11 Menu Maximum Speed - Holding
down the S button for approx. 2 seconds deletes all
data stored in the computer for the current trip.
Beware : Please note that the delete function for this
data also affects the other data logged for the trip
(Tripdistance, Ridingtime, Average and Maximum speed,
Calories, Fatburn, Maximum and Minimum Temperature).
15.12 Press M-IIagain to switch to the display of the
accumulated odometer of all ridden trips.
16.0 Odometer Press M-II again to display the
current calorie of the current trip.
17.0 Menu Current Calorie Pressing M-II again
changes over to the display of all accumulated overall
calorie consumption of all ridden trips.
18.0 Menu Overall Calorie Consumption- Hold down
the Sbutton to change over to the body weight setup.
Now you can make changes in the body weight setting if
needed. After confirming with M-I the display switches
back to menu Overall Calorie Consumption.
18.1 Pressing M-II changes the display to the menu
of Adjustable Trip Distance.
19.0 Menu Adjustable Trip Distance Switch between
KM+ and KM- by holding down the S button for
approx. 2 seconds. The symbol + starts to blink.
19.1 Pressing M-IIchanges the display to KM.
19.2 Confirm your selection with M-I. The first digit
starts to blink.
19.3 Set the value for KM with the M-IIbutton.
19.4 Confirm your selection with M-I. To set the value
of the other digits please proceed in the same manner.
19.5 Press M-II again to switch over to the scan mode.
20.0 Menu Scan-Mode The scan feature allows you
to review all information saved without having to remove
your hands from the handlebars to switch the display.
During the scanning the display shows all information
for the current trip at intervals of 2 seconds.
CLOCK -> TRIP -> RIDETM -> AV.SPD
The scan mode is indicated by the word scanin the
upper right corner of the display. Press M-I briefly to
stop the automatic flow of functions.
Now the bicycle computer shows the current speed and
the time.
21.0 Backlight
In all modes press M-II for approx. 2 seconds and the
backlight will be activated for 5 seconds.
22.0 -22.2 Restart/RESET
To restart the bicycle computer press and hold down the
buttons M-I and M-II for approx 5 seconds. When the
computer is reset all data and settings stored in the computer
are lost.
Now you can start to set up the basic settings beginning
with the language. (Please see point 2.0)
23.0 Sleep mode If the bicycle computer is not receiving
a signal from the sensor or if no button is pressed for
longer than 15 Minutes the computer switches to the
sleep mode. Now the display shows only the time and
the BIKEmate Logo.
MODE I MODE II
SET
Helpline: 00800 147 03 690


Join the conversation about this product
Here you can share what you think about the Bikemate MCP 30102 Cycling Computer. If you have a question, first carefully read the manual. Requesting a manual can be done by using our contact form.