
5. Utilizzo della Fotocamera
5.1 Installazione delle batterie (NON INCLUSE)
1. Aprire il vano delle batterie.
2. Inserire 2 batterie alcaline AAA (NON INCLUSE) nella fotocamera.
3. Chiudere lo sportello batterie.
4. Accendere la fotocamera.
Premere il tasto Accensione per accenderla (premerlo di nuovo per spegnerla).
5.2 Inserimento di una scheda di memoria (NON INCLUSA)
Questa fotocamera non ha una memoria interna. E’ necessario utilizzare una scheda di memoria
Micro-SD (NON INCLUSA).
Seguire le istruzioni per inserire la scheda di memoria Micro-SD opzionale nella fotocamera.
1. Spegnere la fotocamera.
2. Inserire la scheda Micro-SD nella fotocamera.
Nota: c’è un solo modo per inserire la scheda di memoria nella sua posizione. Non forzare la
scheda: si potrebbero danneggiare sia la fotocamera che la scheda stessa.
Nota: la scheda di memoria SD deve essere formattata prima di scattare fotografie. Si vedano le
sezioni seguenti per ulteriori informazioni.
5.3 Formattazione della memoria Micro-SD Card
1. Premere il tasto Menu ( ) in modalità Foto o Video.
2. Selezionare la modalità Setup premendo il tasto Destra.
3. Selezionare la modalità Formattazione premendo il tasto
W( )e premere il tasto Scatto per
confermare.
4. Selezionare Memoria Micro-SD Card e premere il tasto Scatto.
5.4 Impostazione della risoluzione
La fotocamera può essere impostata con diverse risoluzioni.
1. Premere il tasto Menu (
) in modalità Foto, selezionare la risoluzione premendo il tasto
W ( ) e premere il tasto Scatto per confermare.
Risoluzioni: VGA (640 x 480), 1.3M (1280 x 960), 3M (2048 x 1536),
5M (2560 x 1920), 8M (3264x 2448), 12M (4032 x 3024).
2. Le sei diverse risoluzioni saranno visualizzate. Selezionare la risoluzione desiderata usando i
tasti Alto e Basso, poi premere il tasto Scatto per confermare la selezione.
5.5 Scattare una fotografia
1. Accendere la fotocamera.
2. Impostare la fotocamera in modalità fotografica (
).
3. A seconda della distanza dell’oggetto da fotografare, usare la modalità Macro per regolare la
distanza. Selezionare il simbolo del fiore (
) per fotografare un oggetto vicino
(11cm–18cm).
Per fotografare panorami o persone (0.5m - infinito), impostare la modalità Macro
selezionando il simbolo della montagna (
).
4. Se la luce non è sufficiente impostare il flash automatico (
) premendo il pulsante Flash.
(Se le batterie sono quasi scariche il flash non sarà attivato).
5. Usare lo schermo LCD per inquadrare l’oggetto da fotografare.
6. Premere il pulsante Scatto e tenere ferma la fotocamera finché lo schermo LCD non si
accende nuovamente.
7. Se il “Rilevamento sorriso” è attivato, lo scatto avverrà automaticamente quando uno
sguardo sorridente verrà rilevato.
Note:1) Fare fotografie ad oggetti mossi non è raccomandato.
2) Le immagini possono essere distorte se si fanno fotografie a veicoli in movimento.
5.6 Zoom
La fotocamera può zoomare fino a 8 volte.
1. Zoomare tenendo premuto il tasto Alto, un numero apparirà sul display. 8.0 è lo zoom
massimo.
2. Si può ridurre la zoomata premendo il tasto Basso.
5.7 Scattare fotografie con l’autoscatto
La funzione di autoscatto può essere usata per scattare autoritratti o fotografie in cui la
fotocamera deve essere mantenuta molto ferma. È consigliabile l’uso del treppiede.
1. Accendere la fotocamera in modalità fotografica (
).
2. Premere il tasto Menu (
).
3. Premere il tasto
W( ) per selezionare “Modalità Cattura” e premere il tasto Scatto per
confermare.
4. Premere il tasto
W( ) per selezionare “Timer 10s.”.
5. Premere il tasto Scatto per confermare. La funzione Autoscatto è ora pronta per l’uso.
6. Inquadrare l’oggetto che si desidera fotografare.
7. Premere il tasto Scatto per fotografare.
8.
La foto verrà scattata dopo 10 secondi e all’avicinarsi dello scadere del tempo la fotocamera
emetterà un beep sempre più frequente.
5.8 Registrare un video
1. Impostare la fotocamera in modalità video ( ).
2. Per impostare la risoluzione, premere il tasto Menu e selezionare Risoluzione, poi premere il
tasto Scatto per confermare. Verranno visualizzate due risoluzioni: VGA (640 x 480) e
QVGA( 320 x 240).
3. Premere il tasto Scatto per cominciare la registrazione, premere nuovamente il tasto Scatto
per terminare la registrazione. Il file della registrazione verrà salvato con estensione AVI
nella memoria Micro-SD Card.
5.9 Visualizzazione delle fotografie
1. Premere il tasto Riproduzione ( ) per entrare nella modalità Riproduzione.
2. Verrà visualizzata l’ultima foto o video. Premere i tasti Destra o Sinistra per visualizzare le
foto (
).
3. Visualizzando le immagini a schermo pieno, premere il tasto
T( ) per zoomare le foto.
4. Per visualizzare le foto in anteprima, premete il tasto
W( ).
5. Per spostarsi nell’immagine zoomata, premere il tasto Scatto poi muoversi con i tasti Alto,
Basso, Destra e Sinistra.
6. Premere il tasto Menu (
) in modalità Riproduzione, premere nuovamente e tenere
premuto il tasto Menu (
) fino a visualizzare il menu di Riproduzione. Selezionare
Diapositive e premere il tasto Scatto per confermare. Selezionare l’intervallo tra una
diapositiva e l’altra premere il tasto Scatto per confermare. Le immagini salvate nella
memoria Micro-SD Card verranno visualizzate automaticamete in sequenza. Per terminare la
visualizzazione delle Diapositive premere nuovamente il tasto Scatto.
5.10 Visualizzazione delle registrazioni video
1. Premere il tasto Riproduzione ( ) per entrare nella modalità Riproduzione.
2. Verrà visualizzata l’ultima foto o video. Premere i tasti Destra o Sinistra per visualizzare I
video (
).
3. Quando un video è visualizzato, premere il tasto Scatto per riprodurre il video, ripremere il
tasto Scatto per mettere in pausa il video.
4. Premere il tasto Destra per avanzare velocemente la riproduzione o premere il tasto Sinistra
per riavvolgere velocemente la riproduzione.
5. Premere il tasto Basso per fermare la riproduzione.
5.11 Cancellazione fotografie e registrazioni video
E’ possibile cancellare un sola fotografia o video, o cancellare tutte le fotografie e i video dalla
memoria.
Seguire le seguenti istruzioni per eseguire la cancellazione:
1. Premere il tasto Riproduzione ( ) per entrare nella modalità Riproduzione.
2. Premere i tasti Destra o Sinistra per visualizzare la foto o il video da cancellare.
3. Premere il tasto Cancella (
) e selezionare “Immagine Corrente” o “Tutte”.
4. Premere il tasto Scatto, poi selezionare OK per confermare.
5. Premere il tasto Mode per uscire.
NOTE: Selezionando “Tutte” e premendo il tasto Scatto per confermare, tutte le immagini e i
video verranno cancellati.
6. Connessione a un PC
La fotocamera può essere collegata ad un computer come dispositivo di memorizzazione senza
necessità di installare driver.
1. Collegare la Fotocamera ad un pc tramite il cavo USB in dotazione.
2. Accendere la Fotocamera tramite il tasto Accensione. A questo punto il pc rileverà la
memoria Micro-SD Card come unità Disco rimovibile.
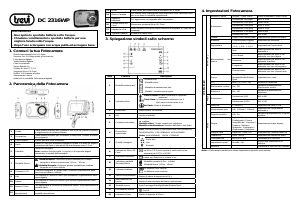
7. Specifiche tecniche
Sensore Sensore CMOS 5.0 Mega pixel
12.0 Mega pixel: (4032x3024)
8.0 Mega pixel: (3264x 2448)
5.0 Mega pixel: (2560x1920)
3.0 Mega pixel: (2048x1536)
1.3 Mega pixel: (1280x960)
Risoluzione Immagine
VGA: (640x480)
Lente F/2.8 f = 8,5mm
Intervallo di fuoco 0,5m. ~ Infinito
Modalità Macro 11cm – 18cm
Zoom digitale 8x
Flash Integrato ( Auto / Forzato / Off )
Display LCD Display a colori TFT 2.4"
Bilanciamento del bianco Auto / Luce diurna / Nuovoloso / Fluorescenza / Tungsteno
Modalità Video 30fps@VGA & 30fps@QVGA con Micro-SD Card
Memoria interna Nessuna
Memory Card esterna Supporta Micro-SD Card fino a 8GB
Formto file Immagine: JPEG, Video: AVI
Autoscatto 10 secondi
Interfaccia PC USB 2.0
Alimentazione 2xAAA batterie alcaline
8. Requisiti di sistema
Sistema Operativo
Windows® XP / Vista o superiore
Mac® 9.x o 10.x
CPU Pentium III o superiore
RAM Almeno 64MB
Interfaccia Porta USB
CD CD ROM velocità 4x o superiore
9. Individuazione e correzione dei problemi
Problema Causa Soluzione
La Fotocamera non
s’accende.
Batterie scariche.
Batterie installate con
polarità errata.
Riposizionare o installare le
batterie correttamente.
Le immagini non possono
essere salvate.
La memoria Micro-Sd Card
non e’ inserita o non e’
formattata.
Formattare la memoria entrando
nel Setup del Menu. Fare
riferimento alla sezione 5.3.
Impossibile trovare il Disco
rimovibile dopo aver
connesso la Fotocamera al
computer
.
1. Connessione fallita.
2. Letterà di unità già
occupata
1. Assicurarsi che il cavo USB
sia connesso e riavvire il
computer se necessario.
2. Cambiare la lettera di unità
entrando nella “Gestione
computer”.
Il flash non funziona. La carica delle batterie è
scarsa.
Sostituire le batterie con 2xAAA
batterie alcaline nuove.
Le batterie si scaricano
velocemente.
Batterie zinco-carbone,
vecchie o usate.
Sostituire le batterie con 2xAAA
batterie alcaline nuove.
Le immagini sono sfocate. 1. La Fotocamera non è
tenuta ferma.
2. La lente è sporca.
1. Tenere ferma la fotocamera
finché lo schermo LCD non si
accende nuovamente.
2. Pulire la lente con un panno
asciutto.
Trevi S.p.A. Strada Consolare Rimini-San Marino, 62 - 47924 RIMINI (RN) Italy
Made in CHINA

Join the conversation about this product
Here you can share what you think about the Trevi DC 2316 WP Digital Camera. If you have a question, first carefully read the manual. Requesting a manual can be done by using our contact form.