
Copyright © Topeak, Inc. 2015
M-TMS072-GB 3/15
WARRANTY
1-year Warranty: All mechanical components against manufacturer defects only.
Warranty Claim Requirements
To obtain warranty service, you must have your original sales receipt. Items returned without a sales receipt will
assume that the warranty begins on the date of manufacture. All warranties will be void if the product is damaged
due to user crash, abuse, system alteration, modification, or used in any way not intended as described in this
manual.
* The specifications and design are subject to change without notice.
Please contact your Topeak dealer with any questions.
For USA customer service call : 1-800-250-3068
www.topeak.com
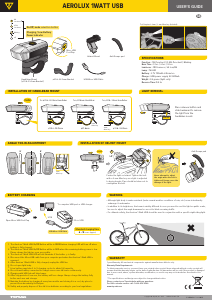
ANGLE TOE-IN ADJUSTMENT
2mm
Allen key
5˚
5˚
INSTALLATION OF HELMET MOUNT
GB
USER'S GUIDE
AEROLUX 1WATT USB
CLICK
INSTALLATION OF HANDLEBAR MOUNT
LIGHT REMOVAL
Press release button and
slide backward to remove
the light from the
handlebar mount.
PRESS
for ø25.4~26.0mm Handlebar for ø31.8~33mm Handlebarfor ø31.8mm Handlebar
ø25.4~26.0mm ø31.8~33.0mmø31.8mm
2mm
Allen Key
3mm
Allen Key
BATTERY CHARGING
The AeroLux 1 Watt USB On/Off Button will be in GREEN when charging. LED will turn off when
battery is fully charged.
The AeroLux 1 Watt USB On/Off Button will be in RED when the remaining battery power is low.
Please charge the light as soon as possible.
The AeroLux 1 Watt USB LED will not illuminate if the batter y is faulty.
Disconnect the Micro-USB cable from your computer port when the AeroLux 1 Watt USB is
removed.
After AeroLux 1 Watt USB is fully charged, unplug the USB line.
Do not open light body.
Li-ion battery may take 3 to 5 charging cycles to attain full capacity.
Do not leave battery connected to charge source over 48 hours continuously.
Charging with USB hub will take longer.
After long periods of non-use, the battery will lose charge. Always charge the battery fully
before each use and storage.
Maintain the battery by charging it every two months and storing it in a cool, dry place to
prevent from decreasing its lifespan.
Safely and properly dispose of the old Li-ion batteries according to your local regulations.
1.
2.
3.
4.
5.
6.
7.
8.
9.
10.
11.
12.
Open Micro USB Port Cap
Standard charging time
4 - 5 hours (approx)
USB
To computer USB port or USB charger.
USB-Micro USB Cable
Micro USB
CLICK
Anti-Scrape pad
WARNING
• Although light body is water-resistant (under normal weather conditions of rain, etc.) never intentionally
submerge it underwater.
• In addition to its brightness, the beam is widely diffused. In case you need to use this light on public roads,
be sure to adjust the angle downward so as not to blind oncoming traffic.
• For ultimate safety, the AeroLux 1 Watt USB should be used in conjunction with a specific night riding light.
SPECIFICATIONS
Function : 1W Constant / 0.5W Constant / Blinking
Burn Time : 2 hrs / 4 hrs / 5 hrs
Luminous : 100 Lumens / 45 Lux/5M
Lamp : 1W LED
Battery :
3.7V 700mAh Lithium Ion
Charge :
USB power supply 5V 500mA
Weight : 53 grams (light only)
Reserve Time: 0.5 hr
Tool Required : 2mm / 3 mm Allen key (Included)
USB-Micro USB Cable
On-Off, mode selection button
ø25.4~26.0mm Bracket
1W
Constant
off
Blinking
0.5W
Constant
Handlebar Mount
(ø31.8~33.0mm Bracket)
Helmet Mount
Anti-Scrape pad
Micro USB
Port Cap
1
2
Fasten the light on helmet. Tighten the bolt
with a 2 mm Allen key once light is adjusted
to desired angle. Care should be taken not to
overtighten the bolt.
Never attempt to adjust
the angle when the bolt is
tightened. It may cause the
damage of the light.
Charging / Low Battery
Power Indicator

Join the conversation about this product
Here you can share what you think about the Topeak AeroLux Bicycle Light. If you have a question, first carefully read the manual. Requesting a manual can be done by using our contact form.