
EN
12
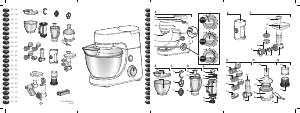
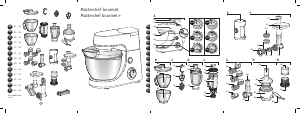
• Make sure that the safety cover (a5) is locked correctly (clockwise) on the high-speed outlet (a4). (Fig 4.1c).
• Position the attachment (e) facing you, insert the drum body (g1) inclined to the right, aligning the two bayonetcs
in the drum body with the two notches in the attachment. Push the drum body home and turn the drum body anti-
clockwise until it latches with the feed tube in the vertical position.
• Insert the chosen drum into the body, and make sure that it is fully engaged in the body.
4.2 - USAGE AND TIPS
• Place a container to collect the preparation in front of the appliance.
• Run the appliance by turning the selector (a1) to speed “3” to slice and to speed “4” to grate.
• Place the food in the feed tube on the body and press down with the pusher (g2). Never push the ingredients with
your fingers or any other utensil.
• To stop the appliance, turn the selector to “0” speed and wait for the appliance to come to a complete stop.
• Unlock the drum body in the reverse order of the assembly.
• Use the drums to :
- Grate coarsely C (g4) / grate nely D (g5): carrots, celery, potatoes, cheese, etc.
- Slice thickly A (g3): potatoes, carrots, cucumbers, ap ples, beetroot, etc.
- Reibekuchen E (g6): potatoes, parmesan, etc.
5 - EXTRACTING JUICE FROM FRUITS AND VEGETABLES (DEPENDING ON MODEL)
ACCESSORIES USED :
- Assembled juice extractor (h).
5.1 - ASSEMBLING THE JUICE EXTRACTOR
• Place the lter (h3) in the middle of the juice collector (h4). (Fig 5.1a).
• Lock the lid: turn it anti-clockwise and lock the lid (h2) on the juice collector (h4) (closed padlock position). (Fig 5.1b).
• General locking: push the locking lever (h6) to closed padlock position. (Fig 5.1c).
5.2 - FITTING THE JUICE EXTRACTOR ON THE APPLIANCE
• Place the multi-function head (a3) in the horizontal position: press the button (a2) and manually lower the multi-
function head (a3) until it locks (the button (a2) returns to its initial position).
• Unlock and remove the cover (a5) from the outlet (a4) by turning it anti-clockwise.
• Make sure that the appliance is switched off before locking the juice extractor (h).
• Lock the assembled juice extractor on the outlet (a4) by turning it clockwise, so as to have the outlet for the
pouring spout aligned with the appliance.
• Fit the pouring spout (h5) on the collector (h4).
5.3 - USAGE AND TIPS
• Place a large glass under the pouring spout (h5).
• Run the appliance by turning the selector (a1) to speed “3”.
• Cut the fruits and/or vegetables into pieces.
• Insert them down the feed tube in the lid (h2) push them slowly using the pusher (h1). Never push the ingredients
with your fingers or any other utensil.
• Do not process 500 g of food more than 5 times continuously, without allowing your appliance to cool down
completely.
• For best results, clean the lter after every 300 g of ingredients.
• Important: When the pulp collector is full, stop the appliance and empty the collector.
• To stop the appliance, turn the selector to “0” speed and wait for the appliance to come to a complete stop.
• Wait until the rotary filter comes to a complete stop before removing the assembly from the appliance.
• To remove the juice extractor, unlock it by turning it anti-clockwise.
• Place the locking lever (h6) in the open padlock position. Open the lid (open padlock position). You can then
remove the filter (h3) to clean it and empty the collector (h4).
Tips :
• You can make juice from: carrots, tomatoes, apples, grapes, raspberries, etc.
• Peel fruits with thick skins; remove stones and the core of pineapples.
• It is not possible to extract juice from certain fruits and vegetables: bananas, avocado pears, blackberries, etc.
• You can prepare juices with different fruits and vegetables without having to clean the juice extractor every time,
the avours will not be mixed. Just run the extractor with a little water to rinse it between two different juices.
• Drink the juices immediately after preparation, and add lemon juice to keep them in the fridge for a few hours.
TE_KITCHEN-8080012365-01.indd 12 5/2/13 8:25 PM


Join the conversation about this product
Here you can share what you think about the Tefal QB405D40 Stand Mixer. If you have a question, first carefully read the manual. Requesting a manual can be done by using our contact form.