
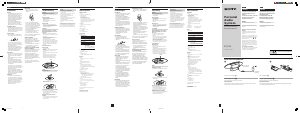
Location of controls/Knappernes placering
Total track number
Samlet antal spor
Programmed track
Programmeret spor
Playing order
Afspilningsrækkefølge
CD
Total playing time
Samlet afspilningstid
Display
Remote Control
Fjernbetjening
FUNCTION
BAND
OPERATE
(POWER)
VOL +*, –
x
PRESET +, –
.,>
SLEEP
*The button has a tactile dot.
*Knappen har en berøringsprik.
To turn on/off the power
European model: Press OPERATE.
Other models: Press POWER.
To adjust the volume
Press VOLUME +, – (VOL +, – on the remote).
To listen through headphones
Connect the headphones to the i (headphones) jack.
To turn off the blue light of the CD compartment lid
When the player is turned on, the blue light of the CD compartment lid lights. To turn the light
off, press and hold MODE for about 4 seconds.
To turn the light on again, press and hold MODE for about 4 seconds.
Adjusting the audio emphasis
You can adjust the audio emphasis of the sound you are listening to.
To reinforce the bass sound
Press MEGA BASS.
“MEGA BASS” appears in the display.
To return to normal sound, press the button again.
Sådan slås strømmen til/fra
Europæisk model: Tryk på OPERATE.
Andre modeller: Tryk på POWER.
Sådan justeres lydstyrken
Tryk på VOLUME +, – (VOL +, – på fjernbetjeningen).
Sådan lyttes gennem hovedtelefoner
Tilslut hovedtelefonerne til i (hovedtelefoner) -jackstikket.
Sådan slås det blå lys på låget til cd-rummet fra
Når afspilleren tændes, slås det blå lys på låget til cd-rummet til. For at slå lyset fra skal du
trykke på og holde MODE i ca. 4 sekunder.
For at tænde lyset igen skal du trykke på og holde MODE i ca. 4 sekunder.
Justering af lydbetoningen
Du kan justere betoningen af den lyd, du lytter til.
Sådan forstærkes baslyden
Tryk på MEGA BASS.
“MEGA BASS” vises på displayet.
For at vende tilbage til normal lyd skal du trykke på knappen igen.
Listening to the radio
1 Press OPERATE (or POWER) to turn on the player.
2 Press RADIO•BAND•AUTO PRESET until the band you want appears in the
display.
Each time you press the button, the indication changes as follows:
European model: “FM” t “MW” t “LW”
Other models: “FM” t “AM”.
3 Hold down TUNE + or – until the frequency digits begin to change in the
display.
The player automatically scans the radio frequencies and stops when it finds a
clear station.
If you can't tune in a station, press the button repeatedly to change the frequency
step by step.
Tip
If the FM broadcast is noisy, press MODE until “Mono” appears in the display and the radio will play in
monaural.
Changing the AM/MW tuning interval (excluding for Australian model)
The AM/MW tuning interval is preset to 9 kHz at the factory.
If you need to change the AM/MW tuning interval, do the following:
1 Press RADIO•BAND•AUTO PRESET until “AM” or “MW” is displayed.
2 Press MEMORY/DISPLAY/ENTER for 2 seconds.
3 Press RADIO•BAND•AUTO PRESET for 2 seconds.
“AM 9” “MW 9” or “AM 10” “MW 10” appears.
4 Press TUNE + or – to select “AM 9” “MW 9” for 9 kHz interval or “AM 10” “MW 10”
for 10 kHz interval.
5 Press MEMORY/DISPLAY/ENTER.
After changing the tuning interval, you need to reset your preset AM/MW radio stations.
Presetting radio stations
You can store radio stations into the player’s memory. You can preset up to 40 radio stations
(European model), 20 for FM and 10 for MW and LW in any order or 30 radio stations (other
models), 20 for FM and 10 for AM in any order,.
1 Press OPERATE (or POWER) to turn on the player.
2 Press RADIO•BAND•AUTO PRESET to select the band.
3 Hold down MEMORY/DISPLAY/ENTER for 2 seconds until “AUTO” flashes
in the display.
4 Press MEMORY/DISPLAY/ENTER.
The stations are stored in memory from the lower frequencies to the higher ones.
If a station cannot be preset automatically
You need to preset a station with a weak signal manually.
1 Press OPERATE (or POWER) to turn on the player.
2 Press RADIO•BAND•AUTO PRESET to select the band.
3 Tune in a station you want.
4 Hold down MEMORY/DISPLAY/ENTER for 2 seconds until the preset number flashes in
the display.
5 Press PRESET + or – until the preset number you want for the station flashes in the display.
6 Press MEMORY/DISPLAY/ENTER.
The new station replaces the old one.
Tip
The preset radio stations remain in memory even if you unplug the AC power adaptor.
Playing preset radio stations
1
Press OPERATE (or POWER) to turn on the player.
2 Press RADIO•BAND•AUTO PRESET to select the band.
3 Press PRESET + or – to tune in the stored station.
Connecting optional components
You can record a CD on a MiniDisc and enjoy the sound from other components, such as
portable MD, CD player and TV, VCR through the speakers of this player.
Be sure to turn off the power of each component before making connections. For details, refer to
the instructions of the component to be connected.
Recording a CD on a MiniDisc recorder and DAT recorder
1
Open the jack cover of the OPTICAL DIGITAL OUT (CD) jack of this player
and connect the jack with the digital input jack of MiniDisc and DAT using the
digital connecting cable * (not supplied).
* Select a connecting cable depending on the type of the digital input jack of the recorder to be
connected. For details, refer to the instruction manual of the component to be connected. The
OPTICAL DIGITAL OUT (CD) jack of this unit is square-shaped jack.
The type of the jack Model number of
of the component the connecting cable
to be connected
Optical miniplug POC-5AB
(MiniDisc recorder, etc.)
L-type 7-pin connector POC-DA12P
(DAT recorder, etc.)
Square-shaped optical POC-10A
connector (MiniDisc
recorder, DAT recorder, etc.)
2 Turn on the power of this player and the connected component.
3 Make the connected component ready for recording.
4 Press u to start playing a CD on this player.
Listening to the sound from the connected components
1
Connect the LINE IN jack of this player with the line output jack or headphones
jack of other component using the audio connecting cable* (not supplied).
* For Minidisc recorder: a cable with a stereo-mini plug on both ends.
* For TV, VCR: a cable with a stereo-mini plug on one end and tow phono plugs on the other end.
2 Press LINE to display “LInE”.
3 Play the optional component connected to the LINE IN jack of the player.
Note
Connect the cords firmly to avoid any malfunction.
Falling asleep to music
1 Play the music source you want.
2 Press SLEEP.
3 Press SLEEP to select the minutes until the player goes off automatically.
Each time you press the button, the indication changes as follows: “60” t
“90” t “120” t “OFF” t “10” t “20” t “30”.
To cancel the sleep function
Press OPERATE (or POWER) to turn off the power.
Tip
The blue light of the CD compartment lid goes off while the sleeping timer is on.
English
Playing a CD
1 Press OPERATE (or POWER) to turn on the player.
2 Press OPEN to load a CD in the CD compartment.
3 Close the CD compartment by hand.
4 Press u.
The player plays all the tracks once.
To
stop playback
pause playback
go to the next track
go back to the previous track
remove the CD
locate a point while listening
to the sound
locate a point while observing
the display
Using the display
To check the total track number and playing time
Press MEMORY/DISPLAY/ENTER in stop mode (see fig. C).
To check the remaining time
Press MEMORY/DISPLAY/ENTER repeatedly while playing a CD. The display changes as
follows:
t the current track number and playing time
r
the current track number and the remaining time on the current track*
r
the number of tracks left and remaining time on the CD
* For a track whose number is more than 20, the remaining time appears as “- -:- -” in the display.
Selecting the play mode
Press MODE until “REP 1” “REP ALL” “SHUF” “SHUF REP” “PGM” “PGM REP” appears in
the display. Then proceed as follows:
To Select
repeat a single track “REP 1”
repeat all tracks “REP ALL”
shuffle play “SHUF”
repeat tracks “SHUF REP”
in random order
programme play “PGM”
repeat programmed tracks “PGM REP”
To cancel selected play mode
Press MODE until the selected mode disappears from the display.
To check the programmed track and playing order in the display
To check the order of tracks before play, press MEMORY/DISPLAY/ENTER.
Every time you press the button, the track number appears in the programmed order.
To change the current programme
Press x once if the CD is stopped and twice if the CD is playing. The current programme will be
erased. Then create a new programme following the programming procedure.
Tip
You can play the same programme again, since the programme is saved until you open the CD
compartment.
Lytte til radioen
1 Tryk på OPERATE (eller POWER) for at tænde for afspilleren.
2 Tryk på RADIO•BAND•AUTO PRESET, indtil det ønskede bånd vises på
displayet.
Hver gang du trykker på knappen, skifter båndet som følger:
Europæisk model: “FM” t “MW” t “LW”
Andre modeller: “FM” t “AM”.
3 Hold TUNE + eller – nede, indtil frekvenstallene begynder at ændre sig på
displayet.
Afspilleren afsøger automatisk radiofrekvenserne, og standser når den finder en
tydelig station.
Hvis du ikke kan stille ind på en station, skal du trykke gentagne gange på
knappen, så frekvensen ændres trin for trin.
Tip
Tryk på MODE indtil “Mono” vises på displayet, hvis der er støj på FM-udsendelsen. Radioen afspiller
herefter i mono.
Ændring af AM/MW-indstillingsintervallet (australsk model undtaget)
AM/MW-indstillingsintervallet er fabriksforvalgt til 9 kHz.
Hvis du vil ændre AM/MW-indstillingsintervallet, skal du gøre følgende:
1 Tryk på RADIO•BAND•AUTO PRESET, indtil “AM” eller “MW” vises.
2 Tryk på MEMORY/DISPLAY/ENTER i 2 sekunder.
3 Tryk på RADIO•BAND•AUTO PRESET i 2 sekunder.
“AM 9” “MW 9” eller “AM 10” “MW 10” vises.
4 Tryk på TUNE + eller – for at vælge “AM 9” “MW 9” for interval på 9 kHz eller “AM
10” “MW 10” for interval på 10 kHz.
5 Tryk på MEMORY/DISPLAY/ENTER.
Efter ændringen af indstillingsintervallet skal du indstille dine forvalgte AM/MW-
radiostationer igen.
Forvalg af radiostationer
Du kan gemme radiostationer i afspillerens hukommelse. Du kan forvælge op til 40
radiostationer (europæisk model), 20 for FM og 10 for MW og LW i vilkårlig rækkefølge, eller
30 radiostationer (andre modeller), 20 for FM og 10 for AM i vilkårlig rækkefølge.
1 Tryk på OPERATE (eller POWER) for at tænde for afspilleren.
2 Tryk på RADIO•BAND•AUTO PRESET for at vælge båndet.
3 Hold MEMORY/DISPLAY/ENTER nede i 2 sekunder, indtil “AUTO” blinker
på displayet.
4 Tryk på MEMORY/DISPLAY/ENTER.
Stationerne gemmes i hukommelsen fra de lave frekvenser til de højere.
Hvis en station ikke kan forvælges automatisk
En station med et svagt signal skal forvælges manuelt.
1 Tryk på OPERATE (eller POWER) for at tænde for afspilleren.
2 Tryk på RADIO•BAND•AUTO PRESET for at vælge båndet.
3 Stil ind på den ønskede station.
4 Hold MEMORY/DISPLAY/ENTER nede i 2 sekunder, indtil forvalgsnummeret blinker på
displayet.
5 Tryk på PRESET + eller – indtil det forvalgte nummer, du vil bruge til stationen, blinker på
displayet.
6 Tryk på MEMORY/DISPLAY/ENTER.
Den gamle station udskiftes med den nye.
Tip
De forvalgte radiostationer bibeholdes i hukommelsen, selv om du afbryder lysnetadapteren.
Afspilning af forvalgte radiostationer
1
Tryk på OPERATE (eller POWER) for at tænde for afspilleren.
2 Tryk på RADIO•BAND•AUTO PRESET for at vælge båndet.
3 Tryk på PRESET + eller – for at stille ind på den gemte station.
Tilslutning af ekstra komponenter
Du kan optage en cd på en MiniDisc, og benytte afspillerens højttalere til at høre lyden fra andre
komponenter, f.eks. en bærbar md, cd-afspiller og tv eller videobåndoptager.
Sørg for at slå strømmen til hver komponent fra, inden du laver tilslutning. Se vejledningerne til
den komponent, der skal tilsluttes for nærmere oplysninger.
Optage en cd på en MiniDisc-optager og DAT-optager
1
Åbn jackstikdækslet på denne afspillers OPTICAL DIGITAL OUT (CD) -
jackstik, og forbind jackstikket til det digitale indgangsjackstik på MiniDisc’en
eller DAT’en med brug af det digitale tilslutningskabel* (medfølger ikke).
* Vælg et tilslutningskabel afhængigt af den digitale indgangsjackstik-type på den optager, der skal
tilsluttes. Se vejledningen til den komponent, der skal tilsluttes for nærmere oplysninger. Denne
afspillers OPTICAL DIGITAL OUT (CD) -jackstik er firkantet.
Jackstik-type Modelnummer for
for den komponent tilslutningskablet
der skal tilsluttes
Optisk ministik POC-5AB
(MiniDisc-optager el.lign.)
7-bens stikforbindelse type L POC-DA12P
(DAT-optager el.lign.)
Firkantet optisk POC-10A
stikforbindelse (MiniDisc-
optager, DAT-optager el.lign.)
2 Slå strømmen til på denne afspiller og den tilsluttede komponent.
3 Gør den tilsluttede komponent klar til optagelse.
4 Tryk på u for at begynde afspilning af en cd på denne afspiller.
Lytte til lyden fra de tilsluttede komponenter
1
Forbind denne afspillers LINE IN-jackstik til linje-udgangsjackstikket eller
hovedtelefonjackstikket på en anden komponent med brug af
audiotilslutningskablet* (medfølger ikke).
* For MiniDisc-optager: et kabel med stereo-ministik på begge ender.
* For tv eller videobåndoptager: et kabel med et stereo-ministik i den ene ende og to phonostik i
den anden ende.
2 Tryk på LINE, så “LInE” vises.
3 Afspil den ekstra komponent, der er tilsluttet afspillerens LINE IN-jackstik.
Bemærk
Sæt ledningerne godt fast, så funktionsfejl undgås.
Falde i søvn til musik
1 Afspil den ønskede musikkilde.
2 Tryk på SLEEP.
3 Tryk på SLEEP for at vælge antal minutter indtil afspilleren slukkes automatisk.
Hver gang du trykker på knappen, ændres indikationen som følger: “60” t “90”
t “120” t “OFF” t “10” t “20” t “30”.
Afbryde sleep-funktionen
Tryk på OPERATE (eller POWER) for at slå strømmen fra.
Tip
Det blå lys på låget til cd-rummet går ud, mens søvn-tidsafbryderen er slået til.
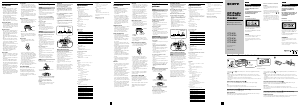
OPERATE
(POWER)
Then do this
Press . or > to select the track that you
want to repeat, then press u.
Press u.
Press u.
Press u.
Press . or > then press MEMORY/
DISPLAY/ENTER for the tracks you want to
programme in the order you want up to 20 tracks
(see fig. D). Then press u.
Press . or > then press MEMORY/
DISPLAY/ENTER for the tracks you want to
programme in the order you want up to 20 tracks.
Then press u.
LINE
OPEN
LINE IN
OPTICAL DIGITAL OUT (CD)
TUNE –, +
MODE
x
u*
RADIO
BAND
AUTO PRESET
Display
Remote sensor
Fotocelle til fjernbetjening
., >
PRESET –, +
VOLUME –, +*
MEMORY
DISPLAY
ENTER
MEGA BASS
OPERATION indicator
OPERATION-indikator
Loading a CD
Isætte en cd
With the labeled side facing you
Med etiketsiden vendende mod dig
i
u
Press
x
u
Press the button again to resume play after pause.
>
.
OPEN
> (forward) or . (backward) while playing until you
find the point
> (forward) or . (backward) in pause until you find
the point
Gør derefter som følger
Tryk på . eller > for at vælge det spor, du
vil gentage, og tryk derefter på u.
Tryk på u.
Tryk på u.
Tryk på u.
Tryk på . eller >, og tryk derefter på
MEMORY/DISPLAY/ENTER for de spor, du vil
programmere, i den ønskede rækkefølge, op til 20
spor (se fig. D). Tryk derefter på u.
Tryk på . eller >, og tryk derefter på
MEMORY/DISPLAY/ENTER for de spor, du vil
programmere, i den ønskede rækkefølge, op til 20
spor. Tryk derefter på u.
Dansk
Afspille en cd
1 Tryk på OPERATE (eller POWER) for at tænde for afspilleren.
2 Tryk på OPEN for at sætte en cd i cd-rummet.
3 Luk cd-rummet manuelt.
4 Tryk på u.
Alle sporene afspilles en gang.
For at
standse afspilning
holde pause i afspilning
gå til det næste spor
gå tilbage til det foregående spor
tage cd’en ud
finde et punkt, mens du lytter
til lyden
finde et punkt, mens du ser på
til displayet
Brug af displayet
Sådan kontrolleres det samlede antal spor og afspilningstid
Tryk på MEMORY/DISPLAY/ENTER i stop-indstilling (se fig. C).
Sådan kontrolleres den resterende tid
Tryk gentagne gange på MEMORY/DISPLAY/ENTER, mens der afspilles en cd. Displayet
skifter som følger:
t det aktuelle spornummer og afspilningstid
r
det aktuelle spornummer og den resterende tid på det aktuelle spor*
r
antal resterende spor og resterende tid på cd’en
* For et spor, hvis nummer er over 20, vises den resterende tid som “- -:- -” på displayet.
Valg af afspilningsindstilling
Tryk på MODE, indtil “REP 1” “REP ALL” “SHUF” “SHUF REP” “PGM” “PGM REP” vises
på displayet. Gå derefter videre som følger:
For at Vælg
gentage et enkelt spor “REP 1”
gentage alle spor “REP ALL”
blandet afspilning “SHUF”
gentage sporene “SHUF REP”
i vilkårlig rækkefølge
programafspilning “PGM”
gentage programmerede spor “PGM REP”
Sådan annulleres den valgte afspilningsindstilling
Tryk på MODE, indtil den valgte indstilling forsvinder fra displayet.
Sådan kontrolleres rækkefølge for programmerede spor og afspilning på displayet
For at kontrollere rækkefølgen af spor inden afspilning skal du trykke på MEMORY/DISPLAY/
ENTER.
Hver gang du trykker på knappen, vises spornummeret i den programmerede rækkefølge.
Ændring af det aktuelle program
Tryk en gang på x, hvis cd’en er standset, og to gange hvis cd’en afspilles. Det aktuelle
program slettes. Lav derefter et nyt program ved at følge programmeringsproceduren.
Tip
Du kan afspille det samme program igen, da programmet gemmes, indtil du åbner cd-rummet.
Tryk på
x
u
Tryk på knappen igen for at fortsætte afspilningen efter pause.
>
.
OPEN
> (fremad) eller . (bagud) under afspilning, indtil
du finder punktet.
> (fremad) eller . (bagud) under pause, indtil du
finder punktet.
P872enda.p65 3-02-25, 10.002


Join the conversation about this product
Here you can share what you think about the Sony ZS-D10 Stereo-set. If you have a question, first carefully read the manual. Requesting a manual can be done by using our contact form.