Before operating the unit, please read this
manual thoroughly and retain it for future
reference.
Features
• Super-directional microphone
(monaural) employing phase-tube
system, which enables highly clear
recording of sound sources located a
good distance off.
• Easy-to-handle fold-out microphone
stand attached.
•2 way power system for compatibility
with your tape recorder (powered by
supplied battery box or the plug-in
power supply system*).
• Remaining battery life is indicated by
LED.
* The system supplies power to the
microphone and allows you to operate it
just by connecting to the microphone jack.
Precautions
• This microphone is a precision
instrument. Never disassemble.
• Keep the microphone away from
extremely high temperatures (above
60°C or 140°F) and humidity.
• If the microphone is placed near
speakers, a high pitched noise may be
heard (howling effect). This is caused by
the microphone catches sound from the
speakers repeatedly.
In this case, place the microphone as far
as possible from the speakers.
• When using outdoors, never let the
microphone become wet with rain or
saltwater.
• When the unit, plugs or lithium battery
become soiled, wipe them with a dry
cloth.
• Always hold the plug when
disconnecting. Pulling the cord may
cause it to snap.
As this system uses a monaural plug (two
poles), recording is done only on the left
channel when connected to a stereo tape
recorder.
Notes on lithium battery
• Keep the lithium battery out of the reach
of children. Should the battery be
swallowed, immediately consult a
doctor.
• Wipe the battery with a dry cloth to
assure good contact.
• Be sure to observe the correct polarity
when installing the battery.
• Do not hold the battery with metallic
tweezers. Doing so can cause a short-
circuit.
WARNING
Battery may explode if mistreated.
Do not recharge, disassemble or dispose in
fire.
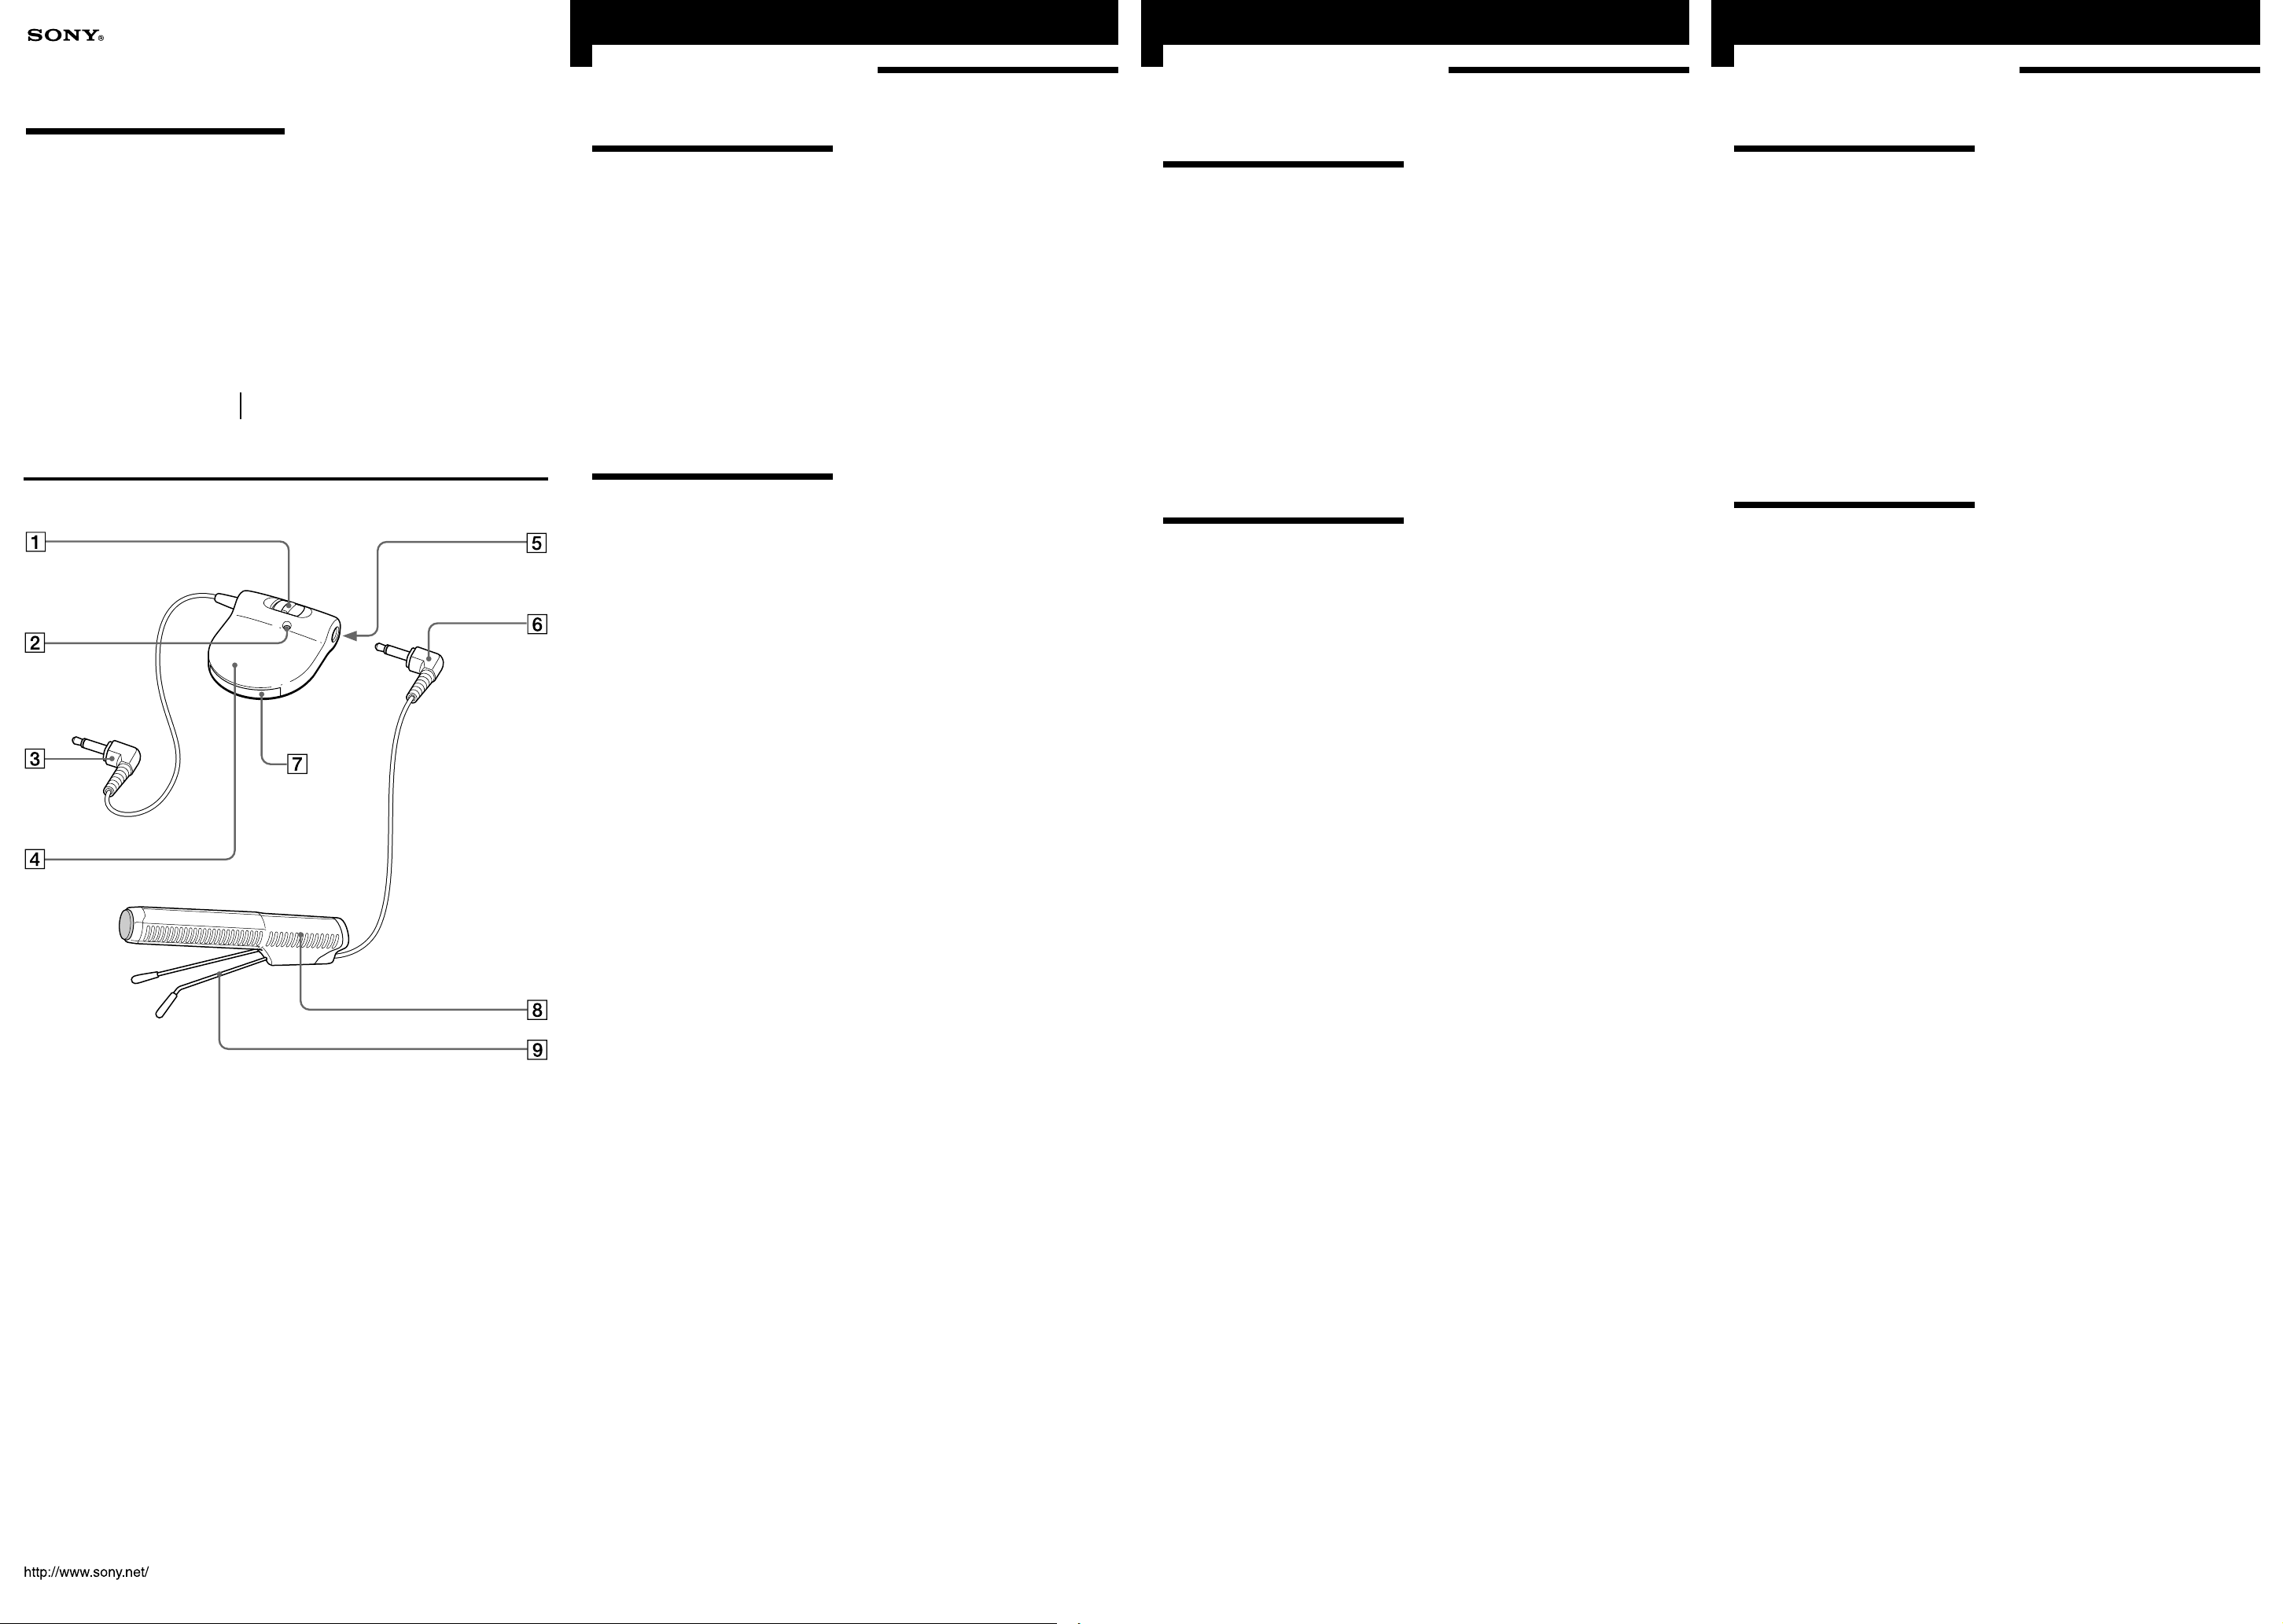
Parts Identification
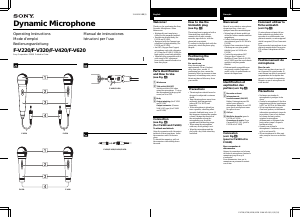
(See fig. A.)
1 POWER switch
2 Battery check indicator
When you turn the power on, the
battery check indicator lights up
momentarily. This is normal. The light
tells you that the battery still has life.
When the battery becomes weak, the
indicator lights dimly or does not light
at all.
3 L-shaped monaural miniplug (gold
plated)
4 Battery box
You can clip the battery box to your tie,
lapel or pocket.
5 Microphone jack
6 L-shaped monaural miniplug (gold
plated)
7 Battery compartment
8 Microphone
9 Attached microphone stand
Using the stand, you can switch the
angle of the microphone between the
flat and slanted positions.
Operating Instructions
Mode d’emploi
Manual de instrucciones
Electret Condenser
Microphone
3-043-185-12 (1)
ECM-Z60
© 1999 Sony Corporation Printed in Japan
A
Avant la mise en service de cet appareil,
prière de lire attentivement ce mode
d’emploi que l’on conservera pour toute
référence future.
Caractéristiques
• Microphone superdirectionnel
(monophonique) à système de tube-
phase, permettant un enregistrement
extrêmement clair des sources sonores
éloignées.
• Avec support de microphone pliable,
facile à manipuler.
• Deux systèmes d’alimentation
compatibles avec votre magnétocassette
(alimentation par le boîtier de pile fourni
ou le système d’alimentation par
enfichage*)
• L’autonomie de la pile est indiquée par
une diode.
* Le système fournit l’alimentation au
microphone. Il suffit donc de raccorder le
microphone à l’appareil pour le faire
fonctionner.
Précautions
• Ce microphone est un instrument de
précision. Ne jamais le démonter.
• Ne pas exposer le microphone à des
températures extrêmement élevées (au-
dessus de 60°C ou 140°F) ni à
l’humidité.
• Si le microphone est placé près
d’enceintes, un bruit aigu peut être
audible (effet Larsen). Ce bruit est dû au
son des enceintes capté par le
microphone. Si le cas se présente,
éloignez le plus possible le microphone
des enceintes.
• Ne jamais laisser mouiller le
microphone par la pluie ou l’eau de mer
s’il est utilisé en extérieur.
• Lorsque l’appareil, les fiches ou la pile
au lithium sont sales, essuyez-les avec
un chiffon sec.
• Débranchez toujours le microphone en
tirant sur la fiche et non pas sur le
cordon. Il pourrait se couper.
Ce microphone a une fiche monophonique
(bipôle). L’enregistrement s’effectue
seulement sur le canal gauche lorsque le
microphone est raccordé à un
magnétocassette stéréo.
Remarques sur la pile au lithium
• Rangez la pile au lithium hors de portée
des enfants. En cas d’ingestion,
consultez immédiatement un médecin.
• Essuyez la pile avec un chiffon sec pour
assurer un bon contact.
• Veillez à respecter la polarité correcte
lorsque vous installez la pile.
• Ne tenez pas la pile par une pince
métallique. Un court-circuit peut se
produire.
AVERTISSEMENT
En cas de mauvaise manipulation, la pile
peut exploser.
Ne pas recharger, démonter ni incinérer la
pile.
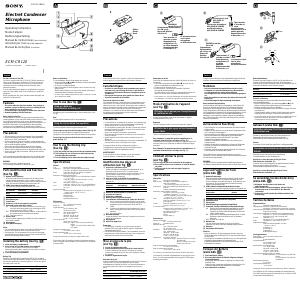
Nomenclature (Voir fig. A.)
1 Interrupteur d’alimentation (POWER)
2 Témoin de pile
Lorsque vous mettez le microphone
sous tension, le témoin s’allume un
instant. C’est normal. Il vous indique
que la pile n’est pas vide. Lorsque la
pile se décharge, le témoin luit
faiblement ou ne s’allume pas du tout.
3 Minifiche monophonique coudée
(plaquée or)
4 Boîtier de pile
Il peut être attaché à une cravate, un
revers de veste ou à une poche.
5 Prise de microphone
6 Minifiche monophonique coudée
(plaquée or)
7 Logement de pile
8 Microphone
9 Support de microphone attaché
Avec ce support, vous pouvez mettre le
microphone en position horizontale ou
inclinée.
Français
Español
Antes de utilizar la unidad, lea
detenidamente este manual, y consérvelo
para futuras referencias.
Características
• Micrófono superdireccional (monoaural)
que emplea un sistema de tubo de fase y
permite la grabación altamente clara de
fuentes de sonido situadas a gran
distancia.
• Soporte de micrófono incorporado
plegable fácil de utilizar.
• Sistema de alimentación de 2 vías para
compatibilidad con su grabadora de
casetes (alimentación con la caja de pila
suministrada o con el sistema de
alimentación a través de la clavija*).
• Indicación de la pila restante mediante
diodo electroluminiscente.
* El sistema suministra alimentación al
micrófono y le permite utilizarlo
conectándolo simplemente la toma para
micrófono.
Precauciones
• Este micrófono es un instrumento de
precisión. No lo desarme nunca.
• Mantenga el micrófono alejado de
temperaturas extremadamente altas
(más de 60°C) y de la humedad.
• Si coloca el micrófono cerca de
altavoces, es posible que oiga un ruido
de tono alto (efecto de aullido). Esto se
debe a que el micrófono capta
repetidamente el sonido procedente de
los altavoces. En tal caso, aleje el
micrófono lo más posible de los
altavoces.
• Cuando utilice el micrófono en
exteriores, no permita nunca que se
moje con la lluvia ni con el agua salada.
• Cuando el micrófono, las clavijas, o la
pila de litio se ensucien, frótelos con un
paño seco.
• Para desconectar el micrófono tire
siempre de la clavija. Si tirase del cable,
podría romperlo.
Como este sistema utiliza una clavija
monoaural (dos polos), la grabación
solamente se realizará en el canal
izquierdo cuando conecte el micrófono a
una grabadora de casetes estéreo.
Notas sobre la pila de litio
• Mantenga la pila de litio fuera del
alcance de los niños. Si alguien tragase
la pila, consulte inmediatamente a un
médico.
• Limpie la pila con un paño seco para
asegurar su buen contacto.
• Tenga en cuenta la polaridad cuando
instale la pila.
• No sujete la pila con pinzas metálicas. Si
lo hiciese, causaría un cortocircuito.
ADVERTENCIA
La pila puede explotar si la maltrata.
No cargue, desarme, ni tire al fuego la pila.
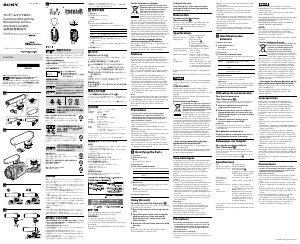
Identificación de
partes
(Consulte la Fig. A.)
1 Interruptor de alimentación (POWER)
2 Indicador de comprobación de la pila
Cuando conecte la alimentación, el
indicador de comprobación de la pila
se encenderá momentáneamente. Esto
es normal. La luz le indicará que la
pila todavía tiene energía. Cuando la
pila se debilite, el indicador se
iluminará débilmente o no se
encenderá en absoluto.
3 Miniclavija monoaural acodada
(dorada)
4 Caja de la pila
Usted podrá prender la caja de la pila
en su corbata, solapa, o bolsillo.
5 Toma para micrófono
6 Miniclavija monoaural acodada
(dorada)
7 Compartimiento de la pila
8 Micrófono
9 Soporte de micrófono incorporado
Utilizando el soporte podrá cambiar el
ángulo del micrófono entre las
posiciones de plano e inclinado.
English
Printed on recycled paper


Join the conversation about this product
Here you can share what you think about the Sony ECM-Z60 Microphone. If you have a question, first carefully read the manual. Requesting a manual can be done by using our contact form.