
Operating Instructions
Mode d’emploi
Bedienungsanleitung
Manual de instrucciones (en el reverso)
Istruzioni per l’uso (facciata opposta)
Electret Condenser Microphone
Sony Corporation © 2000 Printed in Japan
ECM-R300
For the customers in the USA
This device complies with Part 15 of the FCC Rules. Operation is subject to the
following two conditions: (1) This device may not cause harmful interference, and (2)
this device must accept any interference received, including interference that may
cause undesired operation.
You are cautioned that any changes or modifications not expressly approved in this
manual could void your authority to operate this equipment.
Before operating the unit, please read this manual thoroughly and retain it for future
reference.
Features
• The noise-reduction function enables clear pick-up of speakers' voices
by filtering out noise, making the unit most suitable for use at
conferences.
• The two perimeter grooves around the sides of the unit accommodate
the microphone cord, also making the unit convenient for portable use.
• Remaining battery life is indicated by an LED.
Noise-reduction function
The unit detects the level of the input sound, distinguishes object sounds (speakers'
voices) from noise based on their sound level (high level: objective sounds, low level:
noise), and reduces noise by changing sound levels and modulating frequency
characteristics. As the effect of the function varies depending on the surrounding
conditions, it is recommended to do several trial recordings to determine the most
suitable settings before starting actual recording.
Precautions
• This microphone is a precision instrument. Never disassemble.
• Keep the microphone away from extremely high temperatures (above 60°C [140°F])
and humidity.
• If the microphone is placed near speakers, a high-pitched noise (feedback) may be
heard. This is because the microphone pick up sound from the speakers repeatedly.
In this case, place the microphone as far as possible from the speakers.
• When using outdoors, never let the microphone become wet with rain or saltwater.
• When the unit or plugs become soiled, wipe them with a dry cloth.
• Always grip by the plug to disconnect. Pulling by the cord may cause it to break.
As this system uses a monaural plug (two poles), recording is done only on the left
channel when connected to a stereo tape recorder.
WARNING
Battery may explode if mistreated.
Do not recharge, disassemble or dispose in fire.
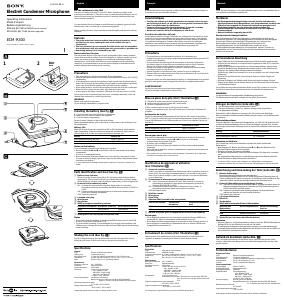
Installing the battery (See fig. A)
1 Unreel the cord, then open the battery compartment.
2 Insert a new R6 (size AA) battery (not supplied).
3 Close the battery compartment.
Be sure to insert a battery so that it lies on the ribbon.
When replacing the battery, pull on the ribbon to easily remove the old battery from
the compartment.
Battery life
When the Power/nR switch is turned from OFF to ON, the battery check indicator
lights momentarily. When the battery becomes weak, the indicator lights dimly or
does not light at all. In this case, replace the battery with a new one.
battery battery life
Sony manganese battery R6P (SR) approx. 20 hours
Sony alkaline battery LR6 (SG) approx. 70 hours
Notes on the battery
To avoid damage to the unit from leakage and corrosion;
• Be sure to match the e and E on the battery with the same marks on the battery
compartment.
• Do not try to recharge the battery.
• Remove the battery if the microphone is not to be used for a long period of time.
In a case of battery leakage, wipe off any deposit in the battery compartment before
installing a new battery.*
* In some cases, battery leakage means repair is required. Consult your nearest Sony
dealer.
Parts Identification and Uses (See fig. B)
1 Battery-check indicator
When you set the Power/nR switch to ON, the battery-check indicator flashes
momentarily. This is normal, and tells you whether the battery still has a charge.
When the battery becomes weak, the indicator lights dimly or does not light at all.
2 Power/nR (noise-reduction) switch
nR: Activates the noise-reduction function. In this mode, you can select
microphone sensitivity by switching the SENS selector position (to HIGH or
LOW).
ON: Deactivates the noise-reduction function. In this mode, the microphone
works as an ordinary microphone.
OFF: Turns the power off.
3 L-shaped mini plug
4 Microphone
5 Plug holder
6 SENS (microphone sensitivity) selector
7 Spiral groove (for storing the microphone cord)
Notes
• If it is hard to hear the speakers' voices when the SENS selector is set to the HIGH
position, set the Power/nR switch to ON.
• To get successful recording, it is recommended to do several trial recordings with
different pairs of settings for the Power/nR switch and SENS selector before starting
actual recording.
Winding the cord (See fig. C)
Put the L-shaped mini plug into the holder and wind the cord around the unit by
fitting the pair of arcs of the looped cord into the groove around the unit.
Specifications
General
Type Electret condenser microphone
Output plug L-shaped mini plug
Micorphone cord 1.5 mm dia., single cord (shielded) (1.2 m [3.9 feet] long)
Dimensions Approx. 66 × 66 × 26 mm (w × d × h) (2
5
/8 × 2
5
/8 × 1
1
/16 in.)
Mass Approx. 60 g (2.1 oz.) (including battery)
Performance
Frequency response 100 – 12,000 Hz
Directivity Omnidirectional
Output impedance 2.8 kilohms
Sensitivity Open circuit output level*
ON: –44 dB ± 3.5 dB
nR-HIGH: –38 dB ± 4 dB
nR-LOW: –44 dB ± 4 dB
* 0 dB = 1 V/Pa, 1,000 Hz
Power requirements one R6 (size AA) battery
Battery life:Approx. 20 hours with Sony R6P (SR) battery
Approx. 70 hours with Sony alkaline LR6 (SG) battery
Operating temperature range
0°C to 40°C (32°F to 104°F)
Storage temperature range
–20°C to 60°C (–4°F to 140°F)
Design and specifications are subject to change without notice.
Avant de faire fonctionner l’appareil, veuillez lire attentivement ce mode d’emploi et
le conserver pour toute référence ultérieure.
Caractéristiques
• Fonction de réduction du bruit permettant une capture claire des voix
par le filtrage du bruit, ce qui fait de ce microphone l’instrument idéal
pour l’enregistrement de conférences.
• Les deux rainures périphériques permettent d’enrouler le cordon
autour du microphone, ce qui facilite le transport.
• Autonomie restante de la pile indiquée par une diode.
Fonction de réduction du bruit
Le microphone détecte le niveau d’entrée du son, distingue les sons objectifs (voix de
l’orateur) du bruit par leur différence de niveau sonore (niveau aigu : sons objectifs,
niveau grave: bruit) et réduit le bruit en changeant les niveaux sonores et modulant
les caractères des fréquences. Comme l’effet obtenu varie selon les conditions
ambiantes, il est conseillé de faire plusieurs essais pour déterminer les réglages les
mieux appropriés avant de commencer l'enregistrement proprement dit.
Précautions
• Ce microphone est un instrument de précision. Ne le démontez pas.
• Gardez le microphone à l’écart des températures extrêmement élevées (plus de 60°C
[140°F]) et de l’humidité.
• Si vous utilisez le microphone près d’une enceinte, un bruit aigu (rétroaction
acoustique) risque de se produire car le microphone capte le son de l’enceinte.
Dans ce cas, éloignez le microphone de l’enceinte le plus possible.
• Quand vous utilisez le microphone à l’extérieur, veillez à ce qu’il ne soit jamais
mouillé par la pluie ou l’eau de mer.
• Quand l’appareil ou les fiches sont sales, essuyez-les avec un chiffon sec.
• Saisissez toujours le microphone par la fiche pour le débrancher. Si vous tirez sur le
cordon, vous risquez de le couper.
Cet appareil utilise une fiche monophonique (bipôle) et l’enregistrement n’est possible
que sur le canal gauche quand l’appareil est raccordé à un magnétophone stéréo.
AVERTISSEMENT
La pile peut exploser en cas de mauvaise manipulation.
Ne pas la recharger, la démonter ni la jeter au feu.
Mise en place de la pile (Voir l’illustration A)
1 Déroulez le cordon puis ouvrez le logement de la pile.
2 Insérez une pile neuve R6 (format AA) (non fournie).
3 Fermez le logement de la pile.
Veillez à insérer la pile de sorte qu’elle repose sur le ruban.
Lorsque vous remplacez la pile, tirez sur le ruban pour la sortir plus facilement du
logement.
Autonomie de la pile
Quand le commutateur d’alimentation/nR est réglé sur ON à partir de la position
OFF, le voyant de contrôle de la pile s’allume momentanément. Quand la pile faiblit, le
voyant luit faiblement ou ne s’allume pas du tout. Dans ce cas, remplacez la pile par
une neuve.
Pile Autonomie de la pile
Pile au manganèse Sony R6P (SR) approx. 20 heures
Pile alcaline Sony LR6 (SG) approx. 70 heures
Remarques sur la pile
Pour éviter les dommages dûs à une fuite d’électrolyte de la pile et à la corrosion;
• Faites bien correspondre les repères e et E de la pile avec les repères
correspondants du logement de la pile.
• N’essayez pas de recharger la pile.
• Enlevez la pile si vous n’avez pas l’intention d’utiliser le microphone pendant
longtemps.
En cas de fuite d’électrolyte, essuyez complètement le logement avant de mettre en
place une pile neuve.*
* Dans certains cas, une fuite d’électrolyte nécessitera l’intervention d’un réparateur.
Consultez le revendeur Sony le plus proche.
Identification des éléments et utilisation
(Voir l’illustration
B
)
1 Voyant de contrôle de la pile
Quand vous réglez le commutateur d’alimentation/nR sur la position de mise en
service (ON), le voyant clignote momentanément. C’est normal et vous pouvez
ainsi voir si la pile est chargée. Quand la pile est faible, le voyant luit faiblement
ou ne s’allume pas.
2 Commutateur d’alimentation/nR (réduction du bruit)
nR: Active la fonction de réduction du bruit. Dans ce mode, vous pouvez
sélectionner la sensibilité du microphone en changeant la position du
sélecteur SENS (HIGH ou LOW).
ON: La fonction de réduction du bruit est désactivée. Dans ce mode, le
microphone fonctionne comme un microphone ordinaire.
OFF: Microphone éteint.
3 Minifiche coudée
4 Microphone
5 Porte-fiche
6 Sélecteur SENS (sensibilité du microphone)
7 Rainure en spirale (pour le rangement du cordon de microphone)
Remarques
• S’il est difficile d’entendre les voix d’un orateur lorsque le sélecteur SENS est en
position HIGH, réglez le commutateur d’alimentation/nR sur ON.
• Pour obtenir des bons enregistrements, il est conseillé de faire plusieurs essais avec
divers réglages du commutateur d’alimentation/nR et du sélecteur SENS avant
l'enregistrement proprement dit.
Enroulement du cordon (Voir l’illustration C)
Insérez la mini fiche coudée dans le porte-fiche et enroulez le cordon autour de
l'appareil en insérant le cordon plié en forme de boucle dans la rainure.
Spécifications
Généralités
Type Microphone électrostatique
Fiche de sortie Minifiche coudée
Cordon de microphone Ø 1,5 mm, cordon simple (blindé) (1,2 m [3,9 pi.] de long)
Dimensions Env. 66 × 66 × 26 mm (l × p × h) (2
5
/8 × 2
5
/8 × 1
1
/16 po.)
Poids Env. 60 g (2,1 on.) (pile comprise)
Performances
Réponse en fréquence 100 – 12.000 Hz
Directivité Omnidirectionnel
Impédance de sortie 2,8 kilohms
Sensibilité Niveau de sortie en circuit ouvert*
ON: –44 dB ± 3,5 dB
nR-HIGH: –38 dB ± 4 dB
nR-LOW: –44 dB ± 4 dB
* 0 dB = 1 V/Pa, 1.000 Hz
Alimentation 1 pile: R6 (format AA)
Autonomie de la pile: Env. 20 heures avec une pile Sony R6P (SR)
Env. 70 heures avec une pile alcaline Sony LR6
(SG)
Plage de températures de fonctionnement
0°C à 40°C (32°F à 104°F)
Plage de températures de stockage
–20°C à 60°C (–4°F à 140°F)
La conception et les spécifications peuvent être modifiées sans préavis.
English Français
3-046-839-12 (1)
B
C
A
1
Deutsch
Lesen Sie diese Anleitung vor der Inbetriebnahme genau durch, und bewahren Sie sie
zum späteren Nachschlagen sorgfältig auf.
Merkmale
• Die Rauschunterdrückungsfunktion erlaubt scharfe Aufnahme von
Sprecherstimmen durch Herausfiltern von Störgeräuschen, wodurch das
Mikrofon hervorragend für Einsatz bei Konferenzen geeignet wird.
• Die beiden Randrillen um die Seiten des Geräts nehmen das
Mikrofonkabel auf und machen das Mikrofon auch für tragbaren
Einsatz geeignet.
• Batteriereststärke angezeigt durch LED.
Rauschunterdrückungsfunktion
Das Gerät erkennt den Pegel des Eingangstons, unterscheidet den Zielton (die
Stimmen der Sprecher) von Umgebungsgeräuschen basierend auf dem Klangpegel
(hoher Pegel: Zieltöne, niedriger Pegel: Störgeräusche) und verringert den
Rauschpegel durch Ändern von Klangpegeln und Modulation der
Frequenzeigenschaften. Da die Wirksamkeit dieser Funktion von den
Umgebungsbedingungen abhängig ist, wird empfohlen, mehrere Versuche zu
unternehmen, um vor dem Einsatz die jeweils beste Einstellung für die jeweilige
Situation zu bestimmen.
Zur besonderen Beachtung
• Dieses Mikrofon ist ein Präzisionsinstrument und darf keinesfalls zerlegt werden.
• Schützen Sie das Mikrofon vor extrem hohen Temperaturen (über 60°C) und hoher
Luftfeuchtigkeit.
• Wenn sich das Mikrofon in der Nähe von Lautsprechern befindet, können durch
akustische Rückkopplung Heulgeräusche erzeugt werden, da das Mikrofon den
Klang aus den Lautsprechern hierbei wiederholt aufnimmt.
Stellen Sie das Mikrofon in diesem Fall so weit wie möglich von den Lautsprechern
entfernt auf.
• Schützen Sie das Mikrofon bei Verwendung im Freien vor Nässe, Regen und
Salzwasser.
• Wischen Sie Schmutz auf Mikrofon und Stecker mit einem trockenen Tuch ab.
• Ziehen Sie das Kabel stets am Stecker haltend ab. Ein Ziehen am Kabel selbst kann
zu Kabelschäden führen.
Da das Mikrofon mit einem monauralen Stecker (zwei Pole) versehen ist, wird bei
Anschluß an einen Stereocassettenrecorder nur der linke Kanal aufgenommen.
WARNUNG
Die Batterie kann bei unsachgemäßer Handhabung explodieren.
Die Batterie niemals aufladen, zerlegen oder ins offene Feuer werfen.
Einlegen der Batterie (siehe Abb. A)
1 Das kabel auswickeln, und das Batteriefach öffnen.
2 Eine neue R6-Batterie (Größe AA, Mignon) einleegn (nicht mitgeliefert).
3 Das Batteriefach schließen.
Sicherstellen, daß die Batterie so eingelegt wird, daß sie über dem Band liegt.
Beim Austauschen der Batterie kann am Band gezogen werden, um die Batterie leicht
zu entfernen.
Batterielebensdauer
Wenn der Betriebs-/Rauschunterdrückungsschalter von OFF auf ON geschaltet wird,
leuchtet die Batterieprüfanzeige kurz auf. Wenn die Batterie schwach wird, leuchtet
die Anzeige schwach oder überhaupt nicht. In diesem Fall die Batterie durch eine neue
ersetzen.
Batterie Batterielebensdauer
Sony-Manganbatterie R6P (SR) Ca. 20 Stunden
Sony-Alkalibatterie LR6 (SG) Ca. 70 Stunden
Hinweise zur Batterie
Zur Vermeidung von Korrosionsschäden am Mikrofon durch auslaufende
Batteriesäure:
• Beim Einlegen der Batterie die Markierungen e und E an der Batterie auf die
gleichen Markierungen im Fach ausrichten.
• Niemals versuchen, die Batterie aufzuladen.
• Die Batterie herausnehmen, wenn das Mikrofon längere Zeit lang nicht verwendet
wird.
Bei ausgelaufener Batteriesäure vor dem Einlegen einer neuen Batterie sämtliche
Säurerückstände im Batteriefach sauber abwischen.*
* In manchen Fällen ist nach dem Auslaufen von Batteriesäure eine Reparatur
notwendig. Wenden Sie sich hierzu bitte an den nächstgelegenen Sony-Fachhändler.
Bezeichnung und Verwendung der Teile (siehe Abb. B)
1 Batterie-Prüfanzeige
Beim Einschalten des Mikrofons mit dem Betriebs-/
Rauschunterdrückungsschalter auf ON blinkt die Batterie-Prüfanzeige kurz auf.
Dieses Aufblinken ist normal und zeigt an, ob die Batterie noch brauchbar ist. Bei
schwacher Batterie leuchtet die Anzeige schwach oder überhaupt nicht.
2 Power/nR (Betrieb/Rauschunterdrückung) Schalter
nR: Aktiviert die Rauschunterdrückungsfunktion. In dieser Betriebsart kann die
Mikrofonempfindlichkeit durch Umstellen der SENS-Wahlschalterposition
(HIGH oder LOW) gewählt werden.
ON: Deaktiviert die Rauschunterdrückungsfunktion. In dieser Betriebsart
arbeitet das Mikrofon wie ein normales Mikrofon.
OFF: Schaltet das Gerät aus.
3 L-förmiger Ministecker
4 Mikrofon
5 Steckerhalter
6 SENS (Mikrofonempfindlichkeit)-Wahlschalter
7 Spiralrille (zur Aufnahme des Mikrofonkabels)
Hinweise
• Wenn es schwer ist, die Sprecherstimmen zu hören, wenn der SENS-Wahlschalter in
Stellung HIGH ist, den Schalter Power/nR auf ON stellen.
• Für erfolgreiche Aufnahmen wird empfohlen, mehrere Versuchsaufnahmen mit
unterschiedlichen Einstellungskombinationen der Schalter Power/nR und SENS vor
der tatsächlichen Aufnahme zu machen.
Aufwickeln des Kabels (siehe Abb. C)
Den L-förmigen Ministecker auf den Halter setzen, und das Kabel um das Gerät
wickeln, indem die beiden Bogenstücke des schleifenförmigen Kabels um das Gerät
gesetzt werden.
Technische Daten
Allgemeine Daten
Type Electret-Kondensatormikrofon
Ausgangsstecker L-förmiger Ministecker
Mikrofonkabel 1,5 mm Durchmesser, Einzelader (abgeschirmt) (1,2 m lang)
Abmessungen Ca. 66 × 66 × 26 mm (B × T × H)
Gewicht Ca. 60 g (einschließlich Batterie)
Leistungsmerkmale
Frequenzgang 100 bis 12.000 Hz
Richtcharakteristik Kugelcharakteristik
Ausgangsimpedanz 2,8 kOhm
Empfindlichkeit Leerlaufspannung*
ON: –44 dB ± 3,5 dB
nR-HIGH: –38 dB ± 4 dB
nR-LOW: –44 dB ± 4 dB
* 0 dB = 1 V/Pa, 1.000 Hz
Stromversorgung Eine R6 (Größe AA) Batterie
Batterielebensdauer:Ca. 20 Stunden mit Sony R6P (SR) Batterie
Ca. 70 Stunden mit Sony LR6 (SG) Alkalibatterie
Betriebstemperaturbereich
0°C bis 40°C
Lagerungstemperaturbereich
–20°C bis 60°C
Änderungen, die dem technischen Fortschritt dienen, bleiben vorbehalten.
2
Positions of the selector
HIGH
LOW
Microphone sensitivity
More sensitive
Less sensitive
Noise-reduction function
Less sensitive
More sensitive
Positions du sélecteur
HIGH
LOW
Sensibilité du
microphone
Le plus sensible
Le moins sensible
Fonction de réduction du
bruit
Le moins efficace
Le plus efficace
Positionen des
Wahlschalters
HIGH
LOW
Mikrofonempfindlichkeit
Empfindlicher
Weniger empfindlich
Rauschunterdrückungs-
funktion
Weniger wirksam
Wirksamer
Ribbon
Ruban
Band

Join the conversation about this product
Here you can share what you think about the Sony ECM-R300 Microphone. If you have a question, first carefully read the manual. Requesting a manual can be done by using our contact form.