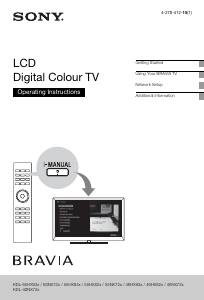
Manual Sony Bravia KLV-40R252F LCD Television
Need a manual for your Sony Bravia KLV-40R252F LCD Television? Below you can view and download the PDF manual for free in English. This product currently has 13 frequently asked questions, 0 comments and has 0 votes. If this is not the manual you want, please contact us.
Is your product defective and the manual offers no solution? Go to a Repair Café for free repair services.
Manual
Loading…


Loading…
Rating
Let us know what you think about the Sony Bravia KLV-40R252F LCD Television by leaving a product rating. Want to share your experiences with this product or ask a question? Please leave a comment at the bottom of the page.More about this manual
We understand that it’s nice to have a paper manual for your Sony Bravia KLV-40R252F LCD Television. You can always download the manual from our website and print it yourself. If you would like to have an original manual, we recommend you contact Sony. They might be able to provide an original manual. Are you looking for the manual of your Sony Bravia KLV-40R252F LCD Television in a different language? Choose your preferred language on our homepage and search for the model number to see if we have it available.
Specifications
| Brand | Sony |
| Model | Bravia KLV-40R252F |
| Category | LCD Televisions |
| File type | |
| File size | 0.71 MB |
All manuals for Sony LCD Televisions
More manuals of LCD Televisions
Frequently Asked Questions about Sony Bravia KLV-40R252F LCD Television
Our support team searches for useful product information and answers to frequently asked questions. If you find an inaccuracy in our frequently asked questions, please let us know by using our contact form.
How do I connect a universal remote control to my television? Verified
To connect your universal remote control, you need the model number and brand name of both the remote control and the television. There is a list of codes for brands and model numbers in the manual of the remote control .
This was helpful (2079) Read moreI want to connect a speaker to my LCD television with HDMI, which port should I use? Verified
You need to use the HDMI-ARC port, which is specifically made for connecting audio equipment.
This was helpful (1400) Read moreDoes it matter to which HDMI port I connect my device? Verified
In general you can connect a device like a blu-ray player or game console to any HDMI port. The device can then be used by selecting the corresponding HDMI channel on your television.
This was helpful (740) Read moreHow do I measure the inches of my LCD television? Verified
Measuring the inches on your LCD television is done by measuring the diagonal distance between for example the upper left corner and the lower right corner of the screen (not the edge). One inch equals 2,54 centimeter, so when you measure 99 centimeter, this means your LCD television is 39 inches.
This was helpful (528) Read moreWill my remote control also work on other television models of the same brand? Verified
Often a remote control of a television will also work on similar models of the same brand. However, it is unusual that it will work on all models of that brand. Universal remote controls are more suited to do this.
This was helpful (305) Read moreWhat is the difference between LCD and LED? Verified
Both techniques use an LCD screen that emits no light by itself. The difference is in the lighting behind the screen. With LCD screens this is done by CCFL (cold-cathode fluorescent lamp) and LED makes use of LED lights.
This was helpful (278) Read moreCan I repair a dead pixel myself? Verified
There is a difference between a dead pixel and a stuck pixel. A stuck pixel is still coloured and might be fixed by applying light pressure exactly onto the pixel until it restores itself. A dead pixel is always black or white and can't be repaired by yourself.
This was helpful (265) Read moreWhat does HDMI stand for? Verified
HDMI stands for High-Definition Multimedia Interface. HDMI is a connection to send high quality video and audio from one device to another.
This was helpful (244) Read moreWhy are there letters next to the numbers on the remote control? Verified
Certain television settings may require you to enter letters. There are usually three letters or other characters on a button. When letter input is required, you can press that button once for the first letter, press twice for the second letter and press 3 times for the third letter. This way, text can be written with a minimum number of buttons.
This was helpful (224) Read moreWhat is the contrast ratio? Verified
The contrast ratio tells how far the whitest white is from the blackest black. A contrast ratio of for example 400:1 means that the blackest black on screen is 400 times darker than the whitest white. A high contrast ratio contributes to the sharpness of the image.
This was helpful (199) Read moreWhat is the optimal viewing distance for my television? Verified
This partially depends on personal preference, but as a rule of thumb the optimal viewing distance is about 3x the diagonal screen size of the television. For a television of 60 inch (152cm) the optimal viewing distance would be 180 inch or about 4.5 meter.
This was helpful (195) Read moreHow can I properly clean my LCD television? Verified
Turn off the television and wipe dust and dirt off the screen with a microfiber cloth. Do not use paper, this can cause scratches. Do not apply too much pressure or you might cause damage to pixels. Use a specialized detergent or make one by mixing 1 part vinegar with 1 part water. Moisten the cloth with the detergent and clean the screen. Make sure the cloth is not too wet. Remove stains by making rotating movements. Dry the screen with a second microfiber cloth to prevent stripes.
This was helpful (193) Read moreWhat does LCD stand for? Verified
LCD stands for Liquid Crystal Display and is a technology that allows liquid crystals to polarise light to generate colours.
This was helpful (185) Read more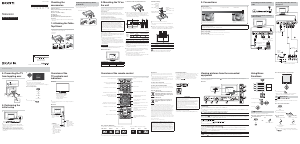


Join the conversation about this product
Here you can share what you think about the Sony Bravia KLV-40R252F LCD Television. If you have a question, first carefully read the manual. Requesting a manual can be done by using our contact form.