
ATENCION
• Lea estas instrucciones antes de poner en funcionamiento su aparato.
• Compruebe que el voltaje de su casa y el indicado en la placa de ca-
racterísticas del transformador (6) coinciden.
• En caso de utilizar el aparato con pila, e mplee sólo la pila reco mendada.
• Antes de conectar el aparato a la red o insertar la pila, asegúrese que
el interruptor del apara to (1) está en posición de apagado.
• Durante el f uncionamiento del aparato no tocar las cuchillas de corte.
• No utilizar nunca el aparato con la rejilla protectora de las cuchillas
d añada.
• No utilizar sobre prendas húmedas, de textura irregu lar o delicadas
(hilo, seda, punto fino).
• No utilizar nunca el aparato sobre aquellas zonas de prendas de
lana o hilo que tengan algún punto fuera.
• No engrasar ni poner aceite sob re e l cabezal de cort e. Su ropa podrí a
mancharse.
• Este aparato está diseñado para eliminar pelusas de prendas de
vestir o muebles tapizados. Nunca debe emplearlo para otras aplica-
ciones.
• Atención: no ejercer una fuerte presión sobre el cabezal de cuchillas
durante la utilización del aparato.
• Retire las pilas en caso de no usarlo durante un largo periodo de tiem-
po.
• Tire la pila usada en los contened ores destinados a ello.
• No ut ilice el aparato con la clavija o el cable dañado del transformador
(6). Si el cable está dañado debe ser remplazado por un Servicio Téc-
nico Autorizado.
• No sumerja el aparato en agua u otros líquidos.
• Manténgalo fuera del a lcance de los niños.
• Los niños deberían ser supervisados para asegurar que no
juegan con el aparato.
• Este aparato no está destinado pa ra ser u tilizado por personas
(incluidos niños) cuyas capacidades físicas, sensoriales o men-
tales estén reducidas, o car ezcan de experienci a o conocimien-
to, s alvo si han tenido supervisión o instrucciones relativas al
uso del aparato por una persona responsable de su seguri-
d ad .
¡¡ATENCIÓN!! Cuando desee desprenders e del ap arato,
NUNCA lo deposite en la basura, sino que acuda al PUN-
TO LIMPIO o de recogida de residuos más cercano a su
domicilio, para su posterior tratamiento. De e sta manera,
está contribuyendo al cuidado del medio ambiente.
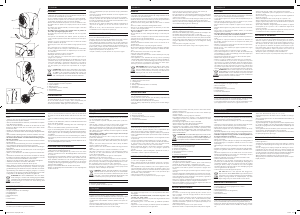
COMPONENTES PRINCIPALES
1.- Interrupt or de encendido/ apagado
2.- Selector regulador de niveles de apurado
3.- Cepil lo limpiador
4 .- Depósito pelusas
5.- Compartimento pilas (no incluidas)
6.- Transformador
7.- Conector transformador
FUNCIONAMIENTO
• En caso de utilizar el aparato con transformador, introduzca la clavija
del transformado r (6) en el conector (7) indicado para éste.
• En caso de utilizar el aparato con pilas, abra el compartimento para
pilas (5) presionando la tapa y deslizándola hacia arriba.
• I nserte 2 pil as tamaño “LR14” según a la indicación de los polos.
• Cierre el compart imento para pilas presionando la tapa y deslizándola
hacia abajo.
• Seleccione el nivel de apurado deslizando el selector regulador de ni-
veles de apurado (2).
• Sitúe el interruptor de funcionamiento (1) en posición de encendido.
• Coloque la prenda sobre una superficie lisa. Deslice suavemente, sin
presionar, el quitapel usas sobre la prenda estirada adecuando el selec-
tor de apurado (2) a cad a necesidad.
• Después de su uso, apague el quitapelusas situando el interruptor (1)
en posición de apagado y en su caso desconecte el aparato de la
red.
• Después de su uso y una vez desconectado el aparato de la red , le
recomendamos vaciar el depósito de pel usas (4)
LIMPIEZA Y MANTENIMIENTO
• Antes de la limpieza del quitapelusas, asegúrese de que está apagado
y en su caso desconectado de la red.
• Extraiga el depósito de pelusas (4) deslizándolo ha cia abajo y vacíelo.
El depó sito de pelusas no debe llenarse más de sus ¾ partes.
• Para la limpieza del cabezal de cuchillas, retire el anillo regulador de
apurad o ( 2) deslizándolo hacia fuera hasta retirarlo del aparato, extrai-
g a la pieza plástica con rejilla ayudándose de una herramienta de su-
perficie plana y limpie las pelusas cuidadosamente con el cepillo (3)
que se adjunta para no dañar el ca bezal de cuchillas.
• L impie las partes plásti cas con un paño seco.
• Coloque la cuchilla y las pieza s plásticas en su posición original.
• ESPAÑOL
ACHTUNG
• Lesen Sie diese Gebrauchsanweisung vor der Inbetriebnahme Ihres
Geräts.
• Stellen Sie sicher, dass die Spannung in Ihrem Haushalt mit der auf dem
Typenschild des Trafos (6) übereinstimmt.
• Wenn Sie das Gerät mi t Batterie betreiben, ausschließlich den empfoh-
lenen Batterietyp verwenden.
• Achten Sie vor dem Anschluss des Geräts an das Netz oder vor dem
Einlegen der Batterie darauf , dass der Schalter (1) des Geräts auf der
Positi on AUS steht.
• Berüh ren Sie während des Betriebs keinesfalls die Scherklingen.
• Verwenden Sie das Gerät niemals mit beschädigtem Kl ingenschutzauf-
satz.
• Nicht auf feuchten Kleidungsstücken, unebenen Strukturen oder emp-
findlichen Stoffen ( Zwirn, Seide, feinmaschiges Gew ebe) verw end en.
• Das Gerät niemals auf Woll- oder Zwirnstoffstellen mit gezogenen
Maschen verwenden.
• Die Scherfläche weder fetten noch ölen. Dies kann zu Flecken auf Ihrer
Kleidung führen.
• Dieses Gerät dient zur Entfernung von Fusseln auf Kleidungsstücken
oder Stoffmöbeln. Niemals für andere Zwecke verwenden.
• Achtung: während des Betriebs keinen starken Druck auf den Klingen-
kopf ausüben.
• Nehmen Sie die Batterien aus dem Gerät, wenn es für einen längeren
Zeitraum nicht benutzt wird.
• Werfen Sie leere Batterien in die dafür vorgesehenen Sammelcon tai-
ner.
• Verwenden Sie das Gerät nicht, wenn Stecker oder Kabel des Trafos (6)
beschädigt sind. Bei Beschädigung muss das Netzkabel von einem
autorisierten technischen Kundendien st ersetzt werden.
• Tauchen Sie das Ge rät niemals in Wasser oder andere Flüssigkei ten.
• Außerhalb der Reichweite von Kind ern aufbewahren.
• Lassen Sie Kinder nicht mit diesem Gerät spielen.
• Dieses Gerät ist nicht für den Gebrauch durc h Pers onen (eins-
chließlich Kindern) mit einer körperlichen, sensitiven oder geisti-
gen Behinderung od er durch Personen, die nicht über die notwen-
dige Erfahrung oder Kenntnisse verfügen, geeignet, es sei denn,
sie wer den von der für ihre Sicherheit zuständigen Person beauf-
sichtigt bzw. in die Benut zung des Gerätes e ingewiesen.
ACHTUNG!! Das Gerät KEINESFALLS über den Haus-
müll entso rgen, sondern zum nächstgelegenen WERT-
STOFFHOF oder zur Abfallannahmestelle zur Weiterver-
wertung bringen. So leisten Sie einen Beitrag zum
Umweltschutz.
HAUPTBESTANDTEILE
1.- Ein-/Aus-Schalter
2.- Regler zum Einstellen der Schnittlä nge
3.- Reinigungspinsel
4 .- Auffangbehälter
5.- Batterienfach (leer)
6.- Trafo
7.- Trafoanschluss
BETRIEB
• Wenn Sie das Gerät mit dem Trafo verwenden, stecken Sie den Stecker
des Trafos (6) in den dafür vorgesehenen Anschluss.
• Wenn Sie das Gerät mit Batterien betreiben, öffnen Sie das Batteriefach
(5), indem Sie auf den Deckel drücken und diesen nach oben schie-
ben.
• Legen Sie 2 Batterien vom Typ „LR14“ ein, die Pole wie gezeigt ausrich-
ten.
• Schließen Sie das Batteriefach, indem Sie auf den Deckel drücken und
diesen nach unt en schieben.
• Stellen Sie die gewünschte Schnittlänge über den Schieberegler (2)
ein.
• Stellen Sie den Betri ebsschalt er (1) auf die Position EIN.
• Legen Sie da s Kleid ungsstück auf eine glatte Oberfläche. Gleiten Sie
m it dem Fusselrasierer ohne Druck über das glattgespannte Kleidungs-
stüc k, regeln Sie dabei die Schnittlänge über den Schieberegler (2) je
nach Bedarf .
• Schalten Sie den F usselrasierer nach der Verwendung a us, indem Sie
den Schalter (1) auf die Position AUS stellen, und trennen Sie das Gerät
vom Netz.
• Nach der Benutzung und Trennung vom Stromnetz empfehlen wir Ih-
nen, den Auffangbehälter (4) zu entleeren.
REINIGUNG UND AUFBEWAHRUNG
• Stellen Sie vor der Reinigung des Fusselrasierers sicher, dass er ausge-
schaltet und vom Stromnetz getrennt ist.
• Entnehmen Sie den Auffangbehälter (4) , indem Sie ihn nach unten
schieben , und entleer en Sie ihn. Der Auffangbehälter sol lte höchstens
zu ¾ voll sein.
• Zur Reinigung des Klingenkopfes entfernen Sie den Ring des Schnitt-
längenreglers (2), indem Sie diesen nach außen schieben und vom
Gerät abnehmen. Entnehmen Sie mit einem glatten Werkzeug das
Kunststoffteil mit dem Sc hutza ufsatz, und entfernen Sie die Fusseln
vorsichtig mit dem beigelegten Reinigungspinsel (3), um den Klingen-
kopf nicht zu beschäd igen.
• Reinigen Sie die Kunststoffteile mit einem trockenen Tuch.
• Bringen Sie Klingenkopf und Kunststoffteile in ihrer ursprünglichen
Positi on w ieder an.
• DEUTSCH
WARNING
• Please read these instructions before using the fabric sha ver.
• Check that your home voltage matches the voltage indicated on the
t ransformer’s (6) specifications plate.
• If using batteries to power the unit, use only the recommended type.
• Make sure that the unit’s ON/OFF switch (1) is in the OFF position bef ore
plugg ing it into t he mains or inserting the batteries.
• Do not touch the cutting blades w hile the fabric shaver is switched
on.
• Ne ver use a fabri c shaver with a damaged blade shield.
• Not for use on del icate garments (linen, silk, fine knits), or those tha t
are wet or have irregular texture.
• Do not use the unit on parts of wool or linen garments that have
any loose stitches.
• Do not lubricate or o il the shaving head. Doing so could stain your
clothes.
• The fabric sha ver is designed to remove lint from clothes and uphol-
stery. Do not use it for any other purpose.
• Warning: do not apply too much pressu re on the shaving head while
using the unit.
• Remove the batteries if the fabric shaver is not to be used for an ex-
tended period.
• Dispose of the batteries in specially designed containers.
• Do not use the unit if the transformer’s (6) cord or the plug is damaged.
If the cord is damaged, i t must be replaced by an au thorised techni-
cian.
• Do not imme rse the unit in water or any other liquids.
• Keep out of the reach of children.
• Children should be supervised to ensure that they do n ot play
with the appliance.
• This appliance is not intended for use by persons (including
children) with reduc ed physical, sensory or mental capabilities,
or lack of experience and knowl edge, unless they have bee n
g iven supervision or instructions concerning use of the appli-
ance by a person responsible for their safety.
IMPORTANT!! When you want to dis pose of the appli-
ance, NEVER throw it in the rubbish bin. Take it to your
nearest CLEAN POINT or the waste collection centre
closest to your home for processing. You will thus be
hel ping to take care of the environment.
MAIN COMPONENTS
1.- ON/OFF switch
2.- Shaving closeness level selector
3.- Cleani ng brush
4 .- Lint chamber
5.- Battery compartment (batteries not included)
6.- Transformer
7.- Transformer connector
USER INSTRUCTIONS
• If using the unit with the transformer, insert the transformer jack (6)
into the matching connector (7).
• If using batteries to power the unit, open the battery compartment (5)
by pressing the lid and sliding it upwards.
• I nsert 2 LR14 batteries with the poles as indicated
• Close the battery compartment by pressing on the lid and sliding it
downwards.
• Select the closeness level using the closeness level selector (2).
• Turn the ON/OFF switch (1) to the ON po sition.
• Place the garment on a smooth surface. Without press ing, gen tly gl ide
the fabric shaver over the stretched garment, changing the closeness
selector (2) as required.
• After use, turn the fabric shaver off by turning t he switch (1) to t he OFF
pos ition and, if applicable, unplug the appliance from the mains.
• After use, and once you have unplugged the appliance from the mains,
we recommend emptying the lint chamber (4)
CLEANING AND MAINTENANCE
• Before cleaning the fabri c shaver, mak e sure it is switched off and, if
applicable, unplugged from the mains.
• Remove the lint ch amber (4) by sliding it downwards, and empty it. The
lint chamber must not fill up more than
3
/
4
of the way.
• To clean the shaving head, remove the closeness adjustment ring (2),
sliding it outwards until it comes free from the unit; remove the shield’s
plastic casing using a flat-edged tool and carefully remove the lint
using the supplied brush (3) taking care not to damage the shaving
he ad .
• Clean the plastic casing with a dry cloth.
• Retu rn the blade and the plastic casing to their original positions.
• ENGLISH
ATTENTION
• L isez att entivement ces instructions avant d’utiliser votre appareil.
• Vérifiez que le voltage de votre domicile est identique à celui indiqué
sur la plaque de caractéristiques du transformateur (6) .
• Si vous utilisez l’appareil avec une pile, utilisez uniquement la pile re-
commandée.
• Avant de brancher l’appareil au secteur ou d’insérer la pile, assurez-
vous que l’interrupteur de l’appareil (1) est éteint.
• Ne pas toucher les lames coupantes si l’appareil est en fonctionne-
ment.
• Ne jamais utiliser l’appareil si la gril le protectrice des lames est endom-
magée.
• Ne pas utiliser sur de s vêtements humides, délicats, ou à la texture
irrégulière (fil, soie, maille fine).
• Ne jamais utiliser l’appareil sur les endroits de vêtements en laine
ou en fil dont l’un des points ressortirait à l’extérieur.
• Ne pas graisser ni huiler la tête de coupe. Vos vêtements pourraient se
tacher.
• Cet appareil est conçu p our éliminer les peluches des vêtements ou
des meubles recouv erts de tissu. Il ne doit jamais être utilisé pour
d’autres applications.
• Attention : ne pas exercer de forte pression sur la tête de coupe à lames
au cours de l’utilisati on d e l’appareil.
• Retirez les piles si vous n’utili sez pas l’appareil pendant une longue
période de temps.
• Jetez la pile usagée d ans les conteneurs conçus à cet effet.
• Ne pas utiliser l’appareil si la fiche ou le câble du transformateur (6)
est endomm ag é. Si le câble est endommagé, il devra être remplacé par
u n Service Tech nique Aut orisé.
• Ne plongez pas l’appareil dans de l’eau ou dans tout autre liquide.
• Gar dez-le hors de portée des enfants.
• Veillez à ce que les enfants ne jouent pas av ec cet appareil.
• I l est recommandé de ne pas laisser cet appareil à la portée
de personnes (y compris d’enfants) ayant un handicap physi-
que, sensitif ou mental, ni par des personnes ne disposant pas
de l’expérience ou des connaissances nécessaires, à moins que
la pe rsonne responsable de leur sécurité les supervise ou leur
apporte des instructions concernant l’utilisation de l’appareil.
ATTENTION ! Pour mettre l’appareil au rebut, NE L E
JETEZ JAMAIS à la poubelle. Déposez-le dans un POINT
DE RECYCLAGE ou à la déchetterie la plus proche afin
qu’il y soit traité comme il convient. Vous contribuerez
ainsi à préserver l’environnement.
PRINCIPAUX COMPOSANTS
1.- Interrupt eur on/off
2.- Sélecteur régulateur de degrés de rasage
3.- Brosse nettoyante
4 .- Récipient à peluches
5.- Compartiment à piles (non fournies)
6.- Transformateur
7.- Connecteur t ransformateur
FONCTIONNEMENT
• Si vous ut ilisez l’appareil avec un transformateur, int roduisez la fiche
du transformateur (6) dans le connecteur (7) adapté à celui-ci.
• Si vous utilisez l’appareil av ec des piles, ouvrez le compartiment à piles
(5) en appuyant sur le couvercle et en le glissant vers le haut.
• I nsérez 2 piles de type « LR14 » selon l’indication des polarités.
• Fermez le compartiment à pile s en appuyant sur le couvercle et en le
g lissant vers le bas.
• Sélectionnez le degré de rasage en g lissant le sélecteur régulateur de
degrés de rasage (2).
• Placez l’interrupteur de mise en marche (1) sur la position « on ».
• Placez le vêtement sur une surface lisse. Faites glisser doucement, sans
appuyer, l’appareil anti-peluches sur le vêtement étendu en ajustant le
sélecteur de rasage (2) à chaque usag e.
• Après chaque utilisation, éteignez l’appareil anti-peluches en plaçant
l’interrupteur (1) sur la position « off » et débranchez l’appareil du
secteur si nécessaire.
• Après usage et après avo ir débranché l’appareil du secteur, nous vous
recommandons de vider le récipient à peluches (4)
NETTOYAGE ET ENTRETIEN
• Avant de procéder au nettoyage de l’appareil anti-peluches, assurez-
vous qu’il est éteint et qu’il est débranché du secteu r le cas échéant.
• Retirez le récipient à peluches (4) en le faisant glisser vers le bas et
videz-le. Le récipient à peluches ne doit pas être rempli à plus des ¾.
• Pour nettoyer la tête de coupe, retirez l’anneau régulateur de r asag e
(2) en le glissant vers l’extérieur de l’appareil, retir ez la pièce en plas-
tique munie d’une grille au moyen d’un outil à la surface plane et
nettoyez soigneusement le surplus de peluches avec la brosse (3)
fournie pour ne pas end ommager la tête de coupe à lames.
• Nettoy ez les pa rties en plastique à l’aide d’un chiffon sec.
• Placez la lame et les pièces en plastique dans leur p osition originale
• FRANÇAISE
ATENÇÃO
• Leia estas i nstr uções antes de coloc ar o seu apare lho em funci onam ento.
• Verifique se a tensão da sua casa e a indicada na placa de característi-
ca s d o transformador (6) coincidem.
• No caso de utilizar o aparelho com pilha, utiliz e apenas a pilha reco-
mendada.
• Antes de ligar o aparelho à corrente ou inserir a pilha, assegure-se de
que o interruptor do aparelho (1) está na posição de desligado.
• Durante o funcionamento do aparelho nã o toque nas lâminas de corte.
• Nunca utilizar o aparelho com a grelha protectora das lâminas danificada.
• Não utilizar sobre roupas húmidas, de textura irregular ou delicadas
(fio, seda, ponto fino).
• Nunca utilizar o aparelho sobre as zonas de peças de lã ou fio que
tenham algum ponto puxado.
• Não lubrificar nem colocar óleo sobre a cabeça de corte. A sua roupa
poderia ficar manchada.
• Este aparelhos está concebido para eliminar borbotos de peças de
roupa ou de móveis forrados. Nunca deve utilizá-lo para outras aplica-
ções.
• Atenção: não exercer uma pressão forte sobre a cabeça de lâminas
durante a utilização do aparelho.
• Retire as pilhas no caso de não utilizá-lo durante um longo período de
tempo.
• Deite fora a p ilha usada nos contentores destin ad os a esse fim.
• Não utilize o aparelho com a ficha ou o cabo danificado do transfor-
mador (6). Se o cabo estiver danificado deve ser substituído por um
Serviço Técnico Autorizado.
• Não coloque o aparelho dentro de água ou ou tros líquidos.
• Mantenha-o fora do alcance das crianças.
• Deve evitar-se que as crianças brinquem com este aparelho.
• Este aparelho não é indicado para utilização por parte de
pessoas (crianças incluídas) com alguma l imitação física, s ensi-
tiva o u mental, nem por pessoa s sem a experiência
ou conhecimentos necessários, a menos que a pessoa respon-
sável pela sua segurança os supervisione ou lhes proporc ione
instruções sobre a utilização do aparelho.
ATENÇÃO!! Quando pretender desfazer-se do aparelho,
NUNCA o deite no caixote do lixo, faça-o no seu ECOPON-
TO ou n o ponto de recolha de resíduos mais perto de sua
casa, para o seu posterior tratamento. Desta forma, está
a contribuir para a protecção do m eio ambiente.
COMPONENTES PRINCIPAIS
1.- Interrupt or de ligar/des ligar
2.- Selector regulador de níveis de precisão
3.- Escova de limpeza
4 .- Depósito de borbotos
5.- Compartimento das pilhas (não incluídas)
6.- Transformador
7.- Conector do transformador
FUNCIONAMENTO
• No caso de utilizar o aparelho com t ransformador, introduza a ficha do
t ransformador (6) no conector (7) indicado para este.
• No caso de utilizar o apar elho com pilhas, abra o compartimento para
pilhas (5) pressionando a tampa e de slizando-a para cima.
• I nsira 2 pilhas do tamanho “LR14” segundo a indicação de polaridade.
• Feche o compartimento das pilhas pressionando a tampa e deslizando-
a para baixo.
• Seleccione o nível de precisão deslizando o selector regulador de níveis
de pr ecisão (2).
• Coloque o interruptor de funcionamento (1) na p osição de ligado.
• Coloque a peça de roupa sobre uma superfície lisa. Desli ze suavemen-
te, sem pressionar, o tira borbotos sobre a peça de roupa esticada,
adequando o selector de precisão (2) a cada necessidade.
• Depois da utilização, desligue o tira borbotos colocando o interruptor
(1) na posição de d esligado e, se f or o caso, desligue o aparelho da
corrente.
• Depois da utiliza ção e, uma vez desligado o a parelho da corrente, re-
comendamos esvaziar o d epósito de borbotos (4)
LIMPEZA E MANUTENÇÃO
• Antes da limpeza do tira borbotos, assegure-se de que está de sligado
e, se for o caso, desligado da corrente.
• Retire o depósito de borboto s4) deslizando-o para baixo e esvazie-o.
O depósito de borbotos não deve encher -se até mais de ¾ da capaci-
d ad e.
• Para a limpeza da cabeça de lâminas, retire o anel regulador de preci-
são (2) deslizando-o para fora até retirá-lo do aparelho, retire a peça
plástica com grelha servindo-se de uma ferramenta de supe rfície plana
e limpe os borbotos cuidadosamente com a escova (3) fornecida para
não danificar a cabeça de lâminas.
• L impe as partes plásticas com um pano seco.
• Coloque a lâmina e as peças plásticas na sua posição original.
• PORTUGUÊS
• ITALIANO
• NEDERLANDS
ATTENZIONE
• Leggere le presenti istruzioni prima di utilizzare l’apparecchio.
• Verificare che la tensione dell’impian to domestico corrisponda a quel-
la riportata sulla targhetta delle specifiche del trasformatore (6).
• Se l’apparecchio viene utilizzato a batterie, utilizzare solo quelle con-
sigliate.
• Prima di collegare l’apparecchio a lla rete o di inserire le batterie, veri-
ficare che l’interruttore dell’accensione (1) sia spento.
• Durante il funzionamento, non toccare le lame da taglio.
• Non utilizzare mai l’apparecchio se la rete di protezione delle lame è
d anneggiata.
• Non utilizzare su indumenti umidi, con tessitura irregolare o deli-
cati (filo, seta, punto sottile).
• Non utilizzare mai l’apparecchio su quelle zone degli indumenti di lana
o filo in cui la trama è rovinata.
• Non utilizzare grasso o olio sulla testina, gli indumenti potrebbero
macchiarsi.
• L’apparecchio è stato concepito per eliminare pelucchi da indumenti o
tappezzeria. Non ut ilizzarlo per altre applicazioni.
• Attenzione: non esercitare una forte pressione sulla testina durante
l’utilizzo dell’apparecchi o.
• Rimuovere le batterie se l’apparecchio non deve essere utilizzato per
u n lungo peri odo.
• Smaltire le batterie usate negli appositi contenitori.
• Non utilizzare l’apparecchio se la spina o il cavo del trasformatore (6)
è danneggiato. In questo caso, richiederne la sostituzione a un centro
di assistenza autorizzato.
• Non immer gere l’apparecchio in acqua o altri liquidi.
• Tenere l’apparecchio lontano dalla portata dei bambin i.
• Tenere lon tano dalla portata dei bambini.
• L’apparecchio non è adatto a essere utilizzato da persone (bambini
compresi) con menomazioni fisiche, sensoriali o psichiche, né da
persone sprovviste dell’esperienza o delle conoscenze necessarie, a
meno che non siano seguite o istruite da un responsabile che ne
illustri il funzionamento.
ATTENZIONE: non smaltire MAI l’apparecchio insieme ai rifiu-
ti domestici. Portarlo presso il CENTRO DI SMALTIMENTO o di
raccolta più vicino perché possa essere smaltito adeguatamen-
te. In questo modo si contribuirà alla tutela dell’ambiente.
COMPONENTI PRINCIPALI
1.- Interruttore di accensione/spegnimento
2.- Selettore regolatore dei livelli di taglio
3.- Spazzola per la pulizia
4 .- Cassetto raccogl i pelucchi
5.- Vano batterie (batterie non incluse)
6.- Trasformatore
7.- Connettore trasformatore
FUNZIONAMENTO
• Se l’apparecchio viene utilizzato con il trasformatore, introdurne la
spina (6) nel connettore (7) ada tto.
• Se l’apparecchio viene utilizzato a batterie, aprire il vano batterie (5)
premendo sul relativo coperchio e spi ngend olo verso l’alto.
• I nserire 2 batterie formato “LR14”, seg uend o l’indicazione di polarità.
• Per chiuder e il vano batt erie, premere sul coperchi o e spingerlo verso
il basso.
• Selezionare il livel lo di taglio spostando l’apposito selett ore di reg ola-
zione (2).
• Posizionare l’interruttore di funzio namen to (1) in posizione di accensione.
• Collocare l’indumento su una superficie piana. Fare scorrere il levape-
lucchi sull’indumento s tirato lentamente, senza premere, reg olando il
livello di taglio (2) in base alle esigenze.
• Dopo l’uso, spegnere il levapelucch i posizionando l’interruttore (1) in
pos izione di spegnimento oppure scollegato dall’alimentazione.
• Dopo averlo utilizzato e dopo aver scollegato l’apparecchio dalla rete,
svuotare il cassetto raccogli pelucchi (4) .
PULIZIA E MANUTENZIONE
• Prima di pulire il levapelucchi, verificare che sia spento o scollegat o
d alla rete.
• Per estrarre il cassetto raccogli pelucchi (4), farlo scivolare verso il
basso e svuotarlo. Il cassetto raccogli pelucchi non deve essere pieno
olt re i tre quarti.
• Per pulire la testina, rimuovere l’anello di regol azione del taglio (2)
facendol o scivolare verso l’esterno fino a estrarlo. Rimuovere il pezzo
di p lastica con la rete utilizzando un utensile con superfici e piana e
rimuovere attentamente i pelucchi con la spazzola (3) fornita per non
d anneggiare la testina.
• Pulire i componenti di plastica con un panno asciutto.
• Riposizionare la lama e i componenti di plas tica n ella posizione originale.
WAARSCHUWINGEN
• Lees vóór ingebruikname deze aanwijzingen aandachtig door.
• Controleer of de spanning op het typeplaat je van de transformator (6)
met de netspanning in uw woning overeenkomt.
• Gebruik a llee n de aanbevolen batt erijen als u voor dat voedingstype
kiest.
• Controleer voordat u het apparaat op het lichtnet aansluit of de bat-
terijen plaatst of de Aan-/Uit-knop (1) in de Uit-stand staat.
• Ra ak de m esjes niet aan zolang de ontpluizer in werking is.
• Gebruik deze ontpluizer niet als het beschermrooster van de mes jes
beschadigd is.
• Gebruik de ontpluizer niet op vochtige of fijne kledingstu kken (l innen,
zijde, fij n b reiwerk) of kledingstukken met een onregel matig weefsel.
• Gebruik de ontpluizer nooit op gedeelten van kledingstukken van
wol of garen waarvan een steek los is.
• De snijkop niet insmeren of ol iën. Dit zou vlekken in uw kledingstukken
kunnen veroorzaken.
• Dit apparaat is speciaal ontworpen om pluisjes van kledingstukken of
meubelstofferingen te verwijderen. Gebruik het nooit voor andere
toepassingen.
• Waarschuwi ngen: oefen tijdens gebruik geen sterke druk op de snijkop
uit.
• Verw ijder de batterijen a ls u de ontpluiz er lange tijd niet gaat gebruiken.
• Deponeer de gebruikte batterijen in de daarvoor bestemde contai-
ners.
• Gebruik de ontpluizer nooit als de stekker of het snoer van de trans-
formator (6) beschadigd is. Laat als het snoer beschadigd is dit door
een Erkende Technische Dienst vervangen.
• Dompel de o ntpluizer niet in water of andere vloeistoffen onder.
• Houd het buiten bereik van kinderen.
• Dit apparaat is niet geschikt om gebruikt te worden door
personen (m.i.v. kinderen) met een lichamelijke, zintuiglijke of
geestelijke handicap, noch door personen zon der de nodige
ervaring of kennis, tenzij er i emand die voor hun vei ligheid
verantwoordelijk is toezicht houdt en hen aanwijzingen geeft
over het gebr uik van dit apparaat.
• Laat kinderen niet met dit apparaat spelen.
LET OP!! Wanneer u het apparaat wilt weggooien,
deponeer het dan IN GEE N GEVAL bij het huisvuil, maar
breng het voor verdere verwerking na ar het dichtstbij-
zijnde r ecyclingcentrum of vuilophaalpunt. Op deze
wijze draagt u bij aan het behoud van het milieu.
VOORNAAMSTE ONDERDELEN
1.- Aan- / U it-sc hakelaar
2.- Keuzeschakelaar om het reinigingsniveau in te stellen
3.- Schoonmaakborstel
4 .- Pluiso pvangreservoir
5.- Batterijvak (batterijen niet meegele verd)
6.- Transformator
7.- Transformatorcontact
WERKING
• Steek indien u het apparaat met de transfo rmator wilt gebruiken de stek-
ker van de transformator (6) in het hiervoor aangeduide con tact (7).
• I ndien u het apparaat op batterijen wilt laten werken, open het bat-
terijvak (5) door het deksel ervan in te drukken en omhoog te schui-
ven.
• Plaats twee “LR14”-batterijen (let op d e + en – pool).
• Sluit het batterijvak door het deksel ervan in te drukken en omlaag te
schuiven.
• Kies het reinig ingsnive au door de desbetreffende keuzeschakelaar (2)
te verschuiven.
• Zet de Aan-/Uit-schakelaar (1) in de Aan-stand.
• Leg het kl edingstuk op een gl ad oppe rvlak. Schuif de ontpluizer zach t-
jes, zonder te drukken, over het glad getr okken kledingstuk en pas
d aarbij het reinigingsniveau met de desbetreffende schakelaar (2) naar
behoefte aan.
• Zet na gebruik de Aan-/Uit-schakelaar (1) in de Uit-stand en sluit, indien
va n toepassing, de kledingontpluizer van het lichtnet af.
• Aanbevolen wordt om na gebruik en na het afsluiten van het lichtnet,
het pluisopvangreservoir (4) te legen.
SCHOONMAAK EN ONDERHOUD
• Controleer vóór het schoonmaken of de ontpluizer uit staat en va n h et
lichtnet afgesloten i s.
• Verwijder het pluisopvangreservoir (4) door het omhoog te schuiven,
en leeg het. Het pluisopvangreservoir mag nooit mee r dan tot voor ¾
vol raken.
• Voor de r einiging van de snijkop, verwijder de instelring voor het rei-
nigingsniveau (2) door deze naar buiten t e schuiven, verwijder het
kunststof deel met het roostertje m et behulp van ee n werktuig met
een plat oppervlak en verwijder de pluisjes zorgvuldig met behulp van
de meegeleverde borstel (3) om de snijkop niet te beschadigen.
• Maak de k unststof onderdelen met een droge doek schoon.
• Breng het mesje en de kunststof onderdelen opnieuw op hun oorspron-
kelijke p laats aan.
Quitapelusas H101 Desplegable.indd 1 14/04/11 10:23



Join the conversation about this product
Here you can share what you think about the Solac H101 Fabric Shaver. If you have a question, first carefully read the manual. Requesting a manual can be done by using our contact form.