METAL BODY
El Metal Body hereda las características principales del Fluidrive Body incluidas en
modelos más antiguos. Además, las partes que acomodan el engranaje de gran
diámetro - la característica de diseño más importante del Fluidrive - están
integradas con el pie del carretel en una sola unidad hecha de Tecnium. La flexión
es mínima aún bajo cargas pesadas, asegurando una rotación regular y un
bobinado suave y seguro.
METAL BODY
Le Metal Body hérite des principales caractéristiques du Fluidrive Body équipant
les modèles précédents. De plus les pièces composant l’engrenage à grand
diamètre intérieur, la caractéristique la plus importante du Fluidrive, sont
intégrées au pied du moulinet en une unité unique en Technium. La flexion est
minimale même sous de lourdes charges, assurant une rotation normale et un
moulinage souple et régulier.
METAL BODY
The Metal Body inherits the main features of the Fluidrive Body featured on
earlier models. In addition, the parts accommodating the large-bore gear
Fluidrive's most important design feature are integrated with the foot of the reel
in a single unit made of Technium. Flexing is minimal even under high loads,
ensuring regular gear rotation and smooth and steady reeling.
METAL BODY
DYNABALANCE
ÉQUILIBRE DYNABALANCE
Pourquoi le votre moulinet semble-t-il si agréable à manier?... Une seule réponse:
DynaBalance!
Les moulinets traditionnels sont généralement déséquilibrés: le rotor ayant un
mécanisme pesant d'un côté, et l'anse elle-même basculant de l'autre côté. Grâce
à l'analyse par ordinateur, Shimano a reconçu les pièces du moulinet pour leurs
apporter un équilibre dynamique parfait.
Résultat: un moulinet qui n'oscille plus!
Tous les avantages du DynaBalance ne sont pas apparents mais à l'usage, vous
découvrirez une sensation plus agréable, un retour plus facile et plus uniforme, et
moins de vibrations faisant obstacle à vos actions lorsque vous sentez la prise
mordre à l'hameçon.
Vous n'avez plus qu'à faire tourner la poignée!
DYNABALANCE
¿Por qué el nombre del carrete se siente tan suave? .....¡DynaBalance!
El carrete giratorio tradicional es de por sí desequilibrado; el rotor tiene un
pesado mecanismo de achique a un lado, y el mismo cable de achique se voltea a
un lado. A través de un análisis hecho por computadoras, Shimano ha rediseñado
las partes "giratorias" para darles el equilibrio dinámico perfecto. El resultado: un
carrete giratorio que no bambolea.
Todos los beneficios de DynaBalance pueda que no le sean aparentes
inmediatamente, pero con el uso usted descubrirá una percepción más ligera y
suave; cobrará con más suavidad e igualdad; sentirá una menor vibración que
pueda estorbar con su habilidad de sentir las mordidas más suaves.
Solo haga girar el mago.
DYNABALANCE
Why does your reel feel so smooth?.....DynaBalance!
The traditional spinning reel is inherently off-balance; the rotor has a heavy bail
mechanism on one side, and the bail wire itself flips to one side. Through
computer analysis Shimano has redesigned the "spinning" parts to give them
perfect dynamic balance. The result; a spinning reel that doesn't wobble.
All the benefits of DynaBalance may not be apparent but with use you'll discover
a lighter, smoother feel; smoother, more even retrieves; less vibration getting in
the way of your ability to sense the lightest bites.
Just give the handle a spin.
FLUIDRIVE
Fluidrive incorpora un engranaje maestro de gran diámetro desarrollado luego de
una investigación concienzuda en cuanto a la forma óptima de los dientes del
engranaje. La superficie de los dientes del engranaje, pulida por medio de un
proceso de enrrollado, hace al rebobinado suave y fluido.
FLUIDRIVE
Fluidrive présente un engrenage principal à grand diamètre intérieur développé à
la suite de recherches sur la forme idéale de la dent d’engrenage. La forme
spéciale de la surface de la dent d’engrenage, polie par un processus
d’enveloppement, rend le moulinage régulier et sans effort.
FLUIDRIVE
Fluidrive features a large-bore master gear developed after thorough research
into the optimal shape of the gear teeth. The specially shaped gear tooth
surface, polished via a wrapping process, makes winding smooth and effortless.
FLUIDRIVE
REVERSIBLE HANDLE
REVERSIBLE HANDLE
To accommodate both left and right handed anglers, the handles of all Shimano
spinning reels work on either side of the reel. To change from left to right hand
drive:
1. Remove the handle screw cap.
2. Place handle on the opposite side.
3. Replace handle screw cap.
MANGO REVERSIBLE
Para servir a pescadores diestros y zurdos, los mangos de todos los carretes
giratorios de Shimano funcionan en cualquier lado del carrete. Para cambiar el
uso de la mano izquierda a la mano derecha:
1. Quite la tapa del tornillo del mango.
2. Coloque el mango en el lado opuesto.
3. Vuelve a colocar la tapa del tornillo del mango.
POIGNÉE RÉVERSIBLE
Pour accommoder les pêcheurs de lancer gaucher ou droitier, les poignées des
moulinets à lancer léger Shimano fonctionnent très bien d'un côté ou l'autre. Pour
changer la poignée du côté gauche au côté droit, il suffit tout simplement de
suivre ces instructions:
1. Enlever la vis de la poignée
2. Placer la poignée sur le côté opposé
3. Replacer la vis de la poignée.
POWER ROLLER
POWER ROLLER
Your new Shimano reel has PowerRoller - a special line roller that reduces
spinning reel line twist. PowerRoller reduces the line twist arising from repeated
casting and retrieving - up to 50%*.
PowerRoller’s special grooved design assures the line will be wrapped on the
spool to minimize forward line twist.
*Line twist measured by counting the twists generated by holding the ends of 5
feet of line together along 55 yards of line after 30-90 casts. PowerRoller has no
effect on line twist due to the drag releasing, winding against the drag or
twirling lures/ bait, etc.
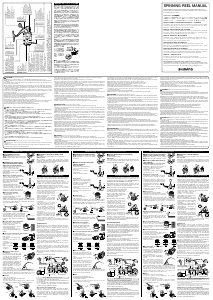
Special Guidelines for winding line onto PowerRoller equipped
spinning reels.
PowerRoller spinning reels work best when the line is loaded in the following
manner. Place a screwdriver shaft (or something similar) through the center of
the spool of line that you’re going to load onto your reel. After tying the line to
your reel, wind the line on, allowing the spool to turn around the screwdriver
shaft (or whatever it is you’re using!) - as in the picture.
POWER ROLLER
Votre nouveau moulinet Shimano possède le PowerRoller - un rouleau de fil
spécial qui réduit le vrillage du fil sur un moulinet à lancer léger. Le PowerRoller
réduit donc le vrillage du fil qui se produit lors des lancers et des récupérations -
jusqu'à 50%*.
Le design spécial du PowerRoller s'assure que le fil ira s'envelopper sur la bobine
pour minimiser le vrillage de celui ci.
*Le vrillage du fil est mesuré en comptant le nombre de torsades généré en
tenant les bouts d'un fil de 5 pieds ensemble longeant un fil de 55 verges après
30-90 lancers. Le PowerRoller a aucun effet sur le vrillage du fil dû au
relâchement du frein, à la récupération contre le frein ou aux leurres/appâts qui
tournoient.
Directives spéciales pour l'embobinage du fil sur les moulinets à lancer
léger équipés du PowerRoller.
Les moulinets à lancer léger PowerRoller fonctionnent à leur meilleur lorsque le fil
est embobiné de la façon suivante. Placez le manche d'un tournevis (ou quelque
chose de similaire) à travers le centre de la bobine de fil. Après avoir attaché le fil
à votre moulinet, embobinez celui-ci de façon à ce que la bobine puisse tourné
autour du manche du tournevis (ou autre objet similaire) - comme illustré dans le
tableau.
POWER ROLLER
Su flamante carrete de Shimano viene equipado con PowerRoller - una ruedecilla
especial para la línea que reduce la torsión de la línea en carretes giratorios.
PowerRoller reduce la torsión de línea que es causada por repetidos lanzamientos
y recuperaciones - hasta en un 50%*.
El diseño especial con surcos del PowerRoller garantiza que la línea será envuelta
en el carrete para reducir al mínimo la torsión de la línea.
*La torsión de la línea fue medida contando las torsiones generadas al juntar los
cabos de un pedazo de 5 pies de línea a lo largo de 55 yardas de línea y después
de 30-80 lanzamientos. El PowerRoller no tiene ningún efecto sobre la torsión de
la línea causada por la liberación del arrastre, cuando se envuelve en contra del
arrastre o por anzuelos/carnadas que giran, etc.
Instrucciones especiales para envolver la línea en carretes giratorios
equipados con PowerRoller.
Los carretes giratorios equipados con PowerRoller funcionan mejor cuando la
línea se envuelve de la siguiente manera. Coloque un destornillador (o algo
parecido) a través del centro de la bobina de la línea que va a ser envuelta en su
carrete. Después de amarrar la línea a su carrete, envuelva la línea, dejando que la
bobina gire alrededor del destornillador (o lo que esté usando) - como se ve en la
foto.
REEL SIDE COVER REMOVAL
For those of your who prefer to maintain your own reel, the side cover may be
removed in the following manner:
1. Remove the spool assembly.
2. Remove the rotor nut lock screw and completely loosen the rotor nut.
3. Remove the side cover screws and handle assembly.
4. Lift the rotor from the body and remove the side cover.
CÓMO QUITAR LA CUBIERTA LATERAL DEL CARRETE
Para aquellos que prefieren mantener su propio carrete, la cubierta lateral del
carrete puede ser quitada de la siguiente manera:
1. Quite la montura del carrete.
2. Quite el tornillo con tuerca del rotor y afloje totalmente la tuerca del rotor.
3. Quite los tornillos de la cubierta lateral y el montaje de la manivela.
4. Levante el rotor del cuerpo principal y quite la cubierta lateral.
RETRAIT DU COUVERCLE LATÉRAL DU MOULINET
Pour ceux qui préfèrent tenir directement le moulinet, le couvercle latéral peut
être retiré de la manière suivante:
1. Retirer l'ensemble du tambour
2. Retirer la vis de blocage de l'écrou du rotor et desserrer complètement celui-ci
3. Retirer les vis du couvercle latéral et l'ensemble de la poignée
4. Soulever le rotor du corps de l'appareil et retirer le couvercle latéral.
REEL SIDE COVER REMOVAL
QUICKFIRE II
Cuando usted voltea el mango hacia atrás, el mecanismo contra marcha atrás
automáticamente detiene el rotor justo en la posición para que su dedo active el
gatillo del QuickFire II. Con el mismo dedo y durante el mismo movimiento, jale el
gatillo (el cual voltea el achique), y tome la línea. ¡Usted ya está listo para
efectuar el lanzamiento! Es tan fácil que se lo hace sin pensar.
1. Retroceda el mango hasta el punto de detención.
2. Tome el gatillo y la línea con su dedo índice.
3. Jale el gatillo del QuickFire II.
4. Efectúe su lanzamiento.
QUICKFIRE II
Lorsque vous tournez la poignée vers l'arrière, le cliquet anti-retour arrête le rotor
à la position adéquate pour que votre doigt puisse saisir la détente QuickFire II.
Avec le même doigt et dans le même mouvement, tirez la détente (qui fait osciller
l'anse) et saisir la ligne. Vous êtes maintenant prêt à lancer! C'est tellement facile
que vous n'avez qu'à lancer.
1. Inverser la poignée vers l'arrêt
2. Enrouler votre index autour de la détente et de la ligne
3. Tirer la détente QuickFire II
4. Lancer votre ligne.
FIGHTIN' DRAG / FRONT DRAG
FIGHTIN' DRAG
With Fightin' Drag making drag adjustments while fishing couldn't be easier.
Fightin' Drag consists of two drag adjustments; a pre-set knob, and the Fightin'
Drag lever. First, with the Fightin' Drag lever in the center of it's range, rotate the
preset knob until you obtain a drag setting that is in the middle of the drag range
that you will be fishing. Second, to make adjustments while fishing, move the
Fightin' Drag lever to the right to increase drag strength, left to decrease it.
Fightin' Drag gives you quicker and more accurate drag adjustments at the height
of the fight.
FIGHTIN' DRAG
Avec le Fightin' Drag, rien de plus simple que le réglage de la drague.
Basculez le levier de drague à fond vers la gauche, à la position minimum. En
tournant le bouton de réglage de la drague, effectuez un réglage doux avec
lequel vous vous assurez de ne pas briser la ligne. Si vous poussez le levier de
drague à fond à droite, la résistance de la drague sera au maximum pour une
prise difficile et vous disposerez de toutes les positions intermédiaires pour mener
le combat à votre guise. En effet, vous pourrez changer très facilement la position
du levier de drague même en pleine bataille.
QUICKFIRE II
A-RB (ANTI-RUST BEARINGS)
A-RB (ANTI-RUST BEARINGS)
Through Shimano's original surface treatment process, we have drastically
improved the bearing's resistance against corrosion.
A-RB (ROULEMENTS ANTI-ROUILLE)
Grâce au processus original de traitement des surfaces de Shimano, la résistance
à la corrosion des roulements a été grandement améliorée.
A-RB (COJINETES ANTIOXIDO)
A través del tratamiento de superficie original de Shimano, hemos mejorado
drásticamente la resistencia del cojinete contra la corrosión.
AGRAFE DE MAINTIEN DE LA LIGNE
L'agrafe de maintien de la ligne située sur le côté du tambour est un endroit
pratique pour tenir votre ligne de façon à ce qu'elle ne s'emmêle pas pendant
l'entreposage. Lorsque la ligne est entièrement enroulée sur le tambour, faites
simplement une petite boucle à l'extrémité de la ligne et glissez-la sous l'agrafe.
Tirez sur l'extrémité libre de la ligne pour bien la tendre.
SUJETADOR DE LÍNEA
El sujetador de línea situado a un lado del carrete es un lugar conveniente para
sujetar la línea y evitar que se desenvuelva mientras no esté en uso. Con la línea
completamente envuelta en el carrete, simplemente haga un pequeño círculo en
el cabo de la línea y deslícelo por debajo del sujetador. Jale el cabo libre de la
línea para evitar que quede floja.
LINE KEEPER CLIP
The line keeper clip on the side of your spool is a handy spot to hold your line so
it does not unravel in storage. With the line completely wound on to the spool,
simply make a small loop in the end of the line and slide it under the clip. Pull on
the free end of the line to take up any slack.
LINE KEEPER CLIP
FRONT DRAG
To increase drag strength turn the drag knob clockwise, counterclockwise to
decrease it. Once completely loose, continue to turn the drag knob
counterclockwise to remove the knob and slide off the spool for spool change.
When completely tightened by hand the drag is at maximum strength. Forcing
the knob to turn further or using tools to turn it may result in damage to the reel.
To change spool, loosen the drag completely, unscrewing the drag adjustment
knob completely. Slide the spool off the shaft. When removing and replacing
spools ensure that the drag parts are properly fitted on the spool shaft, and that
the spool is firmly seated.
FREIN AVANT
Le frein avant se règle comme tous les moulinets à frein avant, en tournant le
bouton de frein dans le sens des aiguilles d'une montre pour augmenter la
tension ou dans le sens inverse pour la diminuer. Lorsqu'il est complètement
relâché, continuez à tourner le bouton de frein dans le sens inverse des aiguilles
d'une montre pour le retirer et faites glisser le tambour pour remplacer celui-ci.
Pour augmenter la tension, tournez le bouton dans le sens des aiguilles d'une
montre. Lorsqu'il est serré à fond, la tension est au maximum. Ne pas forcer le
bouton plus loin, ni utiliser d'outils pour le tourner car ceci pourrait
l'endommager.
Pour changer le tambour, dévissez complètement le bouton de réglage du frein.
Faites glisser le tambour et sortez-le de l'arbre. Veuillez à ce que les pièces du
frein soient bien remises en place lors du changement du tambour.
ARRASTRE FRONTAL
Para aumentar la fuerza de arrastre, haga girar la perilla de arrastre en el sentido
de las agujas del reloj, en sentido contrario para reducir la fuerza de arrastre. Una
vez que esté completamente suelto, continúe haciendo girar la perilla en el
sentido contrario al de las agujas del reloj para quitarlo y deslice el carrete hacia
afuera para cambiarlo. Cuando lo ajuste completamente a mano, el arrastre
estará con su fuerza máxima. El carrete podría ser dañado si se trata de forzar a
que la perilla gire más o si se trata de utilizar herramientas para hacerla girar.
Para cambiar el carrete, afloje el arrastre completamente, desentornillando la
perilla de ajuste de arrastre completamente. Deslice el carrete fuera de su eje.
Cuando quite y cambie los carretes asegúrese de que los componentes del
arrastre encajen adecuadamente en el eje del carrete y que el carrete esté
firmemente asentado.
QUICKFIRE II
When you turn the handle backwards the anti-reverse automatically stops the
rotor in just the right position for your finger to grab the QuckFire II trigger.
With the same finger and the same motion, pull the trigger (which flips the bail),
and grab the line. You're ready to cast! It's so easy, you don't even have to think
about it.
1. Reverse the handle to the stop.
2. Wrap your index finger around the trigger and the line.
3. Pull the QuickFire II trigger.
4. Make your cast.


Join the conversation about this product
Here you can share what you think about the Shimano Solstace 2000RH Fishing Reel. If you have a question, first carefully read the manual. Requesting a manual can be done by using our contact form.