Need a manual for your Rotel RA-1312 Amplifier? Below you can view and download the PDF manual for free in English. This product currently has 1 frequently asked question, 0 comments and has 0 votes. If this is not the manual you want, please contact us.
Is your product defective and the manual offers no solution? Go to a Repair Café for free repair services.
Manual
Loading…
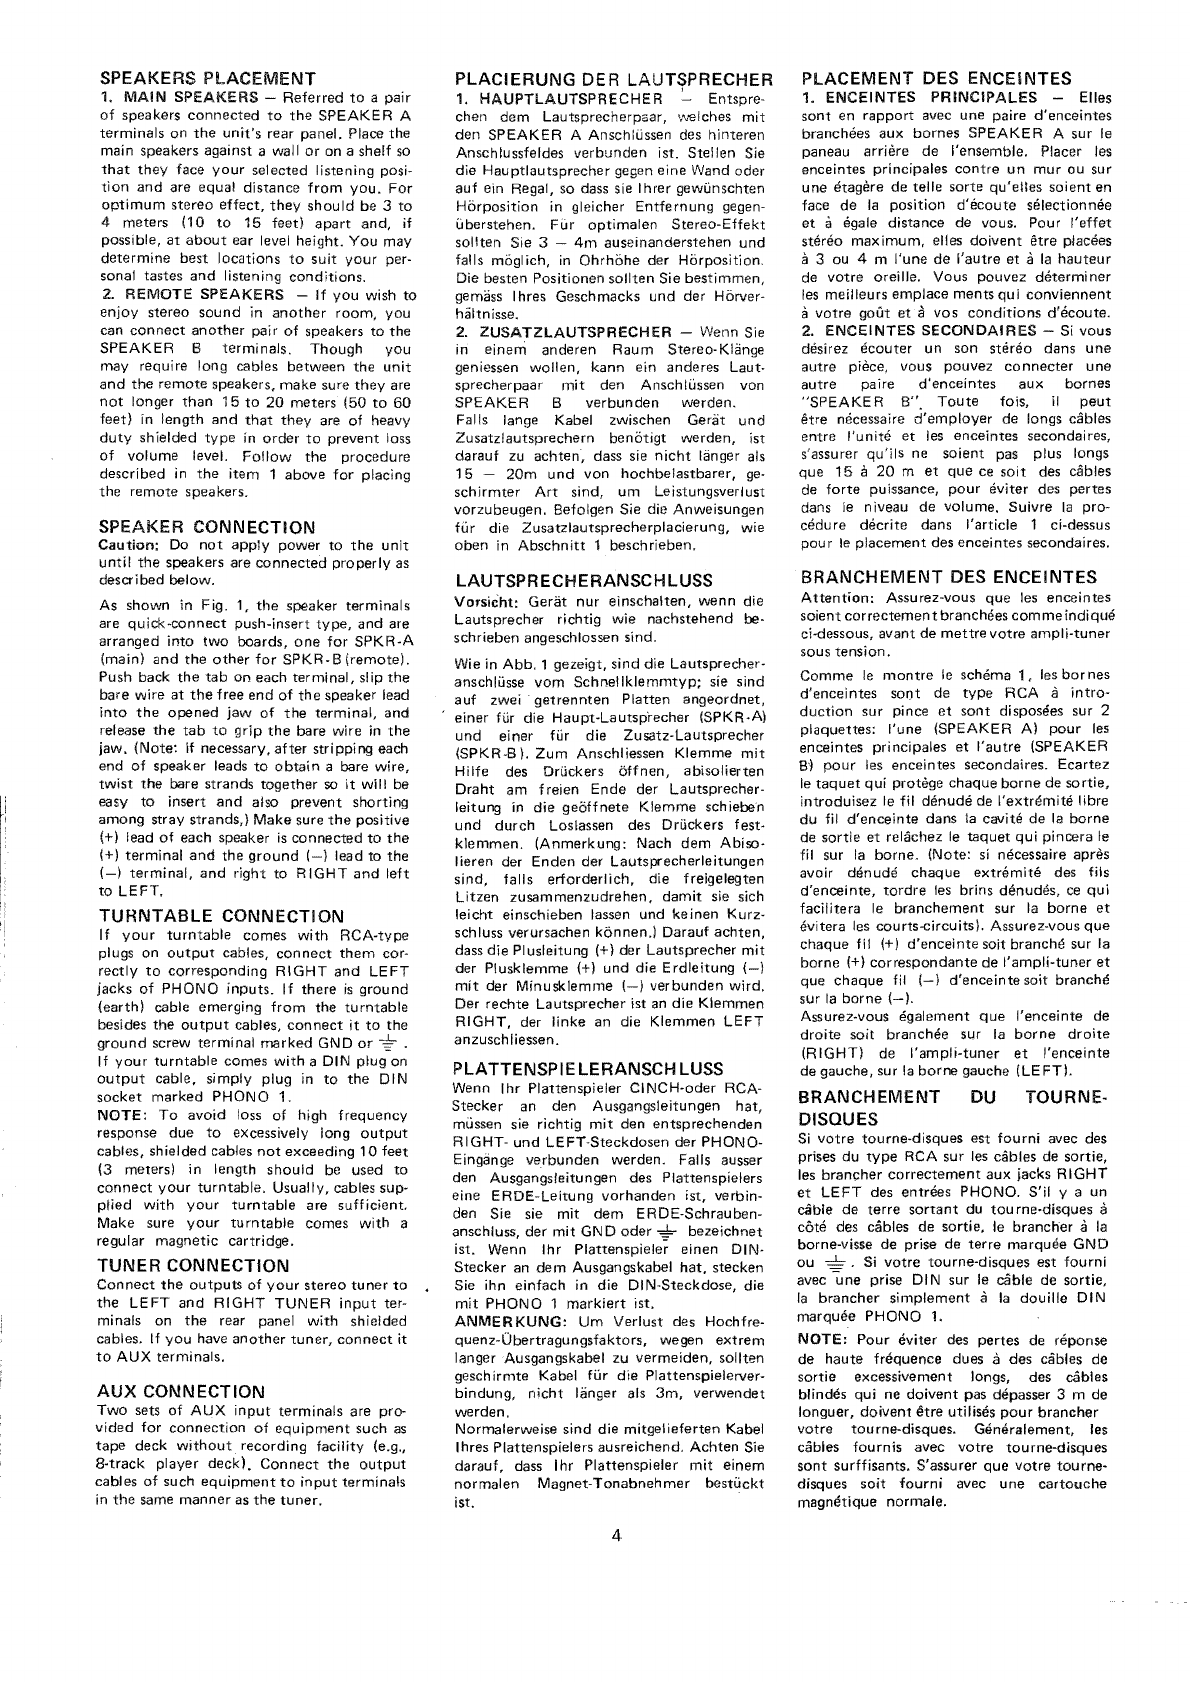
SPEAKERS PLACEMENT
1. MAIN
SPEAKERS
-
Referred
to
a
pair
of
speakers
connected
to
the
SPEAKER
A
terminals
on
the
unit's
rear
panel.
Place
the
main
speakers
against a wall
or
on a
shelf
so
that
they
face
your
selected
listening posi-
tion
and
are
equal
distance
from
you.
For
optimum
stereo
effect,
they
should
be
3
to
4
meters
(10
to
15
feet)
apart
and,
if
possible,
at
about
ear
level
height.
You
may
determine
best
locations
to
suit
your
per-
sonal
tastes
and
listening
conditions.
2.
REMOTE
SPEAKERS
-If
you
wish
to
enjoy
stereo
sound
in
another
room,
you
can
connect
another
pair
of
speakers
to
the
SPEAKER
B
terminals.
Though
you
may
require long cables
between
the
unit
and
the
remote
speakers,
make
sure
they
are
not
longer
than
15
to
20
meters
(50
to
60
feet)
in
length
and
that
they
are
of
heavy
duty
shielded
type
in
order
to
prevent
loss
of
volume
level.
Follow
the
procedure
described
in
the
item
1
above
for
placing
the
remote
speakers.
SPEAKER CONNECTION
Caution:
Do
not
apply
power
to
the
unit
until
the
speakers
are
connected
properly
as
described
below.
As
shown
in Fig.
1,
the
speaker
terminals
are
quick-connect
push-insert
type,
and
are
arranged
into
two
boards,
one
for
SPKR-A
(main)
and
the
other
for
SPKR-B(remote).
Push
back
the
tab
on
each
terminal,
sl
ip
the
bare
wire
at
the
free
end
of
the
speaker
lead
into
the
opened
jaw
of
the
terminal,
and
release
the
tab
to
grip
the
bare
wire in
the
jaw.
(Note:
if
necessary,
after
stri ppi
ng
each
end
of
speaker
leads
to
obtain
a bare wire,
twist
the
bare
strands
together
so
it
will be
easy
to
insert
and
also
prevent
shorting
among
stray
strands,)
Make
sure
the
positive
(+) lead
of
each
speaker
is
connected
to
the
(+)
terminal
and
the
ground
(-)
lead
to
the
(-)
terminal,
and
right
to
RIGHT
and
left
to
LEFT.
TURNTABLE
CONNECTION
If
your
turntable
comes
with
RCA-type
plugs on
output
cables,
connect
them
cor-
rectly
to
corresponding
RIGHT
and
LEFT
jacks
of
PHONO
inputs.
If
there
is
ground
(earth)
cable
emerging
from
the
turntable
besides
the
output
cables,
connect
it
to
the
ground
screw
terminal
marked
GND
or
If
your
turntable
comes
with
a DIN
plug
on
output
cable,
simply
plug
in
to
the
DIN
socket
marked
PHON 0 1.
NOTE:
To
avoid
loss
of
high
frequency
response
due
to
excessively long
output
cables,
shielded
cables
not
exceeding
10
feet
(3
meters) in length
should
be
used
to
connect
your
turntable.
Usually, cables sup-
plied
with
your
turntable
are
sufficient.
Make sure
your
turntable
comes
with
a
regular
magnetic
cartridge.
TUNER CONNECTION
Connect
the
outputs
of
your
stereo
tuner
to
the
LEFT
and
RIGHT
TUNER
input
ter-
minals on
the
rear panel
with
shielded
cables.
If
you
have
another
tuner,
connect
it
to
AUX
terminals.
AUX
CONNECTION
Two
sets
of
AUX
input
terminals
are
pro-
vided
for
connection
of
equipment
such
as
tape
deck
without
recording
facility (e.g.,
g-track
player
deck!,
Connect
the
output
cables
of
such
equipment
to
input
terminals
in
the
same
manner
as
the
tuner.
PLACIERUNG DER LAUTSPRECHER
j
1.
HAUPTlAUTSPRECHER
Entspre-
chen
dam
Lautsprecherpaar,
;'Jelches
mit
den
SPEAKER
A Anschlussen des
hinteren
Anschlussfeldes
verbunden
ist.
Stellen
Sie
die
Hauptlautsprecher
gegen
eine
Wand
oder
auf
ein Regal,
so
dass sie I hrer
gewunschten
Horposition
in gleicher
Entfernung
gegen-
uberstehen.
Fur
optimalen
Stereo-Effekt
soli
ten
Sie
3
4m
auseinanderstehen
und
falls moglich,
in
Ohrhohe
der
Horposition.
Die
besten
Positionen
sollten
Sie
bestimmen,
gemass I hres
Geschmacks
und
der
Horver-
hiiltnisse.
2.
ZUSATZLAUTSPRECHER
-Wenn Sie
in
einem
anderen
Raum
Stereo·Kliinge
geniessen
wollen,
kann
ein
anderes
Laut-
sprecherpaar
mit
den
Ansch lussen von
SPEAKER
B
verbunden
werden.
Falls lange Kabel zwischen
Gerat
und
Zusatzlautsprechern
benotigt
werden,
ist
darauf
zu
achten,
dass sie
nicht
langer als
15
20m
und
von
hochbelastbarer,
ge-
schirmter
Art
sind,
um
Leistungsverlust
vorzubeugen.
Befolgen
Sie
die
Anweisungen
fur
die
Zusatzlautsprecherplacierung,
wie
oben
in
Abschnitt
1
beschrieben.
LAUTSPRECHERANSCHLUSS
VOfsicht:
Gerat
nur
einschalten,
wenn
die
Lautsprecher
richtig
wie
nachstehend
be-
schrieben
angeschlossen sind.
Wie in
Abb.
1 gezeigt,
sind
die
Lautsprecher-
anschlusse
vom
Schnellklemmtyp;
sie
sind
auf
zwei
getrennten
Platten
angeordnet,
einer
fur die
Haupt-Lautsprecher
(SPKR-A)
und
einer
fur
die
Zusatz-Lautsprecher
(SPKR-B).
Zum
Anschliessen
Klemme
mit
Hilfe des
Druckers
effnen,
abisolierten
Draht
am
frelen
Ende
der
Lautsprecher-
leitung
in
die
geoffnete
Klemme
schieben
und
durch
Loslassen
des
Druckers
fest-
klemmen.
(Anmerkung:
Nach
dem
Abiso-
lieren der
Enden
der
Lautsprecherleitungen
sind,
falls
erforderlich,
die freigelegten
Litzen
zusammenzudrehen,
dam
it sie sich
leicht
einschieben
lassen
und
keinen
Kurz-
schluss
verursachen
kennen.)
Darauf
achten,
dass
die
Plusleitung
(+)
der
Lautsprecher
mit
der
Plusklemme
(+)
und
die
Erdleitung
(-)
mit
der
Minusklemme
(-)
verbunden
wird.
Der
rechte
Lautsprecher
ist an
die
Klemmen
RIGHT,
der
linke
an
die
Klemmen
LEFT
anzuschliessen.
PLATTENSPIE LERANSCH
LUSS
Wenn
Ihr
Platten
spieler
CINCH-oder
RCA-
Stecker
an
den
Ausgangsleitungen
hat,
mussen sie richtig
mit
den
entsprechenden
RIGHT-
und
LEFT-Steckdosen
der
PHONO-
Eingange
verbunden
werden.
Falls ausser
den Ausgangsleitungen
des
Plattenspielers
eine
ERDE-Leitung
vorhanden
ist, verbin-
den
Sie
sie mit
dem
ERDE-Schrauben-
anschluss,
der
mit
GND
oder
~
bezeichnet
ist. Wenn Ihr
Plattenspieler
einen
DIN-
Stecker
an
dem
Ausgangskabel
hat,
stecken
Sie ihn
einfach
in
die
DIN-Steckdose,
die
mit
PHONO
1
markiert
ist.
ANMERKUNG:
Um
Verlust
des Hochfre-
quenz-Obertragungsfaktors,
wegen
extrem
langerAusgangskabel
zu
vermeiden,
soli
ten
gesch
irmte
Kabel fUr
die
Plattenspielerver-
bindung,
nicht
langer als
3m,
verwendet
werden.
Normalerweise
sind
die
mitgelieferten
Kabel
Ihres
Plattenspielers
ausreichend.
Achten
Sie
darauf,
dass I hr
Plattenspieler
mit
einem
normalen
Magnet-Tonabnehmer
bestuckt
ist.
4
PLACEMENT
DES
ENCEINTES
1.
ENCEINTES
PRINCIPALES
Elles
50nt
en
rapport
avec
une
paire
d'enceintes
branchees
aux
bornes
SPEAKE
R A
sur
Ie
paneau
arriere
de
I'ensemble. Placer les
enceintes
principales
contre
un
mur
au
sur
une
thagere
de
telle
sorte
qu'elles
soient
en
face
de
la
position
d'tkoute
selection
nee
et
a egale
distance
de
vous. Pour
,'effet
stereo
maximum,
elles
doivent
etre
placees
a 3 ou 4 m
I'une
de
I'autre
et
ala
hauteur
de
votre
oreille. Vous
pouvez
determiner
les meilleurs
emplace
ments
qui
conviennent
a
votre
gout
et
a
vos
conditions
d'ecoute.
2.
ENCEINTES
SECONDAIRES
-Si
vous
desirez
ecouter
un
son
stereo
dans
une
autre
piece, vous
pouvez
connecter
une
autre
paire
d'enceintes
aux
bornes
"SPEAKE
R
8".
Toute
fois,
il
peut
etre
necessaire
d'employer
de
longs
cables
entre
I'unite
et
les
enceintes
secondaires,
s'assurer
qu'ils
ne
soient
pas plus longs
que
15
a
20
m
et
que
ce
soit
des
cables
de
forte
pu issance,
pour
eviter
des
pertes
dans
Ie
niveau
de
volume.
Suivre
la
pro-
cedure
decrite
dans
"article
1 ci-dessus
pour
Ie
placement
des
enceintes
secondaires.
BRANCHEMENT
DES
ENCEINTES
Attention:
Assurez-vous
que
les
enceintes
soient
correctement
brancMes
commeindique
ci-dessous,
avant
de
mettre
votre
ampli-tuner
sous
tension.
Com
me
Ie
montre
Ie
schema
1,
les
bar
nes
d'enceintes
sont
de
type
RCA a
intro-
duction
sur
pince
8t
sont
disposees sur 2
plaquettes:
I'une
(SPEAKER Al
pour
les
enceintes
principales
et
I'autre
(SPEAKER
B'l
pour
les
enceintes
secondaires.
Ecartez
Ie
taquet
qui
protege
chaque
borne
de
sortie,
introduisez
Ie
fil
denude
de
I'extnlmite
libre
du
fil
d'enceinte
dans
la cavitt!
de
la
borne
de
sortie
et
relilchez
Ie
taquet
qui
pinoera
Ie
fil
sur
la
borne.
(Note:
si
ntkessaire
apres
avoir
denude
chaque
eXtr!\mite
des
fils
d'enceinte,
tordre
les brins
denudes,
ce
qui
facil
itera
Ie
branchement
sur
la
borne
et
evitera
les
courts-circuits).
Assurez-vous
que
chaque
fil
(+)
d'enceinte
soit
branche
sur la
borne
(+)
correspondante
de
I'ampli-tuner
et
que
chaque
fil
(-I
d'enceinte
soit
branche
sur
la
borne
(-).
Assurez-vous
egalement
que
I'enceinte
de
droite
soit
branchee
sur la
borne
droite
(R
IGHT)
de
I'ampli-tuner
et
I'enceinte
de
gauche,
sur la
borne
gauche
(LEFT).
BRANCHEMENT
DU
TOURNE·
DISQUES
Si
votre
tourne-disques
est
fourni
avec des
prises
du
type
RCA
sur
les
cables
de
sortie,
les
brancher
correctement
aux
jacks
RIGHT
et
LEFT
des
entrees
PHONO. S'il y a
un
cable
de
terre
sortant
du
tou
rne-disques a
cote
des cables
de
sortie,
Ie
brancher
a
la
borne-visse
de
prise
de
terre
marquee
GND
ou
-::::-. Si
votre
tourne-disques
est
fourni
avec
une
prise DIN
sur
Ie
cable
de
sortie,
la
brancher
simplement
a la
douille
DIN
marquee
PHONO 1.
NOTE:
Pour
eviter
des
pertes
de
rt\ponse
de
haute
frequence
dues
a
des
cables
de
sortie
excessivement
longs,
des
cables
blindes
qui
ne
doivent
pas
depasser
3 m
de
longuer,
doivent
etre
utilises
pour
brancher
votre
tou
rne-disques.
Generalement,
les
cables
fournis
avec
votre
tourne-disques
sont
surffisants.
S'assurer
que
votre
tourne-
disques
soit
fourn
i avec u
ne
cartouche
magnetique
normale.
Loading…
Rating
Let us know what you think about the Rotel RA-1312 Amplifier by leaving a product rating. Want to share your experiences with this product or ask a question? Please leave a comment at the bottom of the page.
Are you satisfied with the Rotel RA-1312 Amplifier? YesNo
Be the first to rate this product
0 votes
Join the conversation about this product
Here you can share what you think about the Rotel RA-1312 Amplifier. If you have a question, first carefully read the manual. Requesting a manual can be done by using our contact form.
More about this manual
We understand that it’s nice to have a paper manual for your Rotel RA-1312 Amplifier. You can always download the manual from our website and print it yourself. If you would like to have an original manual, we recommend you contact Rotel. They might be able to provide an original manual. Are you looking for the manual of your Rotel RA-1312 Amplifier in a different language? Choose your preferred language on our homepage and search for the model number to see if we have it available.
Frequently Asked Questions about Rotel RA-1312 Amplifier
Our support team searches for useful product information and answers to frequently asked questions. If you find an inaccuracy in our frequently asked questions, please let us know by using our contact form.
Wat is the difference betwee an amplifier and a pre-amplifier? Verified
An amplifier is often an integrated amplifier, with pre-amplifier and power amplifier in one device. A pre-amplifier regulates volume and sometimes balance and tone and lets you choose what source is used (cd, tape, turntable, etc). A pre-amplifier often provides a little amplification, just enough for the power amplifier. This is an active pre-amplifier. Sometimes a pre-amplifier does not amplify, making it a passive pre-amplifier.


Join the conversation about this product
Here you can share what you think about the Rotel RA-1312 Amplifier. If you have a question, first carefully read the manual. Requesting a manual can be done by using our contact form.