GB
1. CHARACTERISTICS
- Powered by three 1.5 V alkaline batteries, type
LR 03 or AAA (supplied), with a life of more
than a year. Low-battery indication.
- Integral proportional regulation (Category B),
time base 15 minutes.
- Five (5) fixed programmes and 1 personal
programme (per day) for each day.
- Two (2) adjustable temperatures (from 5°C to
30°C) for programming.
- Manual programme override: Possibility of
choosing a temperature between 5°C and 30°C
until the next change of programme.
- Absence mode: Possibility of choosing a
temperature between 5°C and 15°C due to
absence from the home (from 1 to 99 days or
permanent).
- Digital display.
- Sliding door for access to programming keys.
- Overall dimensions of box: 110 x 82 x 32 mm.
- Wall-fitted or on the stand provided.
- Transmission frequency: 433 MHz.
- Class Ii insulation.
- Apparatus conforms to EEC Directive 89/336.
- Transmission of the On/Off arder every 15
minutes or in a change of state of the regulation.
2. INSTALUTION
2.1 General
Radio waves are propagated in the same way as
light, in straight lines.
lndoors the waves are reflected and weakened
by obstacles in their path.
2.2 lnstallation
For correct operation of the programme it is
necessary to situate the transmitter in a place
that is thermally representative of the room,
avoiding corners, proximity to doors and
Windows, as well as by the sun, chimneys,
radiators,..
The recommended height is 1.5 metres from the
floor.
The transmitter can be regarded as a remote
control for the central heating, that follows the
user aming to where he is at each moment (in
the kitchen, ding-room, bedroom) with the
objective of constantly having the most suitable
temperature.
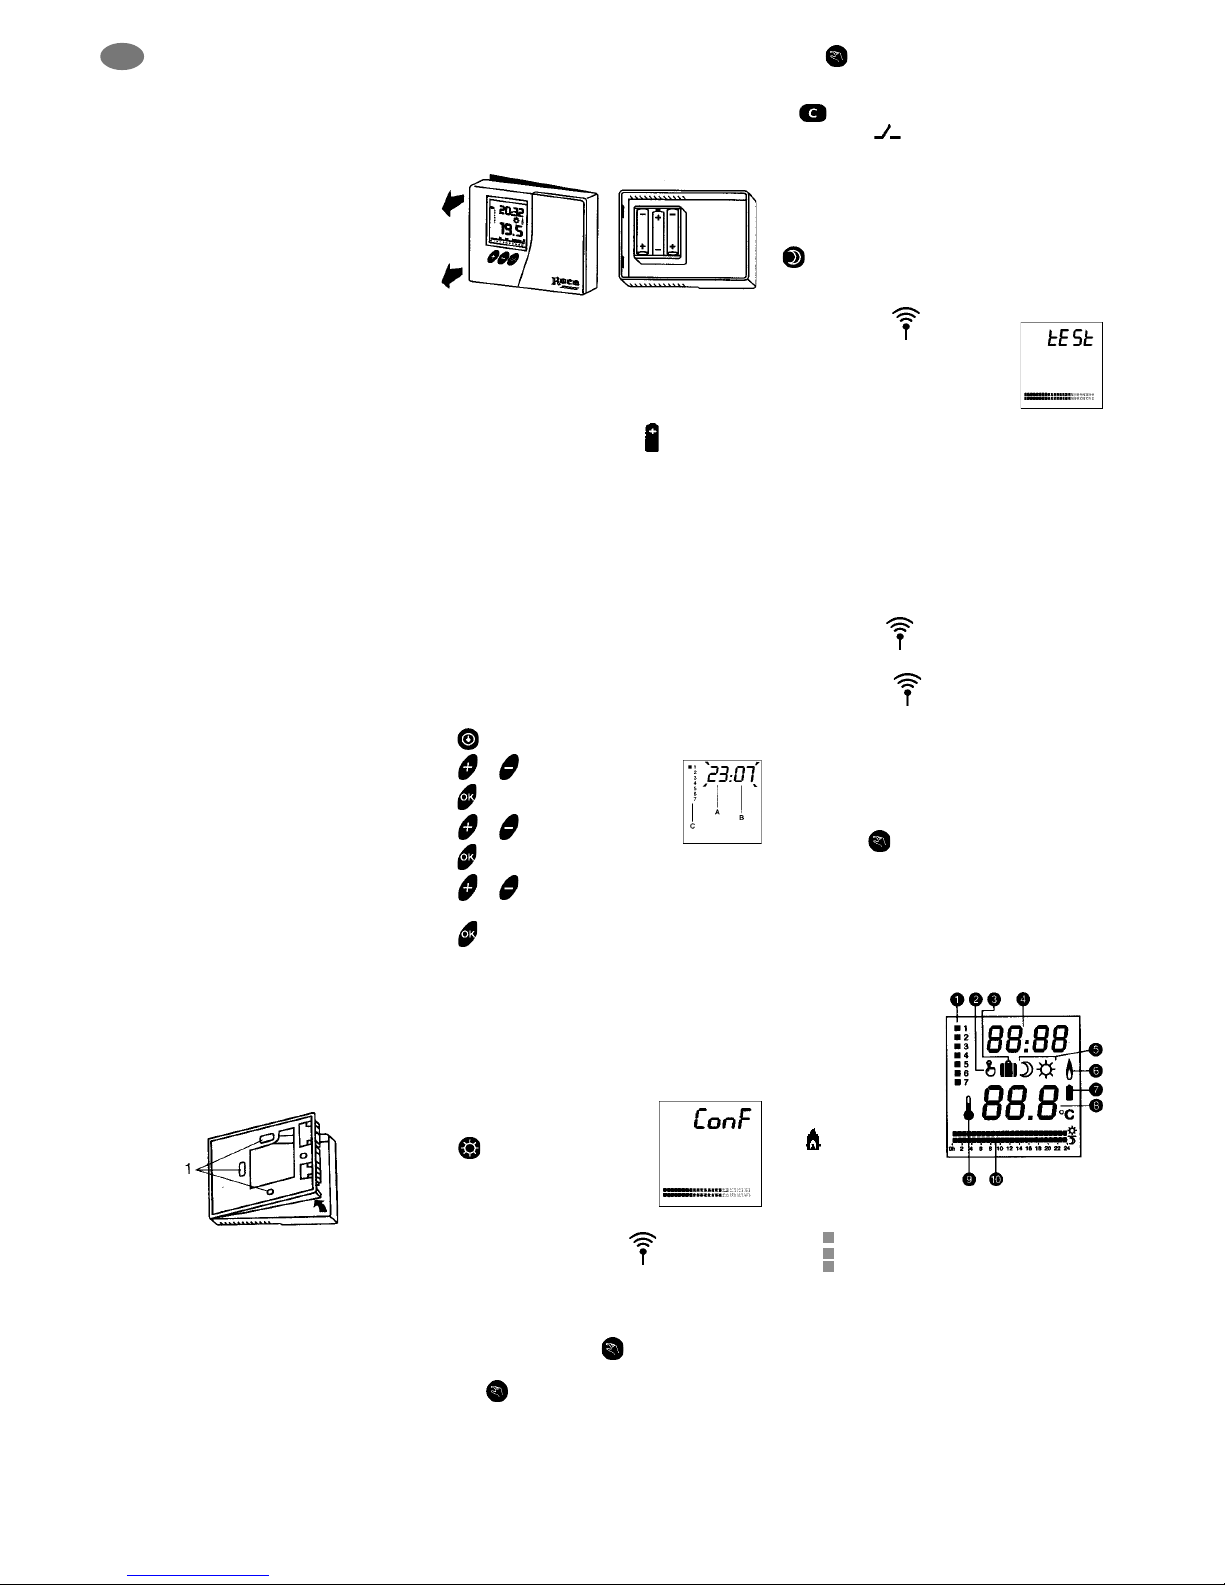
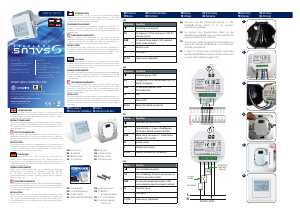
2.2.1 Wall-mounting
To fit the transmitter on a Wall, it is necessary to
remove the back cover as shown in Fig. 1. Once the
back cover is removed from the thermostat, it should
be fixed to the wall using the indicated holes 1.
(Fig. 1).
3. STARTING UP
3.1 Fitting the batteries
Three (3) alkaline 1.5 V batteries, type LR 03 or
AAA (with a life of more than 1 year). Do not use
rechargeable batteries.
2.2.2 Fitting on the stand
The thermostat can be placed on a side-board
or table by inserting the clips of the stand in the
holes (1) in the back cover, as shown in the
diagram. The aforementioned transmitting and
thermal conditions for the chosen situation should
not be forgotten.
To fit the batteries, remove the back cover (Fig. 2)
and insert the batteries, being careful to respect
the polarity (Fig. 3).
* Changing batteries
When the low battety indicator appears on the
screen, the batteries should be replaced since
deterioration of the batteries could cause internal
damage to the apparatus.
You have 2 minutes to replace the batteries
without loss of memory in the apparatus (programme
and temperature).
3.2 Quick help label
There is a summary of all the operations for
normal use on a self-adhesive label supplied with
the apparatus. This label can be stuck on the back
of the sliding door.
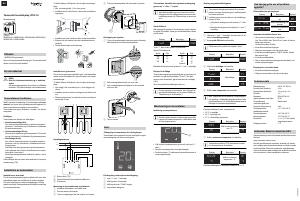
3.3 Setting the time
1.
2. or Hour setting (A)
3.
4. or Minute setting (B)
5.
6. or Day setting (C)
(e.g. 1 = Monday)
7. OK Star clock
3.4 Configuration / Reconfiguration
Each receiver has its own particular transmitter.
This mode of configuration allows the pairing of
the receiver with a transmitter (so there is no
interferente from nearby installations). lt also
allows verification of the radio transmission.
Configuration is done
in 2 stages:
1. (3 seconds) until the
shown screen is obtained.
The transmitter sends
information to the receiver.
2. The flashing yellow light on the receiver
confirms reception of the information.
*lf the green "OK" light is lit and steadx the
receiver is already configured.
To reconfigure it, press for 10 seconds until
the green "OK" light flashes slowly, then release.
Press once more. The green "OK" fight is
steady and the receiver is reconfigured.
*lf the green "OK" light flashes slowly the receiver
is not configured.
Press . The green "OK" light comes on. The
receiver is configured.
3. To exit the configuration mode.
The red light indicates the condition of the
output contact.
Lit = Closed
Out = Open
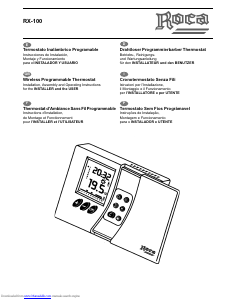
3.5 Checking the radio transmission
To check the quality of the radio transmission, press
(3 seconds) until the screen shown is obtained.
The transmitter sends information to the receiver.
The yellow light
on
the receiver flashes in time
to the transmissions.
The transmission is perfect
if the green "OK" light
flashes 3 times for each
reception ofs information.
3.6 lf a problem exists
lf the green "OK" light flashes rapiclly, it means
that the receiver has received no information for
more than an hour.
1) Check the transmitter batteries.
2) Enter the configuration mode. (para. 3.4).
lf the yellow light on the receiver does not flash,
move the transmitter about until flashing occurs.
lf the yellow light on the receiver flashes and
the green "OK" light does not flash (3 times) for
each reception of information, reconfigure both
apparatuses (para. 3.4)
NOTE
Pressing the key changes the condition of the
output contact (manual adjustment) until the next
transmision form the thermostat (which always
has priority).
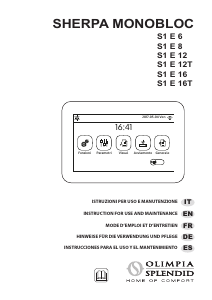
4. OPERATION
1 Days of the week
2 Cancel the automatic
programme
3 Long-term absence
4Time
5 Central Heating
temperature
6 State of output relay
( = lit)
7 Low-battery indicator
8 Temperature value
9 Measured temperature
10 Daily programme outline
= Economy
= Comfort)
11 Adjustment keys
12Validation
13 Keys behind the door
14 Comfort or Configuration
15 Economy (Night Setback) or Test
16Cancel
17 Setting the time
18Consulting or adjusting the weekly programme
19 Absence key
Fig.1
Fig.2 Fig.3


Join the conversation about this product
Here you can share what you think about the Roca RX-100 Thermostat. If you have a question, first carefully read the manual. Requesting a manual can be done by using our contact form.
reply | This was helpful (0) (Translated by Google)
reply | This was helpful (0)