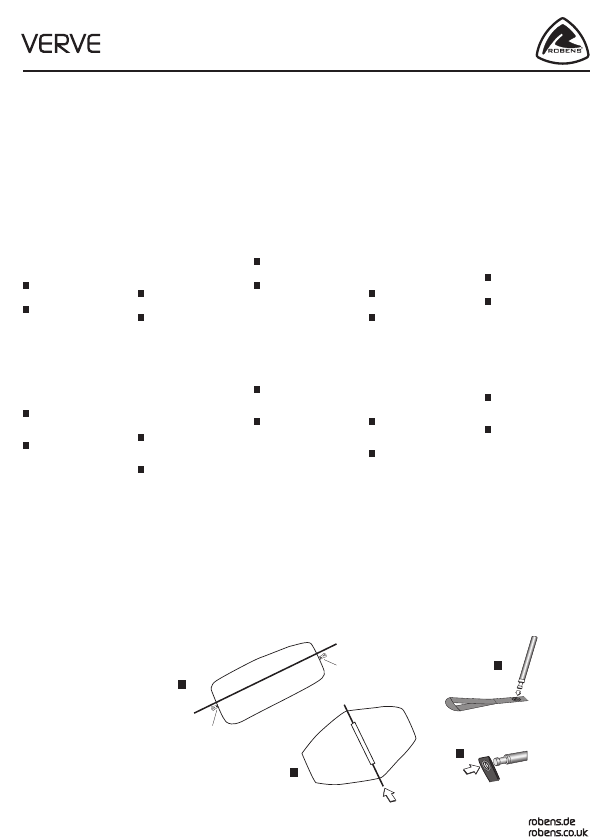
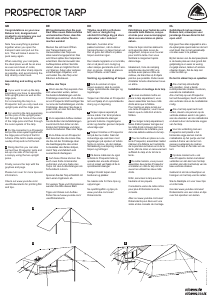
GB Loops with eyelets
DE Schlaufen mit Ösen
DK Strop med metaløje
FR Boucles à œillets
NL Lussen met ogen
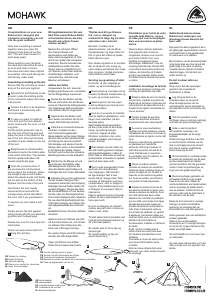
GB Loops with eyelets
DE Schlaufen mit Ösen
DK Strop med metaløje
FR Boucles à œillets
NL Lussen met ogen
VERVE
robens.de
robens.co.uk
Congratulations on your new
Robens tent, designed and
created to accompany you out
into the great outdoors!
Note how everything is packed
together when you open the
transport sack and pull out the
tent. This will make it easier to
pack away again.
When selecting your campsite,
the ideal place would be an area
as even and clean of rocks,
branches and other sharp objects
as possible, and avoid placing the
tent directly under trees.
Assembling and setting up the
tent
Ensure that all entrances are
closed and put the tent poles
together.
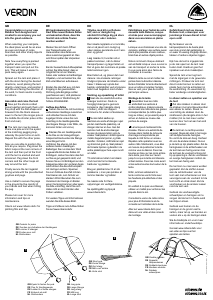
1
Lay the longer pole on the
spread out inner tent.
2
Now place the ends of the pole
in the eyelets on the webbing
loops fastened at the middle of
the short sides of the oor and
raise the arches and x the hooks
attached onto the pole. Then pull
the ysheet over the pole, wrap
the Velcro straps on the inside
around the pole and connect the
corners with the quick release
fasteners on the corners of the
oor.
3
Then push the remaining short
pole into the sleeve on the topside
of the tent.
4
Put the ends of the short pole in
the metal eyelets attached above
the porches. Now position the tent,
x the porches with pegs and then
the remaining guypoints.
Now connect the attachment
points on the inner to the devices
on the inside of the ysheet.
Finally, secure the tent against
strong winds with the pre-attached
guylines and pegs.
Please turn over for more tips and
information.
Check out www.robens.de/tv for
pitching lm and tips.
GB DE DK FR NL
Wir beglückwünschen Sie zum
Kauf Ihres neuen Robens Zeltes
und wünschen Ihnen, dass Sie
hiermit viele schöne Touren
machen werden!
Merken Sie sich beim Önen
des Transportsacks und
Herausziehen des Zeltes wie
alles zusammengepackt ist. Das
wird Ihnen später das Verpacken
erleichtern. Bei der Auswahl des
Aufbauplatzes achten Sie bitte
darauf, dass er möglichst frei ist
von Steinen, Ästen oder anderen
scharfkantigen Objekten, und
vermeiden Sie, das Zelt unter
Bäumen aufzubauen.
Aufbau des Zeltes
Vergewissern Sie sich, dass die
Eingänge geschlossen sind, und
setzen Sie das Zeltgestänge
zusammen.
1
Legen Sie die längere Stange auf
das Innenzelt.
2
Stecken Sie nun die Enden
der Stange in die Ösen an den
Schlaufen die sich an den kurzen
Seiten des Bodens benden, richten
Sie den Bogen auf, und befestigen
Sie die am Innenzelt angebrachten
Haken an der Stange.
Ziehen Sie als nächstes das
Überzelt über das Gestänge,
wickeln Sie die an der Innenseite
angebrachten Klettbänder um die
Stange und verbinden Sie die Ecken
mit den Schnellverschlüssen an den
Ecken des Bodens.
3
Schieben Sie dann die
verbliebene kurze Stange in den
Kanal auf der Oberseite des Zeltes.
4
Stecken Sie die Enden der
kurzen Stange in die Metallösen
oben an den Apsiden. Richten Sie
nun das Zelt abschließend aus
und befestigen Sie die Apsiden mit
Erdnägeln und danach die übrigen
Abspannschlaufen.
Verbinden Sie dann die
Aufhängepunkte des Innenzeltes mit
den Aufnahmen an der Innenseite
des Überzeltes.
Spannen Sie zum Schluss das Zelt
mit den Sturmleinen ab, zum Schutz
vor starkem Wind.
Für weitere Tipps und Informationen
wenden Sie bitte dieses Blatt.
Tipps und Videos zum Aufbau
nden Sie auf www.robens.de/tv.
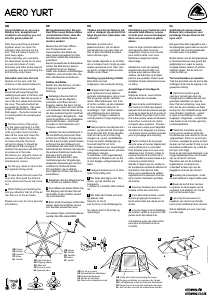
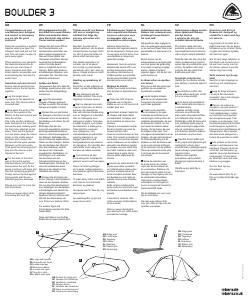
GB Loops with eyelets
DE Schlaufen mit Ösen
DK Strop med metaløje
FR Boucles à œillets
NL Lussen met ogen
GB Inner tent
DE Innenzelt
DK Indertelt
FR Tente intérieure
NLBinnentent
GB Flysheet
DE Überzelt
DK Oversejl
FR Double toit
NL Buitentent
GB Ridge pole
DE Firststange
DK Tagstang
FR Faîtière
NL Nokstang
Tillykke med dit nye Robens
telt, som er designet og
udviklet til at følge dig på store
oplevelser ude i naturen!
Bemærk, hvordan alt er
pakket sammen, når du åbner
transportposen og tager teltet ud.
Det vil gøre det lettere at pakke
teltet sammen igen.
Den ideelle lejrplads er et område,
der er så jævnt som muligt og
uden skarpe genstande som f.eks.
sten og grene. Undgå at placere
teltet direkte under træer.
Samling og opsætning af teltet
Kontroller, at alle indgange er
lukket, og saml teltstængerne.
1
Læg den lange stang på det
udbredte indertelt.
2
Sæt nu stangens ender i
metaløjerne ved pløkstropperne
placeret midt på de korte sider
teltetbunden. Løft den bue som
stangen danner op og fastgør
plastkrogene, som sidder på
inderteltet, til stangen.
Træk derefter oversejlet over
stangen, sno velcrobåndene
på indersiden omkring stangen,
og fastgør hjørnerne med
hurtigspænderne.
3
Før derefter den resterende
korte stang ind i kanalen på teltets
overside.
4
Fastgør hver ende af den korte
stang i metaløjerne som sidder på
oversejlet.
Placer nu teltet og fastgør
de to apsis (indgangspartier)
med pløkker og de resterende
barduner.
Fastgør herefter inderteltet til
oversejlet i ophøngspunkterne.
Til sidst sikres teltet mod stærk
vind med de formonterede
barduner og pløkker.
Se næste side for ere tips og
oplysninger.
Se opstillingslm og tips på
www.robens.de/tv
Félicitations pour l’achat de votre
nouvelle tente Robens, conçue
et créée pour vous accompagner
dans vos excursions en pleine
nature.
Notez la façon dont les éléments
sont agencés dans le sac de
rangement, lorsque vous l’ouvrez
pour sortir la tente. Ceci vous
facilitera le rangement après
démontage.
Idéalement, l’aire de camping
sélectionnée devrait orir une
surface aussi plane et libre de
cailloux, de branches et d’objets
pointus que possible. Évitez aussi
d’installer la tente directement sous
un arbre.
Installation et montage de la tente
Vériez que toutes les entrées sont
fermées et assemblez les mâts.
1
Posez le mât long sur la tente
intérieure étalée sur le sol.
2
Insérez chaque extrémité du mât
dans l’œillet correspondant sur les
boucles d’ancrage situées au centre
des côtés courts du tapis de sol.
Levez les mâts an de former un
arceau, puis attachez les crochets
xés au mât. Tirez ensuite le double
toit au-dessus, enroulez les bandes
auto-agrippantes intérieures autour
des mâts et xez les attaches
rapides de chaque coin au niveau
des coins du tapis de sol.
3
Glissez le mât court restant
dans la gaine située dans la partie
supérieure de la tente.
4
Insérez les extrémités du mât le
plus court dans les œillets en métal
situés au-dessus des porches.
Installez ensuite la tente à l’endroit
souhaité, xez les absides au sol
à l’aide de piquets, ainsi que les
haubans restants.
Attachez les points de xation de
la tente intérieure sur les pièces
correspondantes, à l’intérieur du
double toit.
Consultez le verso de cette notice
pour plus d’informations et de
conseils.
Allez sur www.robens.de/tv pour
découvrir une vidéo et des conseils
de montage.
Gefeliciteerd met uw nieuwe
Robens tent, ontworpen voor
jarenlange trouwe dienst in het
open veld!
Kijk goed hoe alles ingepakt is als u
de opbergzak openmaakt en de tent
eruit haalt. Dan is het gemakkelijk
om alles weer in te pakken.
Bij het kiezen van de kampeerplaats
is de beste plek een stuk grond dat
gelijkmatig is en waar zo weinig
mogelijk stenen, takken of andere
objecten liggen. Zet de tent niet
onder bomen op.
De tent in elkaar zetten en
opzetten
Zorg ervoor dat alle openingen
gesloten zijn en plaats de
tentstokken in elkaar.
1
Leg de langere stok op de
uitgespreide binnentent.
2
Plaats de uiteinden van de stok in
de oogjes op de lussen van netstof
in het midden van de korte zijden
van de vloer. Til de bogen omhoog
en bevestig de haakjes aan de stok.
Trek vervolgens de buitentent over
de stok, sla aan de binnenkant de
klittenbandsluiting om de stokken
en sluit de hoeken aan op de quick
release-sluitingen in de hoeken
onderaan.
3
Steek de resterende korte stok in
de hoes aan de bovenkant van de
tent.
4
Steek de uiteinden van de korte
stok in de metalen ogen aan de
bovenkant van de voorruimtes.
Plaats nu de tent, bevestig de
voorruimte met de haringen en
vervolgens ook met de resterende
scheerlijnen.
Verbind de bevestigingspunten
op de binnentent aan de
verbindingspunten aan de
binnenkant van de buitentent.
Sla de bladzijde om voor meer tips
en informatie.
Ga naar www.robens.de/tv voor een
video en tips over het opzetten van
tenten.
1
2
3
4
© 09/2016 Oase Outdoors ApS


Join the conversation about this product
Here you can share what you think about the Robens Verve Tent. If you have a question, first carefully read the manual. Requesting a manual can be done by using our contact form.