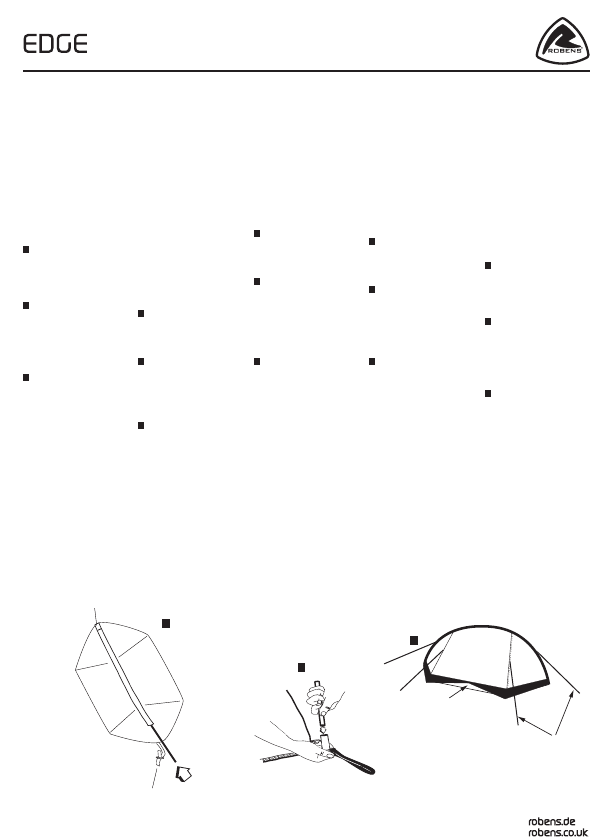
Manual Robens Edge Tent
Need a manual for your Robens Edge Tent? Below you can view and download the PDF manual for free in English. This product currently has 7 frequently asked questions, 0 comments and has 1 vote with an average product rating of 0/100. If this is not the manual you want, please contact us.
Is your product defective and the manual offers no solution? Go to a Repair Café for free repair services.
Manual
Loading…

Loading…
Rating
Let us know what you think about the Robens Edge Tent by leaving a product rating. Want to share your experiences with this product or ask a question? Please leave a comment at the bottom of the page.More about this manual
We understand that it’s nice to have a paper manual for your Robens Edge Tent. You can always download the manual from our website and print it yourself. If you would like to have an original manual, we recommend you contact Robens. They might be able to provide an original manual. Are you looking for the manual of your Robens Edge Tent in a different language? Choose your preferred language on our homepage and search for the model number to see if we have it available.
Specifications
| Brand | Robens |
| Model | Edge |
| Category | Tents |
| File type | |
| File size | 0.55 MB |
All manuals for Robens Tents
More manuals of Tents
Frequently Asked Questions about Robens Edge Tent
Our support team searches for useful product information and answers to frequently asked questions. If you find an inaccuracy in our frequently asked questions, please let us know by using our contact form.
Can I store my tent when it's wet? Verified
Only for very short periods of time. When a tent is stored while wet for a week or longer, it can get moldy. This is harmful for your tent and possibly your health.
This was helpful (384) Read moreHow do I impregnate a tent? Verified
Pitch the tent, clean the cloth and let it dry. Apply the impregnation agent on the cloth with a plant sprayer or other spray. It is also possible to use a paint roller or brush. The cloth needs to be fully saturated with the impregnation agent. Also treat the inside of the tent. Thoroughly clean any windows with a moist cloth. Do not let the impregnation agent dry on it. Let the tent cloth fully dry. Repeat the treatment if needed.
This was helpful (285) Read moreCan I repair a tear or hole in the canvas of my tent myself? Verified
There are special pieces of self-adhesive patches of cloth available for synthetic tent canvases. Stick one of these patches on both sides of the hole or tear. For cotton tent canvases or mixed material tent canvases it's best to use patches that can be ironed on. This will require an iron.
This was helpful (218) Read moreThe zipper of my tent won't run smoothly, what can I do? Verified
When a zipper is running smoothly, use a dry PTFE spray or silicone spray. Do not spray onto the cloth and preventively spray to prevent future problems.
This was helpful (156) Read moreThere are water drops on the inside of the tent, does this mean it is leaking? Verified
No, this is probably condensation. Make sure the tent is properly ventilated to keep condensation at a minimum.
This was helpful (129) Read moreWhat tent pegs are best to use for which surfaces? Verified
On grassland or forest surfaces you can use semi circular or plastic pegs. On rocky surfaces you need to use rock pegs. On clay surfaces you can use semi circular, plastic or universal pegs. On gravel surfaces you need semi circular or universal pegs and on sand you need to use wooden pegs.
This was helpful (105) Read moreThe impregnation agent leaves white stains or a white haze on the tent cloth, what can I do about this? Verified
If the agent leaves a white haze or white stains on the tent cloth, this means you have applied more impregnation agent on those areas. This is not harmful and the stains often disappear over time. It is not advisable to use less impregnation agent to prevent stains. The cloth needs to be fully saturated with the impregnation agent to give good results.
This was helpful (97) Read more
Join the conversation about this product
Here you can share what you think about the Robens Edge Tent. If you have a question, first carefully read the manual. Requesting a manual can be done by using our contact form.