GB Eyelets
DE Ösen
DK Øjer
FR Œillets
NL Ogen
CHALET 500
robens.de
robens.co.uk
Congratulations on your new
Robens tent, designed and
created to accompany you out
into the great outdoors!
Note how everything is packed
together when you open the
transport sack and pull out the
tent. This will make it easier to
pack away again.
When selecting your campsite,
the ideal place would be an area
as even and clean of rocks,
branches and other sharp objects
as possible, and avoid placing the
tent directly under trees.
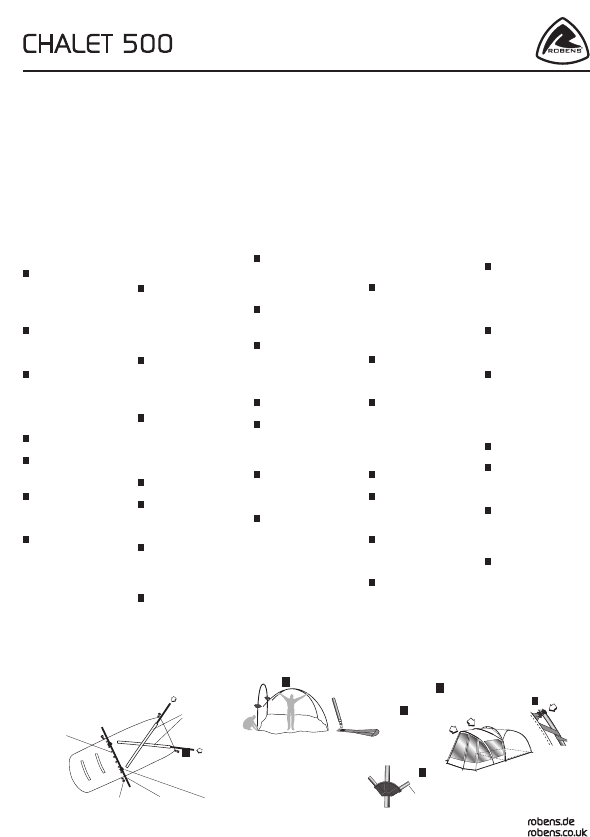
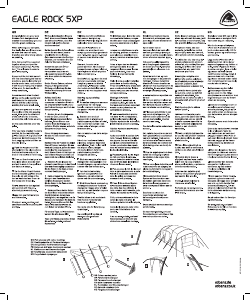
Assembling and setting up the
tent
Spread out the tent, with the
entrance in the desired direction.
Place one end facing into the wind
for greater wind stability.
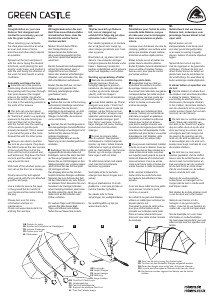
1
At least two people are required
to set up this tent.
Put the colour-coded shock-
corded poles together. Now push
both of the medium length poles
crosswise into the pole sleeves
with matching colour ID.
2
Then take the long, thick pole
and place its ends in the eyelets
on the bottom on the tent sides,
whereby the pole forms an arch
and you lift it up.
3
Fasten the ends of the crossed
poles at the lower angle of the
connector hub of the big pole arch.
Fasten the other ends of the poles
in the eyelets at the rear corners
of the tent. It is very helpful if a
second person lifts up the poles
from inside the tent.
4
Fix the row of plastic hooks to
the big arch.
5
Take the remaining short pole,
push it into the pole sleeve at the
roof of the tent and fasten the pole
ends to the hubs on the big arch.
6
Push the last long pole into
the sleeve at the front of the tent,
fasten its ends and clip the hooks
onto the pole. Then peg down the
tent all around.
7
Tie the Storm Guard System
and the attached guylines around
the rear poles as illustrated and
then clip the hooks onto the poles.
Secure the tent against strong
winds with the pre-attached
guylines and pegs.
Please turn over for more tips and
information.
Check out www.robens.de/tv for
pitching lm and tips
GB DE DK FR NL
Wir beglückwünschen Sie zum
Kauf Ihres neuen Robens Zeltes
und wünschen Ihnen, dass Sie
hiermit viele schöne Touren
machen werden!
Merken Sie sich beim Önen
des Transportsacks und
Herausziehen des Zeltes wie
alles zusammengepackt ist. Das
wird Ihnen später das Verpacken
erleichtern.
Bei der Auswahl des Aufbauplatzes
achten Sie bitte darauf, dass er
möglichst frei ist von Steinen,
Ästen oder anderen scharfkantigen
Objekten, und vermeiden Sie, das
Zelt unter Bäumen aufzubauen.
Aufbau des Zeltes
Breiten Sie das Zelt aus, mit dem
Eingang in der gewünschten
Richtung. Und platzieren Sie ein
Ende in Windrichtung für höhere
Windstabilität.
1
Zum Aufbau dieses Zeltes
werden mindestens zwei
Personen benötigt. Setzen
Sie die verbundenen, farbig
gekennzeichneten Gestänge
zusammen. Schieben Sie nun
die zwei Stangen mittlerer
Länge gekreuzt in die hinteren
Gestängekanäle.
2
Nehmen Sie dann die lange,
dicke Stange mit den beiden
Kunststoteilen und stecken Sie
deren Enden in die Ösen unten an
den Zeltseiten, wobei die Stange
einen Bogen formt, und richten Sie
sie auf.
3
Befestigen Sie die Enden
der gekreuzten Stangen an den
acheren Seiten der Kunststo-
elemente, und stecken Sie die
anderen Enden in die Ösen an den
hinteren Ecken des Zeltes. Hierbei
ist es hilfreich, wenn eine Person im
Zelt vorher die Stangen anhebt.
4
Befestigen Sie dann die Reihe
Kunststohaken an dem Bogen.
5
Nehmen Sie verbliebene
kurze Stange, schieben Sie
sie in den Kanal am Dach und
befestigen Sie die Enden in den
Kunststoelementen.
6
Schieben Sie die letzte lange
Stange in den Kanal vorne am Zelt,
befestigen Sie deren Enden und dann
die seitlichen Haken an der Stange.
Spannen Sie das Zelt ringsherum mit
Heringen ab.
7
Schlingen Sie an beiden Seiten
das Storm Guard System mitsamt
den angebrachten Leinen wie
abgebildet um die Stangen und
befestigen Sie dann die Haken.
Sichern Sie zum Schluss das Zelt
mit den Sturmleinen, zum Schutz vor
starkem Wind.
Für weitere Tipps und Informationen
wenden Sie bitte dieses Blatt.
Tipps und Videos zum Aufbau nden
Sie auf www.robens.de/tv
GB Pole sleeves
DE Gestängekanäle
DK Stangkanaler
FR Gaines de mât
NL Stokhoezen
GB Hooks
DE Haken
DK Kroge
FR Crochets
NL Haken
Tillykke med dit nye Robens telt,
som er designet og udviklet til at
følge dig på store oplevelser ude
i naturen!
Bemærk, hvordan alt er
pakket sammen, når du åbner
transportposen og tager teltet ud.
Det vil gøre det lettere at pakke
teltet sammen igen.
Den ideelle lejrplads er et område,
der er så jævnt som muligt og uden
skarpe genstande som f.eks. sten
og grene. Undgå at placere teltet
direkte under træer
Samling og opsætning af teltet
Bred teltet ud med indgangen i den
ønskede retning. Placer teltets ene
ende mod vinden for at opnå bedre
stabilitet i blæsevejr.
1
Det kræver mindst to personer
at rejse dette telt. Sæt de
farvekodede, elastikforbundne
stænger sammen. Før nu de to
mellemlange stænger diagonalt ind
i kanalerne med matchende farve.
2
Placer derefter enderne af den
lange stang i øjerne på bunden af
teltets sider, så der formes en bue,
som rejses op.
3
Anbring enderne af de krydsede
stænger i samlemuen på den bue
som den lange stang har dannet.
Modsatte ender fastgøres i øjerne
bagerst på teltet. En person kan
med fordel stå inde i teltet og løfte
stængerne op.
4
Fastgør rækken af plastkroge til
den store bue.
5
Før herefter den korte
resterende stang ind i kanalen på
taget af teltet og anbring enderne i
hullerne med matchende diameter
og vinkel i samlemuen på den
store bue.
6
Før den sidste lange stang ind i
kanalen på teltets forende, fastgør
enderne, og sæt derefter krogene
fast på stangen. Sæt derefter pløkke
hele vejen rundt om teltet.
7
Bind Storm Guard systemet og
de fastgjorte barduner rundt om
stængerne som vist.
Se næste side for ere tips og
oplysninger.
Se opstillingslm og tips på www.
robens.de/tv
Félicitations pour l’achat de votre
nouvelle tente Robens, conçue
et créée pour vous accompagner
dans vos excursions en pleine
nature.
Notez la façon dont les éléments
sont agencés dans le sac de
rangement, lorsque vous l’ouvrez
pour sortir la tente. Ceci vous
facilitera le rangement après
démontage.
Idéalement, l’aire de camping
sélectionnée devrait orir une
surface aussi plane et libre de
cailloux, de branches et d’objets
pointus que possible. Évitez aussi
d’installer la tente directement sous
un arbre.
Installation et montage de la tente
Étalez la tente au sol, avec l’entrée
dans la direction souhaitée. Orientez
l’une des extrémités de la tente face
au vent, pour plus de stabilité.
1
Deux personnes minimum sont
nécessaires pour monter cette tente.
Assemblez les sections de mâts à
cordon élastique en respectant le
code couleur. Glissez ensuite les
deux mâts moyens dans les gaines
correspondantes (code couleur), en
les croisant.
2
Insérez les extrémités du mât
long et épais dans les œillets situés
en bas, de chaque côté de la tente.
Le mât forme ainsi un arceau, que
vous dressez.
3
Insérez l’extrémité des mâts
croisés, au niveau des éléments
de raccordement du grand arceau.
Insérez ensuite l’autre extrémité des
mâts dans les œillets situés au coins
arrière de la tente. La manœuvre est
plus facile si une seconde personne
soulève les mâts depuis l’intérieur
de la tente.
4
Fixez la rangée de crochets en
plastique sur le grand arceau.
5
Enn, glissez le mât court
restant dans la gaine située à
le toit de la tente et insérez ses
extrémités dans les embases du
grand arceau.
6
Glissez le dernier mât court dans
la gaine située à l’avant de la tente,
xez ses extrémités et clipsez les
crochets sur le mât. Fixez ensuite la
tente de tous côtés.
7
Fixez le Storm Guard System et
les haubans associés autour des
mâts, comme illustré ci-contre, puis
clipsez les crochets sur les mâts.
Consultez le verso de cette notice
pour plus d’informations et de
conseils.
Allez sur www.robens.de/tv pour
découvrir une vidéo et des conseils
de montage
Gefeliciteerd met uw nieuwe
Robens tent, ontworpen voor
jarenlange trouwe dienst in het
open veld!
Kijk goed hoe alles ingepakt is als u
de opbergzak openmaakt en de tent
eruit haalt. Dan is het gemakkelijk
om alles weer in te pakken.
Bij het kiezen van de kampeerplaats
is de beste plek een stuk grond dat
gelijkmatig is en waar zo weinig
mogelijk stenen, takken of andere
objecten liggen. Zet de tent niet
onder bomen op.
De tent in elkaar zetten en
opzetten
Spreid de tent uit, met de ingang in
de gewenste richting. Plaats één
kant tegen de wind in voor meer
windstabiliteit.
1
Er zijn minstens twee mensen
nodig om deze tent op te zetten.
Zet de kleurgecodeerde stokken
met amortiseurkoorden in elkaar.
Steek nu beide middellange stokken
gekruist in de stokhoezen met
dezelfde kleur.
2
Neem nu de lange, dikke stok
en steek de uiteinden door de
oogjes aan de onderkant van de
tentzijkanten, waarbij de stok een
boog vormt. Til de boog op.
3
Plaats de uiteinden van de
gekruiste stokken in de gaten, in
de verbindingselementen van de
grote stokboog. Plaats de andere
kant van de stokken in de oogjes
aan de achterkant van de tent,
in de hoeken. Het is handig als
een tweede persoon in de tent de
stokken optilt.
4
Bevestig de rij plastic haken
aan de grote boog.
5
Neem als laatste de
overgebleven korte tentstok, steek
die in de hoes aan de dak van de
tent en plaats de uiteinden in de
koppelingen op de grote boog.
6
Duw de laatste lange stok in de
mof aan de voorzijde van de tent,
bevestig de uiteinden ervan en klem
de haken vast op de stok. Zet de
tent vervolgens rondom vast met
haringen.
7
Bescherm tot slot de tent tegen
harde windstoten met de bevestigde
scheerlijnen en haringen, en maak
de tentvloer vast aan de buitentent.
Sla de bladzijde om voor meer tips
en informatie.
Ga naar www.robens.de/tv voor een
video en tips over het opzetten van
tenten
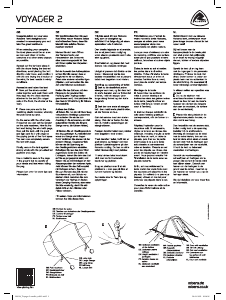
GB Eyelets
DE Ösen
DK Øjer
FR Œillets
NL Ogen
GB Lower angle to the rear
DE Flacher Winkel nach hinten
DK Den ade vinkel vendes bagud
FR Angle plus faible vers l’arrière
NL Lage hoek achteraan
GB One person inside the tent should lift the poles
DE Eine Person sollte im Zelt die Stangen anheben
DK En person inde i teltet skal løfte stængerne
FR Une personne placée à l’intérieur de la tente
peut soulever les mâts.
NL Een persoon in de tent moet de tentstokken
optillen
GB Thick pole with pole hubs
DE Dicke Stange mit Verbindungselementen
DK Den tykke stang med samlemue
FR Mât épais avec embase
NL Dikke tentstok met stokkoppelingen
GB Short pole
DE Kurze Stange
DK Kort stang
FR Mât court
NL Korte stok
GB Long pole
DE Lange Stange
DK Lang stang
FR Mât long
NL Lange stok
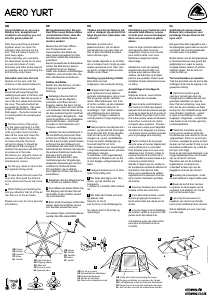
7
1
2
3
5
6
© 09/2016 Oase Outdoors ApS

Join the conversation about this product
Here you can share what you think about the Robens Chalet 500 Tent. If you have a question, first carefully read the manual. Requesting a manual can be done by using our contact form.