
PROSTOR P4
P4 601 - 06
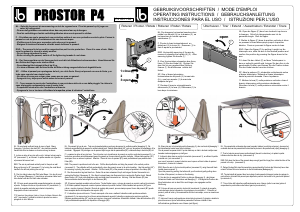
NL. Open de flipper (F) door hem loodrecht op de arm
te brengen. Schuif de telescopische arm tot de
gewenste lengte. Sluit de flipper.
F. Mettez le flipper (F) dans la position verticale et étirez
ou poussez le bras télescopique jusqu'a la position
désirée. Fixez en poussant le flipper contre le bras.
ENG. Open the flipper (F) by putting it upright on the
telescopic arm, slide the arm in the desired position and
confirm the position by pressing the flipper down to the
arm.
D. Lösen Sie den Hebel (F) auf dem Teleskoparm in
dem er aufrecht gestellt wird, bringen Sie den Arm in die
gewünschte Position und fixieren Sie die Position indem
Sie den Hebel wieder herunter drücken.
SP. Abra la palanca (F), situándola verticalmente sobre
el brazo telescópico. Extienda el brazo telescópico
hasta la posición deseada. Cierre la palanca.
IT. Mettere la leva (F) nella posizione verticale e tirare il
braccio telescopico nella posizione desiderata.
Rimettere la leva (F) nella posizione orizzontale contro il
braccio.
GEBRUIKSVOORSCHRIFTEN / MODE D'EMPLOI
OPERATING INSTRUCTIONS / GEBRAUCHSANLEITUNG
INSTRUCCIONES PARA EL USO / ISTRUZIONI PER L'USO
NL. - Gebruik de parasol als zonnewering en niet als regenscherm. Plooi de parasol op bij regen en
zeker bij hevige wind.
- De arm niet gebruiken om andere zaken dan een parasol aan op te hangen.
- Doof de verlichting en laat de verlichting afkoelen alvorens de parasol te sluiten.
F. - N'oubliez pas que le parasol est une protection solaire et non une protection contre la pluie. Fermez le
parasol en cas de pluie et certainement en cas de bourrasque.
- N'utilisez pas le bras pour accrocher autre chose qu'un parasol.
- Eteignez la lumière et laissez la refroidir avant de fermer le parasol.
ENG. - The parasol is to be used for sunprotection, not for rain protection. Close it in case of rain. Make
sure the parasol is closed in windy weather.
- Do not hang objects on the arm.
- Before closing the parasol, switch off the lightening to make it cool down.
D. - Der Sonnenschirm nur als Sonnenschutz und nicht als Allwetterschutz verwenden. Verschliessen Sie
den Schirm bei Regen oder starken Wind.
- Das zulässige Höchstgewicht liegt bei 5 kg.
- Vor dem schliessen des Schirms sollte die Beleuchtung ausgeschaltet und abgekühlt sein.
SP. - Utilice el parasol para protegerse del sol y no de la lluvia. Recoja el parasol en caso de lluvia y en
todo caso cuando hace viento fuerte.
- No utilice el brazo para colgar otras cosas que no sean un parasol.
- Apague la luz y deje que se enfríe antes de cerrar el parasol.
IT. - Tener sempre in mente che l'ombrellone è una protezione dal sole e non dalla pioggia. Va chiuso in
caso di pioggia e certamente in caso di vento forte.
- Sospendere niente altro che l'ombrellone al braccio.
- Spegnere la luce e lasciare raffreddare la lampadina prima di chiudere l'ombrellone.
NL. De draagarm horizontaal zwenken door
middel van hendel (A) los te draaien (3), na
het zwenken de hendel opnieuw
vastdraaien (1).
F. Pivotez le bras horizontalement en
détachant (3) le levier (A). Resserez (1) le
frein A apres le pivotement.
ENG. Horizontally swerving of the arm by
means of releasing the handle (A) (3). After
swerving tighten the handle (1).
D. Zum Horizontales schwenken des Arms,
lösen (3) Sie den Hebel (A). Drehen Sie
den Arm bis zur gewünschten Stellung,
fixieren (1) Sie die Bremse mittels der
Hebel.
SP. Gire el brazo telescópico
horizontalmente aflojando (3) la manivela
(A), y vuelva a apretar (1) la manivela
después del giro.
IT. Ruotare il braccio orizzontalmente
sbloccando (3) la leva (A). Ribloccare (1) la
leva dopo la rotazione.
Uitschuiven / Tirer / Extend / Ausschieben / Extender / Tirare
Roteren / Pivoter / Rotate / Rotieren / Rodar / Rotare
NL. De arm hangt vertikaal langs de muur of paal. Breng
(beweging 1) de arm in de stand 45°, door de kleine zwarte
hendel naar links te draaien en de arm omhoog te duwen.
F. Le bras se situe le long du mât ou mûr. Inclinez le bras jusqu'a
45° (mouvement 1), en tournant la petite manette noir à gauche
et poussant le bras en haut. .
ENG. The arm is positioned vertically next to the pole or wall.
Bring up the arm to 45° (movement 1), by turning the small black
handle to the left and pushing the arm up.
D. Der Arm hängt neben den Pfahl oder Mauer. Um den Arm auf
45° zu bringen (Bewegung 1), den kleinen schwarzen Hebel nach
links drehen und den Arm nach oben schieben.
SP. El brazo queda suspendido perpendicularmente a la pared o
el poste. Coloque el brazo en la posición de 45º (movimiento 1),
girando la pequeña manivela negra hacia la izquierda y
empujando el brazo hacia arriba.
IT. Il braccio si trova lungo il palo o il muro. Inclinare il braccio fino
a 45° (movimento 1) girando a sinistra la piccola leva nera e
spingendo in alto il braccio.
NL. De parasol ligt op de arm. Trek aan de zwarte trekknop en breng de parasol in vertikale positie (beweging 2). De
trekknop vergrendelt als de parasol in vertikale stand komt. Gebruik deze stand (45°) ook om, de parasol te verwijderen of te
monteren. Opgepast : Bij montage van de parasol altijd zorgen dat de parasolstam (B1) voldoende diep in de klem (B2) zit.
.
F. Le parasol se situe le long du bras. Tirez le bouton noir et positionnez le parasol en position verticale (mouvement 2). Le
bouton se verrouillera automatiquement quand le parasol se trouvera dans la position verticale. Utilisez cette position (45°)
aussi pour fixer ou enlever le parasol. Attention : Placez le tronc du parasol (B1) aussi profondément que possible dans
l'étau (B2).
.
ENG. The parasol is positioned next to the arm. Pull the black pullbutton and bring the parasol in the vertical position
(movement 2). The pullbutton will lock automatically, when the parasol moves to its vertical position. Use this position (45°)
for removing or placing the parasol. Attention : Put the trunck (B1) of the parasol as deep as possible in the clamp (B2).
.
D. Das Sonnenschirm liegt auf dem Arm. Ziehen Sie an den schwarzen Knopf und bringen Sie den Sonnenschirm in
senkrechte Position ( Bewegung 2). Den Knopf verriegelt wann der Sonnenschirm in senkrechte Position komt. Benutz
diese Positon (45°) auch zum erweiteren oder montieren des Sonnenschirms. Achtung : Stell den Stamm (B1) des
Sonnenschirmes wie tief wie möglich in der Klammer (B2).
.
SP. El parasol quedará acostado sobre el brazo. Tire del tirador negro y coloque el parasol en posición vertical (movimiento
2). El tirador quedará bloqueado cuando el parasol alcance la posición vertical. Utilice también esta posición (45º) para
retirar o montar el parasol. Atención: Durante el montaje del parasol, procure siempre que el tronco del parasol (B1) quede
bien encajado dentro del dispositivo de sujeción (B2).
.
IT. L'ombrellone riposa sul braccio. Tirare la manopola a tiro nera e mettere l'ombrellone nella posizione verticale
(movimento 2). La manopola a tiro si blocca automaticamente quando l'ombrellone raggiunge la posizione verticale.
Utilizzare questa posizione (45°) anche per inserire o rimuovere l'ombrellone. Attenzione: mettere il tubo dell'ombrellone (B1)
il più profondamente possibile nel dispositivo di fissaggio (B2)
.
NL. Breng de arm in horizontale positie (beweging 3), door net zoals bij beweging 1
de kleine zwarte hendel naar links te draaien.
Om de parasol te openen drukt U op de drukknop en trekt u de buis zachtjes naar
beneden zoals aangegeven op de figuur.
.
F. Inclinez le bras dans sa position horzontale (mouvement 3), en utilisant la petite
manette noir (voir mouvement 1).
pour ouvrir le parasol, pousez le bouton avec le pouce et tirez le tube du parasol
doucement., comme sur le dessin.
.
ENG. Move the arm to the horizontal position (movement 3), using the small black
handle (see movement 1).
Open the parasol by pushing the button with your thumb and gently pulling down
the tube of the parasol, as shown on the drawing.
.
D. Um den Arm in waagrechte Position zu bringen (Bewegung 3), den kleinen
Schwarzen Hebel nach links drehen wie Bewegung 1. In Waagrechte Position den
Knopf eindrucken und an dem Rohr sacht ziegen, wie angegeben auf der
Zeichnung.
.
SP. Coloque el brazo en posición horizontal (movimiento 3), girando la pequeña
manivela negra hacia la izquierda, al igual que en el movimiento 1. Para abrir el
parasol, pulse el botón y tire suavemente del tubo hacia abajo, como se muestra en
la figura.
.
IT. Inclinare il braccio nella posizione orizzontale (movimento 3) girando a sinistra la
piccola leva nera. Aprire l'ombrellone premendo il bottone e tirando il tubo
dell'ombrellone gentilmente verso il basso (vedi figura).
NL. De parasolstok voldoende diep naar beneden trekken (voorbij de scharnier), alvorens het
onderste deel van de parasolstok horizontaal te plooien in de parasolhaak (clips) (beweging 4).
F. Tirez le tube du parasol assez profondément (devant la charnière), et repliez la partie
inférieure du tube dans le clip. (mouvement 4)
ENG. Pull down the tube of the parasol deep enough (past the hinge) then rotate the tube of the
parasol in the clip. (movement 4)
D. Ziehen Sie das Rohr des Sonnenschirms ausreichend tief (vorbei das Scharnier) bevor das
unterst Teil des Rohrs zu bauschen in die Schirmklemme (Bewegung 4)
SP. Tire del mástil del parasol bien hacia abajo (hasta pasada la bisagra) antes de replegar la
parte inferior del mástil del parasol para dejarla en posición horizontal en el gancho del parasol
(movimiento 4).
IT. Tirare il tubo dell'ombrellone sufficientemente verso il basso (sotto la cerniera) prima di
sospendere la parte inferiore del tubo al gancio (movimento 4).
B1
3:open
2
1:close
open
A
F
B2

Join the conversation about this product
Here you can share what you think about the Prostor P4 Garden Parasol. If you have a question, first carefully read the manual. Requesting a manual can be done by using our contact form.
reply | This was helpful (0) (Translated by Google)
reply | This was helpful (0) (Translated by Google)