
IMPORTANT SAFEGUARDS
When using electrical appliances, basic safety precautions should always be followed to reduce
the risk of fire, electric shock, and/or injury to persons, including the following:
1. Read all instructions.
2. This appliance is not intended for use
by persons (including children) with
reduced physical, sensory, or mental
capabilities, or lack of experience and
knowledge, unless they are closely
supervised and instructed concerning
use of the appliance by a person
responsible for their safety.
3. Close supervision is necessary when any
appliance is used by or near children.
Children should be supervised to ensure
that they do not play with the appliance.
4. Do not touch hot surfaces. Use handles
or knobs.
5. To protect against electrical shock, do
not immerse cord, plug, or air fryer in
water or other liquid.
6. Unplug from outlet when not in use and
before cleaning. Allow to cool before
cleaning appliance and putting on or
taking off parts.
7. Do not operate any appliance with a
damaged supply cord or plug, or after
the appliance malfunctions or has been
dropped or damaged in any manner.
Supply cord replacement and repairs
must be conducted by the manufacturer,
its service agent, or similarly qualified
persons in order to avoid a hazard.
Contact Customer Service for
information on examination, repair, or
adjustment as set forth in the Limited
Warranty.
8. The use of accessory attachments
not recommended by the appliance
manufacturer may cause injuries.
9. Do not use outdoors.
10. Do not let cord hang over edge of table
or counter or touch hot surfaces.
11. Do not place on or near a hot gas or
electric burner, or in a heated oven.
12. To disconnect, set timer to 0; then
remove plug from wall outlet. To unplug,
grasp the plug and pull from the outlet.
Never pull from the power cord.
13. Extreme caution must be used when
moving an appliance containing hot oil
or other hot liquid.
14. Do not use appliance for other than
intended use.
15. Clean air fryer interior carefully. Do not
scratch or damage heating element tube.
16. Do not operate the appliance by means
of an external timer or separate remote
control system.
17. CAUTION: HOT SURFACE.
The temperature of accessible
surfaces may be high during
and after operation.
SAVE THESE INSTRUCTIONS
Other Consumer Safety Information
This appliance is intended for household use only.
This appliance is only intended for the preparation, cooking, and serving of foods. This
appliance is not intended for use with any nonfood materials or products.
w WARNING
Electrical Shock Hazard:
This appliance is provided with a polarized
plug (one wide blade) to reduce the risk of
electric shock. The plug fits only one way
into a polarized outlet. Do not defeat the
safety purpose of the plug by modifying
the plug in any way or by using an adapter.
If the plug does not fit fully into the outlet,
reverse the plug. If it still does not fit, have
an electrician replace the outlet.
The length of the cord used on this
appliance was selected to reduce the
hazards of becoming tangled in or tripping
over a longer cord. If a longer cord is
necessary, an approved extension cord
may be used. The electrical rating of the
extension cord must be equal to or greater
than the rating of the appliance. Care must
be taken to arrange the extension cord so
that it will not drape over the countertop
or tabletop where it can be pulled on by
children or accidentally tripped over.
To avoid an electrical circuit overload, do
not use another high-wattage appliance on
the same circuit with this appliance.
How to Use
w CAUTION
Hot Surface. The temperature of accessible surfaces may be high during and
after operation. Hot air and steam exit from air vents on back of unit during cooking.
Before first use: Wash Pan and Removable Crisping Insert in hot, soapy water. Rinse and dry.
1. Place Air Fryer in a location where Air
Vents on back of unit are not blocked.
Plug into outlet. Green POWER/HEATING
Indicator Light will illuminate.
2. Hold Pan Handle and pull straight out to
remove Pan with Removable Crisping
Insert from Base.
3. To add Removable Crisping Insert, place
one finger in center hole and use other
hand to push straight down until level
with bottom of Pan. To remove Crisping
Insert, place one finger in center hole and
pull straight up.
4. Before adding food to Pan, make sure
Removable Crisping Insert is level on
bottom of Pan.
• Lightly misting fresh food with oil will
produce crispier results.
• Do not fill Pan more than 1/2 full.
5. Slide Pan back into Base.
6. Turn Temperature Dial to select desired
temperature. See chart or a recipe for
temperature guide.
7. Turn Timer Dial past 10 and then to
desired cooking time. POWER light will
stay on during cooking. Green HEATING
light will stay on until desired temperature
has been reached, then cycle on and off
during cooking. See chart or a recipe for
cooking time guide.
8. Hold Handle of Pan with Removable
Crisping Insert, pull straight out from
Base, and shake. If recipe calls for stirring
or turning over, place Pan on a flat,
heatproof surface. Use only utensils which
are high-heat resistant (400°F [205°C]) and
prevent scratching of nonstick surfaces.
9. Slide Pan with Removable Crisping
Insert back into Base and cooking will
automatically start if any cooking time
remains.
10. Timer will sound when desired cook time
is reached. Check food for doneness.
11. To remove Pan with hot food, hold Handle
and pull straight out from Base. Place Pan
on a flat, heatproof surface.
12. Carefully empty food to a serving bowl or
platter.
13. Unplug.
Cooking Chart
NOTE: Foods may need to be flipped, stirred, or rotated halfway during cooking. Foods that
can’t be flipped might need to be lightly covered with foil, if getting too brown.
Food Amount Temperature Time
Snacks & Appetizers
Frozen mozzarella bites 6 bites (1 serving) 300°F (149°C) 9–11 minutes
Frozen chicken nuggets
5 nuggets (1 serving)
400°F (205°C) 7–9 minutes
Frozen breaded chicken strips 5 strips (2 servings) 400°F (205°C) 14–16 minutes
Fresh chicken wing pieces 4 pieces (1 serving) 400°F (205°C) 12–14 minutes
Frozen Foods
Frozen dinner yeast rolls 2 rolls (2 servings) 325°F (163°C) 8–10 minutes
Frozen single deep dish pizza 1 pizza (1 serving) 400°F (205°C) 8–9 minutes
Frozen bagel bites 6 bites 375°F (190°C) 5–7 minutes
Potatoes & Vegetables
Frozen crinkle cut French fries
12 pieces (1 serving)
400°F (205°C) 9–11 minutes
Frozen steak fries
7 pieces (1 serving)
400°F (205°C) 10–12 minutes
Frozen tater tots
18 pieces (2 servings)
400°F (205°C) 12–14 minutes
Baking potato (6 ounces)
1 potato (1 serving)
400°F (205°C) 26–30 minutes
Fresh asparagus spears, cut into 2” pieces with
1 teaspoon oil
9 ounces (3 servings) 375°F (190°C) 8–10 minutes
Fresh green beans, trimmed and sprayed with cooking
spray
1 package (12 ounces)
375°F (190°C) 10–12 minutes
Fresh Brussels sprouts, trimmed & halved and tossed
with 1 teaspoon oil
3 cups (3 servings) 375°F (190°C) 16–18 minutes
Meat & Poultry
Fresh chicken thighs or drumsticks with skin
3/4 pound (2 servings) 400°F (205°C) 15–18 minutes
Fresh chicken tenders
3/4 pound (3 servings) 400°F (205°C) 7–8 minutes
Fresh skinless and boneless chicken breast
7 ounces (1 serving) 400°F (205°C) 18–20 minutes
Uncooked breakfast sausage
6 links (2 servings)
350°F (175°C) 7–9 minutes
Hamburger
1 burger (6 oz. [170 g])
350°F (175°C) 15–18 minutes
Boneless ribeye steak (1-1/2" [3.8 cm] thick) 1 serving 400°F (205°C) 20–25 minutes
Fish & Seafood
Fresh salmon
1 fillet (6 oz. [170 g])
400°F (205°C) 10–12 minutes
Frozen fish sticks 10 sticks (2 servings) 350°F (175°C) 9–11 minutes
Frozen breaded butterflied shrimp 4 shrimp (1 serving) 400°F (205°C) 8–10 minutes
Bakery & Desserts
Refrigerated biscuits 1 biscuit 325°F (163°C) 8–10 minutes
Frozen apple turnover 1 turnover 350°F (175°C) 13–15 minutes
Muffins in silicone baking cups 4 muffins 350°F (175°C) 13–15 minutes
NOTE: Review manufacturer-suggested cook times for these and other foods or adjust time
for desired crispness.
Care and Cleaning
1. Unplug. Let cool completely. 2. Hand wash Pan and Removable Crisping
Insert in hot, soapy water; rinse and dry.
Parts and Features
To order parts, visit:
proctorsilex.com/parts
3. Wipe outside of Air Fryer with a soft, damp
cloth. Do not use abrasive cleaners or
sponges; this will damage exterior of Air
Fryer.
4. Interior of Air Fryer can be wiped with a
damp cloth and dried.
Troubleshooting
Air Fryer doesn’t work.
• The appliance isn’t plugged in. Plug into
outlet.
• The timer has not been set. Follow “How
to Use” to set timer.
Food isn’t cooked.
• Too much food in Pan.
Increase cooking
time and continue to cook.
• The temperature was set too low.
Increase temperature and continue to
cook.
Food cooked unevenly.
• Too much food in Pan.
Shake food halfway
through cooking time, or more frequently
if needed.
Fresh vegetables are not crisp enough.
• Cooking time was too short. Increase
cooking time and continue to cook.
• Lightly misting fresh foods with oil will
produce crispier results.
• Temperature is too low. Increase
temperature and continue to cook.
Fresh French fries not crisp.
• Add a small amount of vegetable oil,
enough to lightly coat potatoes.
• Pieces are too large. Cut potatoes
smaller or thinner next batch.
Smoke coming from Air Fryer.
• Excessive oil dripped into Pan or
splattered onto heating coils. Only use
small amounts of oil in air fryers.
Meat or poultry isn’t cooked enough.
• Too much food in Pan. Meat and poultry
should be cooked in a single layer
for even cooking. Refer to the USDA
website for proper cooking doneness
temperatures.
Limited Warranty
This warranty applies to products purchased and
used in the U.S. and Canada. This is the only
express warranty for this product and is
in lieu of any other warranty or condition.
This product is warranted to be free from defects
in material and workmanship for a period of
three (3) years from the date of original purchase.
During this period, your exclusive remedy is
replacement of this product or any component
found to be defective, at our option; however,
you are responsible for all costs associated with
our returning a product or component under this
warranty to you. If the product or component
is unavailable, we will replace with a similar one
of equal or greater value.
This warranty does not cover glass, filters, wear
from normal use, use not in conformity with the
printed directions, or damage to the product
resulting from accident, alteration, abuse, or
misuse. This warranty extends only to the original
consumer purchaser or gift recipient. Keep the
original sales receipt, as proof of purchase is
required to make a warranty claim. This warranty
is void if the product is used for other than single-
family household use or subjected to any voltage
and waveform other than as specified on
the rating label (e.g., 120 V ~ 60 Hz).
We exclude all claims for special, incidental,
and consequential damages caused by breach
of express or implied warranty. All liability is
limited to the amount of the purchase price.
Every implied warranty, including any statutory
warranty or condition of merchantability or
fitness for a particular purpose, is disclaimed
except to the extent prohibited by law, in which
case such warranty or condition is limited to the
duration of this written warranty. This warranty
gives you specific legal rights. You may have
other legal rights that vary depending on where
you live. Some states or provinces do not allow
limitations on implied warranties or special,
incidental, or consequential damages, so the
foregoing limitations may not apply to you.
To make a warranty claim, do not return this
appliance to the store. Please write Hamilton
Beach Brands, Inc. 4421 Waterfront Dr., Glen
Allen, VA 23060, or visit proctorsilex.com/
customer-service in the U.S. or
proctorsilex.ca/customer-service in Canada. For
faster service, locate the model, type, and series
numbers on your appliance.
Read before use.
Lire avant utilisation.
Lea antes de usar.
Questions: 1.800.851.8900
Recipes, tips, product
information and
registration:
proctorsilex.com
Questions : 1.800.267.2826
Recettes, des conseils,
des renseignements sur le
produit et l’enregistrement :
proctorsilex.ca
Preguntas: 800 71 16 100
Recetas, consejos,
información del producto
y registro:
proctorsilex.com.mx
Le invitamos a leer cuidadosamente este instructivo antes de usar su aparato.
Air Fryer
Friteuse à air chaud
Freidora de aire
ENTER TO WIN $100 TO SPEND
ON WEBSITE
Visit register.proctorsilex.com
PARTICIPEZ POUR COURIR
LA CHANCE DE GAGNER UN
MONTANT DE 100 $ À DÉPENSER
SUR NOTRE SITE WEB
Visitez le register.proctorsilex.ca
INGRESE PARA TENER LA
OPORTUNIDAD DE GANAR $100
PARA GASTAR EN NUESTRO
SITIO WEB
Visite register.proctorsilex.com
Open to US customers only • Ce concours s’adresse aux clients
des États-Unis seulement • Este concurso está disponible solo a
clientes de los Estados Unidos
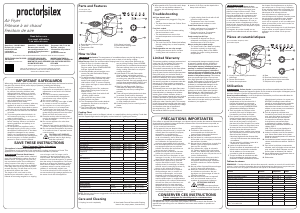
1. Power/Heating Indicator Light
2. Timer Dial
3. Temperature Dial
4. Base
5. Air Vents (on back)
6. Removable Crisping Insert
7. Pan with Handle
PRÉCAUTIONS IMPORTANTES
Pour utiliser un appareil électroménager, vous devez toujours prendre des mesures élémentaires
de sécurité pour réduire le risque d’incendie, d’électrocution et/ou de blessure corporelle, en
particulier les mesures suivantes :
1. Lire toutes les instructions.
2. Cet appareil n’est pas destiné à être
utilisé par des personnes (y compris les
enfants) dont les capacités physiques,
sensorielles ou mentales sont
réduites, ou manquant d’expérience
et de connaissance, sauf si elles sont
étroitement surveillées et instruites
sur l’utilisation de l’appareil par une
personne responsable de leur sécurité.
3. Une surveillance étroite est requise pour
tout appareil utilisé par ou près des
enfants. Surveiller que les enfants ne
jouent pas avec l’appareil.
4. Ne pas toucher les surfaces chaudes.
Utiliser les poignées ou les boutons.
5. Pour éviter de choc électrique, ne pas
immerger le cordon, la fiche ou le corps
de la friteuse dans l’eau ou autre liquide.
6. Débrancher l’appareil de la prise de
courant électrique lorsqu’il n’est pas
utilisé et avant un nettoyage. Le laisser
refroidir avant le nettoyage et avant d’y
placer ou d’y enlever des pièces.
7. Ne pas faire fonctionner un appareil
électroménager avec un cordon ou
une fiche endommagée, ou lorsque
l’appareil ne fonctionne pas bien ou
a été échappé ou endommagé d’une
manière quelconque. Le remplacement
et la réparation du cordon d’alimentation
doivent être faits par le fabricant, son
agent de service ou toute personne
qualifiée de façon à éviter tout danger.
Veuillez communiquer avec le service à
la clientèle pour obtenir de l’information
concernant l’inspection, la réparation
ou le réglage, comme précisé dans la
garantie limitée.
8. L’utilisation d’accessoires non
recommandés par le fabricant de
l’appareil peut causer des blessures.
9. Ne pas utiliser à l’extérieur.
10. Ne pas laisser le cordon pendre du bord
d’une table ou d’un comptoir, ni toucher
des surfaces chaudes.
11. Ne pas placer l’appareil sur ou près d’un
brûleur à gaz ou électrique chaud ou
dans un four chauffé.
12. Pour débrancher, régler la minuterie
à 0. Retirer ensuite la fiche de la prise
murale. Pour débrancher, saisir la fiche
et la retirer de la prise. Ne pas tirer sur le
cordon d’alimentation.
13. Il est nécessaire de faire preuve de la
plus grande prudence en déplaçant
un appareil électroménager contenant
de l’huile chaude ou d’autres liquides
chauds.
14. Ne pas utiliser l’appareil électroménager
à une fin autre que celle prévue.
15. Nettoyer l’intérieur de la friteuse à
air chaud avec précaution. Ne pas
égratigner ou endommager le tube de
l’élément chauffant.
16. Ne pas faire fonctionner cet appareil
avec une minuterie externe ou un
système de commande à distance.
17. ATTENTION! SURFACE
CHAUDE.
La température des surfaces
accessible peut être élevée au
cours du fonctionnement de l’appareil et
après.
CONSERVER CES INSTRUCTIONS
Autres consignes de sécurité pour le consommateur
Cet appareil est destiné à un usage domestique seulement.
Cet appareil est conçu uniquement pour préparer, faire cuire et servir des aliments. Cet
appareil n’est pas conçu pour une utilisation avec toute autre matière ou produit non
alimentaire.
w AVERTISSEMENT
Risque de choc
électrique. Cet appareil est fourni avec une
fiche polarisée (une broche large) pour
réduire le risque d’électrocution. Cette
fiche n’entre que dans un seul sens dans
une prise polarisée. Ne contrecarrez pas
l’objectif sécuritaire de cette fiche en la
modifiant de quelque manière que ce soit
ou en utilisant un adaptateur. Si vous ne
pouvez pas insérer complètement la fiche
dans la prise, inversez la fiche. Si elle refuse
toujours de s’insérer, faire remplacer la prise
par un électricien.
La longueur du cordon installé sur cet
appareil a été sélectionnée afin de réduire
les risques d’enchevêtrement ou de faux
pas causés par un fil trop long. L’utilisation
d’une rallonge approuvée est permise si le
cordon est trop court. Les caractéristiques
électriques de la rallonge doivent
être équivalentes ou supérieures aux
caractéristiques de l’appareil. Prendre toutes
les précautions nécessaires pour installer
la rallonge de manière à ne pas la faire
courir sur le comptoir ou sur une table pour
éviter qu’un enfant ne tire sur le cordon ou
trébuche accidentellement.
Pour éviter la surcharge du circuit électrique,
ne pas utiliser un autre appareil à haute
puissance sur le même circuit que cet
appareil.
Pièces et caractéristiques
Pour commander des pièces, visiter :
proctorsilex.ca/parts
1. Voyant Power/Heating (alimentation/
chauffage)
2. Cadran de minuterie
3. Cadran de température
4. Base
5. Bouches d’aération (à l’arrière)
6. Accessoire pour friture amovible
7. Récipient avec poignée
Utilisation
w ATTENTION
Surface chaude. La température des surfaces accessible peut être élevée au
cours du fonctionnement de l’appareil et après. De l’air chaud et de la vapeur s’échappent par les
bouches d’aération à l’arrière de l’appareil lors de la cuisson.
Avant la première utilisation : Laver le récipient et l’accessoire pour friture amovible dans de
l’eau chaude savonneuse. Rincer et sécher.
1. Placer la friteuse à air dans un
emplacement où les bouches d’air à
l’arrière de l’appareil ne seront pas
bloquées. Branche dans une prise de
courant et le voyant POWER/HEATING
(alimentation/chauffage) s’allumera.
2. Tenir la poignée du récipient et tirer
tout droit pour sortir le récipient avec
l’accessoire pour friture de la base.
3. Pour ajouter l’accessoire pour friture,
insérer un doigt dans le trou du centre
et utiliser l’autre main pour pousser tout
droit vers le bas jusqu’à ce qu’il soit à
plat dans le fond du récipient. Pour retirer
l’accessoire, insérer un doigt dans le trou
du centre et tirer tout droit vers le haut.
4. Avant d’ajouter des aliments dans le
récipient de cuisson, veuilliez vous assurer
que l’accessoire pour friture est bien à plat
dans le fond du récipient.
• Vaporiser légèrement les aliments frais
avec de l’huile donnera des résultats plus
croustillants.
• Ne pas remplir le récipient à plus de la
moitié de sa capacité totale.
5. Insérer le récipient dans la base.
6. Tourner le cadran de température afin de
sélectionner la température souhaitée.
Voir le tableau ou une recette pour
consulter le guide de températures.
7. Tourner le cadran de minuterie au-delà
de 10 et ensuite à la durée de cuisson
souhaitée. POWER (alimentation) restera
allumé durant la cuisson. Le voyant vert
HEATING (chauffage) restera allumé
jusqu’à ce que la température souhaitée
soit atteinte, s’éteindra et s’allumera
alternativement durant la cuisson. Voir le
tableau ou une recette pour consulter le
guide de durées de cuisson.
8. Tenir la poignée du récipient avec
l’accessoire pour friture, tirer tout droit
pour sortir de la base, et secouer. Si
la recette précise qu’il faut remuer
ou retourner les aliments, déposer
le récipient sur une surface plate
et résistante à la chaleur, et utiliser
seulement des ustensiles résistants à la
chaleur (205 °C
[400 °F]) afin de ne pas égratigner le
revêtement antiadhésif des surfaces.
9. Insérer le récipient muni de l’accessoire
pour friture dans la base et la cuisson
démarrera automatiquement s’il reste une
durée de cuisson.
10. La minuterie sonnera lorsque la durée de
cuisson souhaitée sera atteinte. Vérifier la
cuisson.
11. Pour retirer le récipient contenant des
aliments, tenir la poignée et tirer tout droit
pour sortir de la base. Déposer sur une
surface plate et résistante à la chaleur.
12. Verser délicatement les aliments dans un
plat ou un bol de service.
13. Débrancher.
Tableau de cuisson
REMARQUE : Certains aliments doivent être retournés, remués ou tournés à la moitié de la
cuisson. Il sera peut-être nécessaire de couvrir légèrement les aliments qui ne peuvent pas
être retournés avec du papier d’aluminium afin qu’ils ne brunissent pas trop.
Aliment Quantité Température Temps
Grignotines et hors-d’œuvre
Bouchées de mozzarella congelées 6 morsures (1 portion) 149 °C (300 °F) 9–11 minutes
Pépites de poulet congelées
5 pépites (1 portion)
205 °C (400 °F) 7–9 minutes
Doigts de poulet panés congelés 5 bandes (2 portions) 205 °C (400 °F) 14–16 minutes
Ailes de poulet fraîches en morceaux 4 piéces (1 portion) 205 °C (400 °F) 12–14 minutes
Aliments congelés
Petits pains congelés
2 petits pains (2 portions)
163 °C (325 °F) 8–10 minutes
Pizza épaisse individuelle 1 pizza (1 portion) 205 °C (400 °F) 8–9 minutes
Bouchées de bagels congelées 6 morsures 190 °C (375 °F) 5–7 minutes
Pommes de terre et légumes
Pommes de terre frites congelées coupe ondulée
12 piéces (1 portion)
205 °C (400 °F) 9–11 minutes
Pommes de terre frites congelées coupe bifteck
7 piéces (1 portion)
205 °C (400 °F) 10–12 minutes
Pommes de terre rissolées congelées
18 piéces (2 portions)
205 °C (400 °F) 12–14 minutes
Pomme de terre au four (6 onces)
1 pomme (1 portion)
205 °C (400 °F) 26–30 minutes
Asperges fraîches, coupées en morceaux de 2 po
avec 1 cuil. à table d’huile
9 ounces (3 portions) 190 °C (375 °F) 8–10 minutes

Join the conversation about this product
Here you can share what you think about the Proctor Silex 35055 Deep Fryer. If you have a question, first carefully read the manual. Requesting a manual can be done by using our contact form.