w WARNING
Hot Surface. The temperature of accessible surfaces may be high when
the appliance is operating.
Before first use: Wipe the bottom and top Waffle Grids with a soapy, damp cloth. Rinse
cloth; then wipe Grids again. Wipe or brush Waffle Grids with vegetable oil. This is only
recommended before first use. Waffle browning will improve with each subsequent batch.
NOTE: The Red POWER Light comes on when the appliance is first plugged in. This
light will stay on until the unit is unplugged. The Green PREHEAT Light come on when
the appliance has reached the desired temperature. For best results, wait until Green
PREHEAT Light comes on before adding waffle batter. The Green PREHEAT Light will
cycle on and off during cooking and is not an indication that the waffle cone is ready.
How to Use
w WARNING
Burn Hazard. Always use an oven mitt to protect hand when opening a
hot Waffle Maker. Escaping steam can burn.
1. Plug into outlet. The Red POWER Light
will come on.
2. Set Browning Control Dial to halfway
between MIN and MAX, close lid and wait
until green PREHEAT light comes on.
3. Raise Lid. Pour 3–4 tablespoons batter
into center of bottom Grid, allowing
batter to spread for even filling. Lower
Lid. Do not press down or batter will
leak, causing waffle cone to be too thin
and crack.
Tip: Adjust amount of batter as needed.
4. Each waffle cone takes 2–3 minutes to
cook, depending on your recipe.
5. Using tip of Cone Roller, lift edge of
waffle and move Cone Roller under
cooked waffle to remove. Or use heat-
proof, non-metal utensil. Use a paper
towel to quickly shape waffle around
Cone Roller, or form around Waffle
Cup Mold. Hold until set. Remove cone
from Roller and place on a parchment
paper-lined tray.
6. To ensure Waffle Cone Maker is hot
enough for a second batch, allow to
heat 2 minutes before adding batter.
Repeat for each batch.
Care and Cleaning
w WARNING
Electrical Shock Hazard. Disconnect power before cleaning. Do not
immerse cord, plug, or base in any liquid.
1. Unplug. Allow to cool.
2. Wipe Waffle Grids and outside of unit
with a damp, soapy cloth. Rinse cloth
and wipe Grids again. Do not use
steel wool, scouring pads, or abrasive
cleansers on any part of the unit.
Never use sharp or pointed objects for
cleaning purposes.
3. Wrap cord around Cord Wrap on
bottom of Waffle Cone Maker. To save
space, store vertically.
Troubleshooting
Waffle Cone Maker will not turn on or POWER Light is not illuminated.
• Check that Waffle Cone Maker is plugged into outlet. If not, plug into working outlet.
Waffle cone taking too long to cook or not done.
• Check recipe for cooking time. Increase temperature by turning Browning Control Dial
clockwise. Make sure to lower Lid and wait 2 minutes between each waffle cone.
• Slightly lift Lid; if waffle cone starts to release, it is cooked. If it doesn’t, continue to
cook 1-2 minutes.
Waffle cone sticking to Grids.
• Waffle cone isn’t fully cooked. Cook longer, checking often for browning or spray a
small amount of cooking spray on Grids before preheating.
• Grids need to be cleaned. Clean Grids after each use.
Waffle cone or bowl is cracking and too brown.
• Waffle cone is overcooked. Reduce temperature by turning Browning Control Dial
counterclockwise and cook a little less.
Waffle cone or bowl is too soft.
• Batter wasn’t cooked long enough. Keep Mold together until waffle bowl is set and
remove.
• Make sure you are using a waffle cone recipe, not waffle mix.
Waffle Cone Recipe
Ingredients
2/3 cup bread flour
1/4 teaspoon ground cinnamon
1/4 teaspoon salt
2 large eggs
1/4 cup granulated sugar
1/4 cup packed dark brown sugar
1/4 cup unsalted butter, melted
1/4 cup whole milk
1 tablespoon vanilla extract
Directions
1. Set Browning Control Dial to halfway between MIN and MAX, close lid and wait until
green PREHEAT light comes on.
Read before use.
Lire avant utilisation.
Lea antes de usar.
IMPORTANT SAFEGUARDS
When using electrical appliances, basic safety precautions should always be
followed to reduce the risk of fire, electric shock, and/or injury to persons, including
the following:
1. Read all instructions.
2. This appliance is not intended for use
by persons (including children) with
reduced physical, sensory, or mental
capabilities, or lack of experience and
knowledge, unless they are closely
supervised and instructed concerning
use of the appliance by a person
responsible for their safety.
3. Close supervision is necessary
when any appliance is used by or
near children. Children should be
supervised to ensure that they do not
play with the appliance.
4. Do not touch hot surfaces. Use
handles or knobs.
5. To protect against risk of electrical
shock, do not immerse cord, plug, or
any part of the appliance in water or
other liquid.
6. Unplug from outlet when not in use
and before cleaning. Allow to cool
before putting on or taking off parts
and before cleaning.
7. Do not operate any appliance with
a damaged supply cord or plug, or
after the appliance malfunctions or
has been dropped or damaged in any
manner. Supply cord replacement
and repairs must be conducted by
the manufacturer, its service agent,
or similarly qualified persons in order
to avoid a hazard. Call the provided
customer service number for
information on examination, repair, or
adjustment.
8. The use of accessory attachments
not recommended by the appliance
manufacturer may cause injuries.
9. Do not use outdoors.
10. Do not let cord hang over edge
of table or counter, or touch hot
surfaces, including the stove.
11. Do not place on or near a hot gas or
electric burner or in a heated oven.
12. Extreme caution must be used when
moving an appliance containing hot
oil or other hot liquids.
13. Do not use appliance for other than
intended use.
14. Do not use appliance unattended.
15. During use, provide 4 to 6 inches air
space above, behind, and on both
sides for air circulation.
16. Never remove the waffle with any
kind of cutting device or other
metallic kitchen utensil.
17. Always allow the appliance to cool
before putting it away, and never
wrap the cord around the appliance
while it is still hot.
18. Do not operate the appliance by
means of an external timer or
separate remote-control system.
19.
CAUTION HOT SURFACE. The
temperature of
accessible
surfaces
may be high when the appliance is
operating.
SAVE THESE INSTRUCTIONS
Other Consumer Safety Information
This appliance is intended for household use only.
w WARNING
Electrical Shock Hazard: This
appliance is provided with either a polarized
(one wide blade) or grounded (3-prong)
plug to reduce the risk of electric shock. The
plug fits only one way into a polarized or
grounded outlet. Do not defeat the safety
purpose of the plug by modifying the plug in
any way or by using an adapter. If the plug
does not fit fully into the outlet, reverse the
plug. If it still does not fit, have an electrician
replace the outlet.
The length of the cord used on this
appliance was selected to reduce the
hazards of becoming tangled in or tripping
over a longer cord. If a longer cord is
necessary, an approved extension cord
may be used. The electrical rating of the
extension cord must be equal to or greater
than the rating of the appliance. If the
appliance is provided with a grounded
cord, the extension cord must also be a
grounding-type, 3-wire cord. Care must
be taken to arrange the extension cord so
that it will not drape over the countertop
or tabletop where it can be pulled on by
children or accidentally tripped over.
To avoid an electrical circuit overload, do not
use another high-wattage appliance on the
same circuit with this appliance.
Parts and Features
2. In a small bowl, combine flour, cinnamon and salt. Set aside.
3. I
n a medium bowl, whisk together eggs and sugars until well blended, about 1 minute.
Add flour mixture and stir until blended. Add butter, milk and vanilla extract and stir
until well blended.
4. Pour 3-4 tablespoons waffle cone batter in center of Waffle Cone Maker. Lower Lid
onto batter, do not push down. Cook for 2-3 minutes. Waffle cones are thinner than
waffles.
5. Using tip of Cone Roller, lift edge of waffle and move Cone Roller under cooked
waffle to remove. Or use heat-proof, non-metal utensil. Use a paper towel to quickly
shape waffle around Cone Roller. Or form around Waffle Cup Mold. Hold until set.
Remove cone from Roller and place on a parchment paper-lined tray. Repeat with
remaining batter.
6. When cool, fill with ice cream to serve.
Serves: 10
Test Kitchen Tips:
• Waffle cone batter should be cooked crisp
in 2–3 minutes. Adjust the temperature
hotter or cooler as necessary to cook
waffle cones evenly.
• Use a paper towel to hold the waffle cone
while rolling if it is too hot to handle.
• To make waffle bowls, lay the waffle over
one Waffle Cup Mold or put in your own
bowl. Top with the second bowl mold and
gently press together without forcing.
Waffle Cup Molds do not need to meet.
• If waffle bowls or cones crack, reduce
temperature or cooking time. If
temperature is already at MIN, reduce
cooking time.
• The Green PREHEAT Light on Waffle Cone
Maker indicates that the heat is cycling.
To ensure Cone Maker is hot enough for
the next batch, allow the Cone Maker to
heat at least 2 minutes between cones
and make sure the Green PREHEAT Light
is illuminated.
• For smaller cones, quickly move the
waffle cone to a cutting board, cut in half
and roll each half around Cone Roller.
Enlist a helper to help roll before the
halves cool.
• To prevent ice cream from leaking, insert
a small marshmallow in bottom of cone.
Or, drizzle melted chocolate in bottom and
let harden before filling with ice cream.
Limited Warranty
This warranty applies to products purchased and used in the U.S. and Canada. This is the
only express warranty for this product and is in lieu of any other warranty or condition.
This product is warranted to be free from defects in material and workmanship for a
period of three (3) years from the date of original purchase. During this period, your
exclusive remedy is repair or replacement of this product or any component found to
be defective, at our option; however, you are responsible for all costs associated with
returning the product to us and our returning a product or component under this warranty
to you. If the product or component is no longer available, we will replace with a similar
one of equal or greater value.
This warranty does not cover glass, filters, wear from normal use, use not in conformity
with the printed directions, or damage to the product resulting from accident, alteration,
abuse, or misuse. This warranty extends only to the original consumer purchaser or
gift recipient. Keep the original sales receipt, as proof of purchase is required to make a
warranty claim. This warranty is void if the product is used for other than single-family
household use or subjected to any voltage and waveform other than as specified on the
rating label (e.g., 120 V ~ 60 Hz).
We exclude all claims for special, incidental, and consequential damages caused by
breach of express or implied warranty. All liability is limited to the amount of the purchase
price. Every implied warranty, including any statutory warranty or condition of
merchantability or fitness for a particular purpose, is disclaimed except to the extent
prohibited by law, in which case such warranty or condition is limited to the duration of
this written warranty. This warranty gives you specific legal rights. You may have other
legal rights that vary depending on where you live. Some states or provinces do not allow
limitations on implied warranties or special, incidental, or consequential damages, so the
foregoing limitations may not apply to you.
To make a warranty claim, do not return this appliance to the store. Please call
1.800.851.8900 in the U.S. or 1.800.267.2826 in Canada or visit proctorsilex.com in the
U.S. or proctorsilex.ca in Canada. For faster service, locate the model, type, and series
numbers on your appliance.
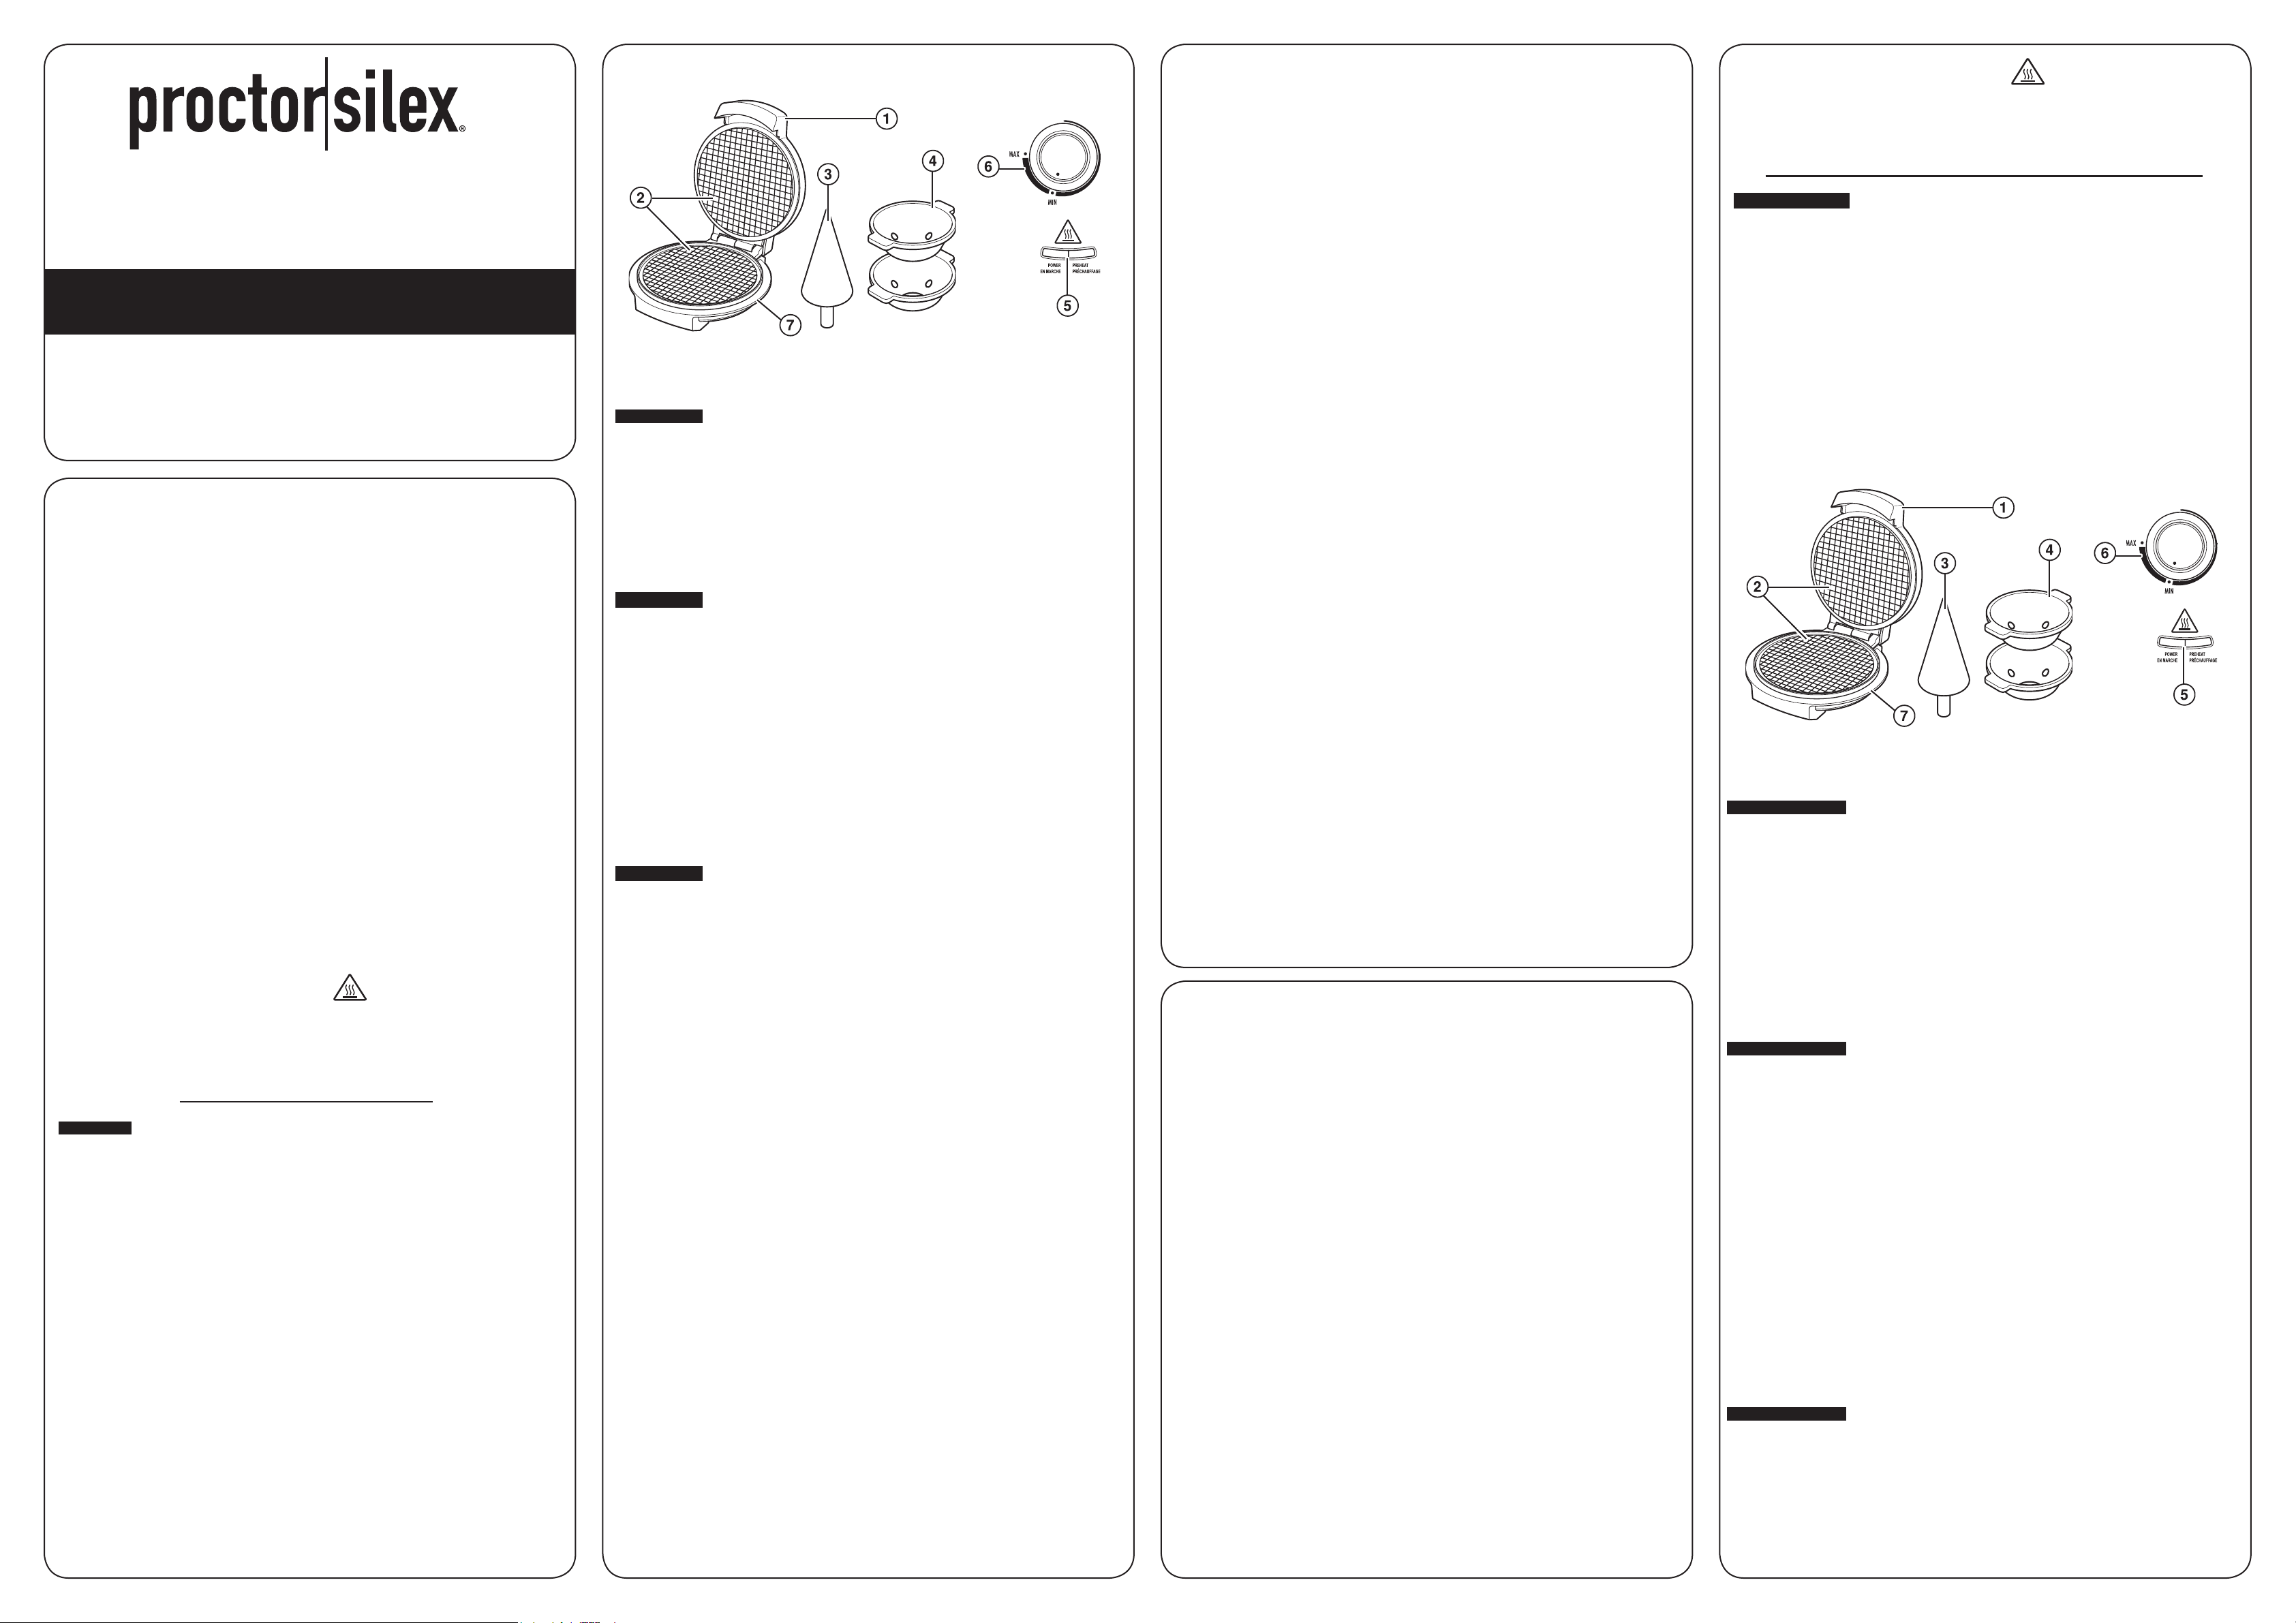
1. Lid with Handle
2. Waffle Grids
3. Cone Roller
4. Waffle Cup Mold
5. Red POWER Light/Green PREHEAT
Light
6. Browning Control Dial
7. Cord Wrap (on bottom)
Waffle Cone Maker
Machine à gaufrette
Waflera para hacer conos
PRÉCAUTIONS IMPORTANTES
Pour utiliser un appareil électroménager, vous devez toujours prendre des mesures
élémentaires de sécurité pour réduire le risque d’incendie, d’électrocution et/ou de
blessure corporelle, en particulier les mesures suivantes :
1. Lire toutes les instructions.
2. Cet appareil n’est pas destiné à
être utilisé par des personnes
(y compris les enfants) dont les
capacités physiques, sensorielles ou
mentales sont réduites, ou manquant
d’expérience et de connaissance, sauf
si elles sont étroitement surveillées et
instruites sur l’utilisation de l’appareil
par une personne responsable de leur
sécurité.
3. Une surveillance étroite est requise
pour tout appareil utilisé par ou près
des enfants. Surveiller que les enfants
ne jouent pas avec l’appareil.
4. Ne pas toucher les surfaces chaudes.
Utiliser les poignées ou les boutons.
5. Pour se protéger contre le risque de
choc électrique, ne pas immerger le
cordon, la fiche ou toute partie de
l’appareil dans l’eau ou tout autre
liquide.
6. Débrancher de la prise murale dès la
fin de l’utilisation et avant le nettoyage.
Laisser refroidir l’appareil avant
d’installer ou de retirer des pièces et
avant le nettoyage.
7. Ne pas faire fonctionner un appareil
électroménager avec un cordon ou
une fiche endommagée, ou lorsque
l’appareil ne fonctionne pas bien
ou a été échappé ou endommagé
d’une manière quelconque. Le
remplacement et la réparation du
cordon d’alimentation doivent être faits
par le fabricant, son agent de service
ou toute personne qualifiée de façon à
éviter tout danger. Appeler le numéro
de service à la clientèle fourni pour des
renseignements concernant l’examen,
la réparation ou l’ajustement.
8. L’utilisation d’accessoires non
recommandés par le fabricant de
l’appareil peut causer des blessures.
9. Ne pas utiliser à l’extérieur.
10. Ne pas laisser le cordon pendre du
bord d’une table ou d’un comptoir,
ou toucher des surfaces chaudes, y
compris la cuisinière.
11. Ne pas placer sur ou près d’un brûleur
chaud à gaz ou électrique ou dans un
four chaud.
12. Une précaution extrême doit être
employée lors du déplacement d’un
appareil électroménager contenant de
l’huile chaude ou autre liquide chaud.
13. Ne pas utiliser l’appareil pour un usage
autre que celui auquel il est destiné
14. Ne pas faire fonctionner l’appareil sans
supervision.
15. Lors de l’utilisation, laisser 4 à 6 po (10
à 15 cm) de libre au-dessus, derrière
et sur les deux côtés de l’appareil pour
permettre la circulation d’air.
16. Ne jamais retirer les gaufres à l’aide
d’ustensiles de cuisine métalliques ou
tout autre dispositif de coupe.
17. Toujours permettre le refroidissement
de l’appareil avant de le ranger et ne
jamais enrouler le cordon autour de
l’appareil pendant qu’il est chaud.
18. Ne pas faire fonctionner cet appareil
avec une minuterie externe ou un
système de télécommande distinct.
19.
ATTENTION : SURFACE
CHAUDE. La température des surfaces
extérieures sera plus élevée pendant le
fonctionnement de l’appareil.
CONSERVER CES INSTRUCTIONS
Autres renseignements relatifs à la sécurité du consommateur
Cet appareil est destiné à l’utilisation domestique seulement.
w AVERTISSEMENT
Risque de choc
électrique : Cet appareil est fourni avec
une fiche polarisée (lame plus large) ou
d’une fiche (3 lames et mise à la terre) pour
réduire le risque d’électrocution. Cette fiche
s’insère d’une seule manière dans une prise
polarisée ou prise avec mise à la terre. Ne
pas transformer le dispositif de sécurité de
la fiche en modifiant celle-ci de quelconque
façon ou en utilisant un adaptateur. Si vous
ne pouvez pas insérer complètement la
fiche dans la prise, inversez la fiche. Si elle
refuse toujours de s’insérer, faire remplacer
la prise par un électricien.
La longueur du cordon installé sur cet
appareil a été sélectionnée afin de réduire
les risques d’enchevêtrement ou de faux
pas causés par un fil trop long. L’utilisation
d’une rallonge approuvée est permise, si le
cordon est trop court. Les caractéristiques
électriques de la rallonge doivent
être équivalentes ou supérieures aux
caractéristiques de l’appareil. Si cet appareil
est du type à mise à la terre, la rallonge
doit être du type à mise à la terre, à 3 fils.
Prendre toutes les précautions nécessaires
pour installer la rallonge de manière à ne
pas la faire courir sur le comptoir ou sur une
table pour éviter qu’un enfant ne tire sur le
cordon ou trébuche accidentellement.
Pour éviter la surcharge du circuit
électrique, ne pas utiliser un autre appareil à
haute puissance sur le même circuit que cet
appareil.
Pièces et caractéristiques
w AVERTISSEMENT
Surface chaude. La température des surfaces accessible peut être
élevée lors du fonctionnement de l’appareil.
Avant d’utiliser pour la première fois : Essuyer les grilles à gaufrettes inférieures et
supérieures à l’aide d’un chiffon humide et savonneux. Rincer le chiffon et essuyer les
grilles à nouveau. Essuyer ou frotter les grilles à gaufrettes avec de l’huile végétale.
Cette recommandation ne concerne que la première utilisation. Le dorage des gaufrettes
s’améliorera après la cuisson de chaque gaufrette.
REMARQUE : Le voyant rouge POWER (alimentation) s’allume lors du branchement de
l’appareil. Ce voyant restera allumé jusqu’à ce que l’appareil soit débranché. Le voyant
vert PREHEAT (préchauffer) s’allume lorsque l’appareil a atteint la température souhaitée.
Pour de meilleurs résultats, attendre jusqu’à ce que le voyant vert PREHEAT (préchauffer)
s’allume avant d’ajouter de la pâte à gaufrette. Le voyant vert PREHEAT (préchauffer)
s’allumera et s’éteindra en alternance durant la cuisson et n’est pas une indication que la
gaufrette est prête.
Mode d’emploi
w AVERTISSEMENT
Risque de brûlere. Veuillez toujours utiliser des gants de cuisine
pour protéger vos mains lorsque vous ouvrez un gaufrier chaud. La vapeur qui s’échappe
peut vous brûler.
1. Brancher dans la prise électrique. Le
voyant rouge POWER (alimentation)
s’allumera.
2. Positionner le bouton de contrôle
du dorage à mi-chemin entre MIN et
MAX, refermer le couvercle et attendre
jusqu’à ce que le voyant vert PREHEAT
(préchauffer) s’allume.
3. Soulever le couvercle. Verser 3-4 cuil.
à table de pâte à gaufre au centre
de la grille inférieure en laissant la
pâte s’étendre pour un remplissage
uniforme. Abaisser le couvercle. Ne
pas appuyer, car la pâte s’écoulera et
le cornet gaufré sera trop mince et
craquera.
Conseil : Vous pouvez ajuster la
quantité de pâte au besoin.
4. Il faut compter 2-3 minutes pour que
le cornet gaufré soit cuit, selon votre
recette.
5. À l’aide du rouleau à cornet, soulever
le bord de la gaufre et insérer le
rouleau à cornet sous la gaufre cuite
pour la retirer. Ou, utiliser un ustensile
non métallique résistant à la chaleur.
À l’aide d’une serviette de papier,
façonner rapidement la gaufrette
autour du rouleau à cornet. Ou,
façonner à l’aide d’un moule à coupe
gaufrette. Maintenir jusqu’à ce que la
gaufrette soit figée. Retirer le cornet
du rouleau et déposer sur un plateau
recouvert de papier parchemin.
6. Pour s’assurer que la machine à
gaufrettes est suffisamment chaude
pour une deuxième gaufrette, laisser
réchauffer pendant 2 minutes avant
d’ajouter de la pâte. Répéter la même
opération pour chaque gaufrette.
Entretien et nettoyage
w AVERTISSEMENT
Risque de choc électrique. Débrancher l’alimentation avant le
nettoyage. Ne pas immerger le cordon d’alimentation, la fiche ou la base dans tout
liquide.
1. Débrancher. Laisser refroidir.
2. Essuyer les grilles à gaufrettes et
l’extérieur de l’appareil à l’aide d’un
chiffon humide et savonneux. Rincer
le chiffon et essuyer les grilles à
nouveau. Ne pas utiliser de laine d’acier,
de tampon à récurer ou de produits
nettoyants abrasifs pour nettoyer
l’appareil. Ne jamais utiliser d’objets
tranchants ou pointus pour le nettoyage.
3. Enrouler le cordon d’alimentation
autour du rembobineur de cordon en
dessous de la machine à gaufrettes.
Pour économiser de l’espace, ranger à la
verticale.
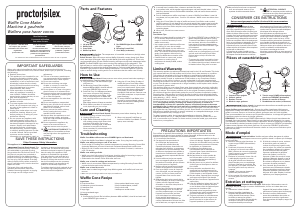
1. Couvercle avec poignée
2. Grilles à gaufres
3. Rouleau à cornet
4. Moule à coupe gaufrette
5. Témoin rouge POWER (alimentation)/
témoin vert PREHEAT (préchauffer)
6. Bouton de contrôle du dorage
7. Rembobineur de cordon (en dessous)
For questions: 1.800.851.8900
For recipes, tips, product
information/use & cares and
registration:
proctorsilex.com
Pour des questions :
1.800.267.2826
Pour des recettes, des
conseils, des renseignements/
utilisation et entretiens sur le
produit et l’enregistrement :
proctorsilex.ca
Para preguntas: 800 71 16 100
Para recetas, consejos,
información del producto/uso
y cuidodos y registro:
proctorsilex.com.mx
Le invitamos a leer cuidadosamente este instructivo antes de usar su aparato.

Join the conversation about this product
Here you can share what you think about the Proctor Silex 26410 Waffle Maker. If you have a question, first carefully read the manual. Requesting a manual can be done by using our contact form.