
Smartmaxx GmbH
Schulzstraße 2c, D-85579 Neubiberg
Stand der Informationen · Version des informations ·
Informatiestand · Information status · Stav informací ·
Fecha de la última actualización · Data da informação ·
Stanje informacij: 09/2017
Ident.-Nr.: 297482 092017 - DE/BE/NL/CZ/SI
QA447
DE
Benötigtes Werkzeug
FR
Outils nécessaires
NL
Benodigd gereedschap
GB
Required tools
CZ
Potřebné nástroje
ES
Herramientas necesarias
PT
Ferramentas necessárias
SI
Potrebno orodje
Ø 6 mm
IAN 297482
INSEKTENSCHUTZ
FÜR DACHFENSTER
3
F
E
2x
H + 55 mm
B +29 mm
AK2 K1D1 D2
I
H
G
B1
I
H
G
B2
E E
FK1 K2D3 D4
H
I
H
I
J J
2
A
B2
D4
D3
B1
(1050 mm – B)
2
(1050 mm – B)
2
INSEKTENSCHUTZ FÜR DACHFENSTER
Montage- und Sicherheitshinweise
MOUSTIQUAIRE POUR FENÊTRE DE TOIT
Instructions de montage et consignes de sécurité
INSECTENWERING VOOR DAKRAMEN
Montage- en veiligheidsinstructies
SKYLIGHT INSECT SCREEN
Installation and safety instructions
OCHRANA PROTI HMYZU NA STŘEŠNÍ
OKNO
Montážní a bezpečnostní pokyny
MOSQUITERA PARA TRAGALUCES
Indicaciones de montaje y seguridad
PROTEÇÃO CONTRA INSETOS PARA
CLARABOIA
Indicações de montagem e segurança
ZAŠČITA PRED MRČESOM ZA STREŠNA
OKNA
Navodila za montažo in varnostni napotki
DE
Inhalt
FR
Contenu
NL
Inhoud
GB
Contents
CZ
Obsah
ES
Contenido
PT
Conteúdo
SI
Vsebina
G
H
D1 D2
A
D3
D4
B1
B2
C
I J
K2
K1
2x E
4x 4x 2x
F
2x 2x
2x
4
5
A
B1
B1
6
B1
G
G
B1
A
7
D1
D1
D3
A
8
D2
A
A
=
=
70 mm
10
D2
E
E
E
D2
D1
9
I
H
Ø 6 mm
11
E
D4
F
E
E
F
D3
D4
12
E
D4
F
Ø 6 mm
F
E
13
F
I
E
H
E
D4
14
J
C
D4
15
50 mm
16
4x
K2
D4
VORSICHT VERLETZUNGSGEFAHR!
Stellen Sie sicher, dass alle Teile unbeschädigt und
sachgerecht montiert sind. Bei unsachgemäßer Monta-
ge besteht Verletzungsgefahr. Beschädigte Teile können
die Sicherheit und Funktion beeinflussen.
5. Montage
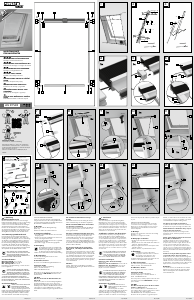
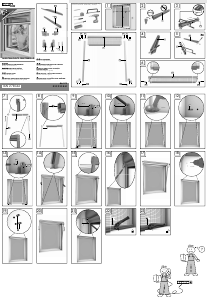
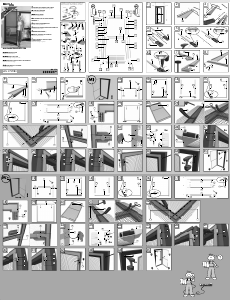
Bitte folgen Sie strikt der Montageanleitung
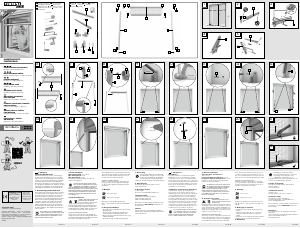
(Bild 1 – 16).
Beachten Sie dabei die Sicherheitshinweise!
6. Reinigung und Pflege
Reinigungsmittel.
-
freien, leicht angefeuchteten Tuch.
-
gen Abständen gründlich.
7. Entsorgung
Die Verpackung besteht aus umweltfreundli-
chen Materialien. Entsorgen Sie diese in den
örtlichen Recyclingbehältern. Möglichkeiten
zur Entsorgung des ausgedienten Produkts
erfahren Sie bei Ihrer Gemeinde oder Stadtverwaltung.
8. Montagevideo
Ein animiertes Montagevideo finden Sie unter:
www.smartmaxx.info
9. Hersteller / Service
Bei Service und Gewährleistungsfall kontaktieren Sie:
Smartmaxx GmbH
Schulzstraße 2c, D -85579 Neubiberg
Hotline: +49 896 784 506 - 0
Bitte halten Sie für alle Anfragen den Kassenbon und
die Artikelnummer IAN 297482 als Nachweis für
den Kauf bereit.
10. FAQ
Was tun, wenn Teile im Bausatz fehlen / de-
fekt sind?
Stellen Sie fest, dass ein im Lieferumfang aufgeführtes
Teil fehlt oder defekt ist, teilen Sie uns dieses unter
Übermittlung der Artikelnummer Ihres Produkts und des
oder nutzen Sie unser Kontaktformular. Sie erhalten
innerhalb der Gewährleistungszeit umgehend kostenlos
Ersatz.
DE
1. Einleitung
Herzlichen Glückwunsch!
Mit Ihrem Kauf haben Sie sich für ein hochwertiges
Produkt entschieden. Machen Sie sich vor der Montage
und der ersten Inbetriebnahme mit dem Produkt
vertraut. Lesen Sie hierzu aufmerksam die nachfolgen-
de Montageanleitung und die Sicherheitshinweise.
Benutzen Sie das Produkt nur wie beschrieben und für
die angegebenen Einsatzbereiche. Bewahren Sie diese
Anleitung gut auf. Händigen Sie alle Unterlagen bei
Weitergabe des Produkts an Dritte ebenfalls mit aus.
2. Bestimmungsgemäßer Gebrauch
Dieser Artikel ist als Schutz gegen Fluginsekten im
privaten Wohnbereich vorgesehen. Eine andere Ver-
wendung als zuvor beschrieben oder eine Veränderung
des Produkts ist nicht zulässig und kann zu Verletzun-
gen und / oder Beschädigungen des Produkts führen.
Für aus bestimmungswidriger Verwendung entstande-
ne Schäden oder Schäden, die durch die Montage
entstehen übernimmt der Hersteller keine Haftung. Das
Produkt ist nicht für den gewerblichen Einsatz bestimmt.
Wir empfehlen das Produkt bei Wind zu öffnen.
BITTE SETZEN SIE SICH BEI PROBLEMEN
ODER RÜCKFRAGEN ZUM PRODUKT ODER
ZUR MONTAGE IMMER ZUNÄCHST MIT
UNSERER SERVICESTELLE IN VERBINDUNG.
WIR HELFEN IHNEN GERNE WEITER.
3. Technische Daten
Max. Bausatzmaß: 110 x 160 cm
Max. Laibungsmaß:
104 x 148 cm
Min. Laibungsmaß:
45 x 20 cm
Die Laibung ist die Maueröffnung, in welche der Fens-
terstock eingebaut ist.
ACHTEN SIE BEIM AUSPACKEN DARAUF,
DASS SIE NICHT VERSEHENTLICH MONTA-
GEMATERIAL WEGWERFEN. KONTROLLIE-
REN SIE UNMITTELBAR NACH DEM AUSPA-
CKEN DEN LIEFERUMFANG AUF VOLLSTÄNDIGKEIT
SOWIE DEN EINWANDFREIEN ZUSTAND DES
PRODUKTS UND ALLER TEILE. MONTIEREN SIE DAS
PRODUKT KEINESFALLS, WENN DER LIEFERUMFANG
NICHT VOLLSTÄNDIG IST.
4. Sicherheitshinweise
LEBENS- UND UNFALLGEFAHR FÜR
KLEINKINDER UND KINDER!
Lassen Sie Kinder niemals unbeauf-
sichtigt mit Verpackungsmaterial und
Produkt. Es besteht Erstickungsgefahr durch Verpackungs-
material und Lebensgefahr durch Strangulation. Kinder
unterschätzen häufig die Gefahren. Halten Sie Kinder
stets vom Produkt fern. Das Produkt ist kein Spielzeug.
Wo wird das Produkt am Fenster ange-
bracht?
Das Produkt wird innen um die Laibung des Fensters
mittels Schraubmontage an der Mauer angebracht.
Welche minimalen Maße muss ich beim Kür-
zen des Plissees beachten?
Das Plissee kann bis auf eine minimale Gesamtbreite
von 45 cm gekürzt werden. Die Höhe kann bis auf
20 cm gekürzt werden.
Wie kürze ich Aluminiumprofile am besten?
Verwenden Sie zum Kürzen von Aluminiumprofilen am
besten eine Eisensäge. Legen Sie die Teile in eine
Gehrungslade, fixieren diese ohne zu quetschen ggf.
mit einer Schraubzwinge, um einen exakt geraden
Schnitt zu erzielen. Als Sicherheitsmaßnahme verwei-
sen wir auf das Tragen von Arbeitshandschuhen. Breite
B und Höhe H sind die Maße der Laibung des Fensters
(Mauer zu Mauer Abstand).
Das Gewebe bleibt nicht an gewünschter
Stelle stehen, oder hängt schief. Was kann
ich tun?
Überprüfen Sie die Schnurspannung. Lockern Sie dazu
die Gewindestifte und spannen Sie die Schnüre nach.
Die Spannung sollte auf beiden Seiten in etwa dieselbe
sein. Handfestes anziehen der Schnüre ist im Normal-
fall ausreichend. Überdrehen Sie die Gewindestifte
nicht. Sollte das Problem weiterhin bestehen, führen Sie
diesen Schritt sowohl in geöffneten, als auch geschlos-
senen Zustand durch.
Hinweis:
Irrtümer, Änderungen und Druckfehler vorbehalten.
Aktuelle Version der Anleitung als PDF-Download unter
www.smartmaxx.info
Tenir hors de la portée des enfants. Le produit n’est pas
un jouet.
ATTENTION RISQUE DE BLESSURE!
Assurez-vous que tous les composants sont montés
correctement et sans dommages. Il existe un risque
de blessure en cas de montage incorrect. Les pièces
endommagées peuvent influencer la sécurité et la
fonction du produit.
5. Montage
Veuillez suivre strictement les instructions de montage
(Illustration1 – 16).
Respectez les consignes de sécurité!
6. Nettoyage et entretien
abrasifs.
pelucheux, légèrement humide.
intervalles réguliers.
7. Élimination
L’emballage est composé de matières
écologiques. Éliminez-le dans les conteneurs
obtiendrez plus d’informations sur les
possibilités d’éliminer le produit usagé auprès de votre
commune ou de l’administration de la ville.
8. Vidéo de montage
l’adresse suivante: www.smartmaxx.info
9. Fabricant / Service
En cas de garantie et de service, contactez:
Smartmaxx GmbH
Schulzstraße 2c, D -85579 Neubiberg
Assistance téléphonique: +49896784506-0
Pour toute question, veuillez préparer le ticket de caisse
et la référence de l’articleIAN 297482 en tant que
preuve d’achat.
10. FAQ
Que faire lorsque des pièces du kit sont man-
quantes / défectueuses?
Si vous constatez l’absence ou la défaillance d’une
pièce indiquée dans le contenu de la livraison, veuillez
de l’article de votre produit et en joignant la preuve
FR
1. Introduction
Félicitations!
Vous venez d’acquérir un produit haut de gamme.
Familiarisez-vous avec le produit avant le montage
et la première mise en service. Lisez attentivement le
présent manuel de montage ainsi que les consignes de
sécurité. Utilisez le produit uniquement comme décrit et
pour les domaines d’utilisation indiqués. Conservez ce
remettez-leur tous les documents.
2. Utilisation conforme aux dispositions
Le présent article est prévu pour protéger contre les
insectes volants dans les espaces d’habitat privés.
Toute autre utilisation que celle décrite précédemment
ou une modification du produit ne sont pas autorisées
et peuvent causer des blessures et / ou endommager
le produit. Le fabricant ne pourra en aucun cas être
tenu responsable des dommages causés dans le cadre
d’une utilisation non conforme ou lors de la procédure
commercial. Nous vous conseillons d’ouvrir ce produit
en cas de vent.
EN CAS DE PROBLÈME OU DE QUESTION
CONCERNANT LE PRODUIT OU LE MON-
TAGE, VEUILLEZ TOUJOURS CONTACTER
NOTRE CENTRE DE SERVICE EN PREMIER
LIEU. NOUS SOMMES HEUREUX DE VOUS AIDER.
3. Données techniques
Dimensions max. du kit de montage:
110 x 160cm
Dimension max. de l’embrasure:
104x148cm
Dimension min. de l’embrasure:
45 x 20cm
laquelle est monté le chambranle.
EN DÉBALLANT LE PRODUIT, VEILLEZ À NE
PAS JETER PAR MÉGARDE DES ÉLÉMENTS
DU MATÉRIEL DE MONTAGE. AU DÉBAL-
LAGE, CONTRÔLEZ L’EXHAUSTIVITÉ ET
L’ÉTAT IRRÉPROCHABLE DU PRODUIT ET DE TOUS LES
COMPOSANTS CONTENUS DANS LA LIVRAISON.
N’ASSEMBLEZ PAS LE PRODUIT SI LA LIVRAISON
N’EST PAS COMPLÈTE.
4. Consignes de sécurité
DANGER DE MORT ET D’ACCI-
DENT POUR LES NOURISSONS ET
LES ENFANTS!
Ne laissez jamais les enfants
s’approcher du matériel d’emballage et du produit sans
surveillance. Il existe un risque d’étouffement dû au
matériel d’emballage et un danger de mort par stran-
gulation. Les enfants sous-estiment souvent les dangers.
d’achat, ou veuillez utiliser notre formulaire de contact.
Si votre produit est toujours sous garantie, votre article
Où apposer le produit sur la fenêtre?
de la fenêtre au moyen du montage vissé dans le mur.
Quelles dimensions minimales dois-je respec-
ter pour raccourcir le plissé?
Le plissé peut être raccourci sur une largeur totale
minimale de 45cm. La hauteur peut être raccourcie
Quelle est la meilleure manière de raccourcir
des profilés en aluminium?
La meilleure manière de raccourcir des profilés en
-
voir effectuer une coupe bien droite. Par mesure de
sécurité, nous vous conseillons de porter des gants de
travail. La largeur B et la hauteur H correspondent aux
dimensions de l’embrasure de la fenêtre (distance de
La toile ne reste pas dans la position voulue
ou pend de travers. Que puis-je faire?
Vérifiez la tension des cordons. Desserrez les tiges file-
peu près la même sur les deux côtés. Normalement, il
les tiges filetées. Si le problème persiste, effectuez cette
étape aussi bien en état ouvert qu’en état fermé.
Remarque:
Sous réserve d’erreurs, de modifications et de fautes
d’impression. Version actuelle des instructions dispo-
www.smartmaxx.info
DE/AT/CH DE/AT/CH DE/AT/CH FR/CH/BE FR/CH/BE FR/CH/BE
1
B
H
≥ 70 mm
≥ 35 mm
≥ 35 mm
≥ 35 mm



Join the conversation about this product
Here you can share what you think about the Powerfix IAN 297482 Fly Screen. If you have a question, first carefully read the manual. Requesting a manual can be done by using our contact form.