Manufacturer / Service
bash-tec GmbH
Hoorwaldstr. 42
D-57299 Burbach-Holzhausen
Service Hotline: +49-180-3000 841
EAN 274102
Please have your receipt and the item number (e.g.
IAN 12345) ready as your proof of purchase
when enquiring about your product.
Warranty
The product has been manufactured according to
strict quality guidelines and meticulously examined
before delivery. In the event of product defects,
you have legal rights against the retailer of this
product. Your statutory rights are not in any way
limited by our warranty detailed below.
This product has a 3 year warranty from the date
of purchase. The warranty period begins on the
date of purchase. Please keep the original receipt
in a safe place. This document is required as your
proof of purchase. Should this device show any
defects in material or manufacture within three
years from the date of purchase, we will replace
it - at our choice - free of charge. This warranty
becomes void if the device has been damaged or
improperly used or maintained. The warranty ap-
plies to defects in materials or manufacture. This
warranty does not extend to product parts subject
to normal wear and tear (e.g. weathering) which
are therefore considered wear parts or for tears
in the fabric due to excess strain (stretching or
sharp objects).
Disposal instructions
Be environmentally conscious. A public take-back
system is in place for packaging materials and
waste equipment. Please contact your municipality
for collection sites and current regulations.
Note: The illustrations in these instructions are
examples and may vary from the actual product.
ATTENTION! Risk of product damage!
Place a blanket or similar item under the
product during assembly to prevent scratches.
Liability
Failure to observe the notices and information in
these instructions, misuse or using the product for
purposes other than those specifi ed will void any
manufacturer warranty for product damage. Lia-
bility for subsequent damage to elements of any
type or to persons is excluded.
ATTENTION!
- Outside bending
angle
5
4
Cleaning instructions
Only clean with a damp cloth with mild deter-
gent.
Dust may be removed from the fi breglass
fabric using a vacuum (brush attachment) or
hand brush. If you do not wish to use the bug
screen year round, it can easily be removed.
To do so, simply unhinge the bug screen from
the window frame.
ATTENTION! Do not uninstall in freezing
temperatures or the product may be dam-
aged.
Installing the bug screen
Windows opening inward
Insert the handle
11
between the lip seal clip
and the fabric (see Fig. I).
ATTENTION!
-
Inside
bending angle
5
4
Windows opening outward
Place the handle
11
on the moulding, place
the fabric over it and press in with the lip seal
clip, tap.
On the right side start with moulding P4.
For the next steps follow the instructions above.
Fig. J:
Push the fabric into the groove in the mould-
ing pieces P1, P2 using the lip seal clip (long)
8
, tap in place (also see Fig. M).
Fig. K:
Trim excess fabric.
Push the lip seal to the side, place the cutter
knife with the blade short into the space
between the lip seal and the moulding.
When trimming, be sure not to damage the
lip seal with the cutter knife.
Fig. L:
Attach the caps
12
to all 4 corner connectors
(tap lightly).
Obr. K:
Prečnievajúcu tkaninu odstrihnite.
Zatlačte tesniacu svorku nabok, cutter-nôž s
krátkou čepeľou vložte do medzery medzi
tesniacou svorkou a profi lom.
Pri odrezávaní dbajte na to, aby čepeľ cutter-
noža nepoškodila tesniacu svorku.
Obr. L:
Snímateľné kryty
12
pevne nasaďte na
všetky 4 rohové spoje (zľahka zatlčte).
Zavesenie ochranného
rámu proti hmyzu
Okná otvárajúce sa smerom dovnútra
Hmat
11
vložte medzi tesniacu svorku a
tkaninu (pozri obr. I).
Obr. G:
Tesniacu svorku (dlhú)
8
položte na profi l
hore a dole.
Vpravo na rohu nasaďte a vľavo zaznačte a
odrežte.
Obr. H:
Tkaninu
6
rozložte na rám, zaťažte, nastrih-
nite na všetkých 4 stranách na ohýbacom
uhle.
Obr. I:
Do ľavého profi lu P3 zovrite tkaninu s tesniacou
svorkou
7 a
až do stredu.
V strede položte hmat
11
medzi tesniacu
svorku a tkaninu.
So skrátenou tesniacou svorkou
7 b
zatlačte
tkaninu až na koniec, zatlčte (pozri tiež obr. M).
Na pravej strane začnite s profi lom P4.
Ďalšie kroky podľa predchádzajúceho popisu.
Obr. J:
Do drážky profi lov P1, P2 zovrite tkaninu s
tesniacou svorkou (dlhá)
8
, zatlčte (pozri
tiež obr. M).
Obr. DI + DII:
Profi lový rám upravte v šírke a výške do pra-
vého uhla
.
Profi ly P3 a P4 roztiahnite (
- 2 mm).
Profi ly P1 a P2 roztiahnite (
- 5 mm).
Zaistite pomocou upevňovacích lepiek
13
.
Ak si želáte skontrolovať rozmery, zmontovaný
rám zaveste do okenného rámu.
Obr. E:
Omega-svorku (krátku)
9
položte na profi ly
P1, zakreslite, odrežte, zatlačte.
Omega-svorku (dlhú)
10
položte na profi ly
P3, zakreslite, odrežte, zatlačte.
Obr. F:
Na ľavý profi l P3 položte tesniacu úchytku
(krátku)
7 a
.
Následne položte druhú svorku
7 b
na profi l
P4, zakreslite na ohýbacom uhle, odrežte.
To isté zopakujte na pravej strane s tesniacou
svorkou
7 a
7 b
.
Obr. AIII:
Rohový spoj
3
hore s ohýbacím uhlom
dlhým
Rohový spoj
3
hore s ohýbacím uhlom
krátkym
Obr. B:
Najskôr odmerajte vnútorné rozmery
okenného rámu (
= výška,
= šírka).
Otvorte preto okno, do vnútra BI alebo
smerom von BII.
Obr. CI:
Okno typ 1: V > Š
Ohýbacie uhly
5
4
pevne zatlačte do ro-
hových spojov a zastrčte do profi lov (zatlčte).
Obr. CII:
Okno typ 2: V < Š
Ohýbacie uhly
5
4
pevne zatlačte do ro-
hových spojov a zastrčte do profi lov (zatlčte).
V prípade, že rohový spoj možno len ťažko
spojiť s aluminiovými profi lmi, vložte medzi
rohový spoj a gumené kladivo drevený klát.
Rohový spoj je tak chránený pred zlomením.
Montážny návod
Obr. Al:
Ohýbací uhol krátky hák
4
a dlhý hák
5
nasaďte zľava na okenný rám.
Rohový spoj
3
otočte tak, aby široký čap
ukazoval nahor.
Uhol zasuňte do vodorovného otvoru rohového
spoja.
Medzi rohovým spojom a okenným rámom
privrite kartón ale iný predmet (ca. 3,5 mm).
Potiahnite uhol smerom von a zahnite ho
nahor.
Obr. AII:
Ohýbací uhol krátky hák
4
a dlhý hák
5
nasaďte vpravo na okenný rám.
Rohový spoj
3
otočte tak, aby úzky čap
ukazoval smerom hore.
Ďalšie kroky popísané ako v poz. Al.
POZOR! Dbajte na to, aby pri ohýbaní uh-
lov nedošlo k poškodeniu gumového tesnenia
na okennom ráme.
Bezpečnostné upozornenia
Pred montážou si prosím dôkladne
prečítajte návod! Návod uschovajte a
v prípade odovzdania produktu ho k
nemu priložte!
Neopierajte o stavebnú súpravu.
Stavebná súprava sa pri silnom tlaku
môže opäť uvoľniť. Nebezpečenstvo
pádu! Držte deti v bezpečnej vzdialenosti!
Sklolaminátovú tkaninu ako aj všetky
plastové časti nevystavujte otvorenému
ohňu alebo iným tepelným zdrojom.
Fóliové vrecko a malé diely držte v
bezpečnej vzdialenosti od malých detí!
Nebezpečenstvo zadusenia! Zaobchá-
dzajte opatrne s lámacím cutter-nožom
- nebezpečenstvo poranenia!
Dodatočné zaťaženie výrobku zavesenými pred-
metmi alebo ovládanie presahujúce mechanické
obmedzenia môže viesť k poškodeniu výrobku a
je teda neprípustné. Výrobca nepreberá ručenie
za škody vyplývajúce z takého používania.
POZOR! Pri silnom vetre okennú sieť proti
hmyzu vybudujte.
Popis častí / Obsah dodávky
1
2 x teleskopický profi l krátky P1 a P2
2
2 x teleskopický profi l dlhý P3 a P4
3
4 x rohový spoj
4
2 x ohýbací uhol krátky
5
2 x ohýbací uhol dlhý
6
1 x tkanina
7 a
2 x tesniaca úchytka krátka
7 b
2 x tesniaca úchytka krátka
8
2 x tesniaca úchytka dlhá
9
2 x omega-svorka krátka
10
2 x omega-svorka dlhá
11
2 x hmat transparentný
12
4 x snímateľný kryt
13
4 x upevňovacie lepky
Teleskopické
protihmyzová sieťka
Úvod
Blahoželáme Vám, že ste si kúpili tento
nový produkt. Rozhodli ste sa tým pre
veľmi kvalitný výrobok. Pred prvým
uvedením do prevádzky sa oboznámte s výrobkom.
Prečítajte si k tomu pozorne nasledujúci montážny
návod a bezpečnostné pokyny. Používajte výrobok
iba ako je uvedené a v uvedených oblastiach
používania. Tento návod na obsluhu si uschovajte.
Ak výrobok odovzdávate ďalšej osobe, priložte k
nemu aj všetky podklady.
Používanie v súlade s
určeným účelom
Tento produkt na ochranu proti hmyzu možno používať
iba v súlade s určeným účelom a nie na priemyselné
účely (montáž na existujúcom okennom ráme). Pri
nepovolenom používaní môže dôjsť k ohrozeniam.
SKSKSKSKSKSKSK
SKGB/CYGB/CYGB/CYGB/CYGB/CYGB/CY
GB/CYGB/CYGB/CYGB/CYGB/CYGB/CYGB/CY
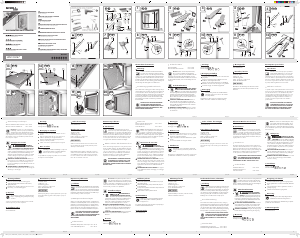
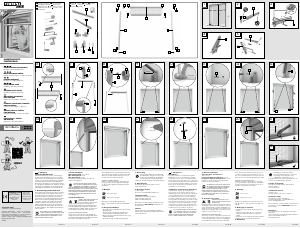
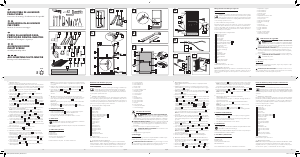
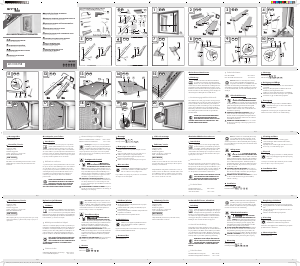
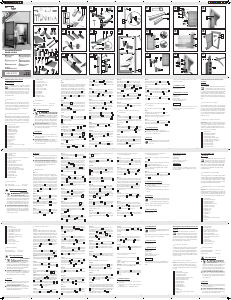
Fig. F:
Place a lip seal clip (short)
7 a
onto the left
moulding P3.
Then place the second clip
7 b
on the mould-
ing P4, mark on the bending angle, trim.
Repeat this step on the right side with lip seal
clip
7 a
7 b
.
Fig. G:
Place the lip seal clip (long)
8
on the mould-
ing top and bottom.
Attach at the right corner, mark and trim at
the left.
Fig. H:
Place the fabric
6
over the frame, weight
down, score at the bending angle at all 4 sides.
Fig. I:
Wedge the fabric into the left moulding P3
up to the middle, using the lip seal clip
7 a
.
Install the handle
11
at the middle, between
the lip seal clip and the fabric.
Use the trimmed lip seal clip
7 b
to secure the
fabric to the end, tap in place (also see Fig. M).
Extendable Insect Screen
Introduction
Congratulations on the purchase of
your new product. You have selected a
high quality product. Familiarise yourself
with the product before using it for the fi rst time.
Carefully read the following installation instructions
and safety advice. Only use the product as described
and for its indicated purpose. Keep these instructions.
If you pass the product on to anyone else, please
be sure to also include all documentation.
Intended use
Only use the insect guard for the intended non-
commercial purposes (installation in existing window
frames). Misuse may result in dangers. Excess
strain on the product due to attached objects or
operation beyond the mechanical limits may result
in product damage and is therefore prohibited. The
manufacturer is not liable for damages resulting
from these actions.
ATTENTION! Uninstall the insect screen in high
winds.
Parts description / Scope
of delivery
1
2 x Adjustable moulding, short, P1 and P2
2
2 x Adjustable moulding, long, P 3 and P4
3
4 x Corner connectors
4
2 x Bending angle, short
5
2 x Bending angle, long
6
1 x Fabric
7 a
2 x Lip seal clip, short
7 b
2 x Lip seal clip, short
8
2 x Lip seal clip, long
9
2 x Omega clip, short
10
2 x Omega clip, long
11
2 x Handle, transparent
12
4 x Caps
13
4 x Adhesive pads
Safety instructions
Carefully read the instructions prior to
assembly! Keep the instructions and in-
clude these when passing the product
on to others!
Do not lean against the kit. Excess
pressure may cause the kit to come
apart. Risk of falling! Keep children
away!
Do not expose the fi breglass fabric or
any other plastic parts to open fi re or
other heat sources.
Keep the plastic bag and small parts
out of reach of small children! Risk of
suff ocation! Handle the cutter knife
with care - risk of injury!
Assembly Instructions
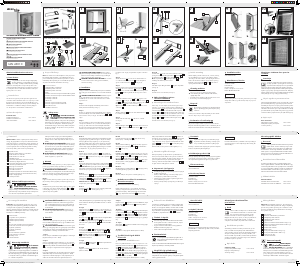
Fig. AI:
Place the short hook
4
and long hook
5
bending angle on the left side of the window
frame.
Rotate the corner connector
3
so the wide
adapter points to the top.
Insert the angle into the horizontal hole on
the corner connector.
Place cardboard or other object between the
corner connector and window frame (approx.
3.5 mm).
Pull the angle outward and bend up
Fig. AII:
Place the short hook
4
and long hook
5
bending angle on the right side of the window
frame.
Rotate the corner connector
3
so the narrow
adapter points to the top.
For the next steps follow the instructions for
Fig. AI.
ATTENTION! Be careful not to damage the
rubber seal on the window frame when bend-
ing the angle
Fig. AIII:
Corner connector
3
top with long bending
angle
Corner connector
3
bottom with short
bending angle
Fig. B:
First measure the inside of the window frame
(
= height, = width).
To do so, open the window to the inside BI
or outside BII.
Fig. CI:
Window type 1: h > w
Push the bending angle
5
4
fi rmly into the
corner connector and push into the moulding
(tap).
Fig. CII:
Window type 2: h < w
Push the bending angle
5
4
fi rmly into the
corner connector and push into the moulding
(tap).
If the corner connectors are diffi cult to connect
with the aluminium moulding, place a piece
of wood between the corner connector and
the mallet. This will protect the corner connec-
tor from breaking
Fig. DI + DII:
Adjust the moulding frame height and width
straight.
Extend moulding pieces P3 and P4 (
- 2 mm).
Extend moulding pieces P1 and P2 (
-
5 mm).
Secure with adhesive pads
13
.
If desired, fi t the assembled frame into the
window opening to check the dimensions.
Fig. E:
Place the Omega clip (short)
9
on moulding
P1, mark, trim, push in.
Place the Omega clip (long)
10
on moulding
P3, mark, trim, push in.
AI
AII
AIII
BII CI



Join the conversation about this product
Here you can share what you think about the Powerfix IAN 274102 Fly Screen. If you have a question, first carefully read the manual. Requesting a manual can be done by using our contact form.