
FRANCE
19 RUE DES HALLES
16510 VERTEUIL SUR CHARENTE • FRANCE
00 33 (0) 5 45 89 68 80
ITALY
VIA MONTE ROSA 28 • 20049
CONCOREZZO • MILAN • ITALY
39 039 5965844
GERMANY
PHOENIX SAFE • DEUTSCHLAND GMBH
BAHNSTR. 23 • D-42327 WUPPERTAL
0049-202-69519-0
SPAIN
AVDA • DE LA INDUSTRIA • 52 POLÍGONO INDUSTRIAL
28820 COSLADA • MADRID • ESPAÑA
0034 (91) 6736411
UNITED KINGDOM
APEX HOUSE • 1 ORRELL MOUNT • LIVERPOOL
L20 6NS • UNITED KINGDOM
+44 (0)151 944 6444
BEDIENUNGSANLEITUNG ISTRUZIONI PER L’USO
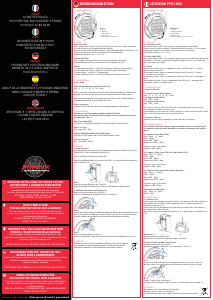
Bild 1.1
1 – Tastatur
2 – Klappgriff
3 – grüne LED (G)
4 – rote LED (R)
5 – Abdeckung für Notbestromung
2. Begriffe
Master Code [PIN1]
6 bis 8-stelliger Code, höchster Code der Codehierachie, kann das Schloss öffnen, den eigenen
Code ändern, wird für alle Programmierfunktionen benötigt
Bevor Sie den Safe in Betrieb nehmen, ändern Sie bitte unbedingt den Master Code (siehe 4.1). Es
ist äußerst wichtig diesen Code von unautorisierten Personen fernzuhalten.
Werkseinstellung Master Code: 1–2–3–4–5–6
Benutzer Code [PIN2]
6 bis 8-stelliger Code, kann das Schloss öffnen, kann den eigenen Code ändern
Standardmäßig wird das Schloss ohne Benutzer Code ausgeliefert (siehe 4.2)
Signale
1 x kurzes akustisches Signal, 1 x grüne LED (3)-Knopf der Tastatur erfolgreich gedrückt
2 x kurzes akustisches Signal, 2 x grüne LED (3)-Aktion erfolgreich durchgeführt
1 x langer Piepton, 1 x rote LED (4) - Fehlermeldung
5 x kurzes akustisches Signal, 5 x rote LED (4)-Batterie leer. Batteriewechsel siehe 5.1
3. Hauptfunktionen
Schloss öffnen
Öffnen mit dem werkseitig eingestellten Master Code
[ON] [1] [2] [3] [4] [5] [6] [Enter]
Ist der Code korrekt leuchtet die grüne LED auf. Bitte drehen Sie innerhalb von 5 Sekunden den
Klappgriff (2) im Uhrzeigersinn, um das Schloss zu entsperren bzw. die Safetür zu öffnen
Nach 3 aufeinanderfolgenden Falscheingaben geht das Schloss in eine 5-minütige Sperrzeit.
Die Sperrzeit erkennen Sie an der blinkenden roten LED.
Schloss verschließen
Schließen Sie die Safetür und drehen Sie den Klappgriff entgegen den Uhrzeigersinn.
4. Codeänderung
Bitte führen Sie alle Programmiervorgänge bei geöffneter Tür durch.
Die Programmierung ist nur mit voller Batterie möglich. Eine leere Batterie erkennen Sie an
den Signaltönen. siehe 2.3.
Master Code ändern [PIN1]
(ON) (Enter) (1) (PIN1) (Enter) (neuen PIN 1) (Enter) (neuen PIN 1 wiederholen) (Enter)
Mastercode prüfen:
[ON] [neuer PIN1] [Enter]
Benutzer Code[PIN2] mit Master Code [PIN1] anlegen
(ON) (Enter) (2) (PIN 1) (Enter) (PIN 2) (Enter) (PIN2 wiederholen) (Enter)
Benutzercode prüfen:
[ON] [neuer PIN2] [Enter]
5. Wartung
5.1 Batterie tauschen
Die Batterie befindet sich inneren des Safes. Abhängig vom Safemodell finden Sie sie im Schloss
(siehe Bild 5.1a), oder im Batteriefach (siehe Bild 5.1b).
Der Sitz der Batterie ist abhängig vom Safemodell.
Kippen Sie den Batteriefachdeckel nach vorne (siehe Bild 5.1a), oder ziehen Sie das Batteriefach
heraus (siehe Bild 5.1b).
Bild 5.1 a. b.
Setzen Sie eine neue Batterie ein (9V, Typ 6LF22).
Kippen Sie den Batteriefachdeckel bzw. schieben Sie das Batteriefach wieder zurück
5.2 Notbestromung von außen falls Batterie leer
Nehmen Sie eine neue Batterie (9V, Typ 6LF22).
Lösen Sie die Abdeckung für die Notbestromung (5). siehe Bild 5.2
Bild 5.2
Drücken Sie die Batterie gegen die Notbestromungspunkte. Bitte korrekte Polung beachten (siehe
Bild 5.3). Die Batterie erst entnehmen, wenn das Schloss / der Safe offen ist. Vermeiden Sie den
Kontakt der Batterie mit den Metallteilen, um eine mögliche Entladung zu verhindern.
Bild 5.3
Geben Sie einen der gültigen Codes ein (1).
Entfernen Sie die Batterie, öffnen Sie die Safetür und tauschen die leere Batterie aus. siehe. 5.1
6. Batterien
Altbatterien gehören nicht in den Hausmüll. Die Batterien sollten zur Entsorgung zu
einer geeigneten Sammelstelle gebracht werden. Sie können Ihre gebrauchten
Batterien auch unentgeltlich an die Verkaufsstelle (Versandlager) schicken.
1. Hauptkomponenten
Illustrazione 1.1
1 – Tastiera
2 – Maniglia ripiegabile
3 –LED Verde [G]
4 –LED Rosso [R]
5–Coperchio in plastica carica di emergenza
2. Definizioni
2.1 Codice Master [PIN1]
Una serie di numeri (da 6 a 8 cifre) che apre la chiusura e gestisce le impostazioni.
Prima di usare la cassaforte, cambiare il codice Master Fabbrica (vedi par.4.1). Si raccomanda
vivamente di custodire il codice master al sicuro da persone non autorizzate.
Codice Master Fabbrica: 1–2–3–4–5–6
2.2 Codice Utente [PIN2]
Una serie di numeri (da 6 a 8 cifre) che apre la chiusura ed ha funzioni limitate nella gestione delle
impostazioni. La chiusura con impostazioni default dalla fabbrica non ha il codice Utente. Vedi
par.4.2 per creare codice Utente.
2.3 Segnali
Breve segnale acustico singolo accompagnato da singolo flash LED verde (3) – conferma
pressione tasto sulla tastiera.
Breve segnale acustico doppio accompagnato da doppio flash LED verde (3) – conferma
conclusione corretta operazione.
Lungo segnale acustico singolo accompagnato da singolo flash LED rosso (4) –messaggio di
errore.
Brevi segnali acustici per 5 volte accompagnati da 5 flash LED rossi (4) – messaggio pila in
esaurimento. Vedi par.5.1 sostituzione pila.
3. Funzioni Principali
3.1 Aprire la Chiusura
3.1.1 Aprire con codice Master Fabbrica
[ON] [1] [2] [3] [4] [5] [6] [Enter]
3.1.2 Aprire con Codice Master
[ON] [PIN1] [Enter]
3.1.3 Aprire con Codice Utente
[ON] [PIN2] [Enter]
Se il codice è corretto, ci sarà un flash LED verde e sarà possibile aprire lo sportello entro 5
secondi girando la maniglia (2) in senso orario.
Se viene digitato un codice errato per tre volte consecutive, la chiusura sarà bloccata per 5 minuti.
Il blocco verrà indicato da una successione di flash LED rosso.
3.2 Chiudere la Chiusura
Chiudere lo sportello e girare la maniglia (2) in senso antiorario fino all’arresto.
4. Funzioni di Servizio
Si raccomanda vivamente di cambiare le impostazioni della chiusura con lo sportello aperto.
Le funzioni di servizio non saranno disponibili in caso di pila in esaurimento, vedi segnali in
par.2.3.
4.1 Cambiare il Codice Master [PIN1]
[ON] [Enter] [1] [Enter]
[PIN1] [Enter]
[nuovo PIN1] [Enter]
[ripetere nuovo PIN1] [Enter]
Controllare il nuovo codice Master:
[ON][nuovo PIN1] [Enter]
4.2 Cambiare il Codice Utente [PIN2] con il Codice Master [PIN1]
[ON] [Enter] [2] [Enter]
[PIN1] [Enter]
[nuovo PIN2] [Enter]
[ripetere nuovo PIN2] [Enter]
Controllare il nuovo codice Utente:
[ON][nuovo PIN2] [Enter]
4.3 Cambiare il Codice utente [PIN2] senza il Codice Master
[ON] [Enter] [3] [Enter]
[PIN2] [Enter]
[nuovo PIN2] [Enter]
[ripetere nuovo PIN2] [Enter]
Controllare il nuovo codice Utente:
[ON][nuovo PIN2] [Enter]
4.4 Rimuovere il Codice Utente
[ON] [Enter] [0] [Enter]
[PIN1] [Enter]
5. Manutenzione
5.1 Cambiare la Pila
La pila è posizionata nella parte interna dello sportello. A seconda del modello della cassaforte, la
pila potrebbe essere sia all’interno dell’alloggiamento pile (ill.5.1a) oppure in una speciale
scatoletta removibile (ill. 5.1b).
La posizione esatta dell’alloggiamento pile oppure della scatoletta potrebbe essere diversa a
seconda del modello della cassaforte.
Rimuovere il coperchio dell’alloggiamento pile (vedi ill. 5.1a. oppure estrarre la scatoletta (vedi ill.
5.1b).
Illustrazione 5.1 a. b.
Inserire una nuova pila (9V,tipo 6LF22).
Riposizionare il coperchio dell’alloggiamento oppure la scatoletta.
5.2 Aprire la chiusura quando la Pila è Esaurita
Prendere una nuova pila (9V, tipo 6LF22).
Rimuovere il coperchio in plastica per carica emergenza (5), vedi ill. 5.2.
Ill. 5.2
Premere la nuova pila agli spinotti carica d’emergenza e fissarla in posizione (vedi ill. 5.3).
Non fare contatto con le parti metalliche della chiusura per evitare che la pila si scarichi.
Ill. 5.3
Digitare il codice corretto sulla tastiera (1).
Scollegare la pila di emergenza, aprire lo sportello e sostituire la pila esaurita, vedi par. 5.1.
6. Batteries
Non eliminare le pile usate insieme ai rifiuti domestici.
Eliminare le pile nei centri di raccolta preposti.
E’ possibile restituire le pile usate al proprio rivenditore a sue spese (dove indicato).
1. Componenti Principali
Phoenix Safe Company: Where peace mind is guaranteed
MANUAL DE INSTRUCCIONES PARA
SS1180E/SS1190E PHOENIX SERIE & GARANTÍA
Para mayor seguridad, le recomendamos que cuando acceda a nuestra página
web www.phoenixsafe.com, haga clic en Registro de garantía e introduzca
su registro de garantía.
AVDA, DE LA INDUSTRIA, 52 POLÍGONO INDUSTRIAL, 28820 COSLADA, MADRID,
ESPAÑA | 0034 (91) 6736411
ISTRUZIONI PER L'USO DI SS1180E/SS1190E SERIE
PHOENIX & REGISTRAZIONE DELLA GARANZIA
Per una maggiore sicurezza vi raccomandiamo di inoltrare la vostra
registrazione della garanzia visitando il nostro sito web: www.phoenixsafe.com e
cliccando su registrazione della garanzia.
VIA MONTE ROSA 28, 20049, CONCOREZZO, MILAN, ITALY | 39 039 5965844
BETRIEBSANLEITUNG FÜR PHOENIX SS1180E/
SS1190E SERIE & GARANTIEKARTE
Aus Sicherheitsgründen empfehlen wir Ihnen, Ihre Garantiekarte online auf unserer
Website www.phoenixsafe.com per Mausklick auf der Schaltfläche
„Garantieanmeldung“ auszufüllen.
DEUTSCHLAND GMBH, BAHNSTR. 23, D-42327 WUPPERTAL 0049-202-69519-0
MODE D'EMPLOI POUR
PHOENIX SÉRIE SS1180E/SS1190E & GARANTIE
Pour une meilleure sécurité, nous vous recommandons d’enregistrer
votre garantie en ligne par notre site: www.phoenixsafe.com et en cliquant
sur enregistrement de garantie.
19 RUE DES HALLES, 16510 VERTEUIL SUR CHARENTE,
FRANCE | 00 33 (0) 5 45 89 68 80
OPERATING INSTRUCTIONS FOR PHOENIX SS1180E/
SS1190E SERIES & GUARANTEE REGISTRATION
Please submit your guarantee registration by visiting our website
www.phoenixsafe.com and clicking on guarantee registration.
For further assistance or information please contact us on 0151 944 6444.
APEX HOUSE, 1 ORRELL MOUNT, LIVERPOOL, L20 6NS,
UNITED KINGDOM | +44 (0)151 944 6444

Join the conversation about this product
Here you can share what you think about the Phoenix SS1193K Safe. If you have a question, first carefully read the manual. Requesting a manual can be done by using our contact form.