
OR
MP3
MP3 AUX
PC
TREBLE
BASS
VOLUME
MP3
MP3 AUX
PC
TREBLE
BASS
VOLU ME
PC IN
AC IN
100~240V
50~60Hz
AUX IN
RIGHT LEFT
SATELLITE
OUT
RL
SUBWOOFER
OUT
DVD
PC
AC
MP3
OR
Subwoofer
R speaker L speaker
1
4
2
3
4
5
1
5
5
6
3
8
7
4
6
2
BASS
BASS
ON
TREBLE
TREBLE
AUX
MP3
AUX
VOLUME
BASS
TREBLE
MP3
PC PC
OR
1
2
GB D NL
SPA9350/10_QSG_aw_A3_front 20 Feb 2009_01 Fold size: H210mm x W148.5mm Materiel size: H420mm x W297mm
SPA9350
Multimedia Speaker
F
Multimedia Speakers Multimedia Lautsprecher
Multimedia Speakers
Parlantes multimedia Altoparlanti multimediali Multimediahögtalare
Enceintes Multimédia
EP I SV
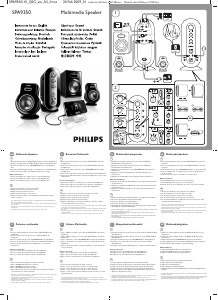
1. Connect the left speaker to SATELLITE OUT white port of the Amplifier Box.
2. Connect the right speaker to SATELLITE OUT red port of the Amplifier Box.
3. Connect the subwoofer to the SUBWOOFER OUT port of the Amplifier
Box.
4. Connect the 3.5mm plug audio cable to the PC IN port of the Amplifier Box.
5. Connect the mains cable to the Amplifier Box & a power supply.
Optional functions
6. Connect the AUX source cable to the port of the Amplifier Box.
7. Connect the MP3 source cable to the port of the Amplifier Box.
8. Connect the headphone cable to the port of the Amplifier Box.
1. Push the power button to turn on the system.
2. Adjust the volume knob for volume control.
3. Adjust the bass knob for bass control.
4. Adjust the treble knob for treble control.
5. Adjust the selector switch to select MP3, PC or AUX with all relevant
cables connected.
• The product shall not be exposed to dripping or splashing and that no objects filled with liquids,
such as vases, shall be placed on the product
• To be completely disconnect the power input, the mains plug of the product shall be disconnected
from the mains
• The mains plug of the product should not be obstructed OR should be easily accessed during
intended use.
• The maximum output voltage of headphone jack is equal or less than 150mV.
Colunas Multimédia
1. Conecte el altavoz izquierdo al puerto blanco SATELLITE OUT del
amplificador.
2. Conecte el altavoz derecho al puerto rojo SATELLITE OUT del
amplificador.
3. Conecte el subwoofer al puerto SUBWOOFER OUT del amplificador.
4. Conecte el cable de audio de 3,5 mm al puerto PC IN del amplificador.
5. Conecte el cable de alimentación al amplificador y a una toma de
alimentación.
Funciones opcionales
6. Conecte el cable de fuente AUX al puerto del amplificador.
7. Conecte el cable de fuente MP3 al puerto del amplificador.
8. Conecte el cable de auriculares al puerto del amplificador.
1. Pulse el botón de encendido para encender el sistema.
2. Gire el dial VOLUME para ajustar el volumen.
3. Gire el dial BASS para ajustar los graves.
4. Gire el dial TREBLE para ajustar los agudos.
5. Gire el dial selector para seleccionar MP3, PC o AUX después de haber
conectado todos los cables pertinentes.
• El producto no se debe exponer a goteos ni salpicaduras ni se deben colocar sobre él objetos que
contengan líquidos, como por ejemplo, un jarrón.
• Para interrumpir completamente la entrada de alimentación, debe desconectar el cable de
alimentación de la toma de corriente.
• No debe haber obstáculos que obstruyan el acceso al cable de alimentación. Se debe poder
acceder al mismo con facilidad.
• El voltaje máximo de salida del conector para auriculares es igual o menor a 150 mV.
1. Ligue o altifalante esquerdo à porta branca SATELLITE OUT da caixa do
amplificador.
2. Ligue o altifalante direito à porta vermelha SATELLITE OUT da caixa do
amplificador.
3. Ligue o subwoofer à porta SUBWOOFER OUT da caixa do amplificador.
4. Ligue o cabo de áudio com a ficha de 3,5mm à porta PC IN da caixa do
amplificador.
5. Ligue o cabo de alimentação à caixa do amplificador e a uma tomada de
corrente eléctrica.
Funções opcionais
6. Ligue o cabo de fonte AUX à porta da caixa do amplificador.
7. Ligue o cabo de fonte MP3 à porta da caixa do amplificador.
8. Ligue o cabo dos auscultadores à porta da caixa do amplificador.
1. Prima o botão de alimentação para ligar o sistema.
2. Ajuste o botão de volume para controlar os níveis de volume.
3. Ajuste o botão de baixos para controlar os níveis de baixos.
4. Ajuste o botão de agudos para controlar os níveis de agudos.
5. Ajuste o selector para seleccionar MP3, PC ou AUX com todos os cabos
relevantes ligados.
• O produto não deverá ser exposto a gotejamento e salpicos; nenhum objecto com líquidos,
tais como jarros, deverá ser colocado sobre o produto
• Para desligar totalmente a corrente, a ficha do produto deverá estar desligada da tomada eléctrica
• O acesso à ficha do produto deverá ser fácil E sem obstáculos.
• A tensão de saída máxima do jack dos auscultadores é igual ou inferior a 150mV.
1. Collegare l'altoparlante sinistro alla porta di colore bianco SATELLITE OUT
dell'amplificatore.
2. Collegare l'altoparlante destro alla porta di colore rosso SATELLITE OUT
dell'amplificatore.
3. Collegare il subwoofer alla porta SUBWOOFER OUT dell'amplificatore.
4. Collegare il cavo audio dotato di presa da 3,5 mm alla porta PC IN
dell'amplificatore.
5. Collegare il cavo principale all'amplificatore e a una fonte di alimentazione.
Funzioni opzionali
6. Collegare il cavo sorgente AUX alla porta dell'amplificatore.
7. Collegare il cavo sorgente MP3 alla porta dell'amplificatore.
8. Collegare il cavo delle cuffie alla porta dell'amplificatore.
1. Premere il pulsante di alimentazione per accendere il sistema.
2. Regolare la manopola del volume per impostare il livello audio desiderato.
3. Regolare la manopola dei bassi per impostare il livello di questi ultimi.
4. Regolare la manopola degli alti per impostare il livello di questi ultimi.
5. Regolare il selettore per scegliere le sorgenti MP3, PC o AUX una volta
effettuati i collegamenti necessari.
• Questo prodotto non deve essere esposto a schizzi o infiltrazioni e su di esso non devono essere
posti oggetti contenenti liquidi come ad esempio vasi
• Scollegare completamente l'alimentazione staccando la spina dalla presa di corrente
• La spina del prodotto non deve essere ostruita e deve essere facilmente raggiungibile durante l'uso.
• Il voltaggio massimo di uscita della presa cuffia è pari o inferiore a 150mV.
1. Anslut den vänstra högtalaren till den vita SATELLITE OUT-porten på
förstärkaren.
2. Anslut den högra högtalaren till den röda SATELLITE OUT-porten på
förstärkaren.
3. Anslut subwoofern till SUBWOOFER OUT-porten på förstärkaren.
4. Anslut ljudkabeln med 3,5 mm kontakt till PC IN-porten på förstärkaren.
5. Anslut nätkabeln till förstärkaren och till ett nätuttag.
Valfria funktioner
6. Anslut AUX-källkabeln till porten på förstärkaren.
7. Anslut MP3-källkabeln till porten på förstärkaren.
8. Anslut hörlurskabeln till porten på förstärkaren.
1. Slå på systemet genom att trycka på strömknappen.
2. Ställ in volymen med volymknappen.
3. Ställ in basen med basknappen.
4. Ställ in diskanten med diskantknappen.
5. Välj MP3, PC eller AUX med källvalsknappen när alla nödvändiga kablar är
anslutna.
• Produkten ska inte utsättas för dropp eller stänk, och inga objekt fyllda med vätska, t.ex. vaser, ska
placeras på produkten.
• För att strömmen ska vara helt bortkopplad ska produktens nätkontakt vara utdragen ur eluttaget.
• Produktens nätkontakt ska inte blockeras ELLER ska vara lätt att komma åt vid användning.
• Den maximala spänningen hos hörlursuttaget är lika med eller mindre än 150mV.
1. Connectez l'enceinte gauche au port blanc SATELLITE OUT du boîtier
d'amplificateur.
2. Connectez l'enceinte droite au port rouge SATELLITE OUT du boîtier
d'amplificateur.
3. Connectez le caisson de basses au port SUBWOOFER OUT du boîtier
d'amplificateur.
4. Connectez le câble audio 3,5 mm au port PC IN du boîtier d'amplificateur.
5. Connectez le câble d'alimentation au boîtier d'amplificateur et à une source
d'alimentation.
Fonctions facultatives
6. Connectez le câble de source AUX au port du boîtier d'amplificateur.
7. Connectez le câble de source MP3 au port du boîtier d'amplificateur.
8. Connectez le câble du casque au port du boîtier d'amplificateur.
1. Appuyez sur le bouton marche/arrêt pour allumer le système.
2. Réglez le volume à l'aide du bouton de volume.
3. Réglez les graves à l'aide du bouton des graves.
4. Réglez les aigus à l'aide du bouton des aigus.
5. Réglez le commutateur de sélection sur MP3, PC ou AUX. Les câbles
correspondants doivent être connectés.
• L'appareil ne doit pas être exposé aux fuites et aux éclaboussures. Aucun objet rempli de liquide,
par exemple un vase, ne doit être placé sur l'appareil.
• Pour débrancher complètement l'alimentation, la prise secteur de l'appareil doit être débranchée
du secteur.
• La prise secteur de l'appareil ne doit pas être obstruée OU doit rester facilement accessible
pendant l'utilisation.
• La tension de sortie maximum de la prise de l’écouteur est égale ou inférieure à 150 mV.
1. Schließen Sie den linken Lautsprecher an den weißen SATELLITE
OUT-Anschluss des Verstärkers an.
2. Schließen Sie den rechten Lautsprecher an den roten SATELLITE
OUT-Anschluss des Verstärkers an.
3. Schließen Sie den Subwoofer an den SUBWOOFER OUT-Anschluss des
Verstärkers an.
4. Schließen Sie das 3,5 mm Audiokabel an den PC IN-Anschluss des
Verstärkers an.
5. Schließen Sie das Netzkabel an den Verstärker und eine Steckdose an.
Optionale Funktionen
6. Schließen Sie das Kabel der AUX-Quelle an den entsprechenden Anschluss
des Verstärkers an.
7. Schließen Sie das Kabel der MP3-Quelle an den entsprechenden Anschluss
des Verstärkers an.
8. Schließen Sie das Kopfhörerkabel an den entsprechenden Anschluss des
Verstärkers an.
1. Drücken Sie die Taste zum Ein-/Ausschalten, um das System einzuschalten.
2. Steuern Sie die Lautstärke mit dem Volume-Regler.
3. Steuern Sie die Bässe mit dem Bass-Regler.
4. Steuern Sie die Höhen mit dem Treble-Regler.
5. Verwenden Sie den Auswahlregler, um nach Anschluss der entsprechenden
Kabel MP3, PC oder AUX auszuwählen.
• Es dürfen keine Flüssigkeiten in das Gerät gelangen. Zudem dürfen keine Behälter mit Flüssigkeit, z. B.
Vasen, auf dem Gerät abgestellt werden.
• Um das Gerät vollständig von der Stromversorgung zu trennen, muss der Netzstecker aus der
Netzsteckdose gezogen werden.
• Der Netzstecker des Geräts darf nicht verstellt werden ODER muss während des Gerätebetriebs
leicht zugänglich sein.
• Die maximale Ausgangsspannung der Kopfhörer-Buchse ist bis zu 150mV.
1. Sluit de linkerluidspreker aan op de witte SATELLITE OUT-poort van de
versterker.
2. Sluit de rechterluidspreker aan op de rode SATELLITE OUT-poort van de
versterker.
3. Sluit de subwoofer aan op de SUBWOOFER OUT-poort van de versterker.
4. Sluit de audiokabel met een stekker van 3,5 mm aan op de PC IN-poort
van de versterker.
5. Sluit het netsnoer aan op de versterker en een stopcontact.
Optionele functies
6. Sluit de AUX-kabel aan op de poort van de versterker.
7. Sluit de MP3-kabel aan op de poort van de versterker.
8. Sluit het snoer van de hoofdtelefoon aan op de poort van de versterker.
1. Druk op de aan-uitknop om het systeem in te schakelen.
2. Pas de volumeknop aan om het volume in te stellen.
3. Pas de Bass-knop aan om de lage tonen in te stellen.
4. Pas de Treble-knop aan om de hoge tonen in te stellen.
5. Pas de keuzeschakelaar aan om MP3, PC of AUX te selecteren als u alle
relevante kabels hebt aangesloten.
• Zorg ervoor dat het apparaat niet vochtig of nat wordt en plaats geen voorwerpen die zijn gevuld
met een vloeistof, zoals een vaas, op het apparaat
• Om het apparaat volledig los te koppelen van de stroomvoorziening, dient u de stekker van het
apparaat uit het stopcontact te trekken
• De stekker van het apparaat mag niet worden geblokkeerd EN u moet er goed bij kunnen tijdens
gebruik van het apparaat.
• Het maximale uitvoer voltage van hoofdtelefoon bus staat gelijk of is minder dan 150mV.
1
2
1
2
1
2
1
2
1
2
1
2
1
2
1
2

Join the conversation about this product
Here you can share what you think about the Philips SPA9350 Speaker. If you have a question, first carefully read the manual. Requesting a manual can be done by using our contact form.