
1 Matikan alat cukur sebelum Anda mulai
mengisi dayanya.
2 Tekan tombol pelepas (1) dan keluarkan
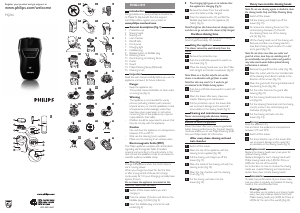
steker lipat (2) (‘klik’) (Gbr. 3).
3 Masukkan unit steker lipat ke stopkontak
dinding (Gbr. 4).
, Lampu pengisian akan menyala untuk
menandakan bahwa alat cukur sedang
diisi (Gbr. 5).
4 Lepaskan alat cukur dari stopkontak di dinding
apabila baterai sudah terisi penuh.
5 Tekan tombol pelepas (1) dan lipat steker
lipat kembali ke dalam alat (2) (‘klik’) (Gbr. 6).
Catatan: Lampu alat cukur tidak berganti warna dan
tidak padam saat baterai alat cukur terisi penuh.
Waktu pencukuran tanpa kabel
Alat cukur yang terisi penuh dapat dipakai
tanpa kabel sekitar 30 menit.
Alat cukur tidak dapat digunakan secara langsung
dari stopkontak listrik.
1 Lepaskan tutup pelindung.
2 Sorong tombol on/off ke atas untuk
menghidupkan alat cukur (Gbr. 7).
3 Gerakkan kepala pencukur pada kulit
Anda. Lakukan gerakan lurus mau pun
memutar (Gbr. 8).
Catatan: Bercukurlah hanya pada permukaan kering.
Jangan menggunakan alat cukur bersamaan dengan
penggunaan gel, busa, atau air.
Catatan: Kulit Anda mungkin butuh 2 atau 3 minggu
untuk terbiasa dengan sistem cukur Philips.
4 Tekan tombol on/off ke bawah untuk
mematikan alat cukur.
5 Bersihkan alat cukur setelah setiap kali
digunakan, lihat bab ‘Membersihkan dan
pemeliharaan’.
6 Pasang tutup pelindung pada alat cukur
setelah digunakan untuk mencegah kerusakan
dan menghindari kotoran menumpuk pada
kepala pencukur (Gbr. 9).
Jangan sekali-kali menggunakan sabut gosok,
bahan pembersih abrasif atau cairan agresif
seperti bensin atau aseton untuk membersihkan
alat.
Selalu bersihkan alat cukur setelah selesai
digunakan untuk menjamin kinerja pencukuran
yang lebih baik. Untuk hasil pembersihan terbaik,
kami sarankan Anda menggunakan Philips Cleaning
Spray. Mintalah informasi pada dealer Philips Anda.
Setelah selesai mencukur: unit
pencukur dan wadah rambut
1 Mematikan alat cukur.
2 Bersihkan bagian atas alat dengan sikat
pembersih yang disertakan (Gbr. 10).
3 Tarik unit pencukur ke atas hingga terlepas
dari alat cukur (Gbr. 11).
4 Bersihkan bagian dalam unit pencukur dengan
sikat pembersih (Gbr. 12).
5 Bersihkan wadah rambut dengan sikat
pembersih (Gbr. 13).
6 Pasang kembali unit pencukur pada alat
cukur (Gbr. 14).
Tiap dua bulan: kepala pencukur
Catatan: Jangan gunakan bahan pembersih atau
alkohol untuk membersihkan kepala pencukur.
Hanya gunakan Philips Cleaning Spray.
1 Matikan alat cukur.
2 Tarik unit pencukur ke atas hingga terlepas
dari alat cukur (Gbr. 15).
3 Untuk melepaskan bingkai penahan,
putar pegas tengah searah jarum jam (1).
Kemudian angkat bingkai penahan dari unit
pencukur (2) (Gbr. 16).
4 Angkat kepala pencukur dari unit pencukur.
Lepaskan dan bersihkan hanya satu kepala
pencukur setiap kalinya. Setiap kepala
pencukur terdiri dari pemotong dan
pelindung (Gbr. 17).
Catatan: Jangan membersihkan lebih dari satu
pemotong dan pelindung sekaligus, karena keduanya
merupakan pasangan. Jika secara tidak sengaja
Anda mencampuradukkan pemotong dan pelindung,
akan dibutuhkan beberapa minggu sebelum alat
cukur dapat kembali optimal.
5 Lepaskan pelindung dari pemotong (Gbr. 18).
6 Bersihkan komponen pemotong dengan
bagian sikat pembersih yang berbulu pendek.
Sikat ke arah panah dengan hati-hati (Gbr. 19).
7 Bersihkan pelindung dengan bagian
yang berbulu panjang pada sikat
pembersih (Gbr. 20).
8 Pasang kembali pemotong pada pelindung
setelah dibersihkan (Gbr. 21).
9 Kembalikan kepala cukur ke dalam unit
cukur (Gbr. 22).
10 Masukkan kembali bingkai penahan ke dalam
unit pencukur (1), lalu putar pegas tengah
berlawanan arah jarum jam (2) (Gbr. 23).
11 Pasang kembali unit pencukur pada alat
cukur (Gbr. 14).
Penyimpanan
Jaga agar alat tetap kering.
Gunakan dan simpan alat pada suhu antara 5°C
dan 35°C.
1 Matikan alat cukur.
2 Pasang tutup pelindung pada alat cukur
setelah digunakan untuk mencegah kerusakan
dan menghindari kotoran menumpuk pada
kepala pencukur (Gbr. 9).
Penggantian
Ganti kepala pencukur setiap dua tahun untuk hasil
pencukuran yang optimal.
Ganti kepala pencukur yang rusak atau yang sudah
aus hanya dengan kepala pencukur Philips (HQ4
untuk Cina atau HQ56 untuk negara lainnya).
Untuk instruksi cara melepaskan kepala pencukur,
lihat Bab ‘Membersihkan dan pemeliharaan’, di
bagian ‘Tiap dua bulan: kepala pencukur’.
INDONESIA
Pendahuluan
Selamat atas pembelian Anda dan selamat datang
di Philips! Untuk memanfaatkan sepenuhnya
dukungan yang ditawarkan Philips, daftarkan
produk Anda di www.philips.com/welcome.
Gambaran umum (Gbr. 1)
1 Tutup pelindung
2 Kepala pencukur
3 Unit pencukur
4 Wadah rambut
5 Geseran on/off
6 Panel depan
7 Lampu pengisian daya
8 Steker lipat
9 Tombol pelepas steker lipat
10 Bingkai penahan
11 Pegas tengah bingkai penahan
12 Pemotong
13 Pelindung
14 Philips Cleaning Spray (Opsional)
15 Sikat pembersih
Penting
Bacalah petunjuk penggunaan ini dengan saksama
sebelum menggunakan alat dan simpanlah sebagai
referensi di masa mendatang.
Bahaya
- Jaga agar alat tetap kering.
- Simbol ini berarti: Dilarang membersihkan
dengan air yang mengalir dari keran (Gbr. 2).
Peringatan
- Alat ini tidak dimaksudkan untuk digunakan
oleh orang (termasuk anak-anak) dengan
cacat sik, indera atau kecakapan mental
yang kurang, atau kurang pengalaman dan
pengetahuan, kecuali jika mereka diberikan
pengawasan atau petunjuk mengenai
penggunaan alat oleh orang yang bertanggung
jawab bagi keselamatan mereka.
- Anak kecil harus diawasi untuk memastikan
mereka tidak bermain-main dengan alat ini.
Perhatian
- Gunakan dan simpan alat pada suhu antara
5°C dan 35°C.
- Gunakan hanya sikat pembersih yang
disertakan.
- Pastikan sikat pembersih tetap dalam keadaan
bersih.
Alat Philips ini mematuhi semua standar yang
berkenaan dengan medan elektromagnet. Jika
ditangani dengan benar dan sesuai dengan
petunjuk dalam buku panduan ini, alat tersebut
aman digunakan menurut bukti ilmiah yang kini
tersedia.
Pengisian daya
Isi ulang baterai alat apabila motornya berhenti
atau jalannya mulai lamban.
Apabila Anda mengisi baterai pencukur untuk yang
pertama kali atau setelah lama tidak digunakan,
biarkan baterai diisi selama 12 jam terus-menerus.
Lama pengisian biasanya sekitar 8 jam.
Jangan biarkan alat tersambung ke sumber listrik
lebih dari 24 jam.
Problem Possible
cause
Solution
Long hairs
obstruct the
shaving heads.
Clean the
cutters and
guards with
the cleaning
brush supplied.
See chapter
‘Cleaning and
maintenance’,
section ‘Every
two months:
shaving heads’.
The shaving
heads are
damaged or
worn.
Replace the
shaving heads.
See chapter
‘Replacement’.
The shaver
does not
work when
I push the
on/off
slide up-
wards.
The battery is
empty.
Recharge the
battery. See
chapter ‘Charg-
ing’.
My skin is
irritated
after shav-
ing.
Your skin
needs time
to get used
to the Philips
shaving
system.
Skin irritation
during the rst
2-3 weeks of
use is pos-
sible. After this
period, the skin
irritation usually
disappears.
The
rotation
speed of
the shaving
heads is
lower than
usual.
Too much dirt
has collected
in the shaving
heads.
Clean the
shaving heads.
See chapter
‘Cleaning and
maintenance’.
The battery is
empty
Recharge the
battery. See
chapter ‘Charg-
ing’.
The
appliance
makes a
strange
noise.
Too much dirt
has collected
in the shaving
heads.
Clean the
shaving heads.
After cleaning,
lubricate the
central point
on the inside of
the guards with
Philips Cleaning
Spray. See chap-
ter ‘Cleaning and
maintenance’.
The shaving
heads are
damaged or
worn.
Replace the
shaving heads.
See chapter
‘Replacement’.
Cleaning
- Use Philips Cleaning Spray to clean the
shaving heads thoroughly.
Environment
- Do not throw away the appliance with the
normal household waste at the end of its life,
but hand it in at an ofcial collection point for
recycling. By doing this, you help to preserve
the environment (Fig. 25).
- The built-in rechargeable battery contains
substances that may pollute the environment.
Always remove the battery before you
discard and hand in the appliance at an ofcial
collection point. Dispose of the battery at an
ofcial collection point for batteries. If you
have trouble removing the battery, you can
also take the appliance to a Philips service
centre. The staff of this centre will remove
the battery for you and will dispose of it in an
environmentally safe way (Fig. 26).
Removing the rechargeable battery
Only remove the rechargeable battery when
it is completely empty.
1 Make sure the appliance is disconnected from
the mains.
2 Let the shaver run until it stops, undo the
screw on the back of the shaver (1) and lift
the back panel off the shaver (2) (Fig. 27).
3 Remove the rechargeable battery (Fig. 28).
Do not connect the shaver to the mains again
after you have removed the battery.
Guarantee and support
If you need information or support, please visit
www.philips.com/support or read the
separate worldwide guarantee leaet.
Guarantee restrictions
The shaving heads (cutters and guards) are
not covered by the terms of the international
guarantee because they are subject to wear.
Troubleshooting
This chapter summarises the most common
problems you could encounter with the
appliance. If you are unable to solve the problem
with the information below, visit www.philips.
com/support for a list of frequently asked
questions or contact the Consumer Care Centre
in your country.
Problem Possible
cause
Solution
The shaver
does not
shave as
well as it
used to do.
The shaving
heads are
dir ty. You have
not cleaned
the shaver
well enough
or you have
not cleaned
it for a long
time.
Clean the shaver
thoroughly
before you
continue shaving.
See chapter
‘Cleaning and
maintenance’.




Join the conversation about this product
Here you can share what you think about the Philips PQ216 Shaver. If you have a question, first carefully read the manual. Requesting a manual can be done by using our contact form.