4222 002 29902
www.philips.com
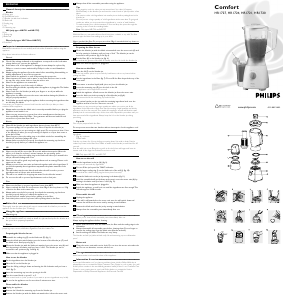
General descriptionIIIIIIIIIIIIIIIIIIIIIIIIIIIIIIIIIIIIIIIIIIIIIIIIIIIIIIIIIIIIIIIIIIIIIIIIIIIIIIIIIIIIIIIIIIIIIIIIIIIIIIIIIIIIIIIIIIIIIIIIIIIIIIIIIIIIIIIIIIIIIIIIIIIIIIIIIIIIIIIIIIIIIIIIIIIIIIIIIIIII
Blender
A. Motor unit
B. On/Off/Pulse knob
C. Blender jar with level indication
D. Blade unit
E. Sealing ring
F. Lid
G. Measuring cup
Mill (only types HR1721 and HR1727)
H. Jar
I. Sealing ring
J. Blade unit
Filter (only types HR1724 and HR1727)
K. Fruit filter
ImportantIIIIIIIIIIIIIIIIIIIIIIIIIIIIIIIIIIIIIIIIIIIIIIIIIIIIIIIIIIIIIIIIIIIIIIIIIIIIIIIIIIIIIIIIIIIIIIIIIIIIIIIIIIIIIIIIIIIIIIIIIIIIIIIIIIIIIIIIIIIIIIIIIIIIIIIIIIIIIIIIIIIIIIIIIIIIIIIIIIIIIIIIIIIIIIIIIIIIIIIIIIIIIIIIIIIIIIIIIIIII
Read these instructions for use carefully and look at the illustrations before using the
appliance.
Keep these instructions for future reference.
General
◗ Check if the voltage indicated on the appliance corresponds to the local mains
voltage before you connect the appliance.
◗ If the mains cord of this appliance is damaged, it must always be replaced by
Philips or a service centre authorised by Philips in order to avoid hazardous
situations.
◗ Always unplug the appliance from the mains before assembling, disassembling or
making adjustments to any of the accessories.
◗ Never switch the appliance on and off by turning the accessories.
◗ Never immerse the motor unit in water or any other fluid, nor rinse it under
the tap. Use only a moist cloth to clean the motor unit.
◗ Never let the appliance run unattended.
◗ Keep the appliance out of the reach of children.
◗ Avoid touching the blades, especially when the appliance is plugged in.The blades
are very sharp!
◗ Never reach into the blender jar with your fingers or an object while the
appliance is running.
◗ Never place the blade unit onto the motor unit without having the (blender or
mill) jar properly attached.
◗ If the blades get stuck, unplug the appliance before removing the ingredients that
are blocking the blades.
If necessary use a spatula to remove food from the wall of the jar after you have
switched off the appliance.
◗ Always make sure that the blade unit is correctly assembled before you plug the
appliance in and switch it on.
◗ Never use any accessories or parts from other manufacturers that have not
been specifically advised by Philips. Your guarantee will become invalid if such
accessories or parts have been used.
Blender
◗ Never fill the blender jar with ingredients that are hotter than 80 cC.
◗ To prevent spillage, do not put more than 1litre of liquid in the blender jar,
especially when you are processing at a high speed. Do not put more than 1 litre
in the blender jar when you are processing hot liquids or recipes that create a
great deal of foam.
◗ Never forget to place the sealing ring on the blade unit before assembling the
blender jar, otherwise leakage will occur.
◗ Always make sure the lid is properly closed and the measuring cup has been
inserted properly before you switch the appliance on.
Mill
◗ Never use the mill for more than 30 seconds without interruption.Allow the
mill to cool down for at least 1 minute between the processing cycles.
◗ Never forget to place the sealing ring in the blade unit before you assemble the
mill jar, otherwise leakage will occur.
◗ Never use the mill to grind very hard ingredients such as nutmeg, Chinese rock
sugar and ice cubes.
◗ Always process cloves, star anise and aniseed together with other ingredients. If
processed separately, these ingredients may attack the plastic materials of the
appliance.
◗ The mill beaker may become discoloured when the mill is used to process
ingredients such as cloves, anise and cinnamon.
◗ The mill is not suitable for chopping raw meat. Use the blender instead.
◗ Do not use the mill to process liquid mixtures such as fruit juice.
Filter
◗ Never use the filter to process ingredients hotter than 80cC.
◗ Never overload the filter. Do not put more than 50g of dried soy beans or 150g
of fruit in the filter at the same time.
◗ Always make sure the lid is properly closed and the measuring cup has been
inserted properly before you switch the appliance on.
◗ Cut the fruit into smaller pieces before putting it in the filter.
◗ Soak dried pulses, such as soy beans, before putting them in the filter.
Before first useIIIIIIIIIIIIIIIIIIIIIIIIIIIIIIIIIIIIIIIIIIIIIIIIIIIIIIIIIIIIIIIIIIIIIIIIIIIIIIIIIIIIIIIIIIIIIIIIIIIIIIIIIIIIIIIIIIIIIIIIIIIIIIIIIIIIIIIIIIIIIIIIIIIIIIIIIIIIIIIIIIIIIIIIIIIIIIIIIIIIIIIIIIIIIIIIIIIIIIII
Thoroughly clean the parts which will come in contact with food before you use the
appliance for the first time (see 'Cleaning').
Using the applianceIIIIIIIIIIIIIIIIIIIIIIIIIIIIIIIIIIIIIIIIIIIIIIIIIIIIIIIIIIIIIIIIIIIIIIIIIIIIIIIIIIIIIIIIIIIIIIIIIIIIIIIIIIIIIIIIIIIIIIIIIIIIIIIIIIIIIIIIIIIIIIIIIIIIIIIIIIIIIIIIIIIIIIIIIIIIIIIIIIIIII
Measuring cup
You can use the measuring cup to measure ingredients or to prepare mayonnaise.
B
The oil should be added very slowly to obtain the right consistency. Run the blender at a
low speed when preparing mayonnaise.
Blender
The blender can be used for pureeing very finely and for blending. It can be used for
preparing soups, sauces, milkshakes, vegetables, fruits, thin batters etc.
Preparing the blender for use
1 Assemble the sealing ring (E) on the blade unit (D) (fig. 1).
2 Screw the blade unit anticlockwise onto the bottom of the blender jar (C) until
the blade unit is fixed properly (fig. 2).
3 Mount the blender jar, with the blade unit attached onto the motor unit (A) and
fix it by turning it clockwise until you hear a 'click' .The blender jar can be
mounted in two positions (fig. 3 and fig. 4).
4 Make sure that the appliance is plugged in.
How to use the blender
1 Put the ingredients into the blender jar.
2 Place the lid on the blender jar.
3 Close the lid by pushing it down and turning the lid clockwise until you hear a
'click' (fig. 5).
4 Insert the measuring cup into the opening in the lid.
5 Turn the control knob to speed 1 or 2.
Turn the control knob to 'pulse' position if you want to process ingredients very briefly.
6 Do not let the appliance run for more than 3 minutes at a time.
Disassemble the blender
1 Unplug the appliance.
2 Remove the lid and the measuring cup from the blender jar.
3 Remove the blender jar with the blade unit attached to it from the motor unit
.
4 Always clean all the removable parts after using the appliance.
Tips
- If you want to crush ice cubes, put not more than 6 ice cubes (of approx.
24x35x25mm) in the blender jar and turn the control knob to pulse position a few
times.
- Cut meat or other solid ingredients into smaller pieces before putting them in the
blender jar.
- Do not process a large quantity of solid ingredients at the same time.To get good
results, we advise you to process these ingredients in a series of small batches.
- To make tomato juice, cut the tomatoes in four and drop the pieces through the
opening in the lid onto the rotating blades.
Filter Only types HR1724 and HR1727
With this filter you can make delicious fresh fruit juices, cocktails or soy milk.The filter
prevents pips and skins from ending up in your drink.
Never overload the filter. Do not put more than 50g of unsoaked dried soy beans or
150g of fruit in the filter at the same time.
Preparing the filter for use
1 Mount the blender jar, with the blade unit attached onto the motor unit (A) and
fix it by turning it clockwise until you hear a 'click' .The blender jar can be
mounted in two positions (fig. 3 and fig. 4).
2 Put the filter (K) in the blender jar (fig. 6).
Make sure that the grooves of the filter fit exactly onto the ribs inside the blender jar.
3 Make sure that the appliance is plugged in.
How to use the filter
1 Place the lid (F) on the blender jar.
Cut fruits into smaller pieces or pre-soak dry hard beans, such as soy beans, before
putting into filter.
2 Put the ingredients in the filter (fig. 7). Do not fill the filter beyond the top of the
sieve mesh.
3 Pour water or another liquid (milk, juice, etc.) into the blender jar.
4 Insert the measuring cup (G) into the hole in the lid.
Let the appliance run for approx. 40 seconds.
5 Switch the appliance off and remove the blender jar from the motor unit.
6 Pour the drink out via the pouring lip of the blender jar (fig. 8).
Do not remove the lid, the measuring cup and the filter.
7 For optimal results, put the jar with the remaining ingredients back onto the
appliance and let it run for a few more seconds.
Note: when you are processing a large quantity, we advise you not to put all the
ingredients in the filter at the same time. Start processing a small quantity and let the
appliance run for a few seconds.Then switch the appliance off and add another small
quantity, but do not exceed the top of the sieve mesh. Repeat this procedure until you
have processed all the ingredients. Always keep the lid on the blender jar during
processing.
Soy milk
Can only be prepared with the filter.
Do not process more than two batches without interruption. Let the appliance cool
down to room temperature before continue processing.
Ingredients
- 50g dry soybeans
- 500ml water
Soak the soy beans for 4 hours before processing them. Set aside to drain. Put the
soaked soy beans in the filter. Pour 500ml of water in the blender jar and blend for 40
seconds.
Pour the milk into a pan. Bring the soy milk to the boil, then add sugar and leave to
simmer until all the sugar has melted. Serve hot or cold.
Mill Only types HR 1721 and HR 1727
How to use the mill
1 Put the ingredients in the jar (H) (fig. 9).
You can process wet and dry ingredients.
2 Do not fill the jar beyond the "MAX" indication.
3 Put the larger sealing ring (I) on the blade unit of the mill (J) (fig. 10).
Make sure that the rubber sealing ring has been placed correctly.
4 Screw the blade unit on the jar by turning it clockwise (fig. 11).
5 Hold the assembled mill upside down and screw it onto the motor unit (A) by
turning it clockwise until you hear a 'click' (fig. 12).
6 Make sure that the appliance is plugged in.
7 Switch the appliance on and let it run until the ingredients are fine enough.This
will take approx. 10-30 seconds.
Disassemble the mill
1 Unplug the appliance.
2 If the mill is still attached to the motor unit, turn the mill upside down and
remove the mill from the motor unit by turning it anticlockwise.
3 Remove the blade unit from the jar by turning it anticlockwise.
4 Always clean the removable parts immediately after use.
CleaningIIIIIIIIIIIIIIIIIIIIIIIIIIIIIIIIIIIIIIIIIIIIIIIIIIIIIIIIIIIIIIIIIIIIIIIIIIIIIIIIIIIIIIIIIIIIIIIIIIIIIIIIIIIIIIIIIIIIIIIIIIIIIIIIIIIIIIIIIIIIIIIIIIIIIIIIIIIIIIIIIIIIIIIIIIIIIIIIIIIIIIIIIIIIIIIIIIIIIIIIIIIIIIIIIIIIIIIIIIIIIIIIIIII
We advise you to clean all the removable parts immediately after use.
Always unplug the appliance before cleaning.
◗ Never clean the motor unit, the blade units, the filter and the sealing rings in the
dishwasher.
◗ Always disassemble all removable parts before cleaning them. Do not forget to
remove the sealing rings from the blade units (blender and mill).
◗ Avoid touching the blades.The blades are very sharp.
The blender and mill jar (without blade unit), lid and measuring cup are dishwasher-
proof.
Motor unit
1 Clean the motor unit with a moist cloth. Do not rinse the motor unit under the
tap. Do not use abrasives, scourers, alcohol, etc.
StorageIIIIIIIIIIIIIIIIIIIIIIIIIIIIIIIIIIIIIIIIIIIIIIIIIIIIIIIIIIIIIIIIIIIIIIIIIIIIIIIIIIIIIIIIIIIIIIIIIIIIIIIIIIIIIIIIIIIIIIIIIIIIIIIIIIIIIIIIIIIIIIIIIIIIIIIIIIIIIIIIIIIIIIIIIIIIIIIIIIIIIIIIIIIIIIIIIIIIIIIIIIIIIIIIIIIIIIIIIIIIIIIIIIIIIIII
Wind excess mains cord round the base of the appliance.
Information & service IIIIIIIIIIIIIIIIIIIIIIIIIIIIIIIIIIIIIIIIIIIIIIIIIIIIIIIIIIIIIIIIIIIIIIIIIIIIIIIIIIIIIIIIIIIIIIIIIIIIIIIIIIIIIIIIIIIIIIIIIIIIIIIIIIIIIIIIIIIIIIIIIIIIIIIIIIIIIIIIIIIIIIIIIIII
If you need information or if you have a problem, please visit the Philips Web site at
www.philips.com or contact the Philips Customer Care Centre in your country (you will
find its phone number in the worldwide guarantee leaflet). If there is no Customer Care
Centre in your country, turn to your local Philips dealer or contact the Service
Department of Philips Domestic Appliances and Personal Care BV.
ENGLISH


Join the conversation about this product
Here you can share what you think about the Philips HRI7240 Comfort Blender. If you have a question, first carefully read the manual. Requesting a manual can be done by using our contact form.