
HR2092
HR2098
HR2099
Specifications are subject to change without notice
© 2015 Koninklijke Philips N.V.
All rights reserved.
4240 002 00145
Deutsch
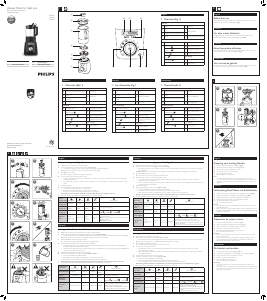
1 Übersicht (Abb. 1)
Hauptgerät
a
Messbecher mit Wasserstandsanzeige
e
Messereinheit
b
Deckel
f
Heizelement
c
Mixbecher mit nicht abnehmbarer
Manschette
d
Dichtungsring
g
Motoreinheit mit Bedienfeld
Bedienfeld
h
Cooking functions
i
Drehknopf und OK-Taste
Pürierte Suppe
j
Impuls-/Ice Crush-Taste
Suppe mit Stückchen
k
Mixgeschwindigkeitsstufen
Kompott
l
Tasten zur Anpassung von
Aufheizstufe und Timer (-/+)
Sauce
LED-Anzeige
Manuelle Einstellung
m
Timer (MM:SS)
n
Aufheizstufe
Français
1 Vue d’ensemble (Fig. 1
Unité principale
a
Verre gradué avec indicateur du niveau
d'eau
e
Lame
b
Couvercle
f
Résistance chauffante
c
Bol de blender avec collier non-
amovible
d
Bague d'étanchéité
g
Bloc moteur avec bloc de
commande
Bloc de commande
h
Fonctions de préparation
i
Bouton rotatif et bouton OK
Soupe moulinée
j
Bouton Pulse / glace pilée
Soupe consistante
k
Vitesses de mixage
Compote
l
Boutons de réglage du
minuteur et du niveau de
cuisson (-/+)
Sauce
Écran LED
Réglage manuel
m
Minuteur (MM:SS)
n
Niveau de cuisson
Nederlands
1 Overzicht (afb. 1)
Het apparaat
a
Blenderkan met niet-afneembare kraag
e
Mesunit
b
Deksel
f
Verwarmingselement
c
Blenderkan met waterniveau-indicator
d
Afdichtring
g
Motorunit met
bedieningspaneel
Conguratiescherm
h
Kookfuncties
i
Draaiknop en OK-knop
Gepureerde soep
j
Knop puls/ijs vermalen
Dikke soep
k
Instellingen blendsnelheid
Vruchtenmoes
l
Verhittingsniveau en
timerknoppen (-/+)
Saus
LED-display
Handmatig instellen
m
Timer (mm:ss)
n
Verhittingsniveau
English
1 Overview (Fig. 1)
Main unit
a
Measuring cup with water level
indicator
e
Blade unit
b
Lid
f
Heating element
c
Blender jar with non-detachable collar
d
Seal ring
g
Motor unit with control panel
Control panel
h
Cooking functions
i
Rotary knob and OK button
Pureed soup
j
Pulse / Ice crush button
Chunky soup
k
Blending speed settings
Compote
l
Heating level and timer
adjustment buttons (-/+)
Sauce
LED display
Manual setting
m
Timer (MM:SS)
n
Heating Level
English
Before first use
Thoroughly clean the parts that will come in contact with food before you use the
appliance for the rst time (see “Cleaning” in Fig. 8).
Deutsch
Vor dem ersten Gebrauch
Reinigen Sie vor dem ersten Gebrauch des Geräts gründlich alle Teile, die mit
Lebensmitteln in Kontakt kommen (siehe «Reinigung» in Abb. 8).
Français
Avant la première utilisation
Avant la première utilisation, nettoyez soigneusement toutes les pièces en contact
avec des aliments (voir le chapitre « Nettoyage », Fig. 8).
Nederlands
Voor het eerste gebruik
Maak alle onderdelen die in aanraking komen met voedsel grondig schoon voordat u
het apparaat voor het eerst gebruikt (zie “Schoonmaken” in afb. 8).
English
Pre-set cooking mode (Fig. 4)
1 Follow the steps in “Preparing your cooking blender”.
2 Turn the rotary knob to a pre-set function you need (step 3 in Fig. 4).
• To adjust the cooking time, press -/+ button. See table below for adjustable cooking time.
Tip: Keep -/+ button pressed to increase or decrease the time setting quickly.
3 Press OK to start cooking.
» When cooking is completed, you will hear a few beeps.
4 Turn the rotary knob to “0” position after cooking.
• The LED display will turn off if there is no operation in 5 minutes. You can wake up the appliance and continue operating by
pressing any function key.
• If you want softer cooked food, switch to manual cooking mode to cook for longer time. Follow the steps in “Manual cooking
mode”.
5 Unplug the appliance.
6 Remove the blender jar from the motor unit (step 9 in Fig. 4).
• This allows the heating element to cool down faster.
• Be aware that the lid and the blender jar will be hot after cooking.
• Be aware of the steam release when you lift the lid and measuring cup.
Warning: Do not touch the bottom of blender jar and the heating element after cooking. It is very hot!
7 Pour out the cooked ingredients/soup from the blender jar to avoid overcooking.
Pre-set
cooking mode
Pureed soup
Chunky soup
Compote
Sauce
Manual setting
Default
cooking time
25 minutes 25 minutes 20 minutes 25 minutes -
Adjustable
cooking time
15 – 35
minutes
15 – 35
minutes
15 – 30
minutes
15 – 35
minutes
30 seconds – 60 minutes
Adjustable
heating level
- - - -
LOW:
MED: HIGH:
Suggested
recipe
Tomato
creamy soup
Chicken soup
Apple
compote
Bolognaise
LOW: Keeping warm, melting butter for desserts or
crepe pancake batter
MED: Simmering, cooking small amount of ingredients like
baby food or sauces
HIGH: Boiling food faster
Deutsch
Voreingestellter Kochmodus (Abb. 4)
1 Befolgen Sie die Schritte unter «Vorbereitung Ihres Mixers mit Kochfunktion».
2 Drehen Sie den Drehknopf auf die benötigte voreingestellte Funktion (Schritt 3 in Abb. 4).
• Um die Kochzeit anzupassen, drücken Sie die Taste -/+. In der Tabelle unten nden Sie die Kochzeiten mit ihren Anpassmöglichkeiten.
Tipp: Halten Sie die Taste -/+ gedrückt, um die Zeiteinstellung zu erhöhen oder zu verringern.
3 Drücken Sie OK, um den Kochvorgang zu beginnen.
» Sobald der Kochvorgang abgeschlossen ist, hören Sie einige Pieptöne.
4 Drehen Sie den Drehknopf nach dem Kochen auf die Position «0».
• Die LED-Anzeige erlischt, wenn 5 Minuten lang keine Aktivität erfolgt. Sie können das Gerät reaktivieren und die Bedienung
fortsetzen, indem Sie eine Funktionstaste drücken.
• Wenn Sie weicher gekochte Zutaten möchten, wechseln Sie zum manuellen Modus, um die Zutaten länger zu garen. Befolgen Sie
die Schritte unter “Manueller Kochmodus”.
5 Ziehen Sie den Netzstecker des Geräts aus der Steckdose.
6 Entfernen Sie den Mixbecher von der Motoreinheit (Schritt 9 in Abb. 4).
• So kann das Heizelement schneller abkühlen.
• Beachten Sie, dass der Deckel und der Mixbecher nach dem Kochen heiß sind.
• Beachten Sie, dass beim Öffnen des Deckels und Messbechers Dampf austreten kann.
Warnung: Berühren Sie nach der Zubereitung nicht die Unterseitedes Mixbechers und das Heizelement. Es ist sehr heiß!
7 Schütten Sie die gekochten Zutaten/Suppen aus dem Mixbecher, um ein Verkochen zu verhindern.
Voreingestellter
Kochmodus
Pürierte Suppe
Chunky soup
Kompott
Sauce
Manuelle Einstellung
StandardKochzeit
25 Minuten 25 Minuten 20 Minuten
25
Minuten
-
Anpassbare
Kochzeit
15 – 35 Minuten
15 – 35
Minuten
15 – 30
Minuten
15 – 35
Minuten
30 Sekunden – 60 Minuten
Anpassbare
Aufheizstufe
- - - -
NIEDRIG:
MITTEL: HOCH:
Empfohlenes
Rezept
Tomatencremesuppe Hühnersuppe Apfelkompott Bolognese
NIEDRIG: Warmhalten, Schmelzen von Butter für
Desserts oder Teig für Crêpes und Pfannkuchen
MITTEL: Simmern, Kochen geringer
Zutatenmengen wie für Babykost oder Saucen
HOCH: schnelleres Kochen von Gerichten
2
English
Preparing your cooking blender
1 Assemble your cooking blender as suggested (Fig. 3).
2 Check the quantity and settings for processing (Fig. 9).
3 Open the lid and put the ingredients in the jar.
4 Insert the measuring cup and close the lid.
5 Put the plug in the wall socket.
» The appliance is ready to use.
Note:
• To remove the blender jar from the motor unit, lift it off the motor unit.
• It is normal that scratches occur on the heating element or the bottom surface
of the blade unit after use. This does not affect the performance or life of the
appliance.
Deutsch
Vorbereitung Ihres Mixers mit Kochfunktion
1 Setzen Sie Ihren Mixer mit Kochfunktion wie angegeben zusammen (Abb. 3).
2 Prüfen Sie die Menge und Einstellungen für die Verarbeitung (Abb. 9).
3 Öffnen Sie den Deckel, und geben Sie die Zutaten in den Becher.
4 Setzen Sie den Messbecher ein, und schließen Sie den Deckel.
5 Stecken Sie den Stecker in die Steckdose.
» Das Gerät ist einsatzbereit.
Hinweis:
• Um den Mixbecher von der Motoreinheit abzunehmen, heben Sie ihn von der
Motoreinheit herunter.
• Es ist normal, dass nach dem Gebrauch Kratzer auf dem Heizelement oder der
Unterseite der Messereinheit auftreten. Dies hat jedoch keinerlei Einuss auf die
Lebendsauer des Geräts.
Français
Préparation du mixeur cuiseur
1 Montez votre mixeur cuiseur comme indiqué (Fig. 3).
2 Vériez la quantité et les réglages pour le mixage (Fig. 9).
3 Ouvrez le couvercle et versez les ingrédients dans le bol.
4 Insérez le verre gradué et fermez le couvercle.
5 Branchez le cordon d’alimentation sur la prise secteur.
» L’appareil est prêt à l’emploi.
Remarque :
• Pour retirer le bol du blender du bloc moteur, soulevez-le jusqu’à ce qu’il se
sépare du bloc moteur.
• Il est normal que des rayures apparaissent sur l’élément chauffant ou sur le
fond de l’ensemble lames après utilisation. Ce phénomène n’affecte ni les
performances ni la durée de vie de l’appareil.
Nederlands
De blender voorbereiden
1 Zet de blender in elkaar zoals aangegeven (afb. 3).
2 Controleer de hoeveelheden en de instellingen voor verwerking (afb. 9).
3 Open het deksel en doe de ingrediënten in de kan.
4 Plaats de maatbeker en sluit het deksel.
5 Steek de stekker in het stopcontact.
» U kunt het apparaat nu gebruiken.
Opmerking:
• Als u de blenderkan van de motorunit wilt verwijderen, tilt u deze van de
motorunit.
• Het is normaal dat er na gebruik krassen optreden op het verwarmingselement
of de onderkant van de mesunit. Dit heeft geen invloed op de prestaties of de
levensduur van het apparaat.
Français
Mode de cuisson avec réglage prédéni (Fig. 4)
1 Suivez les étapes du chapitre « Préparation du mixeur cuiseur ».
2 Tournez le bouton rotatif sur le préréglage souhaité (étape 3, Fig. 4).
• Pour régler le temps de cuisson, appuyez sur le bouton -/+. Consultez le tableau ci-dessous pour savoir quels sont les temps de
cuisson réglables.
Conseil : Maintenez le bouton -/+ enfoncé pour augmenter ou diminuer plus rapidement le réglage du temps de cuisson.
3 Appuyez sur OK pour lancer la cuisson.
» Une fois la cuisson terminée, l’appareil émet plusieurs bips.
4 Placez le bouton rotatif sur la position « 0 » après la cuisson.
• L’écran LED s’éteint si l’appareil est inutilisé pendant 5 minutes. Vous pouvez rallumer l’appareil et continuer à l’utiliser en
appuyant sur n’importe quel bouton.
• Si vous souhaitez des aliments plus cuits, basculez en mode de cuisson manuel pour cuire plus longtemps. Suivez les étapes de la
section « Mode de cuisson Manuel ».
5 Débranchez l’appareil.
6 Retirez le bol mélangeur du bloc moteur (étape 9 à la g. 4).
• Ceci permet à l’élément chauffant de refroidir plus rapidement.
• Souvenez-vous que le couvercle et le bol du blender sont chauds après la cuisson.
• Faites attention à la vapeur qui est libérée lorsque vous ouvrez le couvercle et la mesure graduée.
Attention : Ne touchez pas le fond du bol du blender ni l’élément chauffant après la cuisson. Ils sont très chauds !
7 Videz les ingrédients cuits/la soupe du bol mélangeur pour éviter de trop les cuire.
Mode de
cuisson avec
réglage prédéni
Soupe moulinée
Soupe
consistante
Compote
Sauce
Réglage manuel
Temps de
cuisson par
défaut
25 minutes 25 minutes 20 minutes 25 minutes -
Temps de
cuisson réglable
15 – 35 minutes
15 – 35
minutes
15 – 30
minutes
15 – 35
minutes
30 secondes – 60 minutes
Niveau de
cuisson réglable
- - - -
LOW :
MED : HIGH :
Suggestion de
recette
Soupe
crémeuse à la
tomate
Soupe au
poulet
Compote
de pommes
Bolognaise
LOW : permet de maintenir au chaud, de faire fondre le
beurre pour les desserts ou la pâte à crêpe
MED : permet de faire mijoter, de cuire de petites
quantités d'ingrédients (par exemple des aliments pour
bébés ou des sauces)
HIGH : permet de faire bouillir rapidement des aliments
Nederlands
Vooringestelde kookmodus (afb. 4)
1 Volg de stappen in “De blender voorbereiden”.
2 Draai de knop naar de gewenste voorinstelling (stap 3 in afb. 4).
• Druk op de knop -/+ om de bereidingstijd aan te passen. Raadpleeg onderstaande tabel voor het aanpassen van de bereidingstijd.
Tip: houd de knop -/+ ingedrukt om de tijdinstelling snel te verlagen of te verhogen.
3 Druk op OK om de bereiding te starten.
» Als de bereiding is voltooid, piept het apparaat een paar keer.
4 Draai de knop naar “0” als u klaar bent.
• Het LED-display wordt na 5 minuten inactiviteit uitgeschakeld. U kunt opnieuw met het apparaat werken door op een
willekeurige knop te drukken.
• Als u zachter gekookt voedsel wilt, schakelt u naar de handmatige kookmodus om een langere tijd te koken. Volg de stappen in
‘Handmatige kookmodus’.
5 Haal de stekker van het apparaat uit het stopcontact.
6 Verwijder de blenderkan van de motorunit (stap 9 in afb. 4).
• Zo kan het verwarmingselement sneller afkoelen.
• Houd er rekening mee dat het deksel en de blenderkan na het koken heet zijn.
• Houd er rekening mee dat er stoom vrijkomt wanneer u het deksel en de maatbeker opent.
Waarschuwing: Raak de onderkant van de blenderkan en het verwarmingselement niet aan na het koken. Het is erg heet!
7 Giet de gekookte ingrediënten/soep uit de blenderkan om nagaren te voorkomen.
Vooringestelde
kookmodus
Gepureerde soep
Dikke soep
Vruchtenmoes
Saus
Handmatig instellen
Standaard
bereidingstijd
25 minuten 25 minuten 20 minuten 25 minuten -
Aangepaste
bereidingstijd
15 – 35 minuten
15 – 35
minuten
15 – 30 minuten
15 – 35
minuten
30 seconden – 60 minuten
Aangepast
verhittingsniveau
- - - -
LAAG:
GEMIDDELD: HOOG:
Voorgesteld
recept
Tomatencrèmesoep Kippensoep Appelmoes Bolognaise
LAAG: warmhouden, boter smelten voor
desserts of pannenkoekenbeslag
GEMIDDELD: sudderen, kleine hoeveelheden
ingrediënten bereiden zoals babyvoeding of
sauzen
HOOG: voedsel sneller opwarmen
Always there to help you
Register your product and get support at
www.philips.com/welcome
FR Mode d’emploi
NL Gebruiksaanwijzing
EN User manual
DE Benutzerhandbuch
hijk
lmn
a
b
c
d
e
f
g
4
4
1
2
3
5
7
6
8
9 10
3
5
3
1
2
1
2
4



Join the conversation about this product
Here you can share what you think about the Philips HR2099 Avance Collection Blender. If you have a question, first carefully read the manual. Requesting a manual can be done by using our contact form.