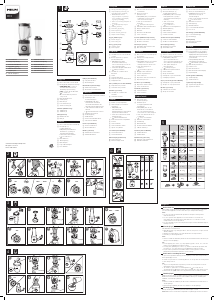
5
1
3 4
1
2
3
4
2
5
5
6
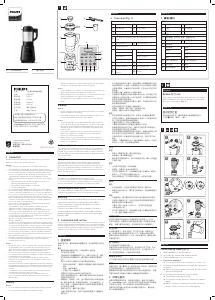
ᆾؽ
1
2
3
4
1
2
6
5
5
6
4
3
4
1
2
8
9 10
7
English
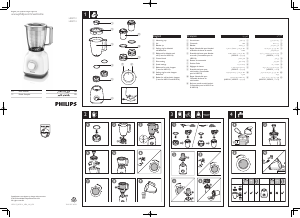
Manual blending mode (Fig.4)
1 Add ingredients to the blender jar.
2 Assemble the exhaust lid and blender lid.
3 Fix the blender jar to the motor base.
4 Plug in the appliance.
» You will hear a beep and the appliance is ready to use.
5 Press timer button (-/+) to adjust the processing time (range from
ve seconds to three minutes).
Note:
• The maximum time on speed “H” is set at 1 minute and 30 seconds
for product protection.
6 Press speed button (-/+) to adjust the processing speed (range from
one to nine 9/H).
7 Press button to start blending.
» The blender starts processing.
» To stop processing, press the button again.
» When blending is completed, you will hear ve beeps. “End” is
shown on the LED display.
8 Unplug the appliance and remove the blender jar from the motor
base after blending.
9 Remove the blender lid.
10 Pour out the blended ingredients/soup from the blender jar
carefully.
Suggested recipe
1 Shred chicken meat (30 gram) into strips.
2 Mix the chicken meat with cooked and peeled potato pieces (600
gram).
3 Add water or milk (180 to 200 gram) to the mixture and mix them well.
4 Put the mixture into the glass jar.
5 Use a spatula to press the mixture down the jar.
6 Use manual blending mode of the appliance (10 seconds at Speed
“H”) to blend the mixture.
繁體中文
手動攪拌模式(圖
4
)
1 添加食材至攪拌杯。
2 安裝排氣蓋子和攪拌機蓋子。
3 將攪拌杯安裝至摩打機座。
4 為產品插入電源。
» 聽到「嗶」一聲後,產品即可使用。
5 按下定時按鈕
(-/+)
調整處理時間(可調整範圍為五秒至三分鐘)。
備註:
• 為保護產品,「
H
」速度的最長時間為
1
分鐘
30
秒。
6 按下速度按鈕
(-/+)
調整處理速度(可調整範圍為
1
至
9/H
)。
7 按
按鈕開始攪拌。
» 攪拌機開始處理。
» 要停止處理,再按一下
按鈕。
» 攪拌完成後,你會聽到五聲嗶聲。
LED
顯示屏顯示「完成」。
8 完成攪拌後,拔除產品電源,並將攪拌杯從摩打機座移除。
9 移除攪拌機蓋子。
10 小心地從攪拌杯倒出攪拌好的食材/湯。
建議食譜
1 將煮熟的雞肉(
30
克)切成雞肉條。
2 將雞肉與煮熟並去皮的薯塊(
600
克)混合。
3 加水或牛奶(
180
至
200
克)至混合材料並均勻攪拌。
4 將混合材料放入玻璃攪拌杯。
5 使用抹刀將混合材料壓在攪拌杯底。
6 使用產品的手動攪拌模式(於速度「
H
」攪拌
10
秒)來攪拌混合材料。
( 4)
1
2
3
4
»
5 (-/+) ( 5 3 )
:
• “H” 1 30
6 (-/+) ( 9/H)
7
»
»
» 5 “End” LED
8
9
10 /
1 (30 )
2 (600 )
3 (180 200 )
4
5
6 (10 “H”)
English
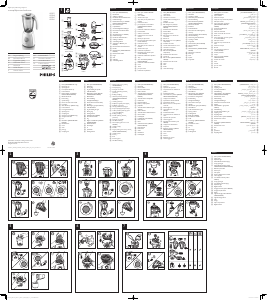
Cleaning (Fig. 5)
1 Pour in washing-up liquid and warm water (no more than half of
maximum capacity).
2 Insert the exhaust cover and close the lid.
3 Press button for three to ve times. Keep the washing-up liquid
in the blender jar for 15 minutes.
4 Unplug the appliance and then pour out to empty the blender jar.
Rinse under tap to clean the blender jar.
5 Use dry cloth to clean the driving shaft head.
6 Use dry cloth to clean the bottom of the blender jar.
Note:
• Do not soak the blender jar in water to avoid damaging the
electronic devices at the bottom.
• Do not use any metallic or sharp-edged utensils on the blade unit to
avoid scratching on the surface.
• Do not use metal wool or brush to wash the blade unit to avoid
scratching.
• Use only soft cloth when cleaning the motor unit and blade unit.
• Do not put the blender jar into the dishwasher.
• Do not rinse the motor base or the bottom of blender jar.
Tip:
• Use soft cloth to clean the heating element after using. This can
ensure the best and consistent cooking performance.
• Do not use sharp-edged tools to remove the burnt ingredients from
the blender jar. To clean the jar in this case, add warm water to the jar
and keep it for two hours and then use brush to remove the residue.
• For better result, soak ingredients for a few hours before cooking
with multigrain milk or grain congee program.
繁體中文
清洗(圖
5
)
1 倒進清潔劑和溫水(不超過最大容量的一半)。
2 安裝排氣蓋,蓋上蓋子。
3 按
按鈕三至五次。將清潔劑保留在攪拌杯
15
分鐘。
4 拔除產品電源,然後清空攪拌杯。在水龍頭下沖洗攪拌杯。
5 使用乾布清潔驅動軸頭。
6 使用乾布清潔攪拌杯底部。
備註:
• 切勿將攪拌杯浸泡於水中,以免損壞底部的電子裝置。
• 切勿於刀組使用任何金屬或鋒利器具,以避免劃傷表面。
• 切勿使用金屬羊毛或刷子來刷洗刀組,以避免劃傷。
• 清洗摩打裝置和刀組時,只可用軟布擦拭。
• 切勿將攪拌杯放進洗碗碟機。
• 切勿沖洗摩打機座或攪拌杯底部。
提示:
• 使用後,用軟布清潔加熱元件。這樣可以確保產品保持最佳烹飪效能。
• 切勿使用鋒利工具移除攪拌杯的燒焦食材。這種情況下,如想清洗攪拌
杯,應在攪拌杯中加入溫水放置兩小時,再用刷子去除殘留物。
• 為達至更佳效果,使用五谷奶程式或穀物粥程式烹飪前,應預先將大豆或
米浸泡數小時。
( 5)
1 ()
2
3 3 5 15
4
5
6
:
•
•
•
•
•
•
:
•
•
2
• 2-3
使用加熱功能(圖
3
)
1 按照「預設烹飪模式」的第
1
至
4
步來準備攪拌機。
2 按
按鈕。(第
5
步,圖
3
)
3 按
按鈕開始加熱。
» 攪拌機開始將食材加熱至
100
°
C
。
» 煮沸後,
LED
顯示屏會顯示剩餘時間(分鐘)。
» 加熱時,
LED
顯示屏會顯示食材溫度。
注意:加熱時,將不時攪拌食物。請勿使用本產品加熱牛奶,五谷奶或冷
粥等粘稠液體。否則,會令食材燒焦,或產生難聞氣味。
使用瞬間加速功能(圖
3
)
1 按照「預設烹飪模式」的第
1
至
4
步來準備攪拌機。
2 按下及按住
按鈕開始處理,直至達到想要的效果。
» 攪拌機開始以極高速攪拌。
3 鬆開
按鈕以停止處理。
4 拔除產品電源。
恢復中斷操作(安全保護)
攪拌機設有安全保護系統。
如果蓋子在處理途中鬆開,操作將中斷,顯示屏會顯示「
E01
」錯誤代碼。
要恢復處理,
1 將蓋子正確放置及鎖定於攪拌杯。
»
顯示屏將顯示「
- - - -
」。
2 按「開始/取消」按鈕。
»
產品恢復處理。
( 3)
1
2
3
4
»
5
» LED
6
»
»
» “End”
LED
7
•
•
•
:
!
8
9 /
:
1 ( 90 ),
1000 .
:
4 (
200 ), 1000 .
:
;
4-8 (2 . x 2 . x 2 .)
:
120 , 30 ,
35 , 800 .
:
350 ,
1000 .
:
1750 .
750 , 1000 .
:
1/2 (50 ),
(20 ) 1000 .
:
100 , 100 ,
200
:
• (1000 . )
•
• /
• ()
( 3)
1 1 4 “”
2 ( 5 3)
3
» 100 °C
» LED ()
» LED
:
( 3)
1 1 4 “”
2
»
3
4
()
“E01”
1
» “- - - -“
2 ”/”
»
5 Press button to toggle through preset programs.
» When a preset program is selected, the LED of this program will
light up.
6 Press button to start cooking.
» The blender starts processing.
» To stop processing, press the button again.
» When cooking is completed, you will hear a few beeps. “End” is
shown on the LED display.
7 Unplug the appliance and remove the blender jar from the motor
base after cooking.
• This allows the heating element to cool down faster.
• Be aware that the blender lid and the blender jar will be very hot
after cooking
• Be aware of the steam release when you remove the blender lid
and exhaust lid.
Warning: Do not touch the bottom of blender jar and the heating
element after cooking. It is very hot!
8 Remove the blender lid.
9 Pour out the cooked ingredients/soup from the blender jar carefully.
Features Program
Description
Ingredients
: Nutritious
congee
Cooking
program with
blending to
give a smooth
rice paste
1 cup rice (approx. 90 grams),
approx. 1000 ml of water
: Corn juice
Cooking
porgram with
blending to
give smooth
corn juice
4 cups of corn kernels (approx. 200
grams), ap-prox. 1000 ml of water
: Crushed ice
Blending
program; ice
cubes are
crushed into
small pieces
4-8 ice cubes (2 cm x 2 cm x 2 cm)
: Multigrain
milk
Cooking
program with
blending
Black sesame seeds 120 grams,
white sesame seeds 30 grams, white
rice 35 grams, water 800 ml
: Soup
Cooking
program with
blending to
make thick
soup
Approx. 350g of ingredients, approx.
1000 ml of water
: Fruit juice
Blending
program
Not more than the maximum 1750
ml level indi-cated on the blender
jar
e.g.: 750 grams carrots, 1000 ml
water
: Grain
congee
Cooking
program with
gentle blending
⁄ cup rice (approx. 50 grams), red
beans (20 grams), approx. 1000 ml
of water
: Smoothie
Blending
Program
Approx. 100 grams of water, 100
grams of ice, 200 grams of fruit
Note:
• The appliance is intended for use at altitudes <2000m, if you are
using this appliance in area higher than 1000m, make sure to reduce
the ingredient quantity in the recipe to prevent ingredient overow.
• To avoid accidents, do not add ingredients to the blender jar
while it is working.
• When making fruit and vegetable drinks, de-core the fruit/vegetables
and add the appropriate amount of drinking water or milk.
• Do not restart the appliance if it stops when making multigrain
milk (or congee), or if the appliance has nished processing.
This may cause the cooked ingredients to burn or damage the
heating plate and other components.If the appliance stops
working or has nished processing, remove the ingredients from
the blender jar before reusing.
Use the heating function (Fig. 3)
1 Follow step 1 to 4 in “Preset cooking mode” to prepare your blender.
2 Press the button. (Step 5 in Fig. 3)
3 Press button to start heating.
» The blender starts to heat the ingredients to 100 °C.
» After boiling, the LED display will show the remaining time
(minute).
» The temperature of the ingredients is shown on LED display
during heating.
Note: Food is occasionally blended during heating. Do not use
the appliance to heat sticky liquid like milk, multigrain milk or cool
congee. Otherwise, it will cause the ingredients to burn or produce
unpleasant smell.
Use the pulse function (Fig. 3)
1 Follow step 1 to 4 in “Preset cooking mode” to prepare your blender.
2 Press and hold the button to start processing until getting the
result desired.
» The blender starts blending at a very high speed.
3 Release the button to stop processing.
4 Unplug the appliance.
Resume an interrupted operation (Safety protection)
The blender has a safety protection system.
If the lid is unlocked during processing, operation is interrupted and “E01”
error code will be shown on display.
To resume processing,
1 Place and lock the blender jar and lid properly.
» · “- - - -“ will be shown on display.
2 Press ”Start/Cancel” button.
» · The appliance resumes processing.
繁體中文
預設烹飪模式(圖
3
)
1 添加食材至攪拌杯。
2 安裝排氣蓋子和攪拌機蓋子。
3 將攪拌杯安裝至摩打機座。
4 為產品插入電源。
» 聽到「嗶」一聲後,產品即可使用。
5 按
按鈕切換預設程式。
» 選擇預設程式後,該預設程式的
LED
燈會亮起。
6 按
按鈕開始烹飪。
» 攪拌機開始處理。
» 要停止處理,再按一下
按鈕。
» 完成烹飪後,你會聽到幾下嗶聲。
LED
顯示屏顯示「完成」。
7 烹飪後,拔除產品電源,並將攪拌杯從摩打機座移除。
• 可更快速地冷卻加熱元件。
• 請小心,烹飪後的攪拌機蓋子和攪拌杯會非常熱
• 移除攪拌機蓋子和排氣蓋子時,請小心冒出的蒸氣。
警告:烹飪後請不要觸碰攪拌杯底部和加熱元件。杯底和加熱組件會非
常熱!
8 移除攪拌機蓋子。
9 小心地從攪拌杯倒出煮好的食材/湯。
功能特點 程式說明 材料
:營養粥
設有攪拌功能的烹
飪程式,適用於製
作幼滑米糊
1
杯米(約
90
克)、約
1000
毫升水
:栗米汁
設有攪拌功能的烹
飪程式,適用於製
作幼滑粟米汁
4
杯粟米粒(約
200
克)、
約
1000
毫升水
:碎冰
攪拌程式;將冰塊
打碎成小塊
4-8
塊冰塊(
2
厘米
x 2
厘米
x 2
厘米)
:五谷奶
設有攪拌功能的烹
飪程式
黑芝麻
120
克、
白芝麻
30
克、
大米
35
克、約
800
毫升水
:湯
設有攪拌功能的烹
飪程式,適用於製
作濃湯
大約
350
克食材、約
1000
毫升水
:果汁
攪拌程式
不超過攪拌杯顯示的最大容量
1750
毫升
例如:
750
克蘿蔔、
1000
毫升水
:穀物粥
設有慢速攪拌功能
的烹飪程式
半杯米(約
50
克)、紅豆(
20
克)、
約
1000
毫升水
:沙冰
攪拌程式 大約
100
克水、
100
克冰、
200
克水果
備註:
• 在高海拔地區(高於
1000
米)使用本產品時,請確保減少食譜中的
食材份量,以防止食材溢出。
• 為避免發生意外,請勿在攪拌機運作時添加食材。
• 製作水果和蔬菜飲料時,請去除水果/蔬菜的核,並加入適量的飲用
水或牛奶。
• 如產品於製作五谷奶(或粥)時停止處理,或產品已完成處理,請勿
重新啟動本產品。這可能令已煮好的食材燒焦,或者損壞加熱板及其
他組件。如果產品停止處理或已完成處理,請在重新使用前從攪拌杯
中取出食材。
Nutritious congee
㨳◳
Corn juice
ᘣ●ᥑ
นํ้าขาวโพด
Crushed ice
⋱յ
นํ้าแข็งบด
Multigrain milk
ㅠଠ
นมมัลติเกรน
Soup
ᬋ
ซุป
Fruit juice
ᗊᥑ
นํ้าผลไม
Grain congee
ḵ◳
โจกธัญพืช
Smoothie
ᦚյ
สมูทตี้


Join the conversation about this product
Here you can share what you think about the Philips HR2088 Blender. If you have a question, first carefully read the manual. Requesting a manual can be done by using our contact form.
reply | This was helpful (4)
reply | This was helpful (1)
reply | This was helpful (0) (Translated by Google)
reply | This was helpful (0)