
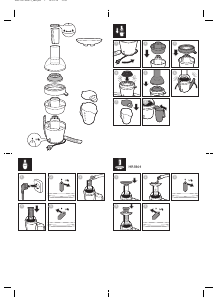
Before first use
Thoroughly clean all detachable parts before you use the appliance for
the rst time (see chapter ‘Cleaning’).
Preparing for use
Always unwind the mains cord completely before you switch on the
appliance.
1 Align the arrow icon ( ) on the juicing unit to the unlock icon ( )
on the main unit, and then insert the juicing unit into the main unit.
(Fig. 2)
2 Turn the juicing unit anticlockwise to fasten it on the main unit. You
will hear a “click” sound when the juicing unit is properly assembled,
and the arrow icon (
) on the juicing unit will be aligned to the lock
icon (
) on the main unit. (Fig. 3)
3 Point the juicing screw to the hole in the main unit, and insert it all
the way to the end. (Fig. 4)
Note:
- Slightly rotate the juicing screw so that you can easily point the
juicing screw to the hole in the main unit.
4 Align the groove on the squeezing chamber to the knob on the
juicing unit and insert the squeezing chamber all the way to the
end. (Fig. 5)
5 Align the arrow icon ( ) on the pulp outlet to the unlock icon ( )
on the juicing unit (Fig. 6) and turn it anticlockwise until the arrow
icon (
) points to the lock icon ( ). (Fig. 7)
6 Slide the juice jug into the main unit, and place the pulp container
under the pulp outlet. (Fig. 8)
Using the appliance
1 Wash the fruit and/or vegetables. If necessary, cut them into pieces
that t into the feeding tube.
Note:
- Remove stones and thick peels of the fruits you would not eat, for
example from oranges, pomegranates etc.
2 Open the drip stop. (Fig. 9)
3 Put the plug in the wall outlet, and then press the on/o button (
) to switch on the appliance. (Fig. 10)
4 Put the ingredients in the feeding tube (Fig. 11) and gently press
them down towards the juicing screw with the pusher. (Fig. 12)
Never insert your ngers or an object into the feeding tube or juicing
unit. (Fig. 13/14)
Note:
- Feed small ingredients directly through the hole on the feeding lid.
For bigger sized ingredients, feed them by opening the feeding lid.
- During processing, some of the ingredients may cause squeaking
sound. This is normal.
5 When the juice ow has stopped, switch o the appliance and wait
until the juicing screw has stopped rotating. (Fig. 15)
6 To prevent juice from dripping onto the main unit, close the drip
stop. (Fig. 16)
Tip:
- Use fresh fruit and vegetables, as they contain more juice. Celery
stalks, apples, cucumbers, carrots, spinach, melons, tomatoes,
pomegranates and oranges are suitable for processing in the juicer.
- The juicer is not suitable for processing very hard and/or brous fruits
or vegetables such as sugar cane. Very soft and/or starchy fruits, such
as bananas, papayas, avocados, gs and mangoes are also not
suitable for processing in the juicer.
- If you want to juice fruits with stones, such as peaches, plums or
cherries, remove the stones before juicing.
Cleaning
- The appliance is easier to clean if you do so immediately after use.
Never use scouring pads, abrasive cleaning agents or aggressive liquids
such as alcohol, petrol or acetone to clean the appliance.
Note:
- All detachable parts are dishwasher-safe and can be safely cleaned
under the tap.
1 Switch o the appliance and remove the plug from the wall outlet.
(Fig. 17)
2 Remove the pusher from the feeding tube. (Fig. 18)
3 Remove the juice jug and pulp container. (Fig. 19)
4 Press and hold the release button and turn the juicing unit
clockwise until the arrow icon (
) on the juicing unit is aligned to
the unlock icon (
) on the main unit (Fig. 20). Pull the juicing unit
out of the main unit. (Fig. 21)
5 Turn the pulp outlet clockwise until the arrow icon ( ) on the pulp
outlet points to the unlock icon ( ) on the juicing unit (Fig. 22), and
then remove the pulp outlet from the juicing unit (Fig. 23).
6 Remove the squeezing chamber. (Fig. 24)
7 Push the juicing screw from the other end of the juicing unit to
remove the juicing screw. (Fig. 25)
8 Clean all detachable parts under the tap. (Fig. 26)
9 Wipe the outside of the main unit with a clean cloth. (Fig. 27)
Storage
1 Wind the mains cord around the cord storage wrap in the base of
the main unit. (Fig. 28)
2 You can store the pulp container in the juice jug. (Fig. 29)
Recycling
- This symbol means that this product shall not be disposed of
with normal household waste (2012/19/EU).
- Follow your country’s rules for the separate collection of
electrical and electronic products. Correct disposal helps
prevent negative consequences for the environment and
human health.
Ordering accessories
To buy accessories or spare parts, visit www.shop.philips.com/service or
go to your Philips dealer. You can also contact the Philips Consumer Care
Centre in your country.
Guarantee and support
If you need information or support, please visit www.philips.com/support
or read the separate worldwide guarantee leaet.
Troubleshooting
This chapter summarises the most common problems you could
encounter with the appliance. If you are unable to solve the problem with
the information below, visit www.philips.com/support for a list of
frequently asked questions or contact the Consumer Care Center in your
country.
Problem Solution
The appliance does
not work.
The appliance is equipped with a built-in
safety lock in the base. Make sure the juicing
unit is assembled properly onto the main unit,
and then press the on/o button (
).
The main unit gives
o an unpleasant
smell the rst few
times the appliance
is used.
This is not unusual. If the appliance continues
to give o this smell after a few times, check
the quantities you are processing and the
processing time.
The juicing screw is
blocked by the
ingredients.
The appliance automatically reverses to
unblock, beeps a few times and switches o.
Press the on/o button (
) to switch on
again. If the appliance is still blocked, power
o, unplug, disassemble the squeezing system
and clean it before you use the appliance
again.
The pulp outlet
cannot be removed
after juicing.
Press and hold the reverse button (
) for a
few seconds and then turn the pulp outlet
clockwise to remove it from the juicing unit.
ҚАЗАҚША
Кіріспе
Осы затты сатып алуыңызбен құттықтаймыз және Philips компаниясына қош
келдіңіз! Philips ұсынатын қолдауды толық пайдалану үшін өнімді www.philips.com/
welcome торабында тіркеңіз.
Жалпы сипаттама (1-сурет )
a
Қабық шығысы
b
Сығу камерасы (сүзгілі)
c
Шырын сығу бұрандасы
d
Итергіш
e
Шырын сығу құрылғысы
A: Азық салатын түтік қақпағы
B. Азық салатын түтік
C: Ағызу түтігі (тамшы тоқтатумен)
f
Басқару панелі
D: Кері түймесі
E: Қосу/өшіру түймесі
g
Шешу түймесі
h
Негізгі бөлік
i
Сым сақтау орамы
j
Тоқ сымы
k
Қабықтарды жинайтын контейнер
l
Шырын ыдысы
Маңызды
Құралды қолданбастан бұрын осы пайдаланушы нұсқаулығын мұқият оқып
шығыңыз да, оны келешекте қарау үшін сақтап қойыңыз.
Қауіпті
- Негізгі құрылғыны суға немесе қандай да бір басқа
сұйықтыққа салмаңыз. Ағын суда шаймаңыз және
ыдыс жуғыш машинада тазаламаңыз.
- Құрылғы жұмыс істеп тұрғанда, азық салатын
түтікке саусақтарыңызды немесе басқа заттарды
еш уақытта салмаңыз. Бұл мақсатқа тек итергішті
пайдаланыңыз.
Ескерту
- Құрылғыны тек осы пайдаланушы нұсқаулығында
көрсетілген мақсатта қолданыңыз.
- Құрылғыны қосар алдында, оның негізінде
көрсетілген кернеу жергілікті кернеу мөлшеріне
сәйкес келетінін тексеріп алыңыз.
- Егер штепсельдік ұшы, қуат сымы немесе өзге
бөлшектері зақымданған болса, құралды
пайдаланбаңыз. Қуат сымы зақымданған болса,
қауіпті жағдай орын алмауы үшін, оны тек Philips
компаниясында, Philips мақұлдаған қызмет
орталығында немесе білікті мамандар ауыстыруы
керек.
- Бұл құрал тек үйде қолдануға жасалған.
Құрылғыны дұрыс қолданбаса, кәсіби немесе
жартылай кәсіби мақсаттарда қолданса,
пайдаланушы нұсқаулығындағы нұсқауларға сәйкес
қолданбаса, кепілдік жарамсыз болады және
Philips компаниясы болған зақымдарға байланысты
кез келген жауапкершіліктен бас тартады.
- Бұл құрылғыны балалардың пайдалануына
болмайды.
- Құралды қауіпсіз пайдалану жөніндегі нұсқаулар
беріліп, басқа біреу қадағалаған және құралды
пайдалануға қатысты қауіп-қатерлер түсіндірілген
жағдайда, осы құралды физикалық, сезу немесе
ойлау қабілеті шектеулі, білімі мен тәжірибесі аз
адамдар пайдалана алады.
- Балаларды бақылап, олардың құралмен ойнамауын
қадағалыныңыз.
- Құралды және оның сымын балалардың қолдары
жетпейтін жерде сақтаңыз.
- Құралды қадағалаусыз қосып қоюға болмайды.
- Қараусыз қалдырсаңыз немесе жинау, бөлшектеу
немесе тазалау алдында әрқашан құрылғыны
желіден ажыратыңыз.
- Құрылғыны қоспай тұрып әрқашан желілік сымды
толығымен тарқатыңыз.
- Ұлпаны жемеңіз және тағам дайындауға
қолданбаңыз.
Абайлаңыз
- Басқа өндірушілер шығарған немесе Philips
компаниясы нақты ұсынбаған қосалқы
құралдар мен бөлшектерді пайдаланбаңыз. Ондай
қосалқы құралдар мен бөлшектерді
пайдалансаңыз, кепілдік өз күшін жояды.
- Құрылғыны әрдайым тұрақты, тегіс жерге орнату
қажет.
- Құрылғыны сыртта пайдаланбаңыз.
- Қозғалатын бөліктерге тиюді болдырмаңыз.
- Құрылғыны қоспас бұрын барлық бөлшектердің
дұрыс жиналғанын тексеріңіз.
- Үлкен ингредиенттерді азық салатын түтікке
сиятындай бөліктерге кесіңіз. Шырынды сығудың
алдында жемістердің немесе көкөністердің
сүйектерін, дәндерін, тұқымдарын немесе қалың
қабаттарын алып тастаңыз.
- Зақымдалуын болдырмау үшін итергішке тым көп
қысым түсірмеңіз.
- Тағам бояуы бөлшектерді түссіздеуі мүмкін. Бұл
қалыпты жағдай және құрылғы өнімділігіне кері
әсер етпейді.
- Құрылғының қызмет көрсету мерзімін
оңтайландыру үшін 20 минуттан көп үздіксіз
пайдаланбаңыз.
- Бұл құрылғы интеллектуалды қорғаныс чипімен
келеді, бұл шамамен 20 минут үздіксіз іске
қосқаннан кейін автоматты түрде тоқтайды.
- Бұл құрылғының дизайны қорғалған. Шырын сығу
бұрандасы құлыпталса немесе тұрып қалса,
құрылғы тоқтап, бірнеше рет дыбыстық сигнал
шығады.
- Шырын сығу бұрандасы ингредиенттермен
құлыпталса, құрылғы автоматты түрде құлыптан
босатылып, бірнеше рет дыбыстық сигнал
шығарып өшеді. Қайта қосу үшін қосу/өшіру
түймесін (
) қайта басыңыз. Егер құрылғы
құлыпталса, қуатты өшіріп, шығарып, қысу жүйесін
бөлшектеп, құрылғыны қайта пайдалану алдында
тазалаңыз. Бұл құрылғыны қорғау үшін қажет.
- Жылу деформациясына байланысты зақымдарды
болдырмау үшін, құрамдастарды тазалауға
микротолқынды пешті немесе стерилизаторды
ешқашан пайдаланбаңыз.
- Шу деңгейі: Lc = 75 дБ(A).
Электромагниттік өрістер (ЭМӨ)
Осы Philips құрылғысы электромагниттік өрістерге қатысты барлық қолданыстағы
стандарттар мен ережелерге сәйкес келеді.
Алғашқы рет қолданар алдында
Құрылғыны алғаш қолданғанда, алдымен барлық алынбалы бөлшектерді мұқият
тазалаңыз («Тазалау» тарауын қараңыз).
Қолдануға дайындық
Құрылғыны қоспай тұрып әрқашан желілік сымды толығымен тарқатыңыз.
1 Шырын сығу құрылғысындағы көрсеткі белгішесін ( ) негізгі құрылғыдағы
құлыптан босату белгішесімен ( ) туралап, шырын сығу құрылғысын негізгі
құрылғыға салыңыз. (2- сурет)
2 Шырын сығу құрылғысын негізгі құрылғыға бекіту үшін сағат тіліне қарсы
бұраңыз. Шырын сығу құрылғысы дұрыс жинақталған кезде, сырт еткен
дыбыс естіледі және шырын сығу құрылғысындағы көрсеткі белгішесі (
)
негізгі құрылғыдағы құлыптау белгішесімен ( ) тураланады. (3- сурет)
3 Шырын сығу бұрандасын негізгі құрылғыдағы саңылауға бағыттап, соңына
дейін салыңыз. (4- сурет)
Ескертпе:
- Шырын сығу бұрандасын негізгі құрылғыдағы саңылауға оңай бағыттай алу
үшін шырын сығу бұрандасын шамалы бұраңыз.
4 Қысу камерасындағы ойықты шырын сығу құрылғысындағы тұтқамен
туралап, қысу камерасын соңына дейін салыңыз. (5- сурет)
5 Қабық шығысындағы көрсеткі белгішесін ( ) шырын сығу
құрылғысындағы құлыптан босату белгішесімен (
) туралап (6- сурет),
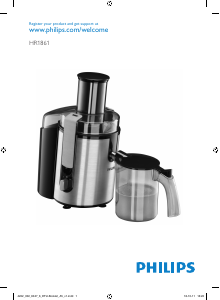
HR1886, HR1887
HR1888, HR1889
EN
User manual
KK
Қолданушының нұсқасы
PL Instrukcja obsługi
RU
Руководство пользователя
UK
Посібник користувача
ENGLISH
Introduction
Congratulations on your purchase and welcome to Philips! To fully
benet from the support that Philips oers, register your product at
www.philips.com/welcome.
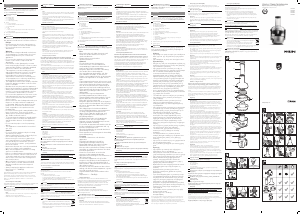
General description (Fig. 1)
a Pulp outlet
b Squeezing chamber (with lter)
c Juicing screw
d Pusher
e Juicing unit
A: Feeding tube lid
B: Feeding tube
C: Spout (with drip stop)
f Control panel
D: Reverse button
E: On/o button
g Release button
h Main unit
i Cord storage wrap
j Power cord
k Pulp container
l Juice jug
Important
Read this user manual carefully before you use the appliance and save it
for future reference.
Danger
- Do not immerse the main unit in water or any
other liquid. Do not rinse it under the tap and
do not clean it in the dishwasher.
- Never reach into the feeding tube with your
ngers or an object while the appliance is
operating. Only use the pusher for this
purpose.
Warning
- Only use the appliance for its intended
purpose as described in this user manual.
- Check if the voltage indicated on the base of
the appliance corresponds to the local mains
voltage before you connect the appliance.
- Do not use the appliance if the plug, the
mains cord or other parts are damaged. If the
mains cord is damaged, you must have it
replaced by Philips, a service centre
authorised by Philips or similarly qualied
persons in order to avoid a hazard.
- This appliance is intended for household use
only. If the appliance is used improperly or for
professional or semi-professional purposes
or if it is not used according to the
instructions in the user manual, the
guarantee becomes invalid and Philips
refuses any liability for damage caused.
- This appliance shall not be used by children.
- This appliance can be used by persons with
reduced physical, sensory or mental
capabilities or lack of experience and
knowledge if they have been given
supervision or instruction concerning use of
the appliance in a safe way and if they
understand the hazards involved.
- Children should be supervised to ensure that
they do not play with the appliance.
- Keep the appliance and its cord out of the
reach of children.
- Never let the appliance operate unattended.
- Always disconnect the appliance from the
mains if you leave it unattended or before
you assemble, disassemble or clean it.
- Always unwind the mains cord completely
before you switch on the appliance.
- Do not eat the pulp or use for preparing
dishes.
Caution
- Never use any accessories or parts from other
manufacturers or that Philips does
not specically recommend. If you use such
accessories or parts, your guarantee
becomes invalid.
- Always place the appliance on a stable, level
and horizontal surface.
- Do not use the appliance outdoors.
- Avoid contact with moving parts.
- Make sure all parts are assembled properly
before you switch on the appliance.
- Cut large ingredients into pieces that t into
the feeding tube. Remove stones, cores,
seeds and thick peels from fruits or
vegetables before juicing.
- Do not exert too much pressure on the
pusher to avoid damage.
- Food colouring can discolour parts. This is
normal and has no impact on the
performance of the appliance.
- To optimise the lifetime of the appliance, do
not use it continuously for more than
20 minutes.
- This appliance comes with an intelligent
protection chip, it will automatically stop
working after about 20 minutes of
continuous running.
- This appliance comes with a protected
design. When the juicing screw is blocked or
stuck, the appliance will come to stop and
beep a few times.
- When the juicing screw is blocked by the
ingredients, the appliance automatically
reverses to unblock, beeps a few times and
switches o. Press the on/o button (
) to
switch on again. If the appliance is still
blocked, power o, unplug, disassemble the
squeezing system and clean it before you use
the appliance again. This is to protect the
appliance.
- To prevent damages due to heat
deformation, never use a microwave or
sterilizer to clean any of the components.
- Noise level: Lc = 75 dB(A).
Electromagnetic elds (EMF)
This Philips appliance complies with all applicable standards and
regulations regarding exposure to electromagnetic elds.
көрсеткі белгішесі ( ) құлыптау белгішесіне ( ) (7- сурет) қаратылғанша
сағат тіліне қарсы бұраңыз.
6 Шырын ыдысын негізгі құрылғыға сырғытып, қабықтарды жинайтын
контейнерді қабық шығысы астына қойыңыз. (8- сурет)
Құрылғыны қолдану
1 Жемісті және/немесе көкөністерді жуыңыз. Қажет болғанда оларды азық
салатын түтікке сиятындай бөліктерге кесіңіз.
Ескертпе:
- Апельсин, анар, т.б. сияқты жемістерден өзіңіз жемейтін сүйектер мен қалың
қабықты алып тастаңыз.
2 Тамшы тоқтатқышты ашыңыз. (9- сурет)
3 Тығынды қабырға розеткасына салып, құралды қосу үшін қосу/өшіру
түймесін (
) басыңыз. (10- сурет)
4 Ингредиенттерді азық салатын түтікке (11- сурет) салып, шырын сығу
бұрандасын итергішпен (12- сурет) төмен ақырын басыңыз.
Азық салатын түтікке немесе шырын сығатын бөлікке ешқашан саусағыңызды
немесе басқа заттарды салмаңыз. (13/14- сурет)
Ескертпе:
- Кішкентай ингредиенттерді тағам қақпағындағы саңылауға тікелей салыңыз.
Тағам қақпағын ашу арқылы үлкен өлшемді ингредиенттерді салыңыз.
- Өңдеу барысында кейбір ингредиенттерден сықыр дыбыс шығуы мүмкін. Бұл
әдеттегі нәрсе.
5 Шырын ағып болған кезде, құрылғыны өшіріп, шырын сығатын бұранда
айналуын тоқтатқанға дейін күтіңіз. (15- сурет)
6 Шырынды негізгі құрылғыға тамызбау үшін тамшы тоқтатқышты
жабыңыз. (16 -сурет)
Кеңес.
- Шырыны көбірек болатындықтан, жаңа піскен жеміс-жидектер мен
көкөністерді қолданыңыз. Балдыркөк бумасын, алманы, қиярды, сәбізді,
шпинатты, қауынды, қызанақты, анарды және апельсинді баяу шырын сыққышта
пайдалануға болмайды.
- Өте қатты және/немесе талшықты жемістерді немесе қант қамысы сияқты
жемістерді баяу шырын сыққыштан өткізуге болмайды. Банан, папайя, авокадо,
інжір және манго сияқты өте жұмсақ және/немесе крахмалды жемістерді де
баяу шырын сыққыштан өткізуге болмайды.
- Сүйегі бар жемістерден, мысалы шабдалы, өрік не шиеден шырын алғыңыз
келсе, алдымен сүйектерін алып тастаңыз.
Тазалау
- Қолданғаннан соң бірден тазаласа, оңайырақ болады.
Құралды тазалағанда, қыратын шүберектерді, қырғыш тазалау құралдарын, спирт,
жанармай немесе ацетон тәріздес сұйықтықтарды қолданбаңыз.
Ескертпе:
- Барлық ажыратылатын бөліктерді ыдыс жуғыш машинада және ағын су
астында қауіпсіз жууға болады.
1 Құрылғыны өшіріп, қабырға розеткасынан ашаны алыңыз. (17- сурет)
2 Азық салатын түтіктен итергішті алыңыз. (18- сурет)
3 Шырын ыдысы мен қабықтарды жинайтын контейнерді алыңыз. (19- сурет)
4 Босату түймесін басып тұрып, шырын сығу құрылғысындағы көрсеткі
белгішесі (
) негізгі құрылғыдағы құлыптан босату белгішесімен ( )
тураланғанша шырын сығу құрылғысын сағат тілімен бұраңыз (20-сурет).
Шырын сығу құрылғысын негізгі құрылғыдан тартып шығарыңыз. (21 -сурет)
5 Қабық шығысындағы көрсеткі белгішесі ( ) шырын сығу құрылғысындағы
құлыптан босату белгішесімен (
) тураланғанша қабық шығысын сағат
тілімен бұрап ( 22-сурет), қабық шығысын шырын сығу құрылғысынан
алыңыз ( 23-сурет).
6 Қысу камерасын алыңыз. (24- сурет)
7 Шырын сығу бұрандасын алу үшін шырын сығу құрылғысының басқа
шетіндегі шырын сығу бұрандасын басыңыз. (25- сурет)
8 Барлық алынбалы бөлшектерді ағын суда тазалаңыз. (26- сурет)
9 Негізгі құрылғының сыртын таза шүберекпен сүртіңіз. (27- сурет)
Сақтау
1 Негізгі құрылғы негізіндегі сым сақтау орамы айналасындағы ток сымын
ораңыз (28 -сурет).
2 Қабықтарды жинайтын контейнерді шырын ыдысында сақтауға
болады. (29 -сурет)
Өңдеу
- Бұл таңба осы өнімді қалыпты тұрмыстық қалдықпен тастауға
болмайтынын білдіреді (2012/19/EU).
- Электр және электрондық өнімдердің қалдықтарын бөлек жинау
жөніндегі еліңіздің ережелерін сақтаңыз. Қоқысқа дұрыс тастау
қоршаған ортаға және адам денсаулығына тиетін зиянды әсердің
алдын алуға көмектеседі.
Қосалқы құралдарға тапсырыс беру
Қосалқы құралдарды немесе бөлшектерді сатып алу үшін,
www.shop.philips.com/service сайтына кіріңіз немесе Philips дилеріне барыңыз.
Сонымен қатар еліңіздегі Philips компаниясының тұтынушыларға қолдау көрсету
орталығына хабарласа аласыз.
Кепілдік және қолдау
Егер сізге ақпарат немесе қолдау қажет болса, www.philips.com/support сайтына
кіріңіз немесе бөлек дүниежүзілік кепілдік парақшасын оқыңыз.
Ақаулықтарды шешу
Бұл тарауда құрылғыда ең көп кездесуі мүмкін ақаулықтар жинақталған. Егер
төмендегі ақпараттың көмегімен мәселені шеше алмасаңыз,
www.philips.com/support торабына кіріп, жиі қойылатын сұрақтар тізімін қараңыз
немесе еліңіздегі тұтынушыларды қолдау орталығына хабарласыңыз.
Ақаулық Шешімі
Құрал жұмыс
жасамайды.
Құрылғы негізге кірістірілген қауіпсіздік құлпымен
жабдықталады. Шырын сығу құрылғысы негізгі
құрылғыға дұрыс жинақталғанын тексеріп, қосу/өшіру
түймесін (
) басыңыз.
Негізгі құрылғыдан
алғашқы бірнеше рет
қолданған кезде жаман
иіс шығады.
Бұл — қалыпты жағдай. Егер бірнеше рет
қолданғаннан кейін де иіс кетпесе, сығып жатқан
тағамдар көлемін және сығу уақытын тексеріңіз.
Шырын сығу бұрандасы
ингредиенттермен
құлыпталған.
Құрылғы автоматты түрде құлыптан босатылып,
бірнеше рет дыбыстық сигнал шығарып өшеді. Қайта
қосу үшін қосу/өшіру түймесін (
) қайта басыңыз.
Егер құрылғы құлыпталса, қуатты өшіріп, шығарып,
қысу жүйесін бөлшектеп, құрылғыны қайта пайдалану
алдында тазалаңыз.
Шырын сыққаннан кейін
қабық шығысы
жойылмайды.
Кері түймесін (
) бірнеше секунд басып тұрып,
шырын сығу құрылғысынан алу үшін қабық шығысын
сағат тілімен бұраңыз.
Шырын сыққыш
HR1887/80, HR1889/70
230V, 150W, 50Hz
Өндіруші: “Филипс Консьюмер Лайфстайл Б.В.”, Туссендиепен 4, 9206 АД,
Драхтен, Нидерланды
“Ресей және Кедендік Одақ территориясына импорттаушы: “ФИЛИПС”
ЖШҚ, Ресей Федерациясы, 123022 Мәскеу қаласы,
Сергей Макеев көшесі, 13-үй, тел. +7 495 961-1111”
Қытайда жасалған
Тұрмыстық қажеттіліктерге арналған
Қазақстан Республикасында сатып алынған тауарға қатысты шағымдарды
қабылдайтын заңды тұлға: «Филипс Казахстан» ЖШС Манас көшесі, 32А,
503-кеңсе, 050008, Алматы қаласы, Қазақстан Юр. лицо принимающее
претензии в отношении товара, приобретенного на территории
Республики Казахстан: ТОО «Филипс Казахстан» ул.Манаса, 32А офис
503, 050008 Алматы,Казахстан
POLSKI
Wprowadzenie
Gratulujemy zakupu i witamy w gronie użytkowników produktów Philips!
Aby uzyskać pełny dostęp do obsługi świadczonej przez rmę Philips,
zarejestruj produkt na stronie
www.philips.com/welcome.
Opis ogólny (rys. 1)
a Wylot miąższu
b Komora wyciskająca (z ltrem)
c Śruba wyciskająca
d Popychacz
e Moduł wyciskania
A: Pokrywka otworu na produkty
B: Otwór na produkty
C: Dziobek (z blokadą kapania)
f Panel sterowania
D: Przycisk biegu wstecznego
E: Wyłącznik
g Przycisk zwalniający
h Jednostka centralna
i Uchwyt na przewód
j Przewód zasilający
k Pojemnik na miąższ
l Dzbanek na sok
Ważne
Przed rozpoczęciem korzystania z urządzenia zapoznaj się dokładnie z
jego instrukcją obsługi. Instrukcję warto też zachować na przyszłość.
Niebezpieczeństwo
- Nie zanurzaj jednostki głównej w wodzie ani
innym płynie. Nie płucz jej pod bieżącą wodą
ani nie myj w zmywarce.
- Nigdy nie wkładaj palców ani żadnych
przedmiotów do otworu na produkty
podczas pracy urządzenia. W tym celu używaj
wyłącznie popychacza.
Ostrzeżenie
- Korzystaj z urządzenia zgodnie z
przeznaczeniem, w sposób opisany w
niniejszej instrukcji obsługi.
- Przed podłączeniem urządzenia upewnij się,
że napięcie podane na podstawie urządzenia
jest zgodne z napięciem w sieci elektrycznej.
- Nie korzystaj z urządzenia, jeśli jego wtyczka,
przewód sieciowy lub inne części są
uszkodzone. Ze względów bezpieczeństwa
wymianę uszkodzonego przewodu
sieciowego należy zlecić autoryzowanemu
centrum serwisowemu rmy Philips lub
odpowiednio wykwalikowanej osobie.
- Urządzenie jest przeznaczone wyłącznie do
użytku domowego. Używanie tego
urządzenia w celach profesjonalnych lub
półprofesjonalnych bądź w sposób
niezgodny z niniejszą instrukcją spowoduje
unieważnienie gwarancji. Firma Philips nie
ponosi odpowiedzialności za szkody
powstałe w takich przypadkach.
- Urządzenie nie może być używane przez dzieci.
- Urządzenie może być używane przez osoby z
ograniczonymi zdolnościami zycznymi,
sensorycznymi lub umysłowymi, a także
nieposiadające wiedzy lub doświadczenia w
użytkowaniu tego typu urządzeń, pod
warunkiem, że będą one nadzorowane lub
zostaną poinstruowane na temat korzystania
z tego urządzenia w bezpieczny sposób oraz
zostaną poinformowane o potencjalnych
zagrożeniach.
- Nie pozwalaj dzieciom bawić się
urządzeniem.
- Przechowuj urządzenie i przewód poza
zasięgiem dzieci.
- Nigdy nie zostawiaj włączonego urządzenia
bez nadzoru.
- Przed rozpoczęciem montażu, demontażu
lub czyszczenia urządzenia, a także wtedy,
gdy chcesz je pozostawić bez nadzoru,
odłącz je od sieci elektrycznej.
- Przed włączeniem urządzenia zawsze
całkowicie rozwiń przewód sieciowy.
Specifications are subject to change without notice
© 2017 Koninklijke Philips N.V.
All rights reserved.
4241 210 49611 B
2
A
d
e
h
g
f
k
b
i
j
B
C
D
E
a
c
l
1
5
1
2
8
11
13
1
2
19
3
6
9
12
4
7
10
26 27 28 29
1614 1715
18 232220
2524
21


Join the conversation about this product
Here you can share what you think about the Philips HR1889 Juicer. If you have a question, first carefully read the manual. Requesting a manual can be done by using our contact form.