ENGLISH NEDERLANDS
www.philips.com
u
4203 000 50663
Introduction
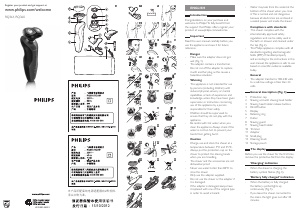
◗ This Philips Ladyshave softselect is equipped
with an adjustable shaving foil with three
different zones for shaving the underarms,
bikini line and legs.
◗ The golden zone of the shaving foil is most
suitable for shaving the underarms (fig. 1).
◗ The gold-striped zone of the shaving foil is
most suitable for shaving the bikini line (fig. 2).
◗ The silvery zone of the shaving foil is most
suitable for shaving the legs (fig. 3).
◗ This Ladyshave can be operated from the
mains as well on batteries. It is suitable for dry
use only.
◗ The Jojoba Glider (fig. 4) improves the gliding
of the appliance to help reduce the risk of skin
irritation for a smooth shave.
The appliance is not rechargeable.
Important
◗ Do not use the Ladyshave in the shower or in
the bath.The Ladyshave is not water-resistant.
◗ Check if the voltage indicated on the adapter
corresponds to the local mains voltage before
you connect the appliance.
◗ Store the appliance at a temperature between
15°C and 35°C.
Preparing the appliance for cordless
use
The Ladyshave runs on 2 R6 AA 1.5 volt
batteries. We strongly advise you to use Philips
LR6 PowerLife batteries.They supply sufficient
energy for approx. 40 minutes of shaving.
1 Pull the battery cap downwards with some
force to remove it (fig. 5).
2 Put the batteries in the battery holder.
Make sure the + and - poles of the batteries are
pointing in the rightdirection (fig. 6).
Make sure your hands and the appliance are dry
when inserting the batteries.
3 Push the battery cap back onto the appliance.
Preparing the appliance for corded
use
1 Insert the small plug into the Ladyshave
(fig. 7).
Make sure you push the plug home completely.
2 Put the adapter plug in the wall socket
(fig. 8).
It is not necessary to remove the batteries if you
are going to use the Ladyshave on mains power.
Using the appliance
1 Check whether the softselect slide on the
shaving head is in the appropriate position for
the body part you wish to shave (fig. 9).
2 Switch the Ladyshave on (fig. 10).
3 Place the trimmers and the shaving foil
gently on the skin and move the Ladyshave
slowly over the skin against the direction of hair
growth while pressing it lightly (fig. 11).
Make sure that both trimmers and the shaving foil
are always completely incontact with the skin.
Cleaning the appliance
Clean the Ladyshave every time you have used it.
Do not use any corrosive detergents, scouring
pads or cloths, petrol acetone etc. to clean
the appliance.
1 Switch the appliance off.
2 Remove the shaving head (fig. 12).
Do not exert any pressure on the shaving foil to
avoid damage.
3 Always put the protective cap on the shaving
head to avoid damage to the foil.
4 Brush the hairs off the cutter block and the
shaving head. Make sure you also brush away any
hairs that have collected under the trimmers
(fig. 13).
Maintenance and replacement
1 Lubricate the shaving foil and the trimmers
with a drop of sewing machine oil twice a year
(fig. 14).
If you use the Ladyshave two or more times a
week, we advise you to replace the shaving foil
and cutter block every two years.
◗ The shaving foil may only be replaced with an
original Philips shaving foil (type HP6120).
Inleiding
◗ Deze Philips Ladyshave softselect is uitgerust
met een instelbaar scheerhoofd met drie
verschillende zones voor het scheren van de
oksels, de bikinilijn en de benen.
◗ De gouden zone van het scheerblad is speciaal
geschikt voor het scheren van de oksels
(fig. 1).
◗ De goudgestreepte zone van het scheerblad is
speciaal geschikt voor het scheren van de
bikinilijn (fig. 2).
◗ De zilverkleurige zone van het scheerblad is
speciaal geschikt voor het scheren van de
benen (fig. 3).
◗ Deze Ladyshave werkt zowel op netspanning
als op batterijen en is alleen geschikt voor
droog gebruik.
◗ De Jojoba strip (fig. 4) verbetert het glijden
van het product over de huid. Dit vermindert
het risico van huid irritatie en geeft een glad
scheer resultaat.
Het apparaat is niet oplaadbaar.
Belangrijk
◗ Gebruik de Ladyshave niet in bad of onder de
douche, omdat het apparaat niet waterdicht is.
◗ Controleer of het voltage dat op de adapter
staat aangegeven overeenkomt met de
plaastelijke netspanning voordat u de stekker
in het stopcontact steekt.
◗ Bewaar het apparaat bij een temperatuur
tussen 15°C en 35°C.
Het apparaat klaarmaken voor
snoerloos gebruik
De Ladyshave werkt op twee R6 AA 1,5 volt
batterijen. We raden u sterk aan Philips LR6
PowerLife batterijen te gebruiken. Deze bevatten
voldoende energie voor ongeveer 40 minuten
snoerloos scheren.
1 Trek de kap van de batterijhouder met enige
kracht naar beneden om hem te verwijderen
(fig. 5).
2 Plaats de batterijen in de batterijhouder.
Zorg ervoor dat de + en - polen van de
batterijen in de juiste richting wijzen (fig. 6).
Zorg ervoor dat uw handen en het apparaat
droog zijn wanneer u de batterijen plaatst.
3 Duw de kap van de batterijhouder terug in
het apparaat.
Het apparaat klaarmaken voor
gebruik met snoer.
1 Steek het kleine stekkertje in de Ladyshave
(fig. 7).
Zorg ervoor dat u het stekkertje goed op zijn
plaats drukt.
2 Steek de stekker van de adapter in het
stopcontact (fig. 8).
U hoeft de batterijen niet te verwijderen wanneer
u de Ladyshave op netspanning gebruikt.
Gebruik van het apparaat
1 Controleer of de softselect-knop op het
scheerhoofd in de juiste stand staat voor het
deel van uw lichaam dat u wilt scheren (fig. 9).
2 Schakel de Ladyshave in (fig. 10).
3 Plaats de tondeuses en het scheerblad
voorzichtig op de huid en beweeg de Ladyshave
langzaam tegen de richting van de haargroei in,
terwijl u lichte druk uitoefent op het apparaat
(fig. 11).
Zorg ervoor dat beide tondeuses en het
scheerblad steeds volledig in contact zijn met de
huid.
Het apparaat schoonmaken
Maak de Ladyshave altijd na gebruik schoon.
Gebruik geen bijtende schoonmaakmiddelen,
schuursponsjes of -doekjes benzine, aceton en
dergelijke om het apparaat schoon te maken.
1 Schakel het apparaat uit.
2 Verwijder het scheerhoofd (fig. 12).
Oefen geen druk uit op het scheerhoofd om
beschadiging te voorkomen.
3 Plaats altijd de beschermkap op het
scheerhoofd om schade aan het scheerblad te
voorkomen.
4 Borstel de haren van het messenblok en het
scheerhoofd af. Zorg er ook voor dat u haartjes
die zich mogelijk onder de trimmers opgehoopt
hebben wegborstelt (fig. 13).
Onderhoud en vervanging
1 Smeer het scheerblad en de tondeuses twee
keer per jaar in met een druppeltje naaimachine-
olie (fig. 14).
Al u de Ladyshave twee keer per week of vaker
gebruikt, raden we u aan het scheerblad en het
messenblok elke twee jaar te vervangen.
◗ Het scheerblad mag uitsluitend vervangen
worden door een origineel Philips scheerblad
(type HP6120).
2 Verwijder het scheerhoofd (fig. 12).
3 Knijp de zijkanten van het scheerhoofd
enigszins met kracht samen in de richting van de
pijlen en verwijder het scheerblad (fig.15).
4 Zorg ervoor dat de softselect-knop in de
middelste stand (bikinilijn) staat wanneer u het
nieuwe scheerblad in het scheerhoofd plaatst
(fig.16).
5 Knijp de zijkanten van het scheerhoofd
enigszins samen en plaats het nieuwe scheerblad
in het scheerhoofd (fig. 17).
6 Let erop dat de drie draaipunten A,B en C
vastklikken in de daarvoor bestemde
uitsparingen (fig. 18).
◗ Het messenblok mag uitsluitend vervangen
worden door een origineel Philips
messenblok, type HP2909 (fig. 19 en 20).
Trek het messenblok met enige kracht van het
apparaat af om het te vervangen.
◗ Als een of beide tondeuses versleten of
beschadigd is/zijn, neem dan contact op met
uw Philips dealer of een Philips
servicecentrum voor vervanging.
◗ Indien de adapter beschadigd is, laat hem dan
altijd vervangen door een van het
oorspronkelijke type om gevaar te
voorkomen.
Het milieu
Batterijen bevatten stoffen die schadelijk kunnen
zijn voor het milieu. Gooi lege batterijen niet bij
het normale huisvuil, maar lever deze apart in op
een officieel verzamelpunt (fig. 21).
◗ Zorg ervoor dat de batterijen helemaal leeg
zijn wanneer u ze weggooit.
◗ Deponeer de motor en andere metalen
onderdelen in een blikbak wanneer u het
apparaat afdankt.
◗ Alle kunststof onderdelen van dit apparaat zijn
voorzien van hergebruik-symbolen. Houd u bij
het weggooien van deze kunststof onderdelen
aan de plaatselijke voorschriften.
Service & informatie
Als u informatie nodig heeft of als u een
probleem heeft, bezoek dan de Philips Website
(www.philips.com), of neem contact op met het
Philips Customer Care Centre in uw land (u vindt
het telefoonnummer in het 'worldwide guarantee'
vouwblad). Als er geen Customer Care Centre in
uw land is, ga dan naar uw Philips dealer of neem
contact op met de afdeling Service van Philips
Domestic Appliances and Personal Care BV.
2 Remove the shaving head (fig. 12).
3 Press the shaving head with some force in
the direction of the arrows, then remove the foil
(fig. 15).
4 Make sure the softselect slide is in the
middle position (bikini line) when you insert the
new foil (fig. 16).
5 Press the sides of the shaving head slightly
together and insert the new foil (fig. 17).
6 Note that pivots A, B and C should snap into
the corresponding holes (fig. 18).
◗ The cutter block may only be replaced with
an original Philips cutter block, type HP2909
(figs. 19 and 20).
To change the cutter block, pull it off the appliance
with some force.
◗ If a trimmer is worn out or damaged, please
contact your Philips dealer or a Philips Service
Centre for replacement.
◗ If the adapter is damaged, always have it
replaced by one of the original type in order
to avoid a hazard.
The environment
Batteries contain substances that may pollute the
environment. Do not throw empty batteries away
with the normal household waste, but hand them
in at an official collection point.(fig. 21).
◗ Make sure the batteries are completely empty
when you dispose of them.
◗ When discarding the appliance in due course,
put the motor unit and other metal parts into
a metal recycling box.
◗ All plastic parts are marked with recycling
symbols. Please dispose of them in accordance
with local regulations.
Information & service
If you need information or if you have a problem,
please visit the Philips Web site at
www.philips.com or contact the Philips Customer
Care Centre in your country (you will find its
phone number in the worldwide guarantee
leaflet). If there is no Customer Care Centre in
your country, turn to your local Philips dealer or
contact the Service Department of Philips
Domestic Appliances and Personal Care BV.
DEUTSCH
FRANÇAIS
Einleitung
◗ Dieser Philips Ladyshave Softselect ist mit
einer Scherfolie ausgerüstet, die sich auf drei
Positionen einstellen lässt: je eine für die
Achselhöhle, für die Bikinizone und für die
Beine:
◗ Der goldfarbene Abschnitt der Scherfolie ist
für die Achselhöhle bestimmt (Abb. 1).
◗ Der zum Teil goldfarbene Abschnitt der
Scherfolie ist für die Bikinizone bestimmt
(Abb. 2).
◗ Der silberfarbene Abschnitt der Scherfolie ist
für die Beine bestimmt (Abb. 3).
◗ Dieser Philips Softselect ist sowohl am Netz
zu betreiben wie über Batterien
◗ Die Jojoba-Gleitschiene (Abb. 4) erleichtert
das Gleiten des Geräts, um Hautirritationen
vorzubeugen und eine glatte Rasur zu erzielen.
Das Gerät ist nicht für den Betrieb über
aufladbare Akkus bestimmt.
Wichtig
◗ Verwenden Sie dieses Gerät nicht unter der
Dusche oder beim Baden in der Wanne. Das
Gerät ist nicht wasserdicht.
◗ Prüfen Sie vor dem Gebrauch, ob die
Spannungsangabe auf dem Gerät mit der
örtlichen Netzspannung übereinstimmt.
◗ Bewahren Sie das Gerät bei Temperaturen
zwischen 15° C und 35° C auf.
Vorbereitung des Geräts zum
kabelfreien Gebrauch
Das Gerät arbeitet mit 2 Batterien Type R6 AA
1,5 V.Wir empfehlen Ihenn nachdrücklich den
Gebrauch von Philips LR6 PowerLife Batterien.
Ihre Energie reicht für ca. 40 Minuten Rasieren.
1 Nehmen Sie die Batteriekappe ab (Abb. 5).
Dazu ist ein wenig Kraft nötig.
2 Setzen Sie die Batterien im Batteriehalter
ein.
Achten Sie auf die richtige Polung (+ und -) der
Batterien (Abb. 6).
Ihre Hände müssen beim Einsetzen der Batterien
völlig trocken sein.
3 Setzen Sie die Batteriekappe wieder auf.
Introduction
◗ Le système de rasage Soft Select de Philips
Ladyshave est composé d'une grille ajustable à
trois zones pour le rasage des aisselles, de la
ligne du maillot et des jambes.
◗ La zone dorée est appropriée pour le rasage
des aisselles (fig. 1).
◗ La zone bicolore (dorée-argentée) est
appropriée pour le rasage de la ligne du
maillot (fig. 2).
◗ La zone de la grille argentée est appropriée
pour le rasage des jambes (fig. 3).
◗ Cet appareil fonctionne sur piles aussi bien
que sur secteur. Il peut être utilisé uniquement
sur une peau sèche.
◗ Les bandelettes lubrifiantes à l'huile de jojoba
(fig. 4) améliorent la glisse de l'appareil et
aident à réduire les risques d'irritations de la
peau pour un rasage plus doux.
L'appareil n'est pas rechargeable.
Important
◗ N'utilisez pas l'appareil pendant que vous
prenez une douche ou un bain. Le Ladyshave
n'est pas étanche.
◗ Avant de brancher l'appareil, vérifiez que la
tension indiquée sur celui-ci corresponde à la
tension de votre secteur.
◗ Conservez l'appareil à une température
comprise entre 15°C et 35°C.
Préparation de l'appareil à l'emploi
sans fil
Le Ladyshave fonctionne avec deux piles de type
R6 AA de 1,5V. Nous vous recommandons
d'utiliser les piles Philips Powerlife LR6. Elles
offrent une autonomie d'environ 40 minutes de
rasage.
1 Poussez le couvercle du compartiment à
piles en exerçant un peu de pression pour le
retirer (fig. 5).
2 Insérez les piles dans le compartiment à
piles.
Vérifiez si les pôles + et - sont correctement
dirigés vers la direction correcte (fig. 6).
Assurez-vous d'avoir les mains bien sèches avant
de mettre les piles.
3 Remettez le couvercle du compartiment à
piles.
Préparation d1e l'appareil à l'emploi
sur secteur
1 Mettez la fiche de l'appareil dans le
Ladyshave (fig. 7).
Assurez-vous qu'elle est bien enfoncée.
2 Insérez l'adaptateur dans la prise de courant
(fig. 8).
Il n'est pas nécessaire de retirer les piles de
l'appareil.
Utilisation
1 Vérifiez si le bouton de sélection au-dessus
de la tête de rasage est réglé sur la position qui
corresponde à la partie du corps que vous
voulez raser (fig. 9).
2 Mettez l'appareil en marche (fig. 10).
3 Placez les tondeuses et la grille doucement
sur la peau et déplacez le Ladyshave lentement
dans le sens inverse de la pousse des poils en
exerçant un peu de pression (fig. 11).
Assurez-vous que les tondeuses et la grille soient
toujours en contact direct avec la peau.
Nettoyage de l'appareil
Nettoyez l'appareil après chaque emploi.
N'utilisez pas des produits abrasifs, d'alcool,
d'acétone, d'essence etc. pour nettoyer l'appareil.
1 Arrêtez l'appareil.
2 Retirez la tête de rasage (fig. 12).
N'exercez aucune pression sur la grille de rasage
pour éviter de l'abîmer.
3 Placez toujours le capot de protection sur la
tête de rasage pour éviter d'endommager la
grille.
4 Otez les poils de l'ensemble couteaux et de
la tête de rasage en les brossant. Brossez
également les poils restés sous la tondeuse
(fig. 13).
Entretien et accessoires
1 Mettez une goutte d'huile pour machine à
coudre sur la grille et les tondeuses deux fois
par an (fig. 14).
Si vous utilisez Ladyshave deux fois par semaine
ou plus, nous vous conseillons de remplacer la
grille et le couteau tous les deux ans.
◗ La grille de rasage doit être remplacée
uniquement par des grilles Philips d'origine
(type HP6120).
2 Retirez la tête de rasage (fig. 12).
3 Poussez la tête de rasage dans la direction
de la flèche en exerçant un peu de pression,
ensuite retirez la grille (fig.15).
4 Assurez-vous que le bouton de sélection est
réglé sur la position intermédiaire (ligne du
maillot) lorsque vous insérez la nouvelle grille
(fig.16).
5 Pressez doucement les extrémités de la tête
de rasage et insérez la nouvelle grille (fig. 17).
6 Note: les pivots A, B et C doivent
s'enclencher dans les orifices correspondants
(fig. 18).
◗ L'ensemble couteaux doit être remplacé
uniquement par des couteaux Philips d'origine
type HP2909 (fig. 19 et 20).
Pour remplacer l'ensemble couteaux, ôtez-le de
l'appareil en le forçant un peu.
◗ Si une tondeuse est endommagée ou usée,
veuillez contacter votre fournisseur Philips ou
un Centre Service Agréé Philips pour
remplacement.
◗ Si l'adaptateur ou le cordon d'alimentation est
endommagé, pour plus de sécurité et pour
éviter tout accident, il ne doit être remplacé
que par un adaptateur ou cordon d'origine.
Environnement
Les piles contiennent des substances qui peuvent
polluer l'environnement. Ne jetez pas les piles
avec les ordures ménagères, mais déposez-les
dans un endroit prévu à cet effet (fig. 21).
◗ Assurez-vous que les piles sont complètement
vides lorsque vous les jeter.
◗ Lorsque vous vous séparerez de votre
appareil en fin de vie, déposez le bloc moteur
et les parties métalliques dans une boîte de
recyclage.
◗ En vue de recyclage, tous les composants en
plastique ont des marques d'indentification.
Veuillez les déposer dans un endroit assigné à
cet effet.
Garantie et service
Pour plus d'informations, visitez notre Philips Web
site : www.philips.com ou veuillez contacter le
Service Consommateurs Philips de votre pays
(vous trouverez le numéro de téléphone dans le
dépliant sur la garantie internationale). S'il n'y a
aucun Service Consommateurs Philips dans votre
pays, contactez votre distributeur ou le Service
Department of Philips Domestic Appliances and
Personal Care BV.
Vorbereitung des Geräts zum
Gebrauch am Netz
1 Stecken Sie den kleinen Gerätestecker in
den Ladyshave (Abb. 7).
Achten Sie darauf, dass der Stecker ganz hinein
gesteckt wird.
2 Stecken Sie das Steckernetzgerät in die
Steckdose (Abb. 8).
Sie brauchen beim Betrieb am Netz die Batterien
nicht aus dem Gerät zu nehmen.
Der Gebrauch des Geräts
1 Vergewissern Sie sich vor Gebrauch, ob der
Softselect-Schalter am Rasierkopf auf den
Hautbereich geschaltet ist, den Sie anschließend
rasieren wollen (Abb. 9).
2 Schalten Sie das Gerät ein (Abb. 10).
3 Setzen Sie den Trimmer und die Scherfolie
sanft auf die Haut. Führen Sie das Gerät langsam
und unter nur mäßigem Druck über die Haut
gegen die Haarwuchsrichtung (Abb. 11).
Achten Sie darauf, dass sich sowohl die Trimmer
als auch die Scherfolie stets in vollem Kontakt zur
Haut befinden.
Reinigung des Geräts
Reinigen Sie das Gerät nach jedem Gebrauch.
Verwenden Sie zum Reinigen keine scharfen
Wasch-, Spül- oder Scheuermittel bzw.
Scheuerschwämme, auch keine Lösungsmittel wie
Alkohol, Azeton, Benzin usw.
1 Schalten Sie das Gerät aus.
2 Nehmen Sie den Scherkopf ab (Abb. 12).
Vermeiden Sie jede Berührung der Scherfolie; sie
ist sehr empfindlich.
3 Behalten Sie stets die Schutzkappe auf dem
Scherkopf, solange Sie das Gerät nicht
verwenden.
4 Bürsten Sie nach Gebrauch stets alle Haare
aus dem Messerblock und dem Scherkopf.
Vergessen Sie nicht die Haare unter den
Trimmern (Abb. 13).
Wartung und Ersatzteile
1 Verteilen Sie zweimal jährlich einen Tropfen
reines Nähmaschinenöl auf der Scherfolie und
auf beiden Trimmern (Abb.14).
Wenn Sie Ihren Ladyshave Softselect zweimal
wöchentlich oder häufiger verwenden, sollten Sie
Scherfolie und Messerblock spätestens alle zwei
Jahren erneuern.
◗ Ersetzen Sie eine verbrauchte oder
beschädigte Scherfolie ausschließlich durch
eine original Philips Scherfolie Type HP6120.
2 Nehmen Sie den Scherkopf ab (Abb. 12).
3 Drücken Sie den Scherkopf mit leichter
Kraftaufwendung in Richtung der Pfeile, und
nehmen Sie die Scherfolie ab (Abb. 15).
4 Achten Sie darauf, dass der Softselect-
Schalter in der mittleren Position (Bikini-Zone)
steht, bevor Sie die neue Scherfolie einlegen
(Abb. 16).
5 Drücken Sie den Scherkopf ein wenig
zusammen, und legen Sie die neue Scherfolie ein
(Abb. 17).
6 Achten Sie darauf, dass die
Verankerungszapfen A, B und C in die
entsprechenden Löcher einrasten (Abb. 18).
◗ Ersetzen Sie den Messerblock ausschließlich
durch einen original Philips Messerblock Type
HP 2909 (Abb. 19 und 20).
Sie brauchen etwas Kraft, um den Messerblock
vom Gerät abzuziehen.
◗ Wegen verbrauchter oder beschädigter
Trimmer wenden Sie sich bitte an Ihren
Philips Händler oder das Philips Service
Center in Ihrem Lande.
◗ Wenn das Netzteil defekt oder beschädigt ist,
darf es aus Sicherheitsgründen nur von einem
Philips Service-Center oder einer von Philips
autorisierten Werkstatt durch ein Original-
Ersatznetzteil ausgetauscht werden.
Umweltschutz
Batterien enthalten Substanzen, welche die
Umwelt gefährden können.Verbrauchte Batterien
gehören nicht zum normalen Hausmüll. Sie sind
als Verbraucher dazu verpflichtet, sie der
Wiederverwertung zuzuführen. Geben Sie sie
bitte bei einer offiziellen Sammelstelle Ihrer
Gemeinde ab oder bei einem Händler, der
Batterien und Akkus oder entsprechende Geräte
führt (Abb. 21).
◗ Achten Sie darauf, dass die Batterien völlig
leer sind, wenn Sie sie entsorgen.
◗ Die Motoreinheit und die anderen Teile aus
Metall gehören zum Sondermüll Blech und
Metall.
◗ Die Kunststoffteile sind zur
Wiederverwertung gekennzeichnet und
gehören zum Sondermüll Kunststoff.
Garantie und Service
Wenden Sie sich mit Ihren Fragen, Wünschen und
Problemen bitte an das Philips Service Center in
Ihrem Lande. Sollte sich in Ihrem Lande kein
solches Center befinden, so wenden Sie sich bitte
an das Service Department von Philips Domestic
Appliances and Personal Care BV. Entnehmen Sie
die Telefonnummern bitte der beigefügten
Garantieschrift. Besuchen Sie uns auch auf der
Homepage www.philips.com.


Join the conversation about this product
Here you can share what you think about the Philips HP6324 Ladyshave Softselect Shaver. If you have a question, first carefully read the manual. Requesting a manual can be done by using our contact form.