
EN
Flashlight Operation
The single push button switch on the top of the ashlight
incorporates a battery status indicator.
1. To turn on the ashlight, push once on the switch. This will
activate the light at full brightness.
2. To activate the dimming feature, push the switch within three
seconds after step (1).
3. To activate strobe feature, push the switch within three
seconds after step (2).
4. To turn the light off, push the switch after three seconds on
any of the above steps.
Battery Status Indicator
This light includes a battery status indicator incorporated into
the switch.
When the light is activated, the opaque switch boot will turn:
1. Green to indicate that the battery is at 76%-100% of capacity
2. Amber to indicate that the battery is at 25%-75% of capacity
3. Red to indicate that the battery is at 24% or less of capacity
Attaching the Power Cord
Before attempting to charge the ashlight, the
power cord plug should be installed into the
socket located on the underside of the charger
base. Once the plug is installed, push the cord
into the channel.
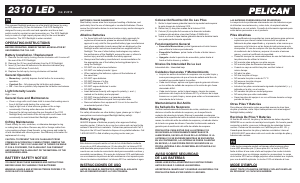
Flashlight Charging
» Set the 9415 on the charger slots.
» Push the ashlight down while sliding it
backwards and release.
» The LED indicator light in the
rear of the charger base will turn
ashing RED indicating charging
is in process, when the light turns
solid GREEN charging is complete.
It is not necessary to remove the
ashlight at this point as the charger will
only give a maintenance charge.
Battery Replacement
To replace the battery:
1. Turn the light over so it is resting on
the handle
2. Use a Philips screw driver to remove
six screws on the bottom housing
3. Carefully unplug the red and yellow
connectors (as shown)
4. Remove battery pack
To install the battery:
1. Place the battery into the battery compartment
2. Carefully connect the red connector on the battery pack to the red connector in the light
3. Carefully connect the yellow connector on the battery pack to the yellow connector in
the light
4. Replace the bottom housing and replace and tighten the six screws by hand.
Do not over tighten!
YOUR 9415 ARRIVES WITH THE BATTERY PACK PARTIALLY CHARGED.
BEFORE USE, CHARGE THE FLASHLIGHT FOR AT LEAST 24 HOURS.
Vehicle Installations
The charger base is approved to NFPA vehicular mounting specications.
It is recommended that the charger be mounted onto a horizontal surface to prevent
accidental ejection of the ashlight. The charger can be secured via the four counterbore
3/8" diameter holes located on the top of the front and rear surfaces. Phillips screws are
recommended.
A professional auto electrician should be used to wire the charger into the electrical
system of a vehicle. Connect the charger to the electrical system of the vehicle so that
there is no ignition-related interrupt. This will prevent the charger from rapidly charging the
battery pack unnecessarily. When the battery pack is charged, the current draw from the
charger in trickle mode will not excessively drain the vehicle’s battery.
9415 Replacement Parts
8056F 12V Plug-in for Charger 9420 Charger Base 9418 Battery Pack
6057 110Transformer 6061F Direct Wiring
BATTERY SAFETY NOTICE
YOU MUST READ THESE WARNINGS AND INSTRUCTIONS BEFORE USING OR
CHARGING YOUR BATTERIES!
WARNING: HANDLE AND STORE BATTERIES PROPERLY TO AVOID INJURY OR
DAMAGE.
BATTERIES CAN BE DANGEROUS!
Most battery issues arise from improper handling of batteries, and particularly from the
use of damaged or counterfeit batteries. Please review the information below to avoid
serious injury and/or damage to your property.
Rechargeable Batteries
» DO NOT mix old and new batteries.
» DO NOT mix battery brands/types.
» When replacing batteries, replace all batteries at the same time.
» DO NOT open batteries.
» DO NOT dispose of in re.
» DO NOT heat above 75°C.
» DO NOT expose batteries to water.
» Insert batteries correctly with regard to polarity (+ and -) marked on the battery and
equipment.
» DO NOT use batteries beyond their expiration date.
» Hazardous location safety approvals for explosive environments are only valid for the
Pelican battery pack that is supplied with the ashlight.
» For replacement battery packs only use the approved Pelican battery pack for the
model of the ashlight that you are using. The use of other battery packs will reduce
the performance of the ashlight, exposure the user or others to serious injury and
invalidate the safety approval.
» Flashlights should only be charged in a non-hazardous location.
» Flashlights should only be charged using the Pelican charger base that is supplied
with the ashlight.
» Flashlights should be charged and operated between the temperatures shown in the
table below.
» DO NOT charge
rechargeable alkaline
batteries while they are still
in the ashlight. Charging
the alkaline batteries while
they are still in the ashlight
can cause internal gas or
heat generation resulting in
venting, explosion or possibly
re which could cause serious injury or property damage.
» Deep discharge* of the rechargeable battery may cause batteries to vent potentially
dangerous gasses and electrolytes.
» It is advisable to condition* batteries every 3 months. Failure to do so will decrease
battery life. Leaving the product unused for long periods of time will decrease battery
life. Withdrawal of the charger from the product prior to a ‘READY’ indication will
result in inadequate charge.
» WARNING - DO NOT use Ni-MH rechargeable battery packs for longer than 3
years or 500 charge/discharge cycles, whichever comes rst. Using the Ni-MH
rechargeable battery packs for longer than 3 years or 500 charge/discharge cycles
will reduce the performance of the ashlight and expose the user to serious injury or
property damage.
Other Batteries
For safety information on other battery types, please go to: https://www.pelican.com/us/
en/support/ashlight-battery-safety/.
Battery Recycling
ALWAYS dispose of batteries properly at an approved battery recycling center. Failure to
do so can be a crime and can lead to the release of harmful toxic materials. Pelican has
partnered with Call 2 Recycle in the US and Canada to dispose of recyclable batteries.
Call 1-800-822-8837 to nd a battery recycling center near you.
* Deep Discharge: The battery has been allowed to discharge most of its capacity to a
point beyond which irreparable damage has occurred. See battery specications for the
specic levels.
* Condition a Battery: Charge your battery to the fullest and then disconnect from charger.
Let your light run until it completely drains the battery and turns itself off. Place the light
back onto its charger and completely recharge the battery before using it. This conditioning
or “cycling” of the battery will help it retain a fuller charge for a longer period of time.
BATTERY TYPE
CHARGE
TEMP
OPERATING
TEMP
Lead Acid
–20°C to 50°C
(–4°F to 122°F)
–20°C to 50°C
(–4°F to 122°F)
Ni-MH
0°C to 40°C
(32°F to 104°F)
–20°C to 50°C
(–4°F to 122°F)
Li-Ion and
LiFePO4
0°C to 45°C
(32°F to 113°F)
–20°C to 60°C
(–4° F to 140°F)
9415 Cat. # 9415
RECHARGEABLE
120° ROTATING HEAD
2. SLIDE BACK AND RELEASE
1. PUSH
DOWN
SAFETY FIRST!
Do not shine the ashlight directly into any
person’s eyes as this may result in injury.
SPECIFICATIONS
Lamp Type: LED
Charger input voltage: 12-24v DC
Battery Type: NiMH
HEAD
ROTATES
120˚


Join the conversation about this product
Here you can share what you think about the Pelican 9415 Flashlight. If you have a question, first carefully read the manual. Requesting a manual can be done by using our contact form.