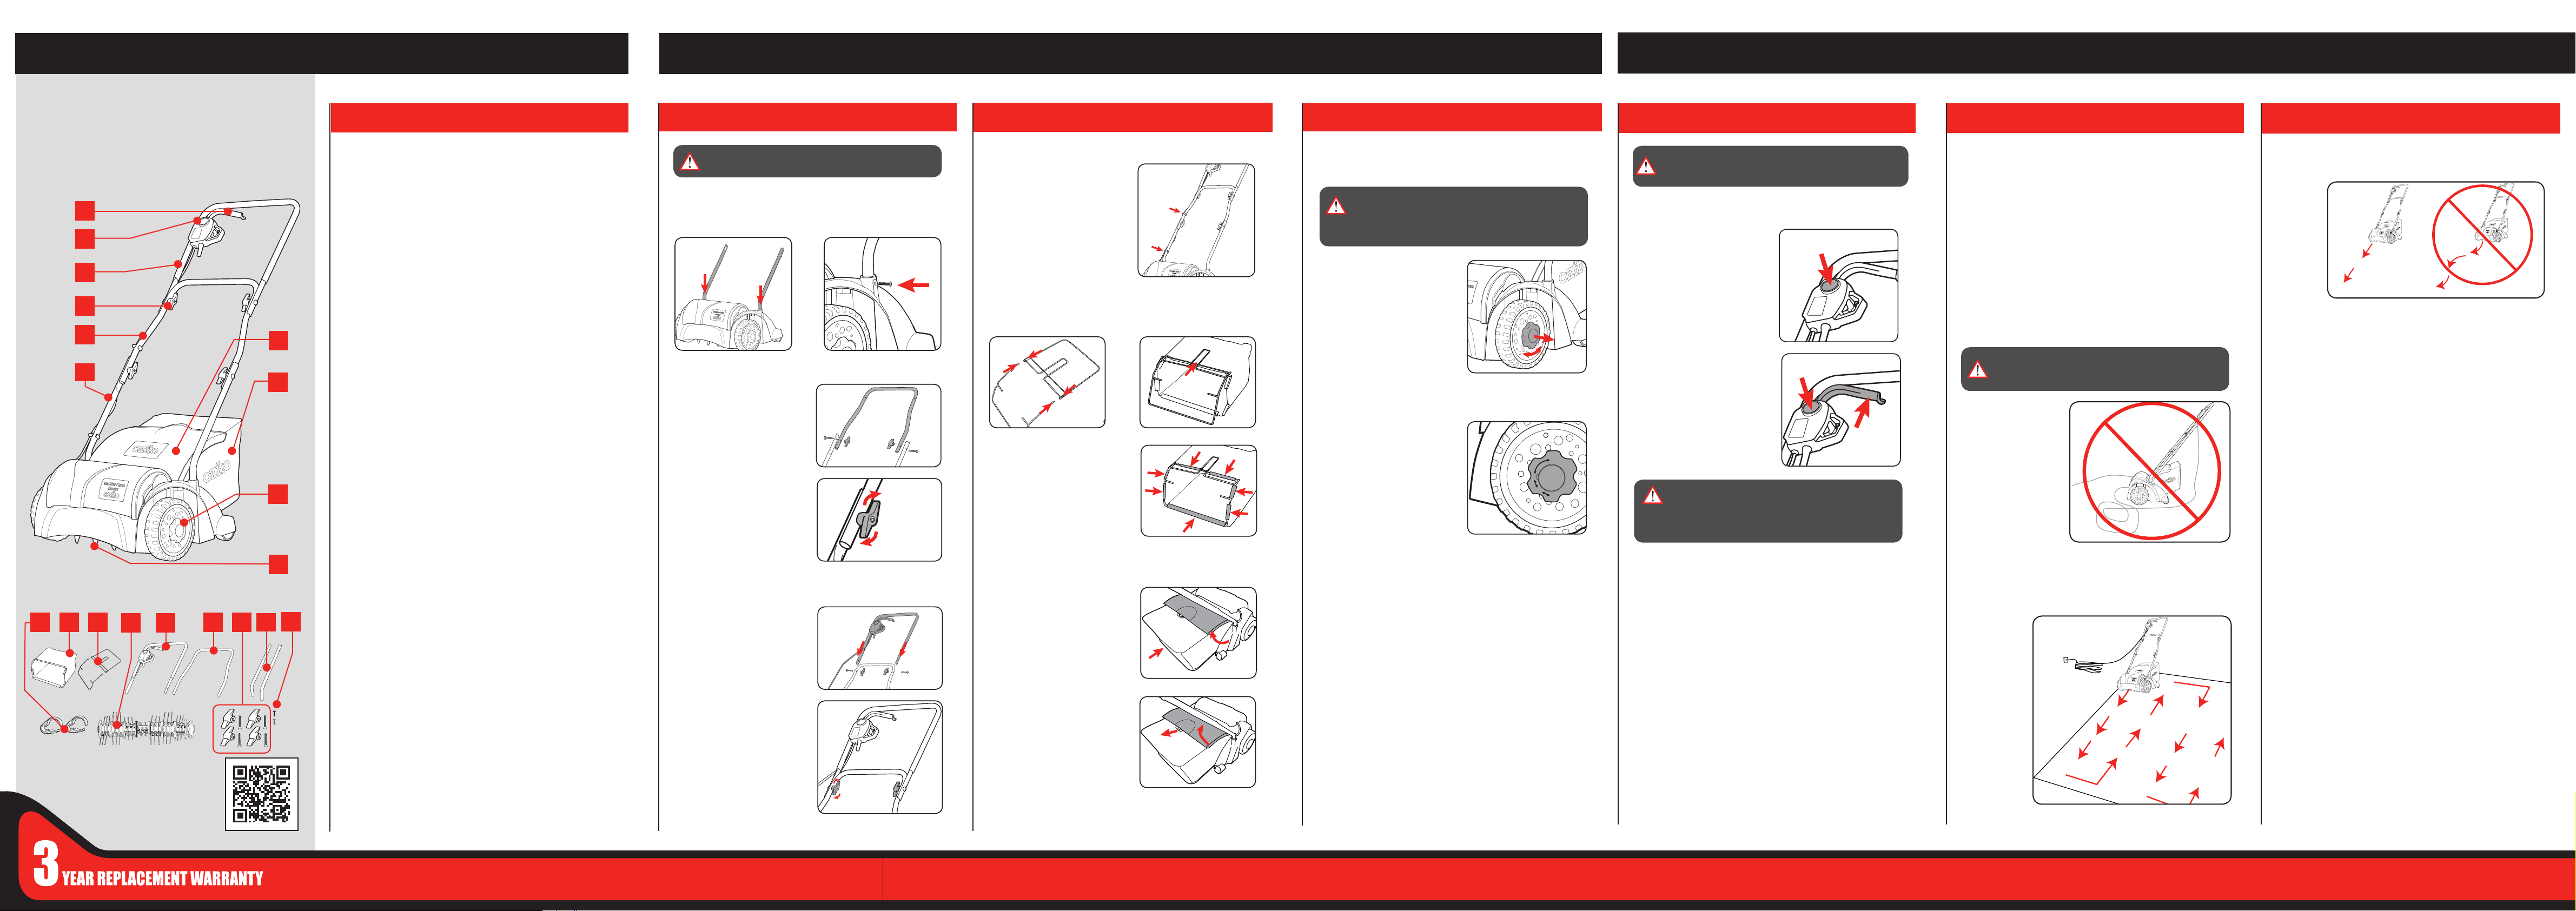
ONLINE MANUAL
Scan this QR Code with your
mobile device to take you to
the online manual.
KNOW YOUR PRODUCT
SETUP & PREPARATION
1. Start/stop lever
2. Safety switch
3. Upper handle
4. Securing knob
5. Mid handle
6. Lower handle
7. Catcher ap
8. Catcher
9. Scarier depth adjustment
10. Scarier roller
2. ASSEMBLY
5. OPERATION TIPS
SCARIFIER / LAWN AERATOR
The scarier depth is adjusted at both front wheels via the depth
adjustment knob.
1. Press and hold the lock-off
button.
1
9
10
11
2
3
4
6
7
5
WARNING!: ENSURE THE TOOL IS DISCONNECTED
FROM THE POWER SUPPLY BEFORE ASSEMBLY.
Fitting the Lower Handles to Motor Body
1. Inset the lower handle onto the
housing.
1. Place the middle handle inside
the upper ends of the lower
handles. From the handle
securing set, t the bolts
through the outer side of the
lower handle and then through
the hole in the middle handle.
1. Secure the power cord from the
switch housing to the scarier
aerator using the two cable clips
(supplied).
To prevent accidental start up of the motor the scarier aerator is
tted with a dual action switch
2. Pull the catcher over the catcher
frame.
1. Push both frame parts into
each other.
WARNING!: DISCONNECT THE SCARIFIER
AERATOR FROM THE POWER SUPPLY AND
ENSURE THE BLADE HAS STOPPED COASTING
BEFORE ADJUSTING THE DEPTH.
Securing the Power Cord to the Handles
Assembling the Grass Catcher
Fitting and Removing Grass Catcher
3. ADJUSTMENTS
Adjusting the Scarier Depth
4. SWITCHING ON/OFF
¥ Lay the power cable on the ground in loops in front of the power
outlet. Scarify away from the power outlet and cable, making sure
that the power cable always trails in the already scaried grass so
that the equipment does not travel over the cable.
¥ Try to scarify in straight lines for a nice, clean look. In so
doing, the aeration swaths should always overlap each other
by a few centimetres in order to avoid bare strips.
Fitting the Middle Handle to the Lower Handles
3. To empty the catcher, lift the
catcher ap with one hand,while
unhooking the catcher with the
other.
1. Lift up the catcher ap with
one hand and hook it onto the
housing from above.
2. Lower the catcher ap. The
catcher ap is held against the
catcher by a spring.
WARNING! KEEP POWER CORD AWAY FROM
ROLLER.
CAUTION: TO REDUCE THE RISK OF ELECTRICAL SHOCK,
WE RECOMMEND THE USE OF A RESIDUAL CURRENT
DEVICE (RATED 30mA OR LESS).
2. Pull the Start/stop lever towards
the handle and hold in position,
the motor will now start.
3. Release the lock-off button
4. Release the Start/stop lever to
stop the motor.
1. Pull out the adjusting knob and
turn to the left or right into one
of the available positions.
2. Release the knob, check that
it is securely seated in the
required depth.
2. Secure in place with a lower
handle screw.
Note: Ensure that the power cord
does not interfere with the catcher
ap and it can be opened and closed
easily.
Cutting Depth Positions
0 - Transport position.
I - Scarier depth 3mm.
II - Scarier depth 7mm
III - Scarier depth 9mm
2. Secure in place by screwing
the handle securing knobs
over the protruding ends of
the bolts.
WARNING! THE ROLLER WILL STOP A FEW
SECONDS AFTER THE SWITCH HAS BEEN
RELEASED. BE AWARE OF THE NECESSARY TIME IT
TAKES FOR THE ROLLER TO STOP. DO NOT ATTEMPT
TO STOP THE ROLLER.
ESA-1231U
1. BEFORE USE
OPERATION
8
12 13
14
15
16
11. Cable clips
12. Catcher
13. Catcher frame
14. Aerator roller
15. Handle securing set x 4
16. Lower handle screws x 2
Fitting the Upper Handle to the Middle Handle
1. Place the upper handle
over each side of the middle
handle. From the handle
securing set, t the bolts
through the outer side of
the upper handle and then
through the hole in the middle
handle.
2. Secure in place by screwing
the handle securing knobs
over the protruding ends of
the bolts.
Note: The scarier depth must
always be identically set on both
sides.
3. Pull the rubber clips over the
catcher frame.
¥ How frequently you should scarify your lawn is determined primarily
by the speed at which the grass grows and the hardness of the soil.
¥ Keep the underside of the equipment clean and remove soil and
grass build-up. Deposits make it more difcult to start the aerator
and decrease the quality of the scarifying.
¥ Always ensure that a safe distance (provided by the long handles) is
maintained between the user and the housing.
¥ Be especially careful when scarifying and changing direction on
slopes and inclines.
¥ Maintain a solid footing and wear sturdy, non-slip footwear and long
trousers.
¥ Always scarify along the incline (not up and down).
¥ For safety reasons, the scarier may not be used to scarify inclines
whose gradient exceeds 15 degrees.
¥ Use special caution when backing up and pulling the scarier
aerator (tripping hazard).
¥ It is recommended that you overlap scarifying paths a little.
Overload Protection
To protect the motor it is equipped with a thermal overload switch
which cuts out when overloaded and starts again automatically after a
short cooling-down period.
Items Supplied
Please check that the article is complete as specified in the scope
of delivery. If parts are missing, please contact our service centre or
the sales outlet where you made your purchase at the latest within
5 working days after purchasing the product and upon presentation
of a valid bill of purchase. Also, refer to the warranty table in the
service information at the end of the operating instructions.
¥ Open the packaging and take out the equipment with care.
¥ Remove the packaging material and any packaging and/or
transportation braces (if available).
¥ Check to see if all items are supplied.
¥ Inspect the equipment and accessories for transport damage.
¥ If possible, please keep the packaging until the end of the
guarantee period.
Danger!
The equipment and packaging material are not toys. Do not let
children play with plastic bags, foils or small parts. There is a
danger of swallowing or suffocating!
Proper Use
The equipment can be used both as a scarier and an aerator
depending on the intended use. Only a few movements are
required to change the roller.
The scarifying roller is designed for ripping moss and weeds -
complete with their roots - out of the soil and for loosening the soil.
As a result your lawn can absorb nutrients better and is cleaned.
The aerating roller scratches the surface of the lawn, helping water
to drain off more easily as well as promoting oxygen intake. Aerate
your lawn throughout the growing period.
The equipment is intended for private use i.e. for use in home and
gardening environments.
Scariers for private use are machines whose annual operating
time generally does not exceed 10 hours, during which the
machine is primarily used to maintain small-scale, residential lawns
and home/hobby gardens. Public facilities, sporting halls, and
agricultural/forestry applications are excluded.
The operating instructions as supplied by the manufacturer must
be kept and referred to in order to ensure that the equipment is
properly used and maintained. The instructions contain valuable
information on operating, maintenance and servicing conditions.
Warning! Due to the high risk of bodily injury to the user, the
equipment may not be used to grind up branch or hedge clippings.
Moreover, the equipment may not be used as a power cultivator to
level out high areas such as mole hills.
For safety reasons, the scarier may not be used as a drive unit for
other equipment or toolkits of any kind, unless specically advised
to do so by the manufacturer.
The equipment is to be used only for its prescribed purpose. Any
other use is deemed to be a case of misuse. The user / operator
and not the manufacturer will be liable for any damage or injuries of
any kind caused as a result of this.
Please note that our equipment has not been designed for use in
commercial, trade or industrial applications. Our warranty will be
voided if the machine is used in commercial, trade or industrial
businesses or for equivalent purposes.
3
5
6


Join the conversation about this product
Here you can share what you think about the Ozito ESA-1231U Lawn Raker. If you have a question, first carefully read the manual. Requesting a manual can be done by using our contact form.