
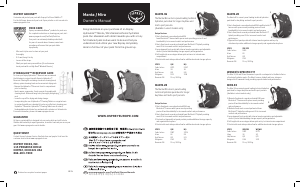
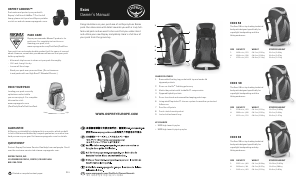
MIRA 26
The Mira 26 is a women’s panel loading technical
hydration pack ideal for longer day hikes and
multi-sport pursuits.
1Women’sxedmeshcoveredperforatedEVAfoam
Biostretch ™ harness with spacer mesh providing
precise fit and breathability for increased comfort
and performance
2Women’sxed,meshcoveredperforatedfoam
BioStretch™ hipbelt providing exact fit for increased comfort and performance
3Dualverticalzipperedfrontpanelpocketsprovideadditionalstoragecapacityand
organizational options
4Dualstretchmeshsidepocketsallowforadditionalexternalstorageoptions
SPECS WXS/WS WS/WM
CubicInches 1465 1587
Liters 24 26
Lbs/Ounces 2 2/2
Kilograms 0.91 0.97
ReservoirWt 11oz/0.31kg
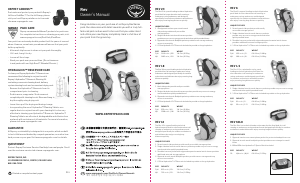
MIRA 18
The Mira 18 is a women’s panel loading technical hydration
pack ideal for day hiking and multi-sport pursuits.
1Women’sxedmeshcoveredperforatedEVAfoamBiostretch™
harness with spacer mesh providing precise fit and breathability
for increased comfort and performance
2Women’sxed,meshcoveredperforatedfoamBioStretch™
hipbelt providing exact fit for increased comfort and
performance
3 Zippered front panel pocket with internal mesh organizer
and key clip attachment provides additional storage capacity
and organizational options
SPECS ONE SIZE
CubicInches 1098
Liters 18
Lbs/Ounces 2/0
Kilograms 0.9
ReservoirWt 11oz/0.31kg
MANTA / MIRA KEY FABRICS
• 70x100Dnylonshadowcheck
• 600Dpoly
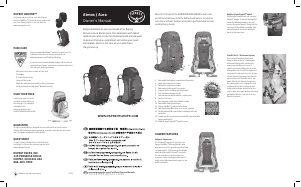
SHARED FEATURES
Hydraulics™ Reservoir
(Availableinselectmarketsonly)
The reservoir design features a direct welded,
anatomically shaped HydroStatic™ backer plate to
prevent barreling of the reservoir and ensure pack fit is
preserved for optimal stability and comfort. This enables
the reservoir to conform to the back’s complex shape,
even when full. The result is a more precise, stable
and comfortable fit. Additionally, the reservoir has an
integrated lightweight, low profile handle/spine that
stabilizes the load of the water while also serving as a
more convenient design to slide the reservoir into the
pack .Other Hydraulics™ Reservoir features include:
• MetallocenePEhighstrengthBPA,PVC,tasteandodor
free material results in greater reservoir strength and
resiliency
• Antimicrobialformulatopreventbacteriaandmold
• Widemouth,¾turncapopeningprovidesquick,
secure opening and closing for easy filling and cleaning
• Articulated,180degreeon/obitevalvewithincluded
sternum strap magnet
• Accessviabitevalvetodeliveryhoseforeasycleaning
• Dualsidehoseexitfromthereservoirforeasyrouting
options
• Flexible¼”/6.35mmhoseprovidesfastwaterow
HydraLock™ System
TheHydraLock™internalcompressioncompartment
provides a dedicated space for the reservoir so that cargo
volumeisnotaectedbyafullreservoir.Iteectively
squeezes the reservoir, supplying hydraulic pressure
toincreasetheowandminimizewatermotion.Italso
provides a perfect anchor point for the vertical spine of
the reservoir, preventing lateral instability and locking the
water load into the overall pack structure.
Inserting/Removing the Hydraulics™ Reservoir
ALocatethehydrationcompartmentdirectaccesszipper
at the top of your pack pack’s hydration compartment
and unzip to open. B Grasp the wide mouth cap
attachment loop at the top of the reservoir and remove.
C Use the handle/spine to insert the reservoir back
into the compartment.
Note: The small, quick release attachment strap is
included as an option to secure non Hydraulics™
Reservoirs.
Filling the Hydraulics™ Reservoir
Grasp the handle/spine in one hand, undo the wide
mouth cap with the other hand and fill as desired.
Replace the cap ensuring the gasket is in place and
invert to test.
Note: Removing air from the reservoir after filling
with water will help prevent excess slosh. To do this,
hold reservoir upside down, pinch the bite valve and
squeeze the reservoir until all air is expelled.
Customizing the Reservoir Delivery Hose Length
Ifyoundthatthedeliveryhoseonyourreservoiris
too long or subject to kinking when placed in your pack,
follow these steps:
1. Try reorienting the hose in the pack watching for
kinks as you route the hose through the pack.
2. Try rerouting the hose to the left of the Hydraulics™
wide mouth cap and then curve it back to the right
towards the shoulder harness Hydraulics™ direct
access zipper.
3. Cut the hose to desired length.
To cut the reservoir delivery hose, A detach the hose
from the reservoir entry point and cut to desired length
using sharp scissors or a utility knife. B Reattach the
hose and invert to test for leaks before using.
TIP:Ifyouhavemorethanonepackyouintendto
use your reservoir in, be sure to test the hose routing
length in all before cutting.
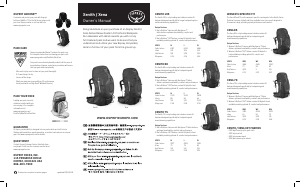
AirSpeed™ Suspension
TheManta/MirafeaturesaperipheralLightWire™alloy
frame. Mesh is stretched taut over a ridge molded
foam backpanel creating an air space with side
venting. This frame support creates a lightweight and
ventilated backpanel providing excellent comfort, carry
and pack to back contact.
BioStretch™ Harness
A mesh covered slotted EVA gender specific foam
harness with breathable spacer mesh and direct
access zip to reservoir sleeve creates a soft contact
surface and features a full sternum strap with built-in
magnet. This provides quick bite-valve attachment,
allowsexible,dynamicmovementandeasyhands
free water management.
BioStretch™ Hipbelt
A mesh covered, perforated gender specific built-in
hipbelt with zippered pockets and modified straight
ErgoPull™ hipbelt closure adjusts easily and stretches
with dynamic movement.
Panel Load Access
The Manta/Mira Series features a dual zippered,
wide panel loading main compartment with internal
organization sleeves.
A
B
Helmet Attachment Loop
A helmet attachment loop can be found near the top of
the Manta/Mira front panel. To attach helmet, find the
helmet icon and route the chin strap through the loop
and engage the buckle. Reverse to remove.
Top Slash Pocket
A quick access top zippered pocket is lined with a
soft, easy to clean heat embossed fabric. Store your
sunglasses and mp3 player here for easy, scratch-proof
access.
Front Pocket
Every Manta/Mira pack features a stretch woven front
pocket with integrated blinker light patch for quick
external storage and visibility. The laser cut patch does
double duty as a hipbelt reverse wrap storage. Simply
wrap from the front of the pack and engage the hipbelt
through the slot for belt free travel.
Integrated Raincover
To use, A locate the raincover icon near the base of the
pack, unzip and pull raincover from compartment and
slip over top and bottom of pack. B Tension into place
adjusting the cord lock at the bottom of the raincover.
Reverse this process to return to compartment.
Note: To remove the raincover altogether, unfasten
the hook-and-loop strap from the cord loop.
Note: To prevent mildew, remove raincover and allow
to dry entirely .
Stow-on-the-Go™ Attachment System
To operate: shorten trekking poles to a safe, manageable
size, A locate the elasticized cord loop on the lower left
side of pack and pull loop away from the side pocket,
inserting the basket end of your poles. B On the left
harness strap locate the trekking pole icon, C grasp the
cord lock beneath the fabric patch and pull up on the
cord to open the bungee loop. Place pole handles in the
loop and tighten to secure. Reverse to remove.
Compression Straps
Adjustable upper and lower compression/carry straps
are featured on each Manta/Mira pack to compress
and stabilize loads and provide alternate gear carrying
options.
1
2
4
3
1
A
B
C
2
3
A
A
A
B
B
C
B


Join the conversation about this product
Here you can share what you think about the Osprey Manta 28 Backpack. If you have a question, first carefully read the manual. Requesting a manual can be done by using our contact form.