Das Symbol "durchgestrichene Mülltonne" erfordert die separate
Entsorgung von Eletro- und Elektronik-Altgeräten (WEEE).
Elektrische und elektronische Geräte können gefährliche und
umweltgefährdende Stoffe enthalten. Dieses Gerät nicht im unsortier-
ten Hausmüll entsorgen. An einer ausgewiesenen Sammelstelle für
Elektro- und Elektronik-Altgeräte entsorgen. Dadurch tragen Sie zum
Schutz der Ressourcen und der Umwelt bei. Für weitere Information
wenden Sie sich bitte an Ihren Händler oder die örtlichen Behörden.
ENTSORGUNG
VORGESEHENER EINSATZZWECK
Dieses Gerät ist nur für die Tonunterhaltung vorgesehen. Nur entspre-
chend vorliegender Anleitung verwenden. Unsachgemäße Verwen-
dung ist gefährlich und führt zum Verlust der Garantie. Nur für den
Hausgebrauch. Nicht im Freien verwenden.
Venalisia Import GmbH
Wankelstrasse 5
D-85046 Ingolstadt
OCR200.07.11
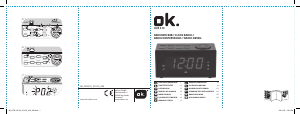
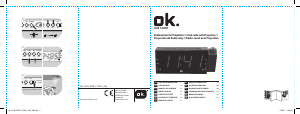
BEDIENELEMENTE
1
2
3
4
6
5
17 16
15
14
13
12
7
9
10
8
11
Wichtige Sicherheitshinweise
befinden sich in einem geson-
derten Dokument.
1 Lautsprecher
2 Funktionsschalter (ON, OFF,
AUTO)
3 Lautsprecher/Summer-Regler
4 Stützbatteriefach
5 SNOOZE-Taste (Schlummer)
6 SLEEP-Taste (Einschlafautoma-
tik)
7 MODE SET-Taste
8 AUTO-Anzeige
9 Weckzeiteinstell-Taste
10 LED-Display
11 Frequenzbereich
12 Abstimmknopf
13 AM/FM-Bandwahlschalter
14 HOUR-Taste
15 MINUTE-Taste
16 Wurfantenne
17 Netzkabel
CONTROLS
Important safety instructions
can be found in the separate
document.
1 Speaker
2 Function switch (ON, OFF,
AUTO)
3 Volume/Buzzer control
4 Back-up battery compartment
5 SNOOZE button
6 SLEEP button
7 MODE SET button
8 AUTO indicator
9 Alarm setting button
10 LED display
11 Frequency range
12 Tuning control
13 AM/FM band selector
14 HOUR button
15 MINUTE button
16 Wire antenna
17 Supply cord
VOR DEM ERSTEN GEBRAUCH
Diese Gebrauchsanleitung sorgfältig durchlesen, um Beschädi-•
gungen oder Verletzungen in Folge unsachgemäßer Verwendung
zu vermeiden. Besonders die Sicherheitshinweise beachten. Zum
späteren Nachschlagen aufbewahren und an zukünftige Benutzer
weitergeben.
Sämtliches Verpackungsmaterial vorsichtig entfernen und Gerät auf •
Vollständigkeit und Unversehrtheit prüfen. Ein beschädigtes Gerät
BEFORE FIRST TIME USE
Carefully read this user manual in order to avoid damage or injuries •
due to incorrect use. Pay particular attention to safety instructions.
Keep for future reference and pass it on to further users.
Carefully remove all packaging and check if appliance is complete •
and undamaged. In case of damage, do not use the appliance.
Eingangsspannung: AC 230 V
~
, Nennfrequenz: 50 Hz / Nennleis-
tungsaufnahme: 6 W / Radiofrequenzbereich: AM 525-1615 kHz, FM
87,5-108 MHz / Batterie: 9 V , 1 x 6F22 (nicht im Lieferumfang)
Das Typenschild befindet sich an der Unterseite des Gerätes.
TECHNISCHE DATEN
Power source: AC 230 V
~
, Rated frequency: 50 Hz / Rated power
consumption: 6 W / Radio frequency range: AM 525-1615 kHz, FM 87,5-
108 MHz / Battery: 9 V , 1 x 6F22 (not included)
The rating label is located at the bottom of the appliance.
SPECIFICATIONS
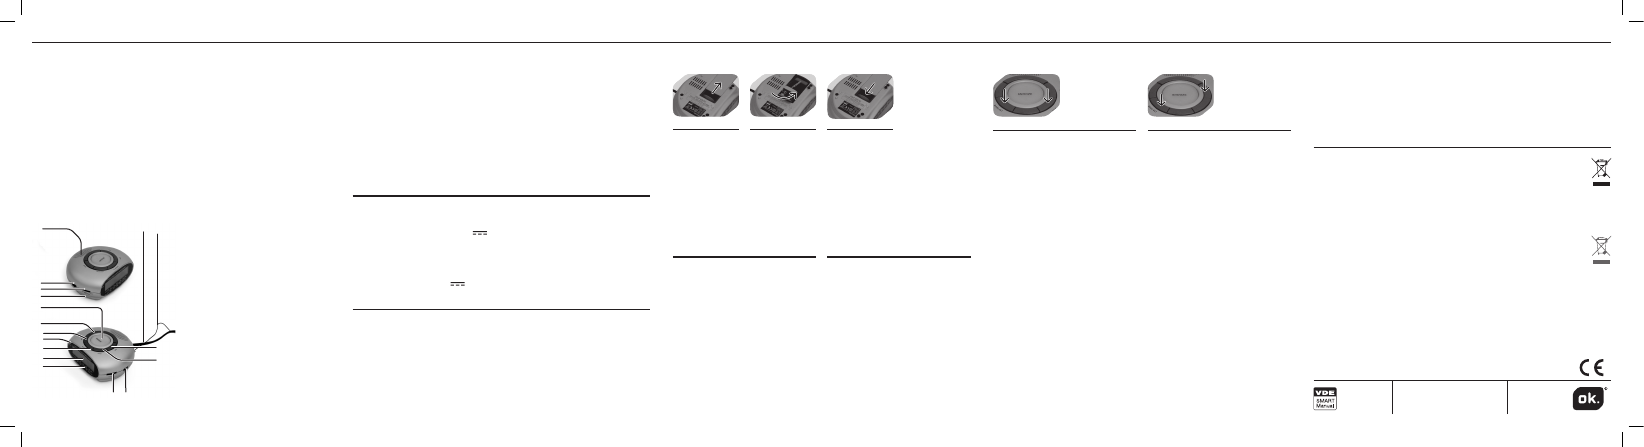
EINSETZEN DER BATTERIE FÜR DAS SPEICHERN DER UHRZEIT
Den Batte-
riefachdeckel
abnehmen.
Eine 9-V-Block-
batterie (nicht
im Lieferum-
fang enthalten)
einsetzen; die
+ und - Kenn-
zeichnung
beachten.
Den Deckel
aufsetzen und
schließen, bis
er einrastet.
321
Die Batterien sind nicht im •
Lieferumfang enthalten; bitte
die Sicherheitshinweise des
Batterieherstellers beachten.
Vor dem Einlegen/Entfer-•
nen der Batterien immer den
Funktionswahlschalter auf OFF
stellen.
Wenn das Gerät für längere •
Zeit nicht benutzt wird, die
Batterien entnehmen, um ein
Auslaufen derselben zu ver-
meiden.
HINWEIS
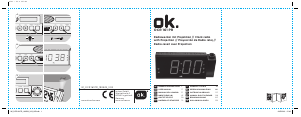
EINSTELLEN DER UHR
Die Stunde einstellen: die MODE-
SET-Taste gedrückt halten und
gleichzeitig die HOUR-Taste
drücken, bis die richtige Stunde
angezeigt wird. Beide Tasten
loslassen.
Die Minute einstellen: Die MODE
SET-Taste gedrückt halten und
gleichzeitig die MINUTE-Taste
drücken, bis die richtige Minute
angezeigt wird. Beide Tasten
loslassen.
21
INSERTING BATTERY FOR CLOCK BACK-UP
Remove bat-
tery compart-
ment door.
Insert battery
of type DC 9V
(not included);
observe + and -
markings.
Refit door and
close until
it clicks into
place.
The batteries are not included; •
please refer to the safety
instructions provided by the
battery manufacturer.
Always turn function switch to •
OFF position before inserting/
removing batteries.
When not using appliance for a •
long time, remove batteries in
order to avoid leakage.
NOTE
CLOCK SETTING
To set hour: While holding MODE
SET button down, press HOUR
button until desired hour is dis-
played. Release both buttons.
To set minutes: While holding
MODE SET button down, press
MINUTE button until correct time
is displayed. Release both but-
tons.
INTENDED USE
This appliance is only intended for audio entertainment. Only use ac-
cording to these instructions. Improper use is dangerous and will void
any warranty claim. For household use only. Do not use outdoors.
Das Gerät mit einem trockenen und weichen Tuch reinigen.•
REINIGUNG UND PFLEGE
Clean appliance with a dry and soft cloth.•
CLEANING AND CARE
The crossed-out wheeled bin logo requires the separate col-
lection of waste electric and electronic equipment (WEEE).
Electric and electronic equipment may contain dangerous and
hazardous substances. Do not dispose of this appliance as unsorted
municipal waste. Return it to a designated collection point for the
recycling of WEEE. By doing so, you will help to conserve resources
and protect the environment. Contact your retailer or local authorities
for more information.
DISPOSAL


Join the conversation about this product
Here you can share what you think about the OK OCR 200 Alarm Clock Radio. If you have a question, first carefully read the manual. Requesting a manual can be done by using our contact form.