Dear Parents,
The NUK Baby Food Warmer is the ideal way of heating feeding bottles and jars of infant
feeds to the right temperature. It is really easy to use. These instructions explain everything
you need to know. Please read them carefully before using the food warmer for the first
time.
NUK wishes your baby Bon Appetit!
For Your Safety
•Feeding bottles and jars must not be sealed while they are heated in the Baby Food
Warmer, as this may result in overpressure (risk of explosion/material damage).
• This appliance should only be used for heating up baby food. Inappropriate use could
be potentially dangerous for the user.
• The mains voltage must comply with the voltage specification on the base of the
appliance.
• Ensure that the Baby Food Warmer is standing upright and stable to prevent your child
from tipping it over or from pulling it off the table or worktop by the cable.
• The Baby Food Warmer has been designed with maximum safety in mind. However,
you should not leave this appliance unattended or let your child play with it. The Baby
Food Warmer is not a toy.
•Please keep this appliance away from direct heat.
• The cable must not come into contact with water or a direct heat.
• The measuring jug must not be used to measure baby food.
• If the plug has been removed and the Baby Food Warmer is accidentally switched on,
once plugged in again the appliance will automatically switch off after a few seconds.
• The Baby Food Warmer must not be used if there is an obvious fault with the
appliance, cable or plug.
• If the supply cord is damaged, it must be replaced by the manufacturer, its service agent
or similarly qualified persons in order to avoid a hazard.
• This appliance is not intended for use by persons (including children) with reduced
physical, sensory or mental capabilities or with lack of experience and/or lack of
knowledge, unless supervised by a person responsible for their safety or given
instructions on the use of the appliance by such a person.
Heating up Baby Feeding Bottles and Jars
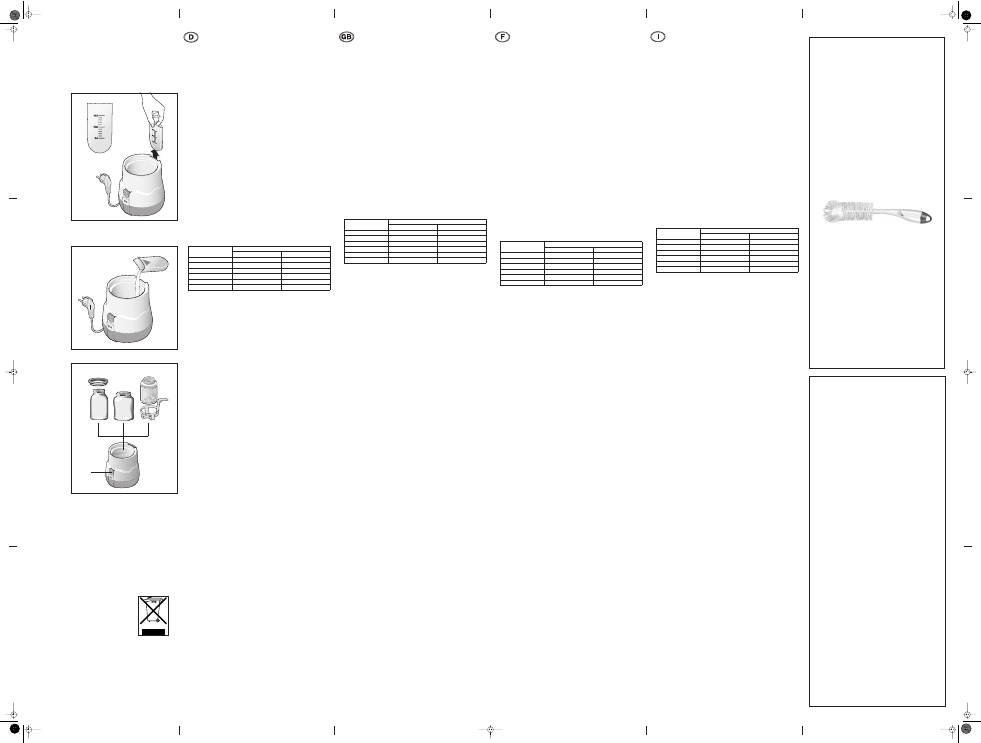
1. Plug the Baby Food Warmer into the socket.
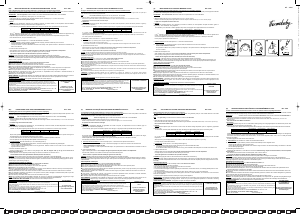
2. Take the measuring jug out of the holder (see Fig. 1).
3. Fill the measuring jug with exactly the right amount of water in accordance with the
table below:
N.B.!
Always use the measuring jug, as the Baby Food Warmer may otherwise overfill
and damage the appliance.
Note: The relevant temperature of the heated food or milk will vary
depending on the initial temperature and the type and quantity of food.
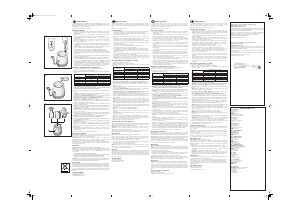
4. Pour the measured quantity of water into the internal container of the Baby Food
Warmer (see Fig. 2).
N.B.!
If too much water is used, the food will heat up for too long and the temperature
may be too hot for your infant.
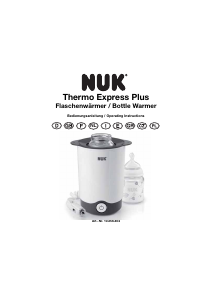
5. When heating up
NUK Standard Bottles
place the ring over the opening of the Baby
Food Warmer (see Fig. 3a). The ring is used to stabilise the bottle.
The
NUK First Choice Bottle
and
NUK Breast Milk Container
should be placed
directly into the Baby Food Warmer without the ring and basket (see Fig. 3b).
When heating up
jars
first insert the basket without ring in the Baby Food Warmer.
Then remove the lid from the jar and lower the jar into the basket (see Fig. 3c).
6. Switch on the Baby Food Warmer by pressing the switch down (see Fig. 3d). The switch
will then light up.
Note:
The food warmer cannot be turned off using the switch; it will switch off
automatically once the correct temperature has been reached. If, however, the
appliance needs to be switched off sooner, then this must be done by removing the plug.
N.B.!
Keep your hands away from the steam in the Baby Food Warmer. While heating
up or being filled with hot water, the appliance should not be moved at all.
7. The food is heated up by the steam. As soon as the water has evaporated and the food
is warm, the Baby Food Warmer will switch off automatically. The light on the switch
will then go out.
8. Lift the bottle or jar carefully out of the Baby Food Warmer.
N.B.!
Do not touch the hotplate in the Baby Food Warmer.
9. Shake or stir the unopened bottle or jar as relevant to check that the heat is evenly
distributed.
Important!
Before feeding you should check that the temperature of the food is not
too hot for your baby.
Tip:
If the food is not sufficiently warm, remember to add more water the next time. If
the food, on the other hand, is too hot, then you should add less water the next time.
10. After use, you should wait a few minutes until the food warmer has cooled down
before it is switched on again. Then it is once more ready for use.
11. Always remember to remove the plug after each use.
Cleaning and care of this appliance
When cleaning the appliance, an occasional wipe with a damp cloth and a little washing-up
liquid over the casing and internal containerit will suffice. Always remember to remove the
plug from the socket and only clean the appliance when cold.
Warning:
The appliance should never be immersed in water, nor should it be put in the
dishwasher. Do not use any harsh cleaning or scouring agent or sponge as these may
damage the surface or even the appliance itself.
The measuring jug, basket and ring can be put in the dishwasher. These can also be cleaned
by hand in warm soapy water and then rinsed with clear water and dried.
Decalcifying
Note:
Commercially available decalcifying agents should not be used.
After a while the heating process could cause calcification in the internal container of the
Baby Food Warmer (depending on the hardness of the water used). This should be
removed at regular intervals to ensure that the appliance functions correctly.
1. When decalcifying the Baby Food Warmer, first remove the plug.
2. Mix 100ml hot water with 100ml white household vinegar and pour into the warmer.
Leave the solution to act for 30 minutes and then discard.
3. Rinse out the appliance with clear water and dry well.
Warning:
Should at any time the appliance need repairing, please contact Customer
Service. On no account should the appliance be opened, otherwise the warranty will be
invalidated. This also applies to replacing the cable.
Disposal
In the European Union the symbol of a crossed-through waste bin on wheels means that
the product must be disposed at a separate waste collection point. This applies not only to
the product, but also to all accessories labelled as such. Labelled items may not be mixed
with normal household waste; they must be taken to a recycling point for electrical and
electronic equipment. Recycling helps to reduce the consumption of raw materials and thus
protect our environment.
Technical Data
Voltage: 230 V ~ 50 Hz
Power consumption: 300 Watt
Safety certificate: GS / CE
Bottle / Jar
Qty of Water Required
Room temperature Refrigerator temperature
125 ml Feeding bottle
8 ml 12 ml
150 ml Feeding bottle
9 ml 12 ml
250 ml Feeding bottle
10 ml 14 ml
300 ml Feeding bottle
10 ml 14 ml
130 g Jar
10 ml 18 ml
190 g Jar
12 ml 20 ml
Liebe Eltern,
der NUK Babykostwärmer bringt Babyflaschen und Babykostgläschen auf die richtige
Te mperatur. Die Bedienung ist denkbar einfach. Diese Anleitung erklärt Ihnen alles, was Sie
dazu wissen müssen. Bitte lesen Sie die Anleitung sorgfältig durch, bevor Sie den
Babykostwärmer zum ersten Mal benutzen.
NUK wünscht Ihrem Baby einen guten Appetit!
Zu Ihrer Sicherheit
•Während der Erwärmung im Babykostwärmer dürfen die Fläschchen oder Gläschen
nicht dicht verschlossen sein, es kann sonst Überdruck entstehen (Explosionsgefahr/
Materialschäden).
• Benutzen Sie das Gerät nur zum Erwärmen von Babynahrung im Haushalt.
Unsachgemäßer Gebrauch birgt mögliche Gefahrenquellen für den Benutzer.
•Die Netzspannung und die Spannungsangabe auf der Geräteunterseite müssen
übereinstimmen.
• Stellen Sie den Babykostwärmer so auf, dass er fest und gerade steht und von Ihrem
Kind nicht umgekippt oder am Kabel vom Tisch oder der Küchenzeile
heruntergezogen werden kann.
•Der Babykostwärmer bietet ein Höchstmaß an Sicherheit. Lassen Sie das Gerät
trotzdem nicht unbeaufsichtigt oder Ihr Kind damit hantieren. Der Babykostwärmer ist
kein Spielzeug.
•Das Gerät darf nicht auf heiße Herdplatten gestellt, in den heißen Backofen geschoben
oder in der Nähe von Gas- und Durchlauferhitzern aufgestellt werden.
•Das Kabel darf nicht mit Wasser oder einer Herdplatte in Berührung kommen.
•Der Messbehälter darf nicht zum Abmessen von Babynahrung verwendet werden.
• Sollte bei gezogenem Stecker versehentlich der Schalter gedrückt werden, schaltet sich
das Gerät nach dem Einstecken des Steckers nach einem kurzen Augenblick
automatisch aus.
• Bei erkennbaren Defekten an Gerät, Kabel oder Stecker darf der Babykostwärmer
nicht in Betrieb genommen werden.
•Wenn das Netzkabel beschädigt ist, muss es durch den Hersteller, seinen Kundendienst
oder eine ähnlich qualifizierte Person ersetzt werden, um Gefährdungen zu vermeiden.
•Dieses Gerät ist nicht dafür bestimmt, durch Personen (einschließlich Kinder) mit
eingeschränkten physischen, sensorischen oder geistigen Fähigkeiten oder mit
mangelnder Erfahrung und/oder mangelndem Wissen benutzt zu werden, es sei denn,
sie werden durch eine für ihre Sicherheit zuständige Person beaufsichtigt oder
erhielten von ihr Anweisungen, wie das Gerät zu benutzen ist. Kinder sollten
beaufsichtigt werden, um sicherzustellen, dass sie nicht mit dem Gerät spielen.
Erwärmen von Babyflaschen und Gläschen
1. Schließen Sie den Babykostwärmer mit dem Stecker an der Steckdose an.
2. Nehmen Sie den Messbehälter aus dem Halter (Abb. 1).
3. Befüllen Sie den Messbehälter exakt mit der Wassermenge entsprechend der folgenden
Tabelle:
Achtung!
Benutzen Sie zum Befüllen stets den Messbehälter, da der Babykostwärmer
sonst überfüllt und das Gerät beschädigt werden könnte.
Hinweis: Je nach Ausgangstemperatur, Menge und Art der Babynahrung
kann die erzielte Temperatur etwas unterschiedlich sein.
4. Gießen Sie die abgemessene Wassermenge in den Innenbehälter des Babykostwärmers
(Abb. 2).
Achtung!
Bei Verwendung von zu viel Wasser wird die Nahrung zu lange erhitzt und
die Nahrungstemperatur kann für Ihr Baby zu heiß werden.
5. Zum Erwärmen von
NUK Standard Flaschen
legen Sie den Ring auf die Öffnung des
Babykostwärmers (Abb. 3a). Durch den Ring wird die Flasche stabilisiert.
NUK First Choice Flasche
und
NUK Muttermilchbehälter
werden ohne Ring
und Körbchen in den Babykostwärmer gestellt (Abb. 3b).
Zum Erwärmen von
Gläschen
platzieren Sie erst das Körbchen ohne Ring in den
Babykostwärmer. Nehmen Sie dann den Deckel vom Babykostgläschen und stellen das
Gläschen anschließend in das Körbchen (Abb. 3c).
6. Schalten Sie den Babykostwärmer ein. Dazu drücken Sie den Schalter nach unten
(Abb. 3d). Der Schalter leuchtet auf.
Hinweis:
Das Gerät kann mit dem Schalter nicht ausgeschaltet werden. Das Gerät
schaltet sich zum Ende des Heizzyklus automatisch ab. Ein vorzeitiges Abschalten ist
durch Ziehen des Steckers möglich.
Achtung!
Halten Sie Ihre Hände vom heißen Wasserdampf des Babykostwärmers fern.
Während der Babykostwärmer heizt oder mit heißem Wasser befüllt ist, diesen nicht
umstellen oder verschieben.
7. Die Babynahrung wird durch das verdampfende Wasser erwärmt. Sobald das Wasser
verdampft und die Babynahrung dadurch warm ist, schaltet sich der Babykostwärmer
automatisch aus. Das Licht des Schalters erlischt.
8. Nehmen Sie die Flasche bzw. das Gläschen vorsichtig aus dem Babykostwärmer.
Achtung!
Berühren Sie nicht die heiße Heizplatte im Babykostwärmer.
9. Damit sich die Wärme gleichmäßig verteilt, schütteln Sie die geschlossene Flasche oder
rühren die Babykost im Gläschen um.
Wichtig!
Vergewissern Sie sich vor dem Füttern, dass die Temperatur der Nahrung
nicht zu heiß für Ihr Baby ist.
Tipp:
Wenn die Babynahrung nicht heiß genug wird, geben Sie beim nächsten
Erwärmen etwas mehr Wasser in den Babykostwärmer. Wenn die Babynahrung zu heiß
wird, geben Sie beim nächsten Erwärmen etwas weniger Wasser in den
Babykostwärmer.
10. Nach Abschluß des Heizvorgangs warten Sie bitte einige Minuten bis der
Babykostwärmer abgekühlt ist und sich wieder einschalten läßt, bevor Sie das Gerät
wiederverwenden.
11. Nicht vergessen, den Stecker nach jedem Einsatz zu ziehen.
Reinigung und Pflege
Es genügt, wenn Sie gelegentlich das Gehäuse und den Innenbehälter mit einem feuchten
Tuch und etwas Spülmittel abwischen. Ziehen Sie dazu immer den Stecker aus der
Steckdose und reinigen Sie nur im abgekühlten Zustand.
Warnung:
Tauchen Sie das Gerät nie in Wasser und waschen Sie es nicht in der
Spülmaschine. Verwenden Sie keine scharfen Reinigungs-, Scheuermittel oder
Scheuerschwämme. Diese könnten die Oberfläche bzw. das Gerät beschädigen.
Messbehälter, Körbchen und Ring können Sie in der Spülmaschine reinigen. Alternativ
können Sie die Teile in warmem Seifenwasser mit der Hand reinigen und danach mit klarem
Wasser abspülen und trocknen.
Entkalken
Hinweis:
Verwenden Sie bitte keine handelsüblichen Entkalkungsmittel.
Nach einiger Zeit wird sich durch den Heizvorgang im Innenbehälter des Babykostwärmers
Kalk absetzen (je nach Härtebereich des verwendeten Leitungswassers). Diesen sollten Sie
in regelmäßigen Abständen entfernen, um die Funktionsfähigkeit des Gerätes
sicherzustellen:
1. Zum Entkalken den Babykostwärmer vom Netz nehmen.
2. 100ml heißes Wasser mit 100ml weißem Haushaltsessig mischen und in den Babykostwärmer
einfüllen. Die Lösung 30 Minuten einwirken lassen und anschließend weggießen.
3. Den Babykostwärmer mit klarem Wasser ausspülen und gut trocknen lassen.
Warnung:
Sollten einmal Reparaturen notwendig sein, versuchen Sie keinesfalls das Gerät
zu öffnen, sondern wenden Sie sich an Ihren Kundendienst. Andernfalls erlischt die Garan-
tie. Dies gilt auch für das Auswechseln der Netzanschlussleitung.
Entsorgung
Das Symbol der durchgestrichenen Abfalltonne auf Rädern bedeutet, dass das Produkt in
der Europäischen Union einer getrennten Müllsammlung zugeführt werden muss. Dies gilt
für das Produkt und alle mit diesem Symbol gekennzeichneten Zubehörteile. Gekennzeich-
nete Produkte dürfen nicht über den normalen Hausmüll entsorgt werden, sondern müs-
sen an einer Annahmestelle für das Recycling von elektrischen und elektronischen Geräten
abgegeben. Recycling hilft, den Verbrauch von Rohstoffen zu reduzieren und die Umwelt zu
entlasten.
Te chnische Daten
Spannung: 230 V ~ 50 Hz
Leistungsaufnahme: 300 Watt
Sicherheitszertifikate: GS / CE
Flasche / Gläschen
Notwendige Wassermenge bei
Raumtemperatur Kühlschranktemperatur
125 ml Babyflasche
8 ml 12 ml
150 ml Babyflasche
9 ml 12 ml
250 ml Babyflasche
10 ml 14 ml
300 ml Babyflasche
10 ml 14 ml
130 g Gläschen
10 ml 18 ml
190 g Gläschen
12 ml 20 ml
➀
➁
➂
abc
d
Chers parents,
le chauffe-biberons NUK permet de chauffer les biberons et les petits pots à la
température idéale. Cet appareil est facile à utiliser. La présente notice d’emploi vous
explique tout ce que vous devez savoir sur ce chauffe-biberons. Veuillez lire attentivement
cette notice d’emploi avant la première utilisation.
NUK souhaite un bon appétit à votre bébé !
Pour votre sécurité
•Ne pas fermer hermétiquement les biberons et petits pots avant de les réchauffer au
chauffe-biberon, car cela peut causer des surpressions (risque d'explosion et
d'endommagement).
•Utilisez l’appareil uniquement pour chauffer les aliments pour bébés à la maison.
L’utilisation non conforme présente des dangers potentiels pour l’utilisateur.
• La tension secteur doit être conforme à la tension indiquée au-dessous de l’appareil.
•Placez le chauffe-biberons sur une surface stable et plane et de sorte que votre enfant
ne puisse le renverser. Veillez également à ne pas laisser pendre le cordon
d’alimentation afin d’éviter que votre enfant ne tire sur celui-ci.
• Le chauffe-biberons offre un maximum de sécurité. Ne laissez pas pour autant
l’appareil sans surveillance ni votre enfant jouer avec celui-ci. Le chauffe-biberons n’est
pas un jouet.
•L’appareil ne peut en aucun cas être posé sur des plaques chaudes ou être introduit
dans un four chaud. En outre, il ne peut pas être placé à proximité d’un chauffe-eau
instantané à gaz.
• Le cordon d’alimentation ne peut pas entrer en contact avec de l’eau ou avec une
plaque chauffante.
• Le récipient de mesure ne peut pas être utilisé pour doser les aliments pour bébés.
• Si l’interrupteur est activé par mégarde lorsque la fiche secteur est débranchée,
l’appareil s’éteint automatiquement après un bref instant en branchant la fiche secteur.
• Si l’appareil, le cordon d’alimentation ou la fiche secteur présente des dommages
visibles, le chauffe-biberons ne doit plus être utilisé.
• Lorsque le câble secteur est endommagé, il doit être remplacé par le fabricant, son
S.A.V. ou une personne qualifiée afin d’éviter des mises en danger.
•L’emploi de cet appareil est interdit aux personnes (y compris les enfants) souffrant de
capacités physiques, sensorielles ou mentales restreintes ou ne pouvant pas s'en servir
pour cause d'un manque d'expériences et / ou de connaissances, sauf s’ils sont
surveillés par une personne compétente pour la sécurité ou si ladite personne leur a
donné des instructions d’emploi pour l’appareil.
Chauffer les biberons et les petits pots
1. Branchez la fiche secteur du chauffe-biberons dans une prise de courant.
2. Retirez le récipient de mesure du support (voir Fig. 1).
3. Remplissez le récipient de mesure en versant exactement la quantité d’eau
correspondant au tableau suivant :
Attention !
Utilisez toujours le récipient de mesure pour le remplissage, sinon le
chauffe-biberons risque de déborder et l’appareil d’être endommagé.
Remarque : selon la température de départ, la quantité et la nature des aliments
pour bébés, la température atteinte peut être quelque peu différente.
4. Versez la quantité d’eau mesurée dans le récipient interne du chauffe-biberons (voir Fig. 2).
Attention !
Si vous utilisez une trop grande quantité d’eau, les aliments seront chauffés
trop longtemps et leur température risque d’être trop chaude pour votre bébé.
5. Pour chauffer les
biberons NUK standards
, posez la bague sur l’ouverture du
chauffe-biberons (voir Fig. 3a). La bague permet de stabiliser le biberon.
Le
biberon NUK First Choice
et le
pot de conservation NUK
sont placés sans
bague ni petit panier dans le chauffe-biberons (voir Fig. 3b).
Pour chauffer les
petits pots
, placez d’abord le petit panier sans bague dans le chauffe-
biberons. Enlevez le couvercle des petits pots et posez-les ensuite dans le petit panier
(voir Fig. 3c).
6. Mettez le chauffe-biberons en marche. Pour cela, activez l’interrupteur en poussant vers
le bas
(voir Fig. 3d)
. L’interrupteur s’allume.
Remarque :
l’appareil ne peut pas être éteint à l’aide de l’interrupteur. L’appareil
s’éteint automatiquement à la fin du cycle de chauffe. Il est possible d’éteindre l’appareil
avant la fin du cycle en débranchant la fiche secteur.
Attention !
Tenez vos mains à l’écart de la vapeur d’eau bouillante produite par le
chauffe-biberons. Pendant que l’appareil chauffe ou lorsqu’il est rempli d’eau bouillante,
ne le déplacez pas.
7. Les aliments pour bébés sont chauffés grâce à la vapeur d’eau. Dès que l’eau est
transformée en vapeur et que les aliments sont dès lors chauffés, le chauffe-biberons
s’éteint automatiquement. Le témoin de l’interrupteur s’éteint.
8. Retirez avec précaution le biberon ou le petit pot du chauffe-biberons.
Attention !
Ne touchez pas la plaque chauffante située à l’intérieur du chauffe-
biberons.
9. Afin que la chaleur se répartisse de manière uniforme, secouez le biberon fermé ou
remuez les aliments pour bébés dans le petit pot.
Important !
Avant de nourrir votre bébé, vérifiez que la température des aliments
n’est pas trop chaude pour lui.
Astuce :
si les aliments pour bébés ne sont pas suffisamment chauds, versez un peu
plus d’eau dans le chauffe-biberons la prochaine fois que vous chaufferez le biberon ou
le petit pot. Si les aliments pour bébés sont trop chauds, versez un peu moins d’eau
dans le chauffe-biberons la prochaine fois que vous chaufferez le biberon ou le petit pot.
10. Lorsque le cycle de chauffe est terminé, attendez quelques minutes jusqu’à ce que le chauffe-
biberons soit refroidi et qu’il puisse être à nouveau mis en marche avant de le réutiliser.
11. N’oubliez pas de débrancher la fiche secteur après chaque utilisation.
Nettoyage et entretien
Il suffit de nettoyer de temps en temps le boîtier et le récipient interne avec un chiffon
humide et quelques gouttes de produit de vaisselle. Pour cela, débranchez toujours la fiche
secteur de la prise de courant et nettoyez l’appareil uniquement lorsqu’il est refroidi.
Avertissement :
n’immergez jamais l’appareil dans l’eau et ne le nettoyez pas dans le lave-
vaisselle. N’utilisez aucun produit d’entretien corrosif, aucun agent abrasif ni aucune éponge
à récurer. Ils risquent d’endommager la surface de l’appareil ou l’appareil lui-même.
Vous pouvez nettoyer le récipient de mesure, le petit panier et la bague dans le lave-
vaisselle. Vous pouvez également nettoyer les éléments à la main dans de l’eau chaude
savonneuse, les rincer à l’eau claire et, ensuite, les sécher.
Détartrage
Remarque :
n’utilisez aucun détartrant usuel.
Après un certain temps, un dépôt de calcaire se forme dans le récipient intérieur du
chauffe-biberons en raison du cycle de chauffe (selon la dureté de l’eau de robinet utilisée
dans votre région). Vous devez éliminer le calcaire à des intervalles réguliers afin de garantir
la capacité de fonctionnement de l’appareil.
1. Pour le détartrage, débranchez le chauffe-biberons.
2. Mélangez 100 ml d’eau bouillante avec 100 ml de vinaigre blanc et versez le tout dans le
chauffe-biberons. Laissez agir la solution pendant 30 minutes et ensuite jetez-la.
3. Rincez le chauffe-biberons à l’eau claire et séchez-le correctement.
Avertissement :
si des réparations s’avèrent nécessaires, ne tentez en aucun cas d’ouvrir
l’appareil, mais adressez-vous à votre service après-vente. Sinon la garantie ne sera pas
appliquée. Cela vaut également pour le remplacement du cordon d’alimentation.
Elimination
Le symbole de la poubelle sur roues barrée d’une croix signifie que le produit doit faire
l’objet d’une collecte sélective au sein de l’Union européenne. Cela s’applique au produit
ainsi qu’à tous les accessoires marqués de ce symbole. Les produits portant ce symbole ne
peuvent pas être mis au rebut dans les déchets ménagers, mais ils doivent être remis à un
point de collecte pour le recyclage des appareils électriques et électroniques. Le recyclage
permet de réduire la consommation de matières premières et la pollution de l’environne-
ment.
Caractéristiques techniques
Tension 230 V ~ 50 Hz
Puissance absorbée : 300 Watt
Certificats de sécurité : GS (Sécurité contrôlée) / CE
Biberon / petit pot
Quantité d’eau nécessaire
Te mpérature ambiante Température du réfrigérateur
Biberon de 125 ml
8 ml 12 ml
Biberon de 150 ml
9 ml 12 ml
Biberon de 250 ml
10 ml 14 ml
Biberon de 300 ml
10 ml 14 ml
Petit pot de 130 g
10 ml 18 ml
Petit pot de 190 g
12 ml 20 ml
Cari genitori,
lo scaldabiberon NUK porta biberon e vasetti alla temperatura corretta. Il suo uso è molto
semplice. Queste istruzioni vi spiegano tutto quello che c’è da sapere. Leggere
attentamente le istruzioni prima di utilizzare lo scaldabiberon per la prima volta.
NUK augura sempre buon appetito al vostro bambino!
Per la vostra sicurezza
•Durante la fase di riscaldamento i biberon ed i vasetti non devono essere chiusi,
potrebbe esserci pericolo di sovrappressione (rischio di esplosione/danni ai materiali).
•Utilizzare l’apparecchio solo per riscaldare alimenti da neonato in ambito domestico.
L’uso improprio cela potenziali fonti di pericolo per l’utente.
• La tensione della rete e l’indicazione della tensione sul lato inferiore dell’apparecchio
devono corrispondere.
• Installare lo scaldabiberon in modo che si trovi in una posizione stabile e verticale e che
non possa essere ribaltato dal vostro bambino o che non possa essere fatto cadere dal
tavolo o dal piano della cucina tirando il cavo.
• Lo scaldabiberon offre la massima sicurezza. Tuttavia, non lasciarlo mai incustodito e
non lasciarlo mai maneggiare dal proprio bambino. Lo scaldabiberon non è un gioco.
•L’apparecchio non deve essere posizionato sul piano di cottura caldo, nel forno caldo o
in prossimità di scaldaacqua a gas e a riscaldamento diretto.
•Il cavo non deve venire a contatto con acqua o con un piano di cottura.
•Il contenitore graduato non deve essere utilizzato per la misurazione del cibo.
• In caso di azionamento accidentale dell’interruttore a spina disinserita, l’apparecchio si
spegne automaticamente dopo un breve attimo dopo l’inserimento della spina.
• In caso di difetti riconoscibili dell’apparecchio, del cavo o della spina, lo scaldabiberon
non deve essere messo in funzione.
• Se il cavo di rete è danneggiato, per evitare pericoli deve essere sostituito dal
produttore, dal relativo servizio di assistenza clienti o da una persona parimenti
qualificata.
•Il seguente apparecchio non deve essere utilizzato da persone (compresi i bambini) con
capacità fisiche, sensoriali o mentali ridotte o che non abbiano una sufficiente
esperienza e/o dimestichezza con lo stesso, a meno che non siano scrupolosamente
sorvegliati da persone competenti o non abbiano ricevuto chiare istruzioni di come
utilizzarlo.
Riscaldamento di biberon e vasetti
1. Collegare lo scaldabiberon con la spina alla presa.
2. Estrarre il contenitore graduato dal supporto (vedere la Fig. 1).
3. Riempire il contenitore graduato esattamente con la quantità d’acqua corrispondente
alla seguente tabella:
Attenzione!
Per riempire, utilizzare sempre il contenitore graduato per evitare che lo
scaldabiberon trabocchi e che l’apparecchio si danneggi.
Avvertenza: a seconda della temperatura iniziale, della quantità e del tipo di
alimento, la temperatura raggiunta può essere di volta in volta diversa.
4. Versare la quantità d’acqua misurata nel recipiente interno dello scaldabiberon (vedere
la Fig. 2).
Attenzione!
Se si utilizza troppa acqua, il cibo viene riscaldato troppo a lungo e la sua
temperatura può risultare eccessiva per il bambino.
5. Per riscaldare
biberon standard NUK
, applicare l'anello sull'apertura dello
scaldabiberon (vedere la Fig. 3a). Il biberon si stabilizza con l’anello.
Il biberon
NUK First Choice
e il
contenitore per latte materno NUK
possono
essere inseriti nello scaldabiberon senza anello e cestello (vedere la Fig. 3b).
Per riscaldare
vasetti
, posizionare prima il cestello senza anello nello scaldabiberon.
Togliere poi il coperchio del vasetto e inserire quest’ultimo nel cestello (vedere la Fig. 3c).
6. Accendere lo scaldabiberon. A questo scopo, premere l’interruttore verso il basso
(vedere la Fig. 2). L’interruttore si accende.
Avvertenza:
l’apparecchio non può essere spento con l’interruttore. L’apparecchio si
spegne automaticamente al termine del ciclo di riscaldamento. Per disinserire
l’apparecchio prima del termine del tempo di riscaldamento, staccare la spina.
Attenzione!
Tenere lontane le mani dal vapore acqueo caldo dello scaldabiberon. Non
spostare lo scaldabiberon mentre si riscalda o quando è pieno di acqua calda.
7. Il cibo si riscalda per effetto dell'acqua di evaporazione. Non appena l’acqua è evaporata
e il cibo si è quindi riscaldato, lo scaldabiberon si spegne automaticamente. La luce
dell’interruttore si spegne.
8. Togliere il biberon o il vasetto dallo scaldabiberon prestando attenzione.
Attenzione!
Non toccare la piastra riscaldante calda dello scaldabiberon.
9. Affinché il calore si distribuisca uniformemente, agitare il biberon chiuso o mescolare il
cibo nel vasetto.
Importante!
Prima di dare da mangiare al bambino, assicurarsi che la temperatura del
cibo non sia eccessiva per il bambino stesso.
Suggerimento:
se il cibo non si scalda a sufficienza, per il ciclo di riscaldamento
successivo inserire più acqua nello scaldabiberon. Se il cibo si scalda eccessivamente,
per il ciclo di riscaldamento successivo inserire meno acqua nello scaldabiberon.
10. Al termine del riscaldamento, prima di riutilizzare l’apparecchio attendere alcuni minuti
per lasciare raffreddare lo scaldabiberon in modo che possa essere riacceso.
11. Non dimenticare di staccare la spina dopo ogni uso.
Pulizia e manutenzione
Basta pulire saltuariamente l’alloggiamento e il recipiente interno con un panno inumidito e
poco detersivo. A questo scopo, staccare sempre la spina dalla presa e pulirla solo nello
stato raffreddato.
Avvertenza:
non immergere mai l’apparecchio in acqua e non lavarlo nella lavastoviglie.
Non utilizzare detersivi aggressivi e agenti o spugne abrasivi, per evitare di danneggiare la
superficie o l'apparecchio.
Il contenitore graduato, il cestello e l’anello possono essere lavati in lavastoviglie. In
alternativa, i componenti possono essere lavati a mano con acqua saponata tiepida e
successivamente risciacquati con acqua pulita e asciugata.
Decalcificazione
Avvertenza:
non utilizzare decalcificanti comuni.
Dopo qualche tempo, il processo di riscaldamento comporta il deposito di calcare nel
recipiente interno dello scaldabiberon (a seconda del grado di durezza dell’acqua potabile
utilizzata). Eliminare il calcare a intervalli regolari per assicurare la funzionalità
dell’apparecchio.
1. Per l’eliminazione del calcare, staccare lo scaldabiberon dall'alimentazione elettrica.
2. Miscelare 100 ml di acqua calda con 100 ml di aceto da cucina bianco e versarli nello
scaldabiberon. Lasciare agire la soluzione per 30 minuti e quindi svuotare lo
scaldabiberon.
3. Risciacquare lo scaldabiberon con acqua pulita e lasciarlo asciugare bene.
Avvertenza:
qualora dovessero essere necessarie riparazioni, non cercare mai di
aprire l'apparecchio ma rivolgersi al servizio di assistenza tecnica, pena l’estinzione della
garanzia. Questo vale anche per la sostituzione del cavo di collegamento elettrico.
Smaltimento
Il simbolo del cassone portarifiuti su ruote cancellato significa che il prodotto deve essere
smaltito in una discarica separata nell’Unione Europea.
Questo vale per il prodotto e per tutti gli accessori muniti di questo simbolo. I prodotti
contrassegnati non devono essere smaltiti insieme ai normali rifiuti domestici, ma devono
essere consegnati presso un punto di raccolta per il riciclaggio di apparecchi elettrici ed
elettronici. Il riciclaggio contribuisce a ridurre il consumo di materie prime e a salvaguar-
dare l'ambiente.
Specifiche tecniche
Tensione: 230 V ~ 50 Hz
Potenza assorbita: 300 Watt
Certificati di sicurezza: GS / CE
Biberon/vasetto
Quantità d’acqua necessaria
Te mperatura ambiente Temperatura frigorifero
Biberon da 125 ml
8 ml 12 ml
Biberon da 150 ml
9 ml 12 ml
Biberon da 250 ml
10 ml 14 ml
Biberon da 300 ml
10 ml 14 ml
Vasetto da 130 g
10 ml 18 ml
Vasetto da 190 g
12 ml 20 ml
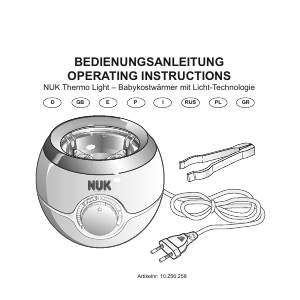
Bitte beachten Sie auch die anderen Produkte aus dem
NUK-Programm, zum Beispiel die
NUK Flaschenbürste 2 in 1
In der Babyküche ist an alles gedacht. Zur gründlichen Vorreinigung von Saugern
und Flaschen hilft Ihnen die NUK Flaschenbürste 2 in 1 - durch ein sich
anpassendes Bürstenprofil und formstabile Borsten.
Praktisch: die Saugerbürste wird direkt in den Griff der Flaschenbürste
eingeclipst und geht nicht mehr verloren. Das Luftloch im Griff der
Flaschenbürste ermöglicht eine schnelle Trocknung der Saugerbürste.
Mit Aufhängevorrichtung am Bürstengriff.
Erhältlich in 2 attraktiven Farben.
Please also bear in mind the other products from the
NUK range, for example the
NUK Bottle Brush 2 in 1
NUK has thought of everything required for the baby household. The NUK
Bottle Brush 2 in 1 is ideal for thorough cleaning of teats and bottles – with its
rigid bristles and a flexible brush profile.
Practical design: The teat brush clips directly into the handle of the bottle brush
for secure storage.
The air hole in the handle of the bottle brush helps the teat brush dry quickly.
The brush handle has a hook for easy storage.
Available in 2 attractive colours.
Contact addresses
DE – GERMANY
MAPA GmbH
Industriestraße 21-25
27404 Zeven
+49 180 1 62 72 46
(0,04 EUR/Min. aus dem Festnetz,
Mobilfunk max. 0,42 Euro/Minute)
ES – SPAIN
Roche Diagnostics, S.L.
Av. Generalitat, s/n
E-08174 Sant Cougat del Vallès
Barcelona
FR - FRANCE
Allègre Puériculture SAS
41, Rue Eduard Martel
B.P. 197
42013 Saint Etienne, Cedex 2
+33 477 81 81 81
GB - GREAT BRITAIN
Mapa Spontex UK Ltd.
Berkeley Business Park
Wainwright Road
Worcester WR4 9ZS
0845 300 2467
GR - GREECE (South)
ΑΦΟΙ Κ. ΤΖΕΒΕΛΕΚΟΥ Ο.Ε.
Θράκης 34
171 21 Ν. Σµύρνη
Αθήνα
210 93 22 165
Φαξ: 210 93 50 870
GR - GREECE (North)
ΦΑΡΜΑΠΟ ΕΕ-Χ.ΤΖΗΜΟ & ΣΙΑ
30 ΧΛΜ ΘΕΣ/ΝÏΚΗΣ-ΚΑΛΟΧΩΡΙΟΥ
ΤΘ 291 - ΚΑΛΟΧΩΡÏ 57009
2310 751 525
Φαξ: 2310 789 621
IT - ITALY
MAPA GmbH
Industriestraße 21-25
D-27404 Zeven
Germania
PT - PORTUGAL
Roche Sistemas de Diagnósticos
Lda. Estrada Nacional, 249-1
2720-413 Amadora
21 425 70 00
Fax: 21 417 28 95
RU – RUSSIA
A..
. .16 . 2
391-392
117 292
www.nuk-baby.ru
☎
☎
☎
☎
☎
☎
Babykostw rmer Seite 1 Montag, 28. M rz 2011 2:51 14


Join the conversation about this product
Here you can share what you think about the NUK Thermo Rapid Bottle Warmer. If you have a question, first carefully read the manual. Requesting a manual can be done by using our contact form.
reply | This was helpful (47) (Translated by Google)
reply | This was helpful (15) (Translated by Google)
reply | This was helpful (0) (Translated by Google)
reply | This was helpful (0) (Translated by Google)