
RIDING AT NIGHT
While a Pro 3600 DIY lighting system will improve your view, control
and enjoyment of night riding, please remember that cycling at night
is an inherently dangerous activity. In addition to using your lighting
system properly and riding with extreme caution, NiteRider™ urges
you to:
• Never ride alone
• Always let someone know where you are going
• Wear a helmet and reective clothing
• Carry an auxiliary light and emergency supplies
• Make sure the headlamp, mounting bracket
and battery are securely fastened
• Always disconnect the battery from the headlamp
when transporting the light system
PROTECTING YOUR INVESTMENT
Properly charge your battery to maximize its lifespan (see the
“Battery Charging and Care” section for detailed information).
The Pro 3600 DIY will perform in wet weather conditions, but
submerging it in water will damage the system.
SUPPORT
If you experience diculties during product installation or operation,
NiteRider™ provides free telephone support on weekdays from
8:00 am to 4:30 pm (Pacic Time) at 800.466.8366, Ext 4.
You may also e-mail us at support@niterider.com.
WARRANTY
NiteRider™ stands behind its products with the following warranties:
• Lifetime warranty on all mechanical components
• 2 Years on electrical components
• 1 Year on rechargeable batteries
To obtain warranty service, it is preferable to have your original
sales receipt. Contact the NiteRider™ Customer Service
Department at 800.466.8366, Ext. 4 to obtain a Return Merchandise
Authorization (RMA) number. The RMA number
must be prominently displayed on the outside of your package.
The product must be properly packaged to prevent damage
in transit.
For complete warranty information, please visit our website at
www.NiteRider.com.
NiteRider™ Technical Lighting Systems, Inc.
8295 Aero Place, Suite 200
San Diego, CA 92123
www.NiteRider.com
Using the D.I.Y. Software
1. From the “O” position, press and hold the power button for 6
seconds to enter the Program Select Mode. The number of lit LED’s
will identify the Program currently being used.
- One LED lit red indicates the factory setting Program.
- One LED lit green indicates Program-1.
- The second LED from the left lit green indicates Program-2.
- The third LED from the left lit green indicates Program-3.
- All four LED’s lit green indicates Program-4.
2. Cycle through the ve (5) Programs by pressing and releasing
the power button.
3. To select a Program, press and hold the power button until all
lit LED’s begin to blink rapidly 5 times. Once a Program has been
selected, the light will operate under that.
Program specications. Before shipping, NiteRider has initialized
the memory for the 4 additional operating Programs
with factory settings.
Power Button Uses
The power button, located on the top of the headlamp, is used to
turn the light on, change light and ash levels, turn the light o and
access the Program Select mode.
• Light On
- Press and release the power button to turn the light on.
- Cycle through the brightness levels by pressing and releasing
the power button.
• Flash
- To access ash mode press and hold the power button for
greater than 3 seconds.
- Cycle through the ash patterns by pressing and releasing
the power button.
• Light Off
- To turn the light o while in either normal light or ash mode,
press and hold the power button for greater than 1 and less
than 3 seconds.
• Program Mode
- From the “O” position, press and hold the power button for
6 seconds to enter the ProgramSelect Mode.
FACTORY SETTINGS
Factory settings are locked and cannot be changed. The Pro 3600
DIY factory settings include 3 light levels and the one ash pattern.
See table below.
RUN TIMES* - FACTORY SETTINGS
Low 6:00h 1000 Lumens
Med 3:30h 1800 Lumens
High 1:30h 3600 Lumens
Flash >16:30h
Race** 16:30h 450 Lumens
*Run times are approximations and will vary.
**Race mode is intended for endurance races.
THERMAL STEP DOWN
If the Pro 3600 DIY headlamp is used in a static air environment,
such as bench testing, heat retention, due to inadequate airow,
may cause the light output to “step down” to a lower level to avoid
damage. In rare cases of extreme heat retention the light will power
o to protect the LED’s from overheating. Use a fan if bench testing
the light in a static air environment.
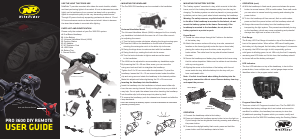
DOCKING STATION
The Docking Station has two uses.
1. To recharge the Pro Series Li-Ion battery.
2. To download Programs from the D.I.Y Software to the headlamp
BATTERY CHARGING AND CARE
Battery Recharging
A Pro 3600 DIY (8-cell, 7.4v, 11.6Ah, Li-Ion) will fully charge
in 5:00 hours.
1. Plug the AC Adapter into the Docking Station and then into
the wall socket. The “Power” indicator on the docking station will
illuminate solid red.
2. Place the battery into the Docking Station. The “Battery”
indicator will illuminate solid blue indicating contact and that
the battery is ready to charge. A blinking yellow indicator
signies the battery is out of the permissible temperature range
for charging.
3. Status of the 5-step charging process is displayed on the front
panel of the Docking Station.
4. When the battery is fully charged the “Charged” indicator will
illuminate solid green and charging will shut o automatically.
5. Leaving the battery in the Docking Station indenitely will not
harm the battery. Every 24-hours the Docking Station will test
the battery level and apply a charge if required.
Warning: If the “Batt Error” indicator illuminates solid red,
contact NiteRider Customer Service for assistance.
D.I.Y. SOFTWARE
The latest version of the D.I.Y Software is available to download at
www.niteriderservices.com
The software runs under Windows 2000 and above. For detailed
information on the software please refer to the “D.I.Y. Pro LED Series
Software Guide”.
DOWNLOAD PROGRAMS FROM THE D.I.Y. SOFTWARE
To download Programs from the D.I.Y. Software, the Docking
Station must be powered by a wall outlet, the Docking Station must
be connected to the host computer and the headlamp must be
connected to the Docking Station.
1. Plug the AC Adapter into the Docking Station and then into
the wall socket. The “Power” indicator on the docking station
will illuminate solid red.
2. Plug one end of the USB Cable into the Docking Station and
the other end into the USB port of a computer. The “USB/PC”
indicator will illuminate solid yellow.
3. Connect the Pro 3600 DIY headlamp to the Docking Station.
The “Headlamp” indicator will illuminate solid yellow.
4. Click the “Update” button on the D.I.Y. Software control panel
to initiate transmission of Programs to the headlamp. Refer to
the “D.I.Y. Pro LED Series Software Guide” for detailed
information on the software features and how they function.
5. Both the “USB/PC” and “Headlamp” indicators will blink
indicating Programs are being downloaded through the Docking
Station and into the headlamp.
6. With a successful download, the headlamp LED indicator
changes from red to green.
Warning: Disconnecting the headlamp from the Docking Station,
or the Docking Station from the computer, or disrupting power
to the Docking Station while transmitting Programs from the
D.I.Y. Software will create a problem. The headlamp will either
not operate or operate unpredictably. To correct this situation,
disconnect power to the Docking Station, wait 10 seconds, then
reconnect power. The D.I.Y. Software and Docking Station will
reconnect, then repeat the downloading process.
BRETT TIPPIE
MTB Hall of Fame Inductee

Join the conversation about this product
Here you can share what you think about the NiteRider Pro 3600 DIY Remote Bicycle Light. If you have a question, first carefully read the manual. Requesting a manual can be done by using our contact form.