
P20UV V2
• 3 User Modes Selectable
• Innovative Power Indicator
• STROBE READY™ Technology
White + UV Dual Output
Tactical Flashlight
Warranty Service
All NITECORE
®
products are warranted for quality. Any DOA /
defective product can be exchanged for a replacement through a local
distributor/dealer within 15 days of purchase. After that, all defective
/ malfunctioning NITECORE
®
products can be repaired free of charge
within 60 months from the date of purchase. Beyond 60 months, a
limited warranty applies, covering the cost of labor and maintenance,
but not the cost of accessories or replacement parts.
The warranty will be nullied if
1. the product(s) is/are broken down, reconstructed and/or modied by
unauthorized parties;
2. the product(s) is/are damaged due to improper use; (e.g. reversed
polarity installation)
3. the product(s) is/are damaged due to battery leakage.
For the latest information on NITECORE
®
products and services, please
contact a local NITECORE
®
distributor or send an email to service@
nitecore.com
※ All images, text and statements specied herein this user manual are
for reference purpose only. Should any discrepancy occur between
this manual and information specied on www.nitecore.com, Sysmax
Innovations Co., Ltd. reserves the rights to interpret and amend the
content of this document at any time without prior notice.
SYSMAX Innovations Co., Ltd.
TEL: +86-20-83862000
FAX: +86-20-83882723
Web: www.nitecore.com
Address:Unit6355,5/F,
No.1021GaopuRoad,
TianheDistrict,Guangzhou,
510653,Guangdong,China
Please find us on facebook : NITECORE Flashlight
Thanks for purchasing NITECORE!
P110720UV22
Made in China
Features
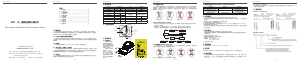
Specications
Accessories
Battery Options
Technical Data
Battery Installation
• White + UV Dual Output Tactical Flashlight specially designed for patrol
inspection, mine exploitation, forensic science as well as gemological
appraisal, document examination and currency detection
• The white light utilizes a CREE XP-L2 V6 LED with a max output of 1,000
lumens
• The UV light utilizes 4 x UV LEDs (320mW, wavelength 365nm)
• Utilizes an OP reector for a wide range ood beam
• Highly ecient constant current circuit provides a stable output for up to
46 hours
• Dual tail switches enable intuitive operations for tactical applications
• STROBE READY™ Technology to enable a quick access to STROBE Mode
(Patent No.: ZL201320545349.4)
• 3 easily selectable user modes available
• The power indicator on the tail cap indicates the remaining battery power
• Anti-impact reverse polarity protection mechanism specially designed for
shooting sports
• Stainless steel clip with titanium coating included
• Strike bezel uses high strength silicon nitride ceramics to enable excellent
glass breaking performance
• Optical lenses with double-sided scratch resistant coating
• Constructed from aero grade aluminum alloy
• HA III military grade hard-anodized nish
• Waterproof and dustproof rating in accordance with IP68
(2 meters submersible)
• Impact resistant to 1 meter
Length: 151.2mm (5.95")
Head Diameter: 31.8mm (1.25”)
Tube Diameter: 25.4mm (1”)
Tail Diameter: 26mm (1.02”)
Weight: 133.5g (4.71oz)
Tactical Holster NTH20, Clip,
Lanyard, Spare O-ring, CR123
Battery Magazine
Type Nominal Voltage Compatibility
18650 Rechargeable Li-ion
Battery (Button-topped)
18650 3.6V/3.7V Y (Recommended)
Primary Lithium Battery CR123 3V Y (Recommended)
Rechargeable Li-ion Battery RCR123 3.6V/3.7V Y (Compatible)
18650 Rechargeable Li-ion
Battery (Flat-topped)
18650 ─ N (Incompatible)
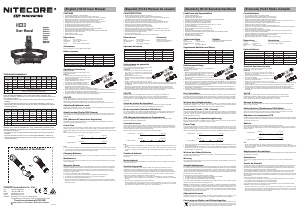
FL1
STANDARD
HIGH
MID
LOW UV STROBE
(Mode 3) (Mode 2)
1,000
Lumens
330
Lumens
180
Lumens
60
Lumens
320mW
1,000
Lumens
2h 30min 7h 16h 46h 27h ─
164m 94m 69m 41m ─ ─
6,700cd 2,230cd 1,200cd 430cd ─ ─
1m (Impact Resistance)
IP68, 2m (Waterproof and Submersible)
Note: The stated data is measured in accordance with the international
ashlight testing standards ANSI/PLATO FL1-2019, using 1 x 18650 Li-ion
battery (3,500mAh) under laboratory conditions. The data may vary in real
world use due to dierent battery usage or environmental conditions.
(English) P20UV V2 (Deutsch) P20UV V2
(Francais)
P20UV V2
Operating Instructions
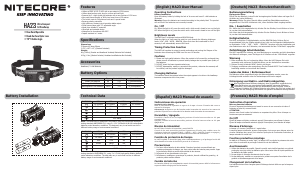
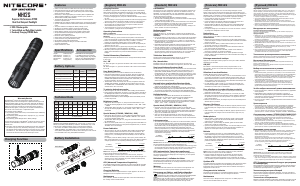
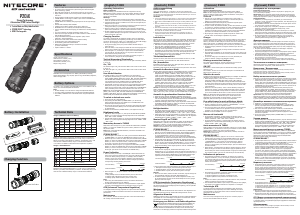
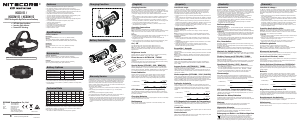
Battery Installation
Insert the battery(s) as illustrated and screw to tighten the tail cap.
Note: After the battery insertion, the power indicator beside the tail
switches will ash to indicate the remaining power. Please refer to the “Power
Indication” section of this manual for more details.
Warnings:
1. Ensure the battery(s) is/are inserted with the positive end towards the
head. The product will not work if the battery(s) is/are incorrectly inserted.
2. Please use the battery magazine when using 2 x CR123 batteries to avoid
battery rattling and to ensure a stable contact.
3. CAUTION! Possible dangerous radiation! Don't look into the light! May be
dangerous for your eyes.
4. When the power level is low, please stop using the product and replace or
recharge the battery to prevent damage to the battery.
5. When the product is kept in a backpack or left unused for prolonged time,
please remove all batteries to prevent accidental activation or battery
leakage.
Tactical Momentary Illumination
Half press and hold the Power Button to turn on the light momentarily.
Release to turn it o.
On / O
On: When the light is o, press the Power Button until a click sound is heard
to turn it on.
O: When the light is on, press the Power Button until a click sound is heard
to turn it o.
User Mode Selection
The P20UV V2 provides 3 user modes for dierent users and situations.
• Tactical Mode (Mode 1):
In this user mode, only the HIGH Level, UV and STROBE Mode are
available. It will automatically access HIGH when reactivated. When the
light is on, short press the Mode Button (STROBE READY™) to switch
between HIGH and UV.
• Law Enforcement Mode (Mode 2):
In this user mode, only 2 brightness levels (MID of 180 Lumens and
HIGH), UV and STROBE Mode are available. It will automatically access
HIGH when reactivated. When the light is on, short press the Mode Button
(STROBE READY™) to cycle through the following modes: HIGH – UV –
MID.
• Daily Mode (Mode 3, Default Setting):
In this user mode, 3 brightness levels (LOW, MID of 330 Lumens and
HIGH), UV and STROBE Mode are available. When the light is on, short
press the Mode Button (STROBE READY™) to cycle through the following
modes: LOW – MID – HIGH – UV. The P20UV V2 will memorize and re-
access the previous mode when reactivated.
Note: The P20UV V2 will automatically lower its output to avoid overheating
and prolong the lifespan of the battery when accessing the HIGH Level for
over 2.5 minutes.
Warning: DO NOT direct the UV light to the naked eyes or the skin.
To select a desired user mode:
1. Ensure the light is turned o.
2. Loosen the tail cap.
3. Keep holding the Mode Button (STROBE READY™) on the tail cap while
simultaneously tightening the tail cap.
4. Once the tail cap has been tightened, the LED will indicate a user mode
selected by ashing once for Tactical Mode, ashing twice for Law
Enforcement Mode and ashing three times for Daily Mode.
5. To cycle through all 3 user modes, please repeat the above procedures.
STROBE READY™
• When the light is o in any user mode, press and hold the Mode Button
(STROBE READY™) to access the STROBE Mode. Release to turn it o.
• When the light is on in any user mode, long press the Mode Button
(STROBE READY™) to access the STROBE Mode. Short press the Mode
Button (STROBE READY™) again to return to the previous mode.
Power Indication
When the battery is inserted, the power indicator located on the tail cap will
ash to indicate the remaining power of the battery:
1. Flashing three times indicates that the power is above 50%.
2. Flashing twice indicates that the power is below 50%.
3. Flashing once indicates that the power is near depletion.
Note: As a precise power reading is required, please ensure the P20UV V2 is
powered down for at least 20 seconds before tightening the tail cap for this
function.
Changing Batteries
The batteries should be replaced when the output appears to be dim or the
ashlight becomes unresponsive due to low power.
Maintenance
Every 6 months, threads should be wiped with a clean cloth followed by a
thin coating of silicon-based lubricant.
Bedienungsanleitung
Einsetzen der Batterien
Legen Sie die Batterien ein – wie auf der Zeichnung zu sehen – und
schrauben Sie die Heckkappe fest.
Hinweis: Nach dem Einlegen der Batterien blinkt die Stromanzeige neben
den Heckschaltern, um die verbleibende Leistung anzuzeigen. Bitte lesen Sie
den Abschnitt "Leistungsanzeige" in dieser Anleitung für weitere Einzelheiten.
WARNUNG:
1. Stellen Sie sicher, dass die Batterien mit dem positiven Pol in Richtung
Lampenkopf installiert sind. Mit falsch eingelegten Batterien wird die
P20UV V2 nicht funktionieren.
2.
Das Batteriemagazin nimmt 2 x CR123 Batterien auf und verhindert Bewegungen
der Batterien im Gehäuse. Dadurch sichert es eine stabile Energieversorgung.
3. ACHTUNG! Möglicherweise gefährliche optische Strahlung! Bei Betrieb
nicht direkt in das Licht blicken. Kann für die Augen gefährlich sein.
4. Wenn der Leistungspegel niedrig ist, stellen Sie bitte die Verwendung des
Produkts ein und tauschen Sie den Akku aus oder laden Sie ihn auf, um
Schäden am Akku zu vermeiden.
5. Wenn das Produkt in einem Rucksack aufbewahrt oder für längere
Zeit nicht benutzt wird, entfernen Sie bitte alle Batterien, um eine
versehentliche Aktivierung oder ein Auslaufen der Batterie zu verhindern.
Momentlicht
Drücken Sie den Heckschalter halb durch und halten sie ihn dort, um das
Momentlicht einzuschalten. Zum Ausschalten lassen Sie die Taste einfach los.
Ein-/Ausschalten
Einschalten: Drücken Sie den Heckschalter ganz durch, bis Sie ein
„Klickgeräusch“ hören.
Ausschalten: Drücken Sie den Heckschalter ganz durch, bis Sie erneut ein
„Klickgeräusch“ hören.
Die verschiedenen Modi
Die P20UV V2 bietet für verschiedene Benutzer und Situationen drei verschiedene Modi.
• Mode 1 - Taktischer-Mode:
In diesem Mode sind nur die Modi HIGH-Mode, UV- und STROBE-Mode
verfügbar. Beim Wiedereinschalten der Taschenlampe wird automatisch in den
HIGH-Mode geschaltet. Wenn das Licht eingeschaltet ist, drücken Sie kurz auf
die Mode-Taste (STROBE READY™), um zwischen HIGH und UV umzuschalten.
• Mode 2 - Behörden-Mode:
Dieser Mode bietet zwei Helligkeitsstufen (MID 180 Lumen und
HIGH) sowie UV- und den Strobe-Mode. Beim Wiedereinschalten der
Taschenlampe wird automatisch in den HIGH-Mode geschaltet. Wenn
das Licht eingeschaltet ist, drücken Sie kurz die Mode-Taste (STROBE
READY™), um zwischen den Modi HIGH – UV – MID zu wechseln.
• Mode 3 - Allgemeiner-Mode (Werkseinstellung):
Dieser Mode bietet drei Helligkeitsstufen: LOW, MID mit 330 Lumen und
HIGH sowie UV- und den STROBE-Mode. Wenn das Licht eingeschaltet ist,
drücken Sie kurz die Mode-Taste (STROBE READY™), um durch die Modi:
LOW – MID – HIGH – UV zu schalten. Die P20UV V2 speichert jeden der
Modi und greift erneut darauf zu, wenn sie wieder aktiviert wird.
HINWEIS: Im HIGH-Mode reduziert die P20UV V2 automatisch nach 2,5
Minuten die Ausgangsleistung, um das Überhitzen der Batterie zu vermeiden
und die Lebensdauer des Akkus zu verlängern.
WARNUNG: Richten Sie das UV-Licht NICHT auf das bloße Auge oder die Haut.
Einstellen des gewünschten Modus
1. Schalten Sie die P20UV V2 aus.
2. Lösen Sie die Heckkappe.
3. Drücken und halten Sie die Taste am Heck, während Sie die Heckkappe
gleichzeitig festziehen.
4. Ist die Heckkappe festgezogen, zeigt die P20UV V2 den ausgewählten
Mode durch Blinken an. Einmal für den taktischen Mode, zweimal für den
Behörden-Mode und dreimal für den allgemeinen Mode.
5. Zur Auswahl eines anderen Modus wiederholen Sie die Prozedur.
STROBE READY™
• Drücken und halten Sie bei ausgeschaltetem Licht die Taste am Heck
gedrückt, um in den STROBE-Mode zu schalten. Zum Verlassen des Modus
entlasten Sie die Taste einfach.
• Drücken Sie bei eingeschaltetem Licht die Taste am Heck, um in den
STROBE-Mode zu schalten. Zum Verlassen des Modus drücken Sie kurz die
Taste erneut, um in den vorherigen Mode zurück zu schalten.
Power-Tipps
Wenn Sie die Batterie/den Akku einlegen, zeigt die eingebaute Kontroll-LED
durch Blinken den verbleibenden Leistungsstand an:
a. 3-maliges Blinken für mehr als 50%.
b. 2-maliges Blinken für weniger als 50%.
c. 1-maliges Blinken für weniger als 10%.
Hinweis: Um die Batterieleistung zu überprüfen, lösen Sie bitte die
Heckkappe, warten Sie 20 Sekunden und ziehen Sie sie dann wieder fest.
Batteriewechsel / Auaden der Akkus
Die Batterien sollten ausgetauscht oder aufgeladen werden, wenn der
Lichtkegel dunkel erscheint oder wenn die Taschenlampe nicht mehr reagiert.
Wartung
Alle 6 Monate sollte das Gewinde mit einem sauberen Tuch abgewischt und
anschließend mit einer dünnen Schicht Silikonfett geschmiert werden.
Allgemeine Hinweise
Altbatterien gehören nicht in den Hausmüll. Sie können gebrauchte Batterien
unentgeltlich an unser Versandlager zurückgeben. Als Verbraucher sind Sie
zur Rückgabe von Altbatterien gesetzlich verpichtet.
Entsorgung von Elektro- und Elektronikgeräten
Die durchgestrichene Mülltonne bedeutet, dass Sie gesetzlich
verpichtet sind, diese Geräte einer vom unsortierten Siedlungsabfall
getrennten Erfassung zuzuführen. Die Entsorgung über die
Restmülltonne oder die gelbe Tonne ist untersagt. Enthalten die Produkte
Batterien oder Akkus, die nicht fest verbaut sind, müssen diese vor der
Entsorgung entnommen und getrennt als Batterie entsorgt werden.
Instructions
Insertion des batteries/piles
Insérez une batterie Li-ion comme illustré et verrouillez le capuchon.
Après insertion des batteries, l’interrupteur du capuchon va clignoter pour
informer l’utilisateur de la batterie restante. Voir plus bas.
ATTENTION
1. Assurez-vous que les batteries sont insérées avec le pôle positif (+)
pointant vers la tête de la lampe. La lampe ne fonctionnera pas si les
batteries sont insérées de façon incorrecte.
2. Le chargeur de piles est conçu pour 2 batteries Li-ion CR123, et empêche
tout mouvement des batteries dans le compartiment an de maintenir le
passage du courant.
3. ATTENTION! Rayonnement dangereux possible! Ne regardez pas dans la
lumière! Peut être dangereux pour vos yeux.
4. Lorsque le niveau de puissance est faible, veuillez arrêter d'utiliser le
produit et remplacer ou recharger la batterie pour éviter d'endommager la
batterie.
5. Lorsque le produit est stocké dans un sac à dos ou laissé inutilisé pendant
une période prolongée, veuillez retirer toutes les piles pour éviter une
activation accidentelle ou une fuite de batterie
Eclairage momentané
Pour éclairer momentanément, pressez l’interrupteur à mi-course et
maintenez. Relâchez simplement pour éteindre la lampe
ON/OFF
Pour allumer : Pressez l’interrupteur à l’extrémité de la lampe jusqu’à
entendre un clic.
Pour éteindre : Pressez une nouvelle fois l’interrupteur à l’extrémité de la
lampe jusqu’à entendre un clic.
Sélection du mode
La lampe P20UV V2 possède trois modes d’éclairage pour s’adapter aux
diérents utilisateurs et aux diérentes situations.
• Mode Tactique (mode 1) :
ce mode correspond à des éclairages haut, ultraviolet et STrobe. Il
accédera automatiquement à HIGH lorsqu'il sera réactivé. Lorsque la
lumière est allumée, appuyez brièvement sur le bouton Mode (STROBE
READY™) pour basculer entre HIGH et UV.
• Mode force de l’ordre (mode2) :
Dans ce mode utilisateur, seuls 2 niveaux de luminosité (MID de 180
Lumens et HIGH), les modes UV et STROBE sont disponibles. Il accédera
automatiquement à HIGH lorsqu'il sera réactivé. Lorsque la lumière est
allumée, appuyez brièvement sur le bouton Mode (STROBE READY™) pour
faire déler les modes suivants: HIGH - UV - MID.
• Mode Général (Mode 3) :
ce mode correspond à des éclairages Bas, moyen (330lm) , haut,
ultraviolet et strobe. Lorsque la lumière est allumée, appuyez brièvement
sur le bouton Mode (STROBE READY™) pour faire déler les modes
suivants: LOW - MID - HIGH - UV. Le P20UV V2 mémorisera et réaccédera
au mode précédent lorsqu'il sera réactivé.
Note : Le P20UV V2 réduira automatiquement sa sortie pour éviter la
surchaue et prolongera la durée de vie de la batterie lors de l'accès au
niveau HIGH pendant plus de 2,5 minutes
Attention : éviter toute exposition des yeux ou de la peau à la lumière
ultraviolette.
Pour sélectionner le mode désiré :
1. Assurez-vous que la lampe P20UV V2 est éteinte.
2. Dévissez légèrement la bague.
3. Pressez et maintenez le bouton supérieur « STROBE READY
TM
» tout en
resserrant la bague.
4. Une fois que la bague a été serrée, la lampe P20UV V2 indique qu’un
mode a été sélectionné en s’allumant une fois pour le mode Tactique, deux
fois pour le mode Forces de l’ordre et trois fois pour le mode Général.
5. Pour alterner entre ces modes, répétez simplement les étapes ci-dessus.
STROBE READY™
• Avec les batteries chargées et la lampe éteinte, pressez et maintenez
le bouton supérieur « STROBE READY
TM
» pour accéder au mode
Stroboscope et relâchez pour quitter.
• Avec la lampe allumée (quelque soit le mode), pressez et maintenez le
bouton supérieur « STROBE READY
TM
» pendant plus de 0,5 seconde
pour accéder au mode Stroboscope. Pour quitter, appuyez simplement de
nouveau sur le bouton « STROBE READY
TM
».
Batterie
Deux LEDs intégrées à l’interrupteur supérieur clignotent pour indiquer
la batterie restante lorsque la bague est resserrée après l’insertion des
batteries. Ces indicateurs lumineux clignotent trois fois si la batterie est
chargée à plus de 50% ; deux fois si elle est chargée à moins de 50% ; et
une fois si elle est presque déchargée.
Note : si les batteries sont déjà insérées et qu’une information précise sur
leur statut est désirée, assurez-vous que la lampe P20UV V2 est coupée
pendant 20 secondes avant de serrer la bague à nouveau pour faire indiquer
le statut des batteries.
Changement des batteries
Lorsque les indicateurs lumineux clignotent rapidement, les batteries ont
besoin d’être remplacées. Si l’éclairage devient faible ou ne répond plus aux
réglages, cela signie également que les batteries doivent être remplacées.
Maintenance
Tous les six mois, le letage doit être essuyé avec un chion propre et
recouvert d’un lubriant à base de silicone.
Инструкция по эксплуатации
Вставка аккумулятора
Вставьте аккумулятор(-ы), как показано на рисунке, и завинтите
торцевую крышку.
Примечание: после установки аккумулятора лампа индикатора питания,
расположенная рядом с торцевыми выключателями, будет мигать, показывая
уровень заряда аккумулятора. Для получения более подробной информации
обратитесь к разделу настоящего руководства «Индикация питания».
Предупреждения:
1. Убедитесь в том, что положительный(-е) терминал(-ы) аккумулятора(-
ов) при вставке направлен(-ы) в сторону головной части. Устройство
не будет работать, если аккумулятор(-ы) вставлен(-ы) неправильно.
2. Просьба использовать аккумуляторный магазин при применении
батарей 2 x CR123, чтобы батареи не дребезжали и был обеспечен
стабильный контакт.
3. ВНИМАНИЕ! Возможно опасное излучение! Не смотрите на световой
луч! Это может быть опасным для глаз.
4.
При низком уровне заряда следует прекратить использование изделия и
заменить или зарядить аккумулятор, чтобы предотвратить его повреждение.
5. Если устройство хранится в рюкзаке или не используется длительное
время, необходимо извлечь все аккумуляторы, чтобы предотвратить
случайное включение и утечку электролита.
Тактическое кратковременное освещение
Нажмите кнопку питания до половины и удерживайте для кратковременного
освещения. Отпустите выключатель, чтобы отключить свет.
Включение/Выключение
Включение: при выключенном свете нажмите кнопку питания до
щелчка, чтобы включить свет.
Выключение: при включенном свете нажимайте кнопку питания, пока
не услышите щелчок, чтобы выключить его.
Выбор пользовательского режима
Изделие P20UV V2 имеет 3 пользовательских режима для разных
пользователей и ситуаций.
• Тактический режим (режим 1):
в этом пользовательском режиме доступен только ВЫСОКИЙ уровень,
УФ и режим МИГАНИЯ. При повторной активации автоматически
выполняется переход в режим ВЫСОКИЙ. При включенном свете
кратковременно нажимайте на кнопку «Режим» (STROBE READY™),
чтобы переключиться между режимами ВЫСОКИЙ и УФ.
• Полицейский режим (режим 2):
в этом пользовательском режиме доступно только 2 уровня яркости
(СРЕДНИЙ на 180 люмен и ВЫСОКИЙ), а также режимы УФ и МИГАНИЕ.
При повторной активации автоматически выполняется переход в
режим ВЫСОКИЙ. При включенном свете кратковременно нажимайте
на кнопку «Режим» (STROBE READY™), чтобы последовательно
переключать между следующими режимами: ВЫСОКИЙ - УФ - СРЕДНИЙ.
• Повседневный режим (режим 3, настройка по умолчанию):
в этом пользовательском режиме доступно 3 уровня яркости (НИЗКИЙ,
СРЕДНИЙ на 330 люмен и ВЫСОКИЙ), а также режимы УФ и МИГАНИЕ. При
включенном свете кратковременно нажимайте на кнопку «Режим» (STROBE
READY™), чтобы последовательно переключать между следующими
режимами: НИЗКИЙ - СРЕДНИЙ - ВЫСОКИЙ - УФ. P20UV V2 запомнит
предыдущий режим и вернется к нему при повторном включении.
Примечание: при достижении ВЫСОКОГО уровня P20UV V2 будет
автоматически понижать мощность в течение 2,5 минут во избежание
перегрева и для продления срока службы аккумулятора.
Предупреждение: УФ-луч ЗАПРЕЩЕНО направлять в незащищенные
глаза или на кожу.
Чтобы выбрать необходимый
пользовательский режим:
1. Убедитесь, что свет выключен.
2. Ослабьте торцевую крышку.
3. Удерживайте нажатой кнопку «Режим» (STROBE READY™) на торцевой
крышке, одновременно затягивая торцевую крышку.
4. После того, как торцевая крышка будет затянута, светодиод укажет
выбранный режим пользователя, мигнув один раз для тактического
режима, мигнув дважды для полицейского режима и мигнув три раза
для повседневного режима.
5. Для последовательного переключения всех 3 пользовательских
режимов повторите вышеописанную процедуру.
STROBE READY™
• При выключенном свете в любом пользовательском режиме нажмите
и удерживайте кнопку «Режим» (STROBE READY™), чтобы перейти в
режим СТРОБОСКОП. Отпустите выключатель, чтобы отключить свет.
• При включенном свете в любом пользовательском режиме длительно
нажмите кнопку «Режим» (STROBE READY™), чтобы перейти в режим
СТРОБОСКОП. Нажмите кнопку «Режим» (STROBE READY™) еще раз,
чтобы вернуться в предыдущий режим.
Индикация уровня заряда
Когда аккумулятор вставлен, индикатор питания, расположенный на торцевой
крышке, будет мигать, указывая на оставшийся уровень заряда аккумуляторов:
1. Троекратное мигание указывает на то, что уровень заряда выше 50%.
2. Двукратное мигание указывает на то, что уровень заряда ниже 50%.
3. Однократное мигание указывает на то, что уровень заряда почти
полностью истощен.
Примечание: поскольку требуется точное считывание уровня заряда,
прежде чем затягивать торцевую крышку для этой функции, убедитесь,
что P20UV V2 был выключен не менее чем на 20 секунд.
Замена аккумуляторных батарей
Батареи необходимо заменить, если свет становится тусклым или если фонарь
перестает реагировать на нажатия кнопок из-за низкого уровня заряда.
Техническое обслуживание
Каждые 6 месяцев резьбовые соединения следует протирать чистой
тканью и наносить на них тонкий слой смазки на силиконовой основе.
(Русский) P20UV V2


Join the conversation about this product
Here you can share what you think about the Nitecore P20UV V2 Flashlight. If you have a question, first carefully read the manual. Requesting a manual can be done by using our contact form.