11
7
8
14
13
9
10
12
6
5
4
3
1
2
17
16
15
English - Description
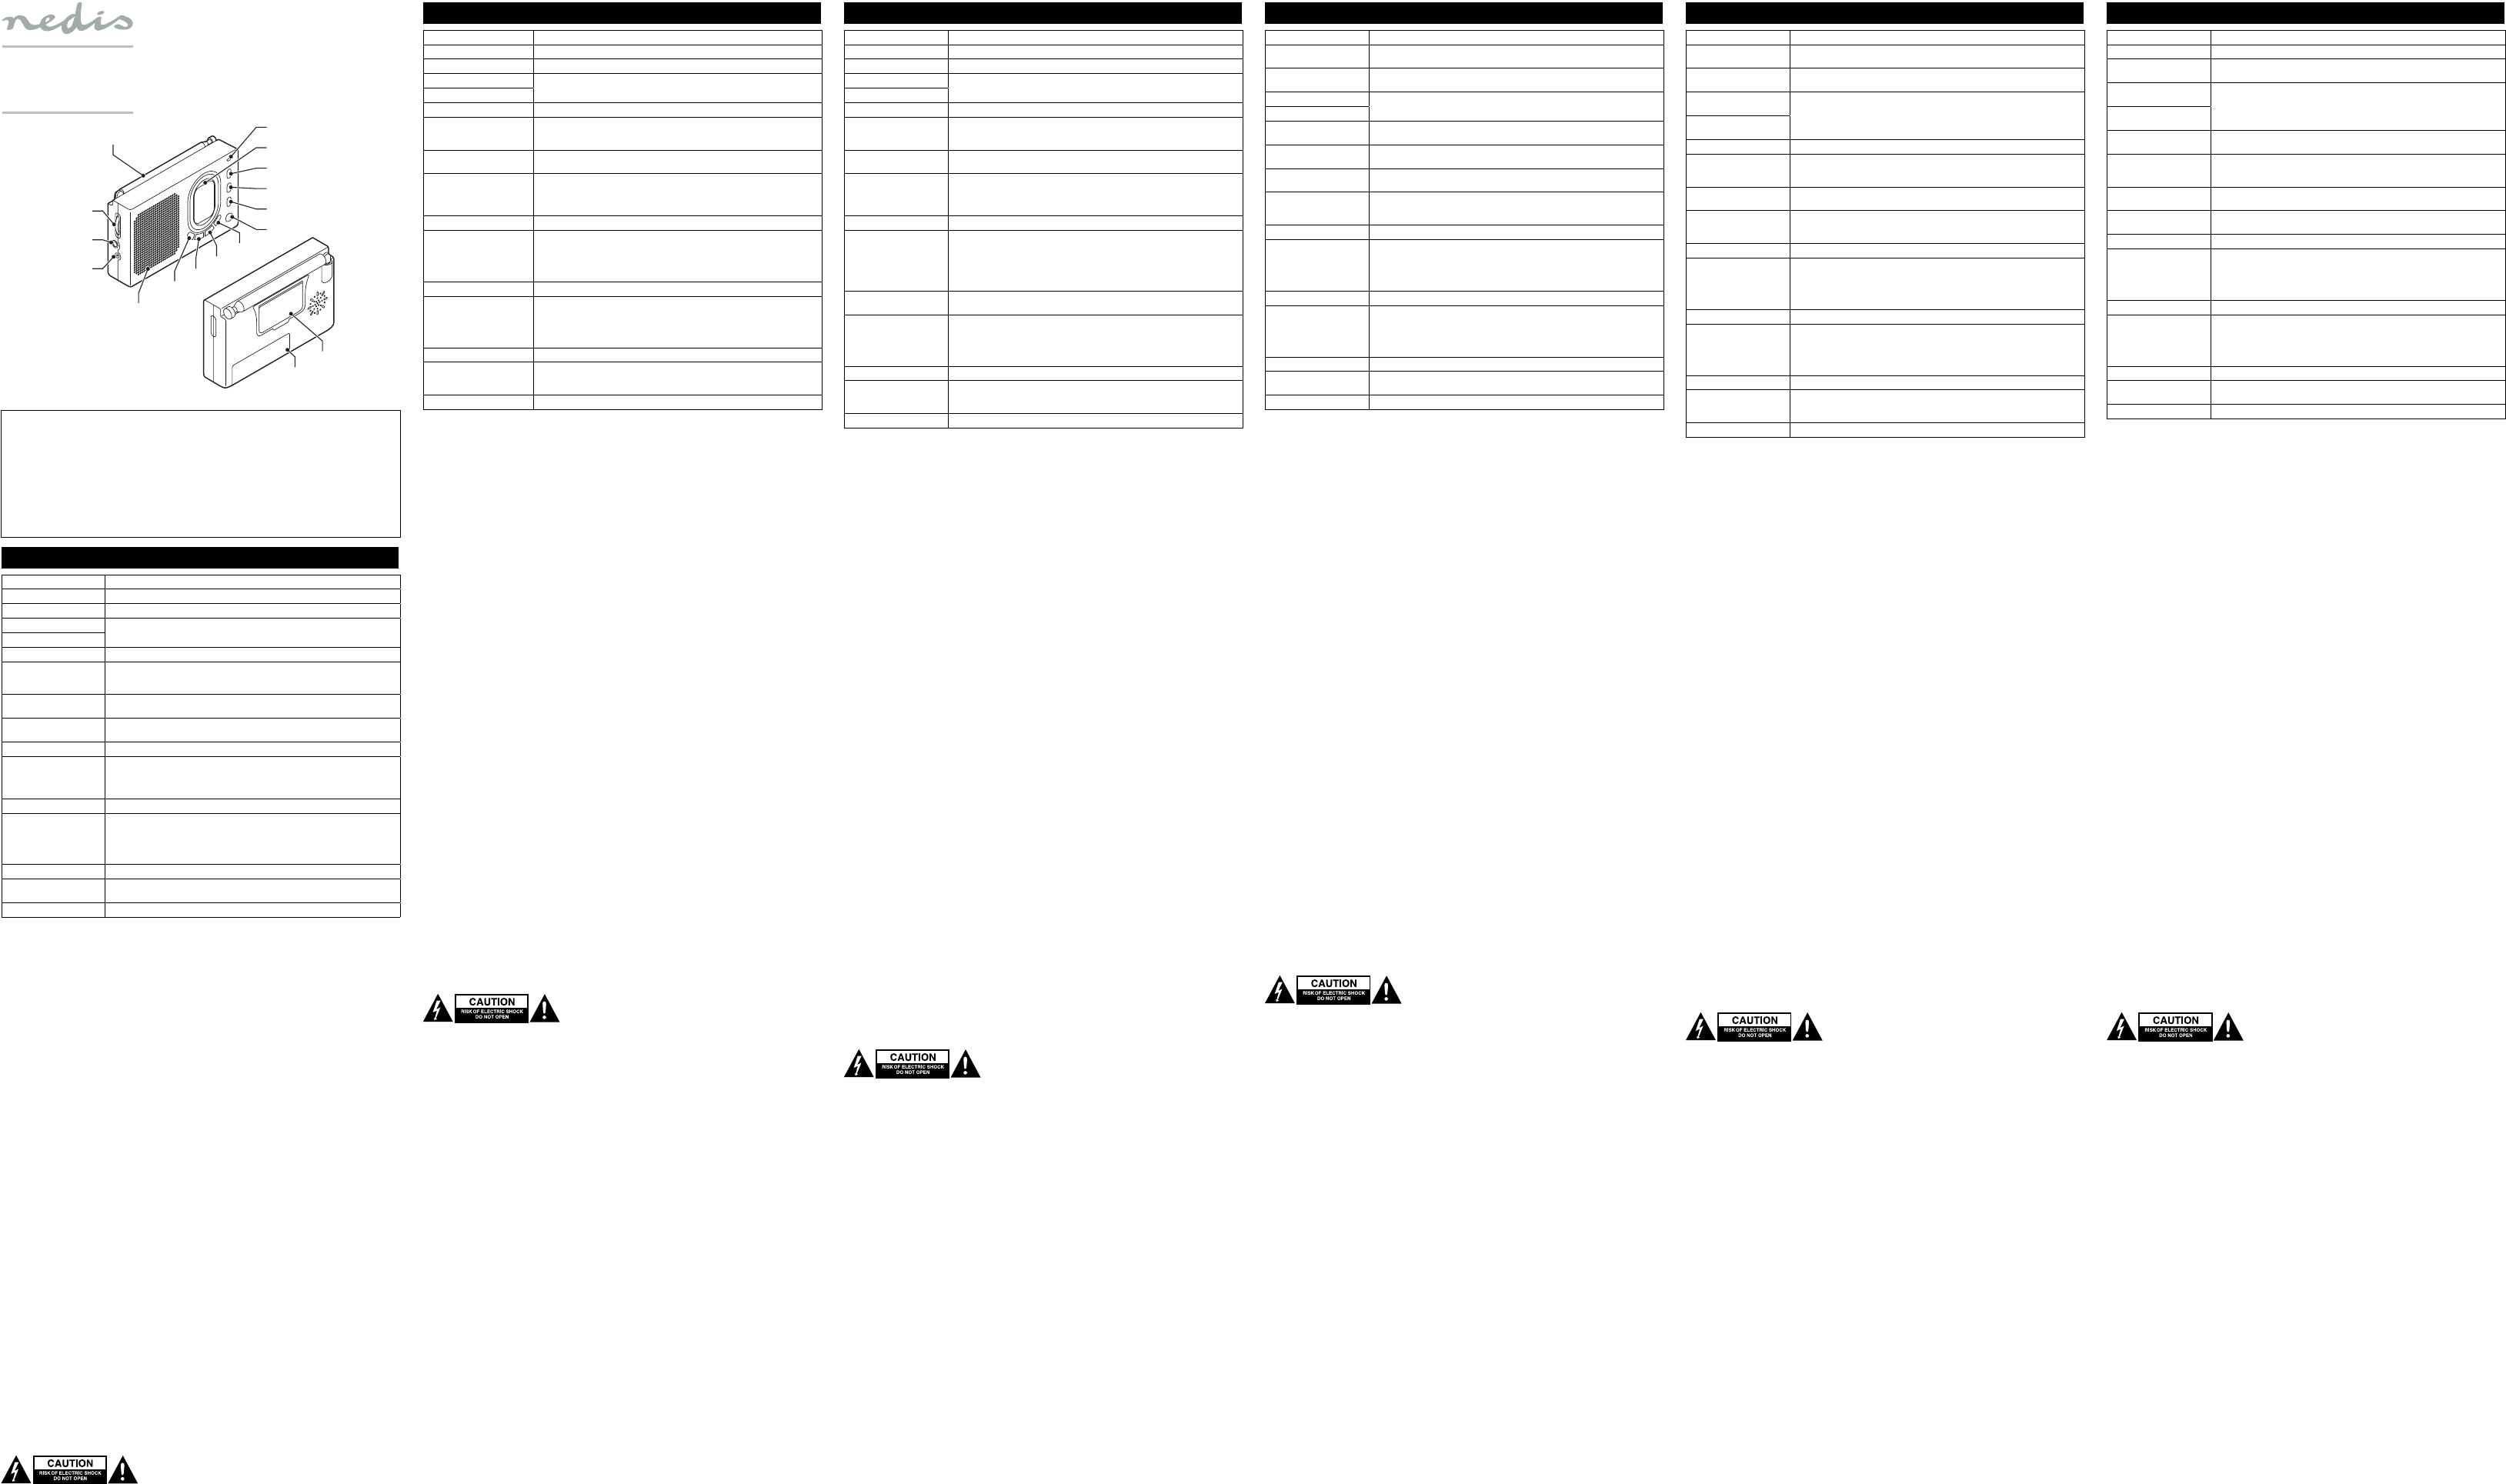
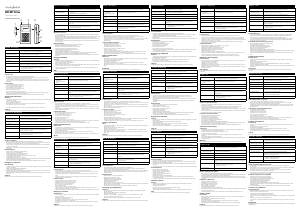
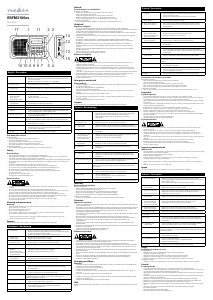
1. LCD display
2. Tuning indicator
3. Frequency band button • Press the button to select the frequency band: FM/MW/SW.
4. Tuning + button
• Press the buttons to manually tune to the required channel.
5. Tuning - button
6. On/o button • Press the button to switch on or switch o the radio.
7. Memory button
• Tune in to the desired channel and press the button to store the channel in the
memory.
Note: A maximum of 20 channels (0-19) can be stored in each frequency band.
8. M + button
9. M - button
• Press the button to go to the next channel in the memory.
• Press the button to go to the previous channel in the memory.
10. Lock button
• Press and hold the button to lock or unlock the panel of the device.
Note: The icon of a key appears on the display when the panel is locked.
11. Speaker
12. Antenna
• FM: Extend the antenna for best possible radio reception.
• MW: Turn the device in the direction that gives best possible radio reception.
Note: The sensitive ferrite core antenna inside the device is directional.
• SW 1-7: Extend the antenna fully and keep it in the vertical position.
13. Foldable stand
14. Battery compartment
• Open the battery compartment.
• Insert the batteries (2x AA) into the battery compartment.
• Make sure that the battery polarity (+/-) matches the polarity markings inside the
battery compartment.
• Close the battery compartment.
15. Volume dial • Turn the dial to adjust the volume.
16. Headphone jack
• Connect the headphones to the headphone jack.
Note: Do not use headphones at high volume levels to prevent hearing damage.
17. DC input • Connect the adapter to the DC input and the mains socket.
Use
• Insert the adapter into the DC input and the mains socket or insert the batteries to switch on the device.
• Press the on/o button to switch on the radio.
• Turn the volume dial to adjust to the desired sound level.
• Press the button to select the required frequency band (FM/MW/SW). The display shows the selected band.
• Press the tuning buttons to tune to the required channel. The display shows the frequency.
• Adjust the antenna.
• Press the on/o button to switch o the radio.
Setting the time
• Press the on/o button to switch o the radio.
• Press the memory button. The time format (12Hr/24Hr) ashes in the display.
Note: The time format stops ashing after 4 seconds. The time as seen in the display is conrmed.
• Press the memory button again. The time appears on the display with the hour ashing. Press the tuning +/- buttons to
set the hours.
• Press the memory button again. The minute starts to ash. Press the tuning +/- buttons to set the minutes.
• Press the memory button again to conrm the set time.
Setting the alarm time
• Press the on/o button to switch o the radio.
• Press the frequency band button. The icon of a clock appears in the display.
• Press the memory button. The clock icon and the hour ashes in the display. Press the tuning +/- buttons to set the
hours.
• Press the memory button again. The clock icon and the minute ashes in the display. Press the tuning +/- buttons to set
the minutes.
• Press the memory button again to set the radio to turn on to the sound of the alarm time buzzer. Press the memory
button again to conrm. The radio will turn on at the set time.
• Press the frequency band button again. The clock icon disappears and the alarm setting is cancelled.
Note: The clock icon, hours and minutes stop ashing after 4 seconds. The setting as seen in the display is conrmed. When
the display stops ashing, repeat the above steps to reset the alarm time. When the alarm time is set and the clock icon
appears on the display, you cannot reset the time.
Setting the sleep time
• Press the on/o button to switch o the radio.
• Press and hold the on/o button to set the sleep time.
• Press the on/o button again to select the number of minutes of sleep time: 90 / 80 / 70 / 60 / 50 / 40 / 30 / 20 / 10.
Note: The radio will turn on and then turn o after the selected minutes have passed.
• To cancel the sleep function, press the on/o button again.
Note: The setting is conrmed automatically after 3 seconds. Repeat the steps to reset the sleep time.
Safety
General safety
• Read the manual carefully before use. Keep the manual for future reference.
• The manufacturer is not liable for consequential damages or for damages to property or persons caused by non-
observance of the safety instructions and improper use of the device.
• Only use the device for its intended purposes. Do not use the device for other purposes than described in the manual.
• Do not use the device if any part is damaged or defective. If the device is damaged or defective, replace the device
immediately.
• The device is suitable for indoor use only. Do not use the device outdoors.
• The device is suitable for domestic use only. Do not use the device for commercial purposes.
• Do not use the device in locations with high humidity, such as bathrooms and swimming pools.
• Do not use the device near bathtubs, showers, basins or other vessels containing water.
• Do not use a timer or a separate remote-control system that switches on the device automatically.
• Do not cover the device.
• Place the device on a stable, at surface.
• Keep the device away from ammable objects.
Electrical safety
• To reduce risk of electric shock, this product should only be opened by an authorized technician when service is required.
• Disconnect the product from the mains and other equipment if a problem should occur.
• Do not use the device if the mains cable or mains plug is damaged or defective. If the mains cable or mains plug is
damaged or defective, it must be replaced by the manufacturer or an authorised repair agent.
• Before use, always check that the mains voltage is the same as the voltage on the rating plate of the device.
• Do not move the device by pulling the mains cable. Make sure that the mains cable cannot become entangled.
• Do not immerse the device, the mains cable or the mains plug in water or other liquids.
• Do not leave the device unattended while the mains plug is connected to the mains supply.
• Do not use an extension cable.
Cleaning and maintenance
Warning!
• Before cleaning or maintenance, always switch o the device, remove the mains plug from the wall socket and wait until
the device has cooled down.
• Do not use cleaning solvents or abrasives.
• Do not clean the inside of the device.
• Do not attempt to repair the device. If the device does not operate correctly, replace it with a new device.
• Do not immerse the device in water or other liquids.
• Clean the outside of the device using a soft, damp cloth. Thoroughly dry the device with a clean, dry cloth.
• Clean the ventilation openings using a soft brush.
Support
If you need further help or have comments or suggestions please visit www.nedis.com/support
Contact
NEDIS B.V., De Tweeling 28, 5215 MC ‘s-Hertogenbosch, The Netherlands
Nederlands - Beschrijving
1. LCD-display
2. Afstemmingsindicator
3. Frequentiebandknop • Druk op de knop om de frequentieband te selecteren: FM/MW/SW.
4. Afstemmen + knop
• Druk op de knoppen om handmatig op het gewenste kanaal af te stemmen.
5. Afstemmen - knop
6. Aan/uit-knop • Druk op de knop om de radio in of uit te schakelen.
7. Geheugenknop
• Stem op het gewenste kanaal af en druk op de knop om het kanaal in het
geheugen op te slaan.
Opmerking: Per frequentieband kunnen maximaal 20 kanalen (0-19) worden opgeslagen.
8. M + knop
9. M - knop
• Druk op de knop om naar het volgende kanaal in het geheugen te gaan.
• Druk op de knop om naar het vorige kanaal in het geheugen te gaan.
10. Vergrendelingsknop
• Houd de knop ingedrukt om het paneel van het apparaat te vergrendelen of te
ontgrendelen.
Opmerking: Als het paneel is vergrendeld, verschijnt het pictogram van een sleutel op
de display.
11. Speaker
12. Antenne
• FM: Verleng de antenne voor de best mogelijke radio-ontvangst.
• MW: Draai het apparaat in de richting die de beste radio-ontvangst geeft.
Opmerking: De gevoelige antenne met een kern van ferriet in het apparaat is een
richtantenne.
• SW 1-7: Trek de antenne maximaal uit en houd deze verticaal.
13. Inklapbare standaard
14. Batterijcompartiment
• Open het batterijcompartiment.
• Plaats de batterijen (2x AA) in het batterijcompartiment.
• Zorg dat de polariteit van de batterij (+/-) met de polariteitsmarkeringen in het
batterijcompartiment overeenkomt.
• Sluit het batterijcompartiment.
15. Volumeknop • Draai de knop om het volume af te stellen.
16. Hoofdtelefoonaansluiting
• Sluit de hoofdtelefoon aan op de hoofdtelefoonaansluiting.
Opmerking: Gebruik geen hoofdtelefoons bij een hoog volumeniveau om
gehoorbeschadiging te voorkomen.
17. DC-ingang • Sluit de adapter op de DC-ingang en op het stopcontact aan.
Gebruik
• Sluit om het apparaat in te schakelen de adapter op de DC-ingang en op het stopcontact aan of plaats de batterijen.
• Druk op de aan/uit-knop om de radio in te schakelen.
• Draai de volumeknop om het gewenste volume af te stellen.
• Druk op de knop om de gewenste frequentieband (FM/MW/SW) te selecteren. De display toont de geselecteerde band.
• Druk op de afstemknoppen om op het gewenste kanaal af te stemmen. De display toont de frequentie.
• Stel de antenne af.
• Druk op de aan/uit-knop om de radio uit te schakelen.
De tijd instellen
• Druk op de aan/uit-knop om de radio uit te schakelen.
• Druk op de geheugenknop. De tijdnotatie (12 uur/24 uur) knippert op de display.
Opmerking: De tijdnotatie stopt na 4 seconden met knipperen. De tijd wordt in de op de display weergegeven opmaak
opgeslagen.
• Druk nogmaals op de geheugenknop. De tijd verschijnt op de display, waarbij het uur knippert. Druk op de knoppen
afstemmen +/- om het uur in te stellen.
• Druk nogmaals op de geheugenknop. De minuten gaan knipperen. Druk op de knoppen afstemmen +/- om de minuten
in te stellen.
• Druk nogmaals op de geheugenknop om de ingestelde tijd te bevestigen.
De wektijd instellen
• Druk op de aan/uit-knop om de radio uit te schakelen.
• Druk op de frequentiebandknop. Het pictogram van een klok verschijnt op de display.
• Druk op de geheugenknop. Het klokpictogram en het uur knipperen op de display. Druk op de knoppen afstemmen
+/- om het uur in te stellen.
• Druk nogmaals op de geheugenknop. Het klokpictogram en de minuten knipperen op de display. Druk op de knoppen
afstemmen +/- om de minuten in te stellen.
• Druk nogmaals op de geheugenknop om de radio in te stellen en het geluid van de wektijdzoemer in te schakelen. Druk
nogmaals op de geheugenknop om te bevestigen. De radio wordt op de ingestelde tijd ingeschakeld.
• Druk nogmaals op de frequentiebandknop. Het klokpictogram verdwijnt en de wekkerinstelling wordt geannuleerd.
Opmerking: Het klokpictogram, het uur en de minuten stoppen na 4 seconden met knipperen. De instelling wordt zoals op
de display weergegeven bevestigd. Herhaal als de display stopt met knipperen de bovenstaande stappen om de wektijd
opnieuw in te stellen. Als de wektijd is ingesteld en het klokpictogram op de display verschijnt, kunt u de tijd niet opnieuw
instellen.
De slaaptijd instellen
• Druk op de aan/uit-knop om de radio uit te schakelen.
• Houd de knop ingedrukt om de slaaptijd in te stellen.
• Druk nogmaals op de aan/uit-knop om het aantal minuten slaaptijd te selecteren: 90 / 80 / 70 / 60 / 50 / 40 / 30 / 20 / 10.
Opmerking: De radio wordt ingeschakeld en zal na het verstrijken van het geselecteerde aantal minuten uitschakelen.
• Druk om de slaapfunctie te annuleren nogmaals op de aan/uit-knop.
Opmerking: De instelling wordt automatisch na 3seconden bevestigd. Herhaal de stappen om de slaaptijd opnieuw in te
stellen.
Veiligheid
Algemene veiligheid
• Lees voor gebruik de handleiding zorgvuldig door. Bewaar de handleiding voor latere raadpleging.
• De fabrikant is niet aansprakelijk voor gevolgschade of voor schade aan eigendommen of personen veroorzaakt door
het niet naleven van de veiligheidsinstructies en door verkeerd gebruik van het apparaat.
• Gebruik het apparaat uitsluitend voor de beoogde doeleinden. Gebruik het apparaat niet voor andere doeleinden dan
beschreven in de handleiding.
• Gebruik het apparaat niet als een onderdeel beschadigd of defect is. Vervang een beschadigd of defect apparaat
onmiddellijk.
• Het apparaat is uitsluitend geschikt voor gebruik binnenshuis. Gebruik het apparaat niet buitenshuis.
• Het apparaat is uitsluitend geschikt voor huishoudelijk gebruik. Gebruik het apparaat niet voor commerciële doeleinden.
• Gebruik het apparaat niet op plaatsen met een hoge luchtvochtigheid, zoals badkamers en zwembaden.
• Gebruik het apparaat niet in de buurt van badkuipen, douches, wastafels of andere voorzieningen die water bevatten.
• Gebruik geen timer of afzonderlijk afstandsbedieningssysteem om het apparaat automatisch uit te schakelen.
• Bedek het apparaat niet.
• Plaats het apparaat op een stabiele, vlakke ondergrond.
• Houd het apparaat uit de buurt van brandbare objecten.
Elektrische veiligheid
• Dit product mag voor onderhoud uitsluitend door een erkende technicus worden geopend om het risico op elektrische
schokken te verkleinen.
• Koppel het product los van het stopcontact en van andere apparatuur als zich problemen voordoen.
• Gebruik het apparaat niet als het netsnoer of de netstekker beschadigd of defect is. Indien het netsnoer of de netstekker
beschadigd of defect is, moet het onderdeel door de fabrikant of een erkend servicecentrum worden vervangen.
• Controleer voor gebruik altijd of de netspanning overeenkomt met de spanning op het typeplaatje van het apparaat.
• Verplaats het apparaat niet door aan het netsnoer te trekken. Zorg dat het netsnoer niet in de war kan raken.
• Dompel het apparaat, het netsnoer of de netstekker niet onder in water of andere vloeistoen.
• Laat het apparaat niet onbeheerd achter terwijl de netstekker op de netvoeding is aangesloten.
• Gebruik geen verlengsnoer.
Reiniging en onderhoud
Waarschuwing!
• Schakel voor reiniging en onderhoud altijd het apparaat uit, verwijder de netstekker uit het stopcontact en wacht tot het
apparaat is afgekoeld.
• Gebruik geen reinigingsmiddelen of schuurmiddelen.
• Reinig niet de binnenzijde van het apparaat.
• Probeer het apparaat niet te repareren. Indien het apparaat niet juist werkt, vervang het dan door een nieuw apparaat.
• Dompel het apparaat niet onder in water of andere vloeistoen.
• Reinig de buitenzijde van het apparaat met een zachte, vochtige doek. Droog het apparaat grondig af met een schone,
droge doek.
• Reinig de ventilatieopeningen met een zachte borstel.
Support
Breng voor hulp of als u een opmerking of suggestie heeft een bezoek aan www.nedis.com/support
Contact
NEDIS B.V., De Tweeling 28, 5215 MC ’s-Hertogenbosch, Nederland
Deutsch - Beschreibung
1. LCD-Anzeige
2. Tuning-Anzeige
3. Frequenzband-Taste • Drücken Sie die Taste, um das Frequenzband zu wählen: FM/MW/SW.
4. Tuning + Taste
• Drücken Sie die Tasten, um den gewünschten Kanal manuell einzustellen.
5. Tuning - Taste
6. Ein-/Aus-Taste • Drücken Sie zum Ein- oder Ausschalten des Radios auf die Taste.
7. Speichertaste
• Stellen Sie den gewünschten Kanal ein und drücken Sie die Taste, um den Kanal im
Speicher zu hinterlegen.
Hinweis: In jedem Frequenzband können maximal 20 Kanäle (0-19) gespeichert werden.
8. M + Taste
9. M - Taste
• Drücken Sie die Taste, um zum nächsten Kanal im Speicher zu gelangen.
• Drücken Sie die Taste, um zum vorherigen Kanal im Speicher zu gelangen.
10. Sperrtaste
• Halten Sie die Taste gedrückt, um das Bedienfeld des Geräts zu sperren oder zu
entsperren.
Hinweis: Das Symbol eines Schlüssels wird auf dem Display angezeigt, wenn das
Bedienfeld gesperrt ist.
11. Lautsprecher
12. Antenne
• FM: Ziehen Sie die Antenne aus, um den bestmöglichen Radioempfang zu erzielen.
• MW: Drehen Sie das Gerät in die Richtung, die den bestmöglichen Radioempfang
ermöglicht.
Hinweis: Die empndliche Ferritkernantenne im Inneren des Gerätes ist
richtungsabhängig.
• SW 1-7: Die Antenne vollständig ausfahren und in eine vertikale Position bringen.
13. Zusammenklappbarer
Ständer
14. Batteriefach
• Önen Sie das Batteriefach.
• Setzen Sie die Batterien (2x AA) in das Batteriefach ein.
• Achten Sie darauf, dass die Polarität der Batterien (+/-) mit den
Polaritätskennzeichnungen im Batteriefach übereinstimmt.
• Schließen Sie das Batteriefach.
15. Lautstärkeregler • Drehen Sie den Regler, um die Lautstärke einzustellen.
16. Kopfhörerbuchse
• Verbinden Sie den Kopfhörer mit der Kopfhörerbuchse.
Hinweis: Verwenden Sie keine Kopfhörer mit hoher Lautstärke, um Hörschäden zu
vermeiden.
17. DC-Eingang • Verbinden Sie den Adapter mit dem DC-Eingang und der Wandsteckdose.
Gebrauch
• Stecken Sie den Adapter in den DC-Eingang und in die Netzsteckdose oder legen Sie die Batterien ein, um das Gerät
einzuschalten.
• Drücken Sie zum Einschalten des Radios auf die Ein-/Aus-Taste.
• Drehen Sie den Lautstärkeregler, um den gewünschten Lautstärkepegel einzustellen.
• Drücken Sie die Taste, um das gewünschte Frequenzband (FM/MW/SW) zu wählen. Auf der Anzeige wird das
ausgewählte Band angezeigt.
• Drücken Sie die Tuning-Tasten, um den gewünschten Kanal einzustellen. Auf dem Display erscheint die Frequenz.
• Richten Sie die Antenne aus.
• Drücken Sie zum Ausschalten des Radios auf die Ein-/Aus-Taste.
Einstellung der Zeit
• Drücken Sie zum Ausschalten des Radios auf die Ein-/Aus-Taste.
• Drücken Sie die Speichertaste. Das Zeitformat (12Hr/24Hr) blinkt in der Anzeige.
Hinweis: Das Zeitformat hört nach 4 Sekunden auf zu blinken. Die in der Anzeige angegebene Zeit wird bestätigt.
• Drücken Sie erneut auf die Memory-Taste. Die Uhrzeit erscheint auf der Anzeige, wobei die Stunde blinkt. Drücken Sie auf
die Tuning +/- Tasten, um die Stunde einzustellen.
• Drücken Sie erneut auf die Memory-Taste. Die Minuten beginnen zu blinken. Drücken Sie auf die Tuning +/- Tasten, um
die Minuten einzustellen.
• Drücken Sie die Memory-Taste erneut, um die eingestellte Zeit zu bestätigen.
Einstellung der Weckzeit
• Drücken Sie zum Ausschalten des Radios auf die Ein-/Aus-Taste.
• Drücken Sie die Frequenzband-Taste. Das Symbol einer Uhr erscheint auf der Anzeige.
• Drücken Sie die Speichertaste. Das Uhrensymbol und die Stunde blinken in der Anzeige. Drücken Sie auf die Tuning +/-
Tasten, um die Stunde einzustellen.
• Drücken Sie erneut auf die Memory-Taste. Das Uhrensymbol und die Minuten blinken in der Anzeige. Drücken Sie auf die
Tuning +/- Tasten, um die Minuten einzustellen.
• Drücken Sie die Memory-Taste erneut, um das Radio so einzustellen, dass es sich auf das Geräusch des Weckzeitsummers
einschaltet. Drücken Sie zur Bestätigung erneut die Memory-Taste. Das Radio schaltet sich zur eingestellten Zeit ein.
• Drücken Sie die Frequenzband-Taste erneut. Das Uhrensymbol verschwindet und die Weckereinstellung wird aufgehoben.
Hinweis: Das Uhrensymbol, Stunden und Minuten blinken nach 4 Sekunden nicht mehr. Die in der Anzeige erscheinende
Einstellung wird bestätigt. Wenn die Anzeige nicht mehr blinkt, wiederholen Sie die obigen Schritte, um die Weckzeit
zurückzusetzen. Wenn die Weckzeit eingestellt ist und das Uhrensymbol auf der Anzeige erscheint, können Sie die Uhrzeit
nicht zurücksetzen.
Einstellung der Schlafzeit
• Drücken Sie zum Ausschalten des Radios auf die Ein-/Aus-Taste.
• Drücken und halten Sie die Ein-/Aus-Taste, um die Schlafzeit einzustellen.
• Drücken Sie die Ein-/Aus-Taste erneut, um die Anzahl der Minuten Schlafzeit auszuwählen:
90 / 80 / 70 / 60 / 50 / 40 / 30 / 20 / 10.
Hinweis: Das Radio wird sich einschalten und dann ausschalten, nachdem die ausgewählten Minuten abgelaufen sind.
• Um die Schlaf-Funktion abzubrechen, drücken Sie die Ein-/Aus-Taste erneut.
Hinweis: Die Einstellung wird nach 3 Sekunden automatisch bestätigt. Wiederholen Sie die Schritte, um die Schlafzeit
zurückzusetzen.
Sicherheit
Allgemeine Sicherheit
• Lesen Sie die Bedienungsanleitung vor dem Gebrauch genau durch. Bitte bewahren Sie die Bedienungsanleitung zur
späteren Bezugnahme auf.
• Der Hersteller ist nicht schadensersatzpichtig für Folgeschäden, Sachschäden oder Personenverletzungen, die durch die
Nichtbeachtung der Sicherheitshinweise und durch unsachgemäße Handhabung des Gerätes entstanden sind.
• Verwenden Sie das Gerät nur bestimmungsgemäß. Verwenden Sie das Gerät nur für den in dieser Bedienungsanleitung
beschriebenen Zweck.
• Verwenden Sie das Gerät nicht, falls ein Teil beschädigt oder defekt ist. Ist das Gerät beschädigt oder defekt, erneuern
Sie es unverzüglich.
• Das Gerät eignet sich nur zur Verwendung in Innenräumen. Verwenden Sie das Gerät nicht im Freien.
• Das Gerät eignet sich nur für den Hausgebrauch. Verwenden Sie das Gerät nicht für den gewerblichen Gebrauch.
• Verwenden Sie das Gerät nicht an Orten mit hoher Feuchtigkeit wie beispielsweise Badezimmern oder Schwimmbädern.
• Verwenden Sie das Gerät nicht in der Nähe von Badewannen, Duschen, Becken oder anderen Behältnissen, die Wasser
enthalten.
• Verwenden Sie keine Zeitschaltuhr und kein separates Fernbedienungssystem, das das Gerät automatisch einschaltet.
• Decken Sie das Gerät nicht ab.
• Stellen Sie das Gerät auf einer stabilen achen Oberäche auf.
• Halten Sie das Gerät von entzündlichen Gegenständen fern.
Elektrische Sicherheit
• Um die Gefahr eines elektrischen Schlags zu verringern, sollte dieses Produkt bei erforderlichen Servicearbeiten
ausschließlich von einem autorisierten Techniker geönet werden.
• Bei Problemen trennen Sie das Gerät bitte von der Spannungsversorgung und von anderen Geräten.
• Verwenden Sie das Gerät nicht, falls das Netzkabel oder der Netzstecker beschädigt oder defekt ist. Ist das Netzkabel
oder der Netzstecker beschädigt oder defekt, muss das Netzkabel oder der Netzstecker vom Hersteller oder einem
autorisierten Service-Partner erneuert werden.
• Vergewissern Sie sich stets vor dem Gebrauch, dass die Netzspannung mit der Spannung auf dem Typenschild des
Geräts übereinstimmt.
• Bewegen Sie das Gerät nicht durch Ziehen am Netzkabel. Achten Sie darauf, dass sich das Netzkabel nicht verwickeln kann.
• Tauchen Sie das Gerät, das Netzkabel oder den Netzstecker nicht in Wasser oder andere Flüssigkeiten ein.
• Lassen Sie das Gerät nicht unbeaufsichtigt, während der Netzstecker mit dem Stromnetz verbunden ist.
• Verwenden Sie kein Verlängerungskabel.
Reinigung und Pege
Warnung!
• Schalten Sie das Gerät vor der Reinigung oder Pege immer aus, ziehen Sie den Netzstecker aus der Wandsteckdose und
warten Sie, bis sich das Gerät abgekühlt hat.
• Verwenden Sie keine Lösungs- oder Scheuermittel.
• Reinigen Sie das Gerät nicht von innen.
• Versuchen Sie nicht, das Gerät zu reparieren. Falls das Gerät nicht einwandfrei arbeitet, tauschen Sie es gegen ein neues aus.
• Tauchen Sie das Gerät nicht in Wasser oder andere Flüssigkeiten ein.
• Reinigen Sie das Äußere des Geräts mit einem weichen feuchten Tuch. Trocknen Sie das Gerät gründlich mit einem
sauberen trockenen Tuch ab.
• Reinigen Sie die Belüftungsönungen mit einer weichen Bürste.
Hilfe
Wenn Sie weitere Hilfe benötigen oder Kommentare oder Vorschläge für uns haben, gehen Sie bitte auf www.nedis.com/support
Kontakt
NEDIS B.V., De Tweeling 28, 5215 MC ’s-Hertogenbosch, Niederlande
Español - Descripción
1. Visor LCD
2. Indicador de
sintonización
3. Botón de banda de
frecuencia
• Pulse el botón para seleccionar la banda de frecuencia: FM/MW/SW.
4. Botón de sintonización +
• Pulse los botones para sintonizar manualmente el canal deseado.
5. Botón de sintonización -
6. Botón de encendido/
apagado
• Pulse el botón para encender o apagar la radio.
7. Botón de memoria
• Sintonice el canal deseado y pulse el botón para almacenar el canal en la memoria.
Nota: Puede almacenarse un máximo de 20 canales (0-19) en cada banda de frecuencia.
8. Botón M +
9. Botón M -
• Pulse el botón para ir al canal siguiente en la memoria.
• Pulse el botón para ir al canal anterior en la memoria.
10. Botón de bloqueo
• Pulse y mantenga pulsado el botón para bloquear o desbloquear el panel del
dispositivo.
Nota: El icono de una llave aparece en el visor cuando el panel está bloqueado.
11. Altavoz
12. Antena
• FM: Extienda la antena para obtener la mejor recepción de radio posible.
• MW: Gire el dispositivo en la dirección que ofrezca la mejor recepción de radio
posible.
Nota: La antena de núcleo de ferrita sensible que tiene el dispositivo es direccional.
• SW 1-7: Extienda la antena completamente y manténgala en posición vertical.
13. Soporte plegable
14. Compartimento de
las pilas
• Abra el compartimento de las pilas.
• Introduzca las pilas (2x AA) en el compartimento de las pilas.
• Asegúrese que la polaridad de las pilas (+/-) se corresponda con las marcas de
polaridad situadas en el interior del compartimento de las pilas.
• Cierre el compartimento de las pilas.
15. Mando de volumen • Gire el mando para ajustar el volumen.
16. Toma de auriculares
• Conecte los auriculares a la toma de auriculares.
Nota: No utilice auriculares a niveles elevados de volumen para evitar daños auditivos.
17. Entrada CC • Conecte el adaptador a la entrada CC y a la toma de red.
Uso
• Inserte el adaptador en la entrada CC y la toma de red o inserte las pilas para encender el dispositivo.
• Pulse el botón de encendido/apagado para encender la radio.
• Gire el mando de volumen para ajustar el nivel de sonido deseado.
• Pulse el botón para seleccionar la banda de frecuencia deseada (FM/MW/SW). La pantalla muestra la banda seleccionada.
• Pulse los botones de sintonización para sintonizar el canal deseado. La pantalla muestra la frecuencia.
• Ajuste la antena.
• Pulse el botón de encendido/apagado para apagar la radio.
Ajuste de la hora
• Pulse el botón de encendido/apagado para apagar la radio.
• Pulse el botón de memoria. El formato de hora (12Hr/24Hr) parpadea en el visor.
Nota: El formato de hora deja de parpadear después de 4 segundos. Se conrma la hora como se ve en el visor.
• Pulse de nuevo el botón de memoria. La hora aparece en el visor con la hora parpadeando. Pulse los botones de
sintonización +/- para ajustar las horas.
• Pulse de nuevo el botón de memoria. Los minutos empiezan a parpadear. Pulse los botones de sintonización +/- para
ajustar los minutos.
• Pulse el botón de memoria de nuevo para conrmar la hora ajustada.
Ajuste de la hora de alarma
• Pulse el botón de encendido/apagado para apagar la radio.
• Pulse el botón de banda de frecuencia. El icono de un reloj aparece en el visor.
• Pulse el botón de memoria. El icono del reloj y la hora parpadean en el visor. Pulse los botones de sintonización +/- para
ajustar las horas.
• Pulse de nuevo el botón de memoria. El icono del reloj y los minutos parpadean en el visor. Pulse los botones de
sintonización +/- para ajustar los minutos.
• Pulse de nuevo el botón de memoria para ajustar la radio para encenderse cuando suene del timbre de la hora de
alarma. Pulse el botón de memoria de nuevo para conrmar. La radio se encenderá a la hora ajustada.
• Pulse de nuevo el botón de banda de frecuencia. El icono del reloj desaparece y el ajuste de alarma se cancela.
Nota: El icono del reloj, las horas y los minutos dejan de parpadear tras 4 segundos. Se conrma el ajuste como se ve en el
visor. Cuando el visor deje de parpadear, repita los pasos anteriores para restablecer la hora de la alarma. Cuando se ajusta la
hora de la alarma y aparece el icono del reloj en el visor, no puede restablecerse la hora.
Ajuste del tiempo de autoapagado
• Pulse el botón de encendido/apagado para apagar la radio.
• Pulse y mantenga pulsado el botón para ajustar el tiempo de autoapagado.
• Pulse y mantenga pulsado el botón para seleccionar el número de minutos del tiempo de autoapagado:
90 / 80 / 70 / 60 / 50 / 40 / 30 / 20 / 10.
Nota: La radio se encenderá y posteriormente se apagará una vez que hayan pasado los minutos seleccionados.
• Para cancelar la función de autoapagado, pulse el botón de encendido/apagado de nuevo.
Nota: El ajuste se conrma automáticamente tras 3 segundos. Repita los pasos para restablecer el tiempo de autoapagado.
Seguridad
Seguridad general
• Lea el manual detenidamente antes del uso. Conserve el manual en caso de futura necesidad.
• El fabricante no es responsable de daños consecuentes o de daños en la propiedad o en las personas causados por no
seguir estas instrucciones de seguridad y por un uso inadecuado de este dispositivo.
• Utilice el dispositivo únicamente para su uso previsto. No utilice el dispositivo con una nalidad distinta a la descrita en
el manual.
• No utilice el dispositivo si alguna pieza ha sufrido daños o tiene un defecto. Si el dispositivo ha sufrido daños o tiene un
defecto, sustitúyalo inmediatamente.
• El dispositivo sólo es apto para uso en interiores. No utilice el dispositivo en exteriores.
• El dispositivo sólo es apto para uso doméstico. No utilice el dispositivo con nes comerciales.
• No utilice el dispositivo en lugares con un nivel alto de humedad, como baños y piscinas.
• No utilice el dispositivo cerca de bañeras, duchas, lavabos u otros recipientes que contengan agua.
• No utilice un temporizador o un sistema de control remoto separado que conecte el dispositivo automáticamente.
• No cubra el dispositivo.
• Coloque el dispositivo sobre una supercie estable y plana.
• Mantenga el dispositivo alejado de objetos inamables.
Seguridad eléctrica
• Para reducir el peligro de descarga eléctrica, este producto sólo debería abrirlo un técnico autorizado cuando necesite
reparación.
• Desconecte el producto de la toma de corriente y de los otros equipos si ocurriera algún problema.
• No utilice el dispositivo si el cable de red o el enchufe de red está dañado o es defectuoso. Si el cable de red o el enchufe
de red está dañado o es defectuoso, éste debe ser sustituido por el fabricante o un servicio técnico autorizado.
• Antes del uso, compruebe siempre que la tensión de red sea la misma que se indica en la placa de características del
dispositivo.
• No mueva el dispositivo tirando del cable de red. Asegúrese de que el cable de red no se enrede.
• No sumerja el dispositivo, el cable de red o el enchufe de red en agua ni otros líquidos.
• No deje el dispositivo desatendido cuando el enchufe de red esté conectado al suministro de red.
• No utilice un cable alargador.
Limpieza y mantenimiento
¡Advertencia!
• Antes de la limpieza o el mantenimiento, apague siempre el dispositivo, retire el enchufe de red de la toma de pared y
espere hasta que se haya enfriado el dispositivo.
• No utilice disolventes de limpieza ni productos abrasivos.
• No limpie el interior del dispositivo.
• No intente reparar el dispositivo. Si el dispositivo no funciona correctamente, sustitúyalo por uno nuevo.
• No sumerja el dispositivo en agua ni otros líquidos.
• Limpie el exterior del dispositivo con un paño suave humedecido. Seque bien el dispositivo con un paño limpio y seco.
• Limpie las ranuras de ventilación con un cepillo suave.
Apoyo
Si necesita ayuda adicional o si tiene comentarios o sugerencias, visite www.nedis.com/support
Contacto
NEDIS B.V., De Tweeling 28, 5215 MC ‘s-Hertogenbosch, Países Bajos
Français - Description
1. Achage LCD
2. Indicateur de
syntonisation
3. Bouton de plage de
fréquence
• Appuyez sur le bouton pour sélectionner la plage de fréquence : FM/MW/SW.
4. Bouton de syntonisation
+
• Appuyez sur les boutons pour syntoniser manuellement le canal voulu.
5. Bouton de syntonisation
-
6. Bouton marche/arrêt • Appuyez sur le bouton pour allumer/éteindre la radio.
7. Bouton mémoire
• Syntonisez le canal voulu et appuyez sur le bouton pour mémoriser le canal.
Remarque: Un maximum de 20 canaux (0-19) peuvent être mémorisés pour chaque
plage de fréquence.
8. Bouton M +
9. Bouton M -
• Appuyez sur le bouton pour passer au canal suivant dans la mémoire.
• Appuyez sur le bouton pour passer au canal précédent dans la mémoire.
10. Bouton de verrouillage
• Appuyez sur le bouton sans le relâcher pour verrouiller ou déverrouiller le panneau
de l'appareil.
Remarque: L'icône d'une clé s'ache lorsque le panneau est verrouillé.
11. Haut-parleur
12. Antenne
• FM: Étendez l'antenne pour la meilleure réception radio possible.
• MW : Tournez l'appareil dans la direction orant la meilleure réception de radio
possible.
Remarque: L'antenne à âme de ferrite sensible dans l'appareil est directionnelle.
• SW 1-7 : Étendez à fond l'antenne et maintenez-la à la verticale.
13. Support pliable
14. Compartiment de pile
• Ouvrez le compartiment de pile.
• Insérez les piles (2x AA) dans le compartiment de pile.
• Assurez-vous que la polarité des piles (+/-) correspond aux repères indiqués dans le
compartiment de pile.
• Fermez le compartiment de pile.
15. Molette de volume • Tournez la molette pour régler le volume.
16. Prise casque
• Connectez le casque à la prise casque.
Remarque: N'utilisez pas les écouteurs à des niveaux de volume élevés pour éviter tout
dommage auditif.
17. Entrée CC • Connectez l'adaptateur à l'entrée CC et à la prise secteur.
Usage
• Insérez l'adaptateur dans l'entrée CC et la prise secteur ou insérez les piles pour allumer l'appareil.
• Appuyez sur le bouton marche/arrêt pour allumer la radio.
• Tournez la molette de volume pour régler le niveau sonore voulu.
• Appuyez sur le bouton pour sélectionner la plage de fréquence voulue (FM/MW/SW). L'achage indique la plage
sélectionnée.
• Appuyez sur les boutons de syntonisation pour syntoniser le canal voulu. L'écran indique la fréquence.
• Ajustez l'antenne.
• Appuyez sur le bouton marche/arrêt pour arrêter la radio.
Réglage de l'heure
• Appuyez sur le bouton marche/arrêt pour arrêter la radio.
• Appuyez sur le bouton mémoire. Le format d'heure (12H/24H) clignote à l'achage.
Remarque: Le format d'heure cesse de clignoter après 4 secondes. L'heure achée est conrmée.
• Appuyez à nouveau sur le bouton de mémoire. L'heure s'ache avec les heures clignotantes. Appuyez sur les boutons de
syntonisation +/- pour régler les heures.
• Appuyez à nouveau sur le bouton de mémoire. Les minutes commencent à clignoter. Appuyez sur les boutons de
syntonisation +/- pour régler les minutes.
• Appuyez sur le bouton de mémoire à nouveau pour conrmer l'heure réglée.
Réglage de l'heure d'alarme
• Appuyez sur le bouton marche/arrêt pour arrêter la radio.
• Appuyez sur le bouton de plage de fréquence. L'icône d'horloge s'ache.
• Appuyez sur le bouton mémoire. L'icône d'horloge et les heures clignotent à l'achage. Appuyez sur les boutons de
syntonisation +/- pour régler les heures.
• Appuyez à nouveau sur le bouton de mémoire. L'icône d'horloge et les minutes clignotent à l'achage. Appuyez sur les
boutons de syntonisation +/- pour régler les minutes.
• Appuyez sur le bouton de mémoire à nouveau pour régler la radio an de s'allumer au son de l'avertisseur d'heure
d'alarme. Appuyez sur le bouton de mémoire à nouveau pour conrmer. La radio s'allume à l'heure réglée.
• Appuyez à nouveau sur le bouton de plage de fréquence. L'icône d'horloge disparaît et le réglage d'alarme est annulé.
Remarque: L'icône d'horloge, les heures et les minutes cessent de clignoter après 4 secondes. Le réglage aché est conrmé.
Lorsque l'achage cesse de clignoter, répétez les étapes précédentes pour réinitialiser l'heure d'alarme. Lorsque l'heure
d'alarme est réglée et l'icône d'horloge s'ache, vous ne pouvez pas réinitialiser l'heure.
Réglage de l'heure de mise en veille
• Appuyez sur le bouton marche/arrêt pour arrêter la radio.
• Appuyez sur le bouton marche/arrêt sans le relâcher pour régler l'heure de mise en veille.
• Appuyez sur le bouton marche/arrêt à nouveau pour sélectionner les minutes de l'heure de mise en veille :
90 / 80 / 70 / 60 / 50 / 40 / 30 / 20 / 10.
Remarque: La radio s'allume puis s'éteint après que les minutes sélectionnées se soient écoulées.
• Pour annuler la fonction de veille, appuyez sur le bouton marche/arrêt à nouveau.
Remarque: Le réglage est conrmé automatiquement après 3 secondes. Répétez les étapes pour régler les heures de veille.
Sécurité
Sécurité générale
• Lisez attentivement le manuel avant usage. Conservez le manuel pour toute référence ultérieure.
• Le fabricant décline toute responsabilité pour les dommages ou blessures consécutifs causés par le non-respect des
consignes de sécurité et d'une utilisation inappropriée de l'appareil.
• Utilisez l'appareil uniquement pour son usage prévu. N'utilisez pas l'appareil à d'autres ns que celles décrites dans le
manuel.
• N'utilisez pas l'appareil si une pièce quelconque est endommagée ou défectueuse. Si l'appareil est endommagé ou
défectueux, remplacez-le immédiatement.
• L'appareil est conçu exclusivement pour une utilisation en intérieur. N'utilisez pas l'appareil à l'extérieur.
• L'appareil est conçu exclusivement pour un usage domestique. N'utilisez pas l'appareil à des ns commerciales.
• N'utilisez pas l'appareil dans des endroits très humides, ainsi les salles de bains et piscines.
• N'utilisez pas l'appareil à proximité d'une baignoire, d'une douche, d'un lavabo ou d'autres récipients contenant de l'eau.
• N'utilisez pas une minuterie ou une télécommande de mise en marche automatique de l'appareil.
• Ne couvrez pas l'appareil.
• Placez l'appareil sur une surface stable et plane.
• Maintenez l'appareil à l'écart des objets inammables.
Sécurité électrique
• Pour réduire le risque de choc électrique, ce produit doit être ouvert uniquement par un technicien qualié si une
réparation s'impose.
• Débranchez l'appareil et les autres équipements du secteur s'il y a un problème.
• N'utilisez pas l'appareil si le cordon d'alimentation ou la che secteur est endommagé ou défectueux. Si le cordon
d'alimentation ou la che secteur est endommagé ou défectueux, il doit être remplacé par le fabricant ou par un
réparateur agréé.
• Avant toute utilisation, vériez que la tension du secteur correspond à celle indiquée sur la plaque signalétique de
l'appareil.
• Ne déplacez pas l'appareil en le tirant par le cordon d'alimentation. Assurez-vous que le cordon d'alimentation ne
s'enchevêtre pas.
• N'immergez pas l'appareil, le cordon d'alimentation ou la che secteur dans l'eau ou d'autres liquides.
• Ne laissez pas l'appareil sans surveillance si la che secteur est branchée.
• N'utilisez aucune rallonge.
Nettoyage et entretien
Avertissement!
• Avant le nettoyage ou l'entretien, arrêtez toujours l'appareil, débranchez la che secteur de la prise murale et attendez
que l'appareil refroidisse.
• N'utilisez pas de solvants ni de produits abrasifs.
• Ne nettoyez pas l'intérieur de l'appareil.
• Ne tentez pas de réparer l'appareil. Si l'appareil fonctionne mal, remplacez-le par un neuf.
• Ne plongez pas l'appareil dans l'eau ou autres liquides.
• Nettoyez l'extérieur de l'appareil avec un chion doux et humide. Séchez soigneusement l'appareil avec un chion
propre et sec.
• Nettoyez les ouvertures de ventilation avec une brosse douce.
Support
Si vous avez des commentaires, des suggestions ou besoin d'aide, veuillez visiter www.nedis.com/support
Contact
NEDIS B.V., De Tweeling 28, 5215 MC ‘s-Hertogenbosch, Pays-Bas
Italiano - Descrizione
1. Display LCD
2. Spia di sintonizzazione
3. Pulsante della banda di
frequenza
• Premere il pulsante per selezionare la banda di frequenza: FM/MW/SW.
4. Pulsante di
sintonizzazione +
• Premere i pulsanti per sintonizzarsi manualmente sul canale richiesto.
5. Pulsante di
sintonizzazione -
6. Pulsante di accensione/
spegnimento
• Premere il pulsante per accendere o spegnere la radio.
7. Pulsante della memoria
• Sintonizzarsi sul canale desiderato e premere il pulsante per memorizzare il canale
in memoria.
Nota: In ogni banda di frequenza è possibile memorizzare un massimo di 20 canali (0-19).
8. Pulsante M +
9. Pulsante M -
• Premere il pulsante per passare al canale successivo in memoria.
• Premere il pulsante per passare al canale precedente in memoria.
10. Pulsante di blocco
• Tenere premuto il pulsante per bloccare o sbloccare il pannello del dispositivo.
Nota: Quando il pannello è bloccato sul display compare un'icona a forma di chiave.
11. Altoparlante
12. Antenna
• FM: Estendere l’antenna per ottenere una ricezione radio ottimale.
• MW: Sintonizzare il dispositivo nella direzione che ore la migliore ricezione radio
possibile.
Nota: La sensibile antenna interna del dispositivo con anima in ferrite è direzionale.
• SW 1-7: Estendere completamente l'antenna e tenerla in posizione verticale.
13. Supporto ripiegabile.
14. Vano batterie
• Aprire il vano batterie.
• Inserire le batterie (2 x AA) nel vano batterie.
• Assicurarsi che la polarità delle batterie (+/-) corrisponda a quella indicata nel vano
batterie.
• Chiudere il vano batterie.
15. Selettore di volume • Ruotare il selettore per regolare il volume.
16. Jack per cue
• Collegare le cue all'apposito jack.
Nota: Per evitare danni all'udito, non utilizzare le cue a volume elevato.
17. Ingresso CC • Collegare l'adattatore all’ingresso CC e alla presa elettrica.
Uso
• Per accendere il dispositivo inserire l'adattatore nell'ingresso CC e nella presa elettrica o inserire le batterie.
• Premere il pulsante di accensione/spegnimento per accendere la radio.
• Ruotare il selettore di volume per regolare il volume al livello desiderato.
• Premere il pulsante per selezionare la banda di frequenza richiesta (FM/MW/SW). Sul display viene visualizzata la banda
selezionata.
• Premere i pulsanti di sintonizzazione per sintonizzarsi sul canale richiesto. Sul display viene visualizzata la frequenza.
• Regolare l'antenna.
• Premere il pulsante di accensione/spegnimento per spegnere la radio.
Impostazione dell'ora
• Premere il pulsante di accensione/spegnimento per spegnere la radio.
• Premere il pulsante della modalità memoria. Il formato dell'ora (12Hr/24Hr) lampeggia sul display.
Nota: Il formato dell'ora smette di lampeggiare dopo 4 secondi. È confermato il formato visualizzato sul display.
• Premere di nuovo il pulsante della memoria. Sul display compare l'ora lampeggiante. Premere i pulsanti di
sintonizzazione +/- per impostare l'ora.
• Premere di nuovo il pulsante della memoria. I minuti iniziano a lampeggiare. Premere i pulsanti di sintonizzazione +/- per
impostare i minuti.
• Premere di nuovo il pulsante della memoria per confermare l'ora impostata.
Impostazione della sveglia
• Premere il pulsante di accensione/spegnimento per spegnere la radio.
• Premere il pulsante della banda di frequenza. Sul display compare un'icona a forma di orologio.
• Premere il pulsante della modalità memoria. L'icona a forma di orologio e l'ora lampeggiano sul display. Premere i
pulsanti di sintonizzazione +/- per impostare l'ora.
• Premere di nuovo il pulsante della memoria. L'icona a forma di orologio e i minuti lampeggiano sul display. Premere i
pulsanti di sintonizzazione +/- per impostare i minuti.
• Premere di nuovo il pulsante della memoria per impostare la radio per l'attivazione della sveglia. Premere di nuovo il
pulsante della memoria per confermare. La radio si accende all'ora impostata.
• Premere di nuovo il pulsante della banda di frequenza. L'icona a forma di orologio scompare e l'impostazione della
sveglia viene annullata.
Nota: Icona a forma di orologio, ore e minuti smettono di lampeggiare dopo 4 secondi. È confermata l'impostazione
visualizzata sul display. Quando il display smette di lampeggiare, ripetere i passaggi indicati sopra per reimpostare la sveglia.
Quando la sveglia è impostata e sul display compare l'icona a forma di orologio, l'ora non può essere reimpostata.
Impostazione del tempo di sonno
• Premere il pulsante di accensione/spegnimento per spegnere la radio.
• Tenere premuto questo pulsante di accensione/spegnimento per impostare il tempo di sonno.
• Premere di nuovo il pulsante di accensione/spegnimento per selezionare il numero di minuti di sonno:
90 / 80 / 70 / 60 / 50 / 40 / 30 / 20 / 10.
Nota: La radio si accende e poi si spegne una volta trascorsi i minuti selezionati.
• Per annullare la funzione di sonno, premere di nuovo il pulsante di accensione/spegnimento.
Nota: L'impostazione viene confermata automaticamente dopo 3 secondi. Ripetere i passaggi per reimpostare il tempo di
sonno.
Sicurezza
Istruzioni generali
• Leggere il manuale con attenzione prima dell'uso. Conservare il manuale per riferimenti futuri.
• Il fabbricante non è responsabile per eventuali danni consequenziali o per danni a cose o persone derivanti
dall'inosservanza delle istruzioni sulla sicurezza o dall'uso improprio del dispositivo.
• Utilizzare il dispositivo solo per gli scopi previsti. Non utilizzare il dispositivo per scopi diversi da quelli descritti nel
manuale.
• Non utilizzare il dispositivo se presenta parti difettose. Se il dispositivo è danneggiato o difettoso, sostituirlo
immediatamente.
• Questo dispositivo è adatto solo per uso in ambienti interni. Non utilizzare il dispositivo all'aperto.
• Questo dispositivo è adatto solo per uso in ambienti domestici. Non utilizzare il dispositivo per scopi commerciali.
• Non utilizzare il dispositivo in posizioni con un elevato tasso di umidità come bagni o piscine.
• Non utilizzare il dispositivo in prossimità di vasche da bagno, docce, lavandini o altri recipienti contenenti acqua.
• Non utilizzare un timer o un telecomando separato per accendere automaticamente il dispositivo.
• Non coprire il dispositivo.
• Collocare il dispositivo su una supercie stabile e piana.
• Tenere il dispositivo a distanza da oggetti inammabili.
Sicurezza elettrica
• Per ridurre il rischio di scosse elettriche, il presente prodotto deve essere aperto solo da un tecnico autorizzato, nel caso
sia necessario ripararlo.
• Scollegare il prodotto dall’alimentazione e da altri apparecchi se dovesse esserci un problema.
• Non utilizzare il dispositivo in presenza di danni o difetti al cavo o alla spina di alimentazione. Se il cavo o la spina di
alimentazione è danneggiato o difettoso, deve essere sostituito dal fabbricante o da un centro riparazioni autorizzato.
• Prima dell'uso vericare sempre che la tensione di alimentazione corrisponda a quella indicata sulla targhetta nominale
del dispositivo.
• Non spostare il dispositivo tirandolo per il cavo di alimentazione. Vericare che il cavo non possa aggrovigliarsi.
• Non immergere il dispositivo, il cavo o la spina di alimentazione in acqua o altri liquidi.
• Non lasciare il dispositivo incustodito con la spina collegata alla rete di alimentazione.
• Non utilizzare cavi di prolunga.
Pulizia e manutenzione
Attenzione!
• Prima di qualsiasi intervento di pulizia o manutenzione, spegnere sempre il dispositivo, rimuovere la spina dalla presa a
parete e attendere che il dispositivo si sia rareddato.
• Non utilizzare solventi detergenti o abrasivi.
• Non pulire l'interno del dispositivo.
• Non cercare di riparare il dispositivo. Se il dispositivo non funziona correttamente, sostituirlo con uno nuovo.
• Non immergere il dispositivo in acqua o in altri liquidi.
• Pulire l'esterno del dispositivo con un panno morbido e umido. Asciugare a fondo il dispositivo con un panno pulito e
asciutto.
• Pulire le aperture di ventilazione con una spazzola morbida.
Assistenza
Per ulteriore assistenza o per fornire commenti o suggerimenti visitare il sito www.nedis.com/support
Contatti
NEDIS B.V., De Tweeling 28, 5215 MC ‘s-Hertogenbosch, Paesi Bassi
RDWR1000GY
World receiver
Specications
Power (RMS): 0.5 W
Peak power: 1.5 W
Frequency range: FM: 87.5 - 108 MHz, MW: 522 - 1620 KHz, SW: 3.7 - 22.05 MHz
Power input: 3 V DC or 2x 1.5V AA (not incl.)
Display: LED
Preset stations: 20
Sound alarm: Yes
Connections: Headphones output

Join the conversation about this product
Here you can share what you think about the Nedis RDWR1000GY Radio. If you have a question, first carefully read the manual. Requesting a manual can be done by using our contact form.