e
Snabbstartsguide
Riskokare KARC06WT
För ytterligare information, se den utökade manualen online:
ned.is/karc06wt
Avsedd användning
Denna enhet är avsedd för kokning och ångkokning.
Produkten är inte avsedd för yrkesmässig användning.
Modiering av produkten kan medföra konsekvenser för säkerhet,
garanti och korrekt funktion.
Huvuddelar (bild A)
1
Mått
2
Sked
3
Värmeplatta
4
Kokare
5
Varmfunktions-LED
6
Kokfunktions-LED
7
Funktionsomkopplare
8
Strömbrytare
9
Lock
10
Ångkokkärl
11
Kokkärl
12
Strömkabel
Säkerhetsanvisningar
-
VARNING
• Använd inte produkten om en del är skadad eller defekt. Byt en
omedelbart en skadad eller defekt enhet.
• Läs anvisningarna före användning.
• Sänk inte ned produkten i vatten.
• Kontakta en kvalicerad tekniker för service/reparation.
• Koppla inte ur produkten genom att dra i kabeln. Håll alltid i
kontakten när du drar.
• Vidrör inte heta ytor.
• Låt inte nätsladden vidröra heta ytor.
• Denna produkt är endast avsedd för användning inomhus.
• Dra alltid ut stockkontakten ur eluttaget före montering eller
demontering av tillbehör.
• Små barn bör hållas under uppsikt för att säkerställa att de inte leker
med produkten.
• Dra ut stickkontakten ur eluttaget när apparaten inte används och
före rengöring.
• Placera inte produkten nära gas, en elektrisk kokplatta eller i en varm
ugn.
• Var ytterst försiktig när enheten ska yttas om den är fylld med varmt
innehåll.
• Dra ut stickkontakten ur eluttaget när kokkärlet inte är infört i
riskokaren.
• Anslut nätsladden till endast ett eluttag. Använd inte
förlängningssladdar.
• Använd inte andra tillbehör än de medföljande.
• Låt inte nätsladden hänga över bordets eller bänkens kant.
• Säkerställ att kärlet och värmeplattans yta är fria från främmande
substanser.
• Använd produkten endast enligt anvisningarna i denna
bruksanvisning.
• Anslut endast denna produkt till ett 220 V eluttag.
Tillsätt ris och vatten (Bild B)
1. Mät den erforderliga mängden ris med det medföljande måttet
1
och skeden
2
.
2. Skölj riset in ett separat kärl.
3. Placera riset i kokkärlet
w
.
4. Tillsätt vatten i kokkärlet
w
enlig följande tabell:
Råris Erforderlig mängd
vatten
Kokt ris
2 koppar 2 – 2 ½ koppar 6 koppar
4 koppar 4 – 4 ½ koppar 12 koppar
6 koppar 6 – 6 ½ koppar 18 koppar
8 koppar 8 – 8 ½ koppar 24 koppar
10 koppar 10 – 10 ½ koppar 30 koppar
Koka riset (Bild C)
1. Placera kokkärlet
w
i kokaren
4
. Vrid det försiktigt åt vänster och
höger.
4
När ångkokkärlet används
q
ska det placeras överst på
w
.
2. Stäng locket
9
ordentligt.
3. Anslut nätsladden
e
till kokaren
4
och för in stickkontakten i ett
eluttag.
4. Använd strömbrytaren
8
för att slå på enheten.
5. Skjut funktionsomkopplaren
8
nedåt för att börja koka.
4
e
tänds för att indikera att kokningen har startat.
4
Tvinga inte
8
. I händelse av problem, för åter ner
w
i
4
och försök
igen.
6.
8
poppar upp när riset är färdigkokt.
5
tänds för att indikera
varmhållning.
4
Lämna aldrig tillbehör i kärlet när varmhållningsfunktionen är aktiv.
4
Värm inte upp ris som tidigare tillagats med varmhållningsfunktionen.
7. Låt locket ligga på i 6 - 8 minuter för att ångkoka riset.
8. Ta av locket
1
för att servera riset.
4
Lägg alltid på locket
9
efter varje servering för att förhindra att riset
torkar eller missfärgas.
9. Använd
7
för att stänga av enheten.
10. Dra ut stickkontakten
e
ur eluttaget efter användningen.
11. Låt produkten kallna.
Rengör kokkärlet och locket
1. Diska
9
,
q
och
w
i varmt vatten med diskmedel.
2. Skölj med rent vatten.
3. Torka med en mjuk trasa.
Att rengöra kokaren
• Använd inte aggressiva kemiska rengöringsmedel såsom ammoniak,
syra eller aceton vid rengöring av produkten.
• Rengör produkten regelbundet med en mjuk, ren och torr trasa.
Undvik slipande produkter som kan skada ytan.
• Sänk inte ned produkten i vatten.
Att rengöra värmeplattan
1. För att förhindra ojämn kokning ska du avlägsna alla främmande
substanser som fastnad på kokplattan
3
.
2. Använd stålull för att jämna ut och polera värmeplattans kontaktyta
3
.
Specikationer
Produkt Riskokare
Artikelnummer KARC06WT
Dimensioner (l x b x h) 260 x 260 x 230 mm
Inspänning 220 V
Max eekt 300 W
Kapacitet 0,6 l
h
Guía de inicio rápido
Olla arrocera KARC06WT
Para más información, consulte el manual ampliado en línea:
ned.is/karc06wt
Uso previsto por el fabricante
Este dispositivo está diseñado como un dispositivo de cocción normal y
de cocción al vapor.
El producto no está diseñado para un uso profesional.
Cualquier modicación del producto puede tener consecuencias para la
seguridad, la garantía y el funcionamiento adecuado.
Partes principales (imagen A)
1
Vaso de medición
2
Cuchara
3
Placa calentadora
4
Olla
5
LED de función calentar
6
LED de función cocinar
7
Interruptor de funciones
8
Interruptor de alimentación
9
Tapa
10
Cazuela de vapor
11
Cazuela de cocción
12
Cable de alimentación
Instrucciones de seguridad
-
ADVERTENCIA
• No use el producto si alguna pieza está dañada o presenta defectos.
Sustituya inmediatamente el aparato si presenta daños o está defectuoso.
• Lea las instrucciones antes de usarla.
• No sumerja el producto en agua.
• Póngase en contacto con un técnico cualicado para que se encargue
del mantenimiento/reparación.
• No desenchufe el producto tirando del cable. Sujete siempre el
enchufe y tire de él.
• No tocar las supercies calientes.
• No dejar que el cable de alimentación toque supercies calientes.
• El producto está diseñado únicamente para uso en interiores.
• Quitar siempre el enchufe de alimentación de la toma de corriente
antes de ensamblar o de quitar accesorios.
• Se debe supervisar a los niños para asegurarse de que no jueguen con
el producto.
• Desenchufar el producto cuando no esté en uso y antes de limpiarlo.
• No colocar el producto cerca de gas, un quemador eléctrico o un
horno calentado.
• Hay que poner mucha precaución en caso de mover el producto con
contenido caliente dentro.
• Desenchufar el cable de alimentación cuando la cazuela de cocción
no se encuentre dentro de la olla arrocera.
• Enchufe el cable solo a una toma de pared. No utilice cables alargadores.
• No utilizar accesorios que no estén incluidos.
• No permitir que el cable de alimentación cuelgue sobre el borde de
una mesa o mostrador.
• Asegurarse de que la cazuela y la supercie de la placa calentadora
permanezcan libres de sustancias extrañas.
• Utilice el producto únicamente tal como se describe en este manual.
• Utilizar este producto solamente con una toma de corriente de 220 V.
Añadir arroz y agua (Imagen B)
1. Medir la cantidad necesaria de arroz con el vaso de medición
1
y la
cuchara
2
.
2. Lavar el arroz en un bol aparte.
3. Poner el arroz en la cazuela de cocción
w
.
4. Añadir agua a la cazuela de cocción
w
de acuerdo con la tabla siguiente:
Arroz crudo Agua necesaria Arroz cocido
2 tazas 2 – 2 ½ tazas 6 tazas
4 tazas 4 – 4 ½ tazas 12 tazas
6 tazas 6 – 6 ½ tazas 18 tazas
8 tazas 8 – 8 ½ tazas 24 tazas
10 tazas 10 – 10 ½ tazas 30 tazas
Cocinar el arroz (Imagen C)
1. Colocar la cazuela de cocción
w
dentro de la olla
4
. Girarla con
cuidado hacia la derecha y hacia la izquierda.
4
Al utilizar la cazuela de vapor
q
, colocarla en la parte superior de
w
.
2. Cerrar la tapa rmemente
9
.
3. Fijar el cable de alimentación
e
a la olla
4
y enchufarlo a una toma
de corriente.
4. Use el interruptor de alimentación
8
para encender el dispositivo.
5. Deslizar el interruptor de funciones
8
hacia abajo para iniciar la cocción.
4
e
se ilumina para indicar que se ha iniciado la cocción.
4
No forzar
8
. Si hay dicultades, reinsertar
w
dentro de
4
e
intentarlo de nuevo.
6.
8
salta cuando el arroz ha terminado de cocerse.
5
se ilumina para
indicar que la comida se mantiene caliente.
4
No dejar nunca ningún accesorio en la cazuela al utilizar la función de
mantener caliente.
4
No recalentar el arroz que haya sido cocido previamente con la
función de mantener caliente.
7. Dejar la tapa puesta durante 6-8 minutos para vaporizar el arroz.
8. Quitar la tapa
1
para servir el arroz.
4
Cerrar siempre la tapa
9
completamente después de servir para
evitar que el arroz se seque o se decolore.
9. Utilizar el
7
para apagar el dispositivo.
10. Desenchufar el cable de alimentación
e
de la toma de corriente
después del uso.
11. Dejar que el producto se enfríe.
Limpieza de la cazuela de cocción y de la tapa
1. Lavar
9
,
q
y
w
en agua caliente con jabón.
2. Enjuagar con agua limpia.
3. Secar con un paño suave.
Limpieza de la olla
• Para limpiar el producto, no utilice productos de limpieza agresivos
como amoníaco, ácido o acetona.
• Limpie el producto regularmente con un paño suave, limpio y seco.
Evite los productos abrasivos que puedan dañar la supercie.
• No sumerja el producto en agua.
Limpieza de la placa calentadora
1. Para prevenir una cocción desigual, retirar toda la materia extraña
adherida a la placa calentadora
3
.
2. Utilizar lana de acero para suavizar y pulir el área de contacto de la
placa calentadora
3
.
Especicaciones
Producto Olla arrocera
Número de artículo KARC06WT
Dimensiones (L x An x Al) 260 x 260 x 230 mm
Tensión de entrada 220 V
Potencia máxima 300 W
Capacidad 0,6 l
j
Guida rapida all’avvio
Cuociriso KARC06WT
Per maggiori informazioni vedere il manuale esteso online:
ned.is/karc06wt
Uso previsto
Questo dispositivo è inteso come dispositivo di cottura e cottura al vapore.
Il prodotto non è inteso per utilizzi professionali.
Eventuali modiche al prodotto possono comportare conseguenze per la
sicurezza, la garanzia e il corretto funzionamento.
Parti principali (immagine A)
1
Tazza di misurazione
2
Cucchiaio
3
Piastra di riscaldamento
4
Cuociriso
5
Spia LED funzione di riscaldamento
6
Spia LED funzione di cottura
7
Interruttore Funzione
8
Interruttore di alimentazione
9
Coperchio
10
Vaporiera
11
Pentola di cottura
12
Cavo di alimentazione
Istruzioni di sicurezza
-
ATTENZIONE
• Non utilizzare il prodotto se una parte è danneggiata o difettosa.
Sostituire immediatamente un dispositivo danneggiato o difettoso.
• Leggere le istruzioni prima dell’uso.
• Non immergere il prodotto in acqua.
• Contattare un tecnico qualicato per la manutenzione/riparazione.
• Non scollegare il prodotto tirandolo per il cavo. Aerrare sempre la
presa e tirare.
• Non toccare alcuna parte calda.
• Non lasciare che il cavo di alimentazione tocchi le superci calde.
• Il prodotto è inteso solo per utilizzo in interni.
• Estrarre sempre la spina di alimentazione dalla presa elettrica prima di
montare o rimuovere gli accessori.
• I bambini devono essere sottoposti a supervisione per assicurarsi che
non giochino con il prodotto.
• Scollegare il prodotto quando non viene utilizzato e prima della
pulizia.
• Non posizionare il prodotto accanto a gas, bruciatori elettrici o forni
riscaldati.
• Prestare estrema cautela nello spostare il prodotto nel caso in cui
contenga sostanze calde.
• Scollegare il cavo di alimentazione quando la pentola di cottura non si
trova all’interno della cuociriso.
• Collegare il cavo solo a una presa di corrente. Non utilizzare prolunghe.
• Non utilizzare accessori non in dotazione.
• Non lasciar penzolare il cavo di alimentazione dal bordo di un tavolo o
di un piano da cucina.
• Assicurarsi che la pentola e la supercie della piastra riscaldante
rimangano libere da sostanze estranee.
• Utilizzare il prodotto solo come descritto nel presente manuale.
• Utilizzare questo prodotto solo con una presa elettrica da 220 V.
Aggiungere riso e acqua (Immagine B)
1. Misurare la quantità necessaria di riso con la tazza di misurazione
1
e
il cucchiaio
2
in dotazione.
2. Lavare il riso in una ciotola separata.
3. Inserire il riso nella pentola di cottura
w
.
4. Aggiungere acqua alla pentola di cottura
w
in base alla seguente tabella:
Riso crudo Acqua necessaria Riso cotto
2 tazze 2 – 2 ½ tazze 6 tazze
4 tazze 4 – 4 ½ tazze 12 tazze
6 tazze 6 – 6 ½ tazze 18 tazze
8 tazze 8 – 8 ½ tazze 24 tazze
10 tazze 10 – 10 ½ tazze 30 tazze
Cottura del riso (Immagine C)
1. Inserire la pentola di cottura
w
nel cuociriso
4
. Ruotarla
delicatamente a destra e a sinistra.
4
Quando si utilizza la vaporiera
q
, disporla sopra a
w
.
2. Chiudere saldamente il coperchio
9
.
3. Collegare il cavo di alimentazione
e
al cuociriso
4
e inserirlo in una
presa elettrica.
4. Utilizzare l’interruttore di alimentazione
8
per accendere il
dispositivo.
5. Scorrere l’interruttore delle funzioni
8
verso il basso per iniziare la
cottura.
4
e
si accende a indicare che la cottura ha avuto inizio.
4
Non forzare
8
. Se si riscontrano dicoltà, inserire nuovamente
w
in
4
e riprovare.
6.
8
scatta una volta che il riso ha terminato la cottura.
5
si accende a
indicare che la pietanza viene mantenuta calda.
4
Non lasciare mai alcun accessorio nella pentola quando si utilizza la
funzione di riscaldamento.
4
Non riscaldare il riso cotto in precedenza con la funzione per il
mantenimento del calore.
7. Lasciare il coperchio chiuso per 6-8 minuti per cuocere il riso al vapore.
8. Rimuovere il coperchio
1
per servire il riso.
4
Chiudere sempre il coperchio
9
completamente dopo aver servito
ciascuna porzione per impedire che il riso si asciughi o perda colore.
9. Utilizzare
7
per spegnere il dispositivo.
10. Scollegare il cavo di alimentazione
e
dalla presa elettrica dopo l’uso.
11. Lasciar rareddare il prodotto.
Pulizia della pentola di cottura e del coperchio
1. Lavare
9
,
q
e
w
in acqua calda e sapone.
2. Sciacquare con acqua pulita.
3. Asciugare con un panno morbido.
Pulizia del cuociriso
• Per la pulizia del prodotto non utilizzare detergenti chimici aggressivi
come ammoniaca, acido o acetone.
• Pulire il prodotto regolarmente con un panno asciutto, morbido e
pulito. Evitare sostanze abrasive che possono danneggiare la supercie.
• Non immergere il prodotto in acqua.
Pulizia della piastra di riscaldamento
1. Per prevenire una cottura disomogenea, rimuovere tutte le sostanze
estranee attaccate alla piastra di riscaldamento
3
.
2. Utilizzare lana d’acciaio per spianare e levigare l’area di contatto della
piastra di riscaldamento
3
.
Speciche
Prodotto Cuociriso
Numero articolo KARC06WT
Dimensioni (p x l x a) 260 x 260 x 230 mm
Tensione in ingresso 220 V
Potenza massima 300 W
Capacità 0,6 l
c
Kurzanleitung
Reiskocher KARC06WT
Für weitere Informationen beachten Sie die erweiterte
Anleitung online: ned.is/karc06wt
Bestimmungsgemäße Verwendung
Dieses Gerät dient als Koch- und Dampfgargerät.
Das Produkt ist nicht für den professionellen Einsatz gedacht.
Jegliche Modikation des Produkts kann Folgen für die Sicherheit,
Garantie und ordnungsgemäße Funktionalität haben.
Hauptbestandteile (Abbildung A)
1
Messbecher
2
Löel
3
Heizplatte
4
Kocher
5
Warmhaltefunktion-LED
6
Kochfunktion-LED
7
Funktionsschalter
8
Ein/Aus-Schalter
9
Abdeckung
10
Dampfgareinsatz
11
Kocheinsatz
12
Stromkabel
Sicherheitshinweise
-
WARNUNG
• Verwenden Sie das Produkt nicht, wenn ein Teil beschädigt ist oder es einen
Mangel aufweist. Ersetzen Sie ein beschädigtes oder defektes Gerät unverzüglich.
• Lesen Sie vor der Verwendung die Anweisungen.
• Tauchen Sie das Produkt nicht in Wasser.
• Nehmen Sie Kontakt zu einem geschulten Techniker zur Wartung/Reparatur auf.
• Ziehen Sie das Produkt niemals am Kabel aus der Steckdose. Halten
Sie immer den Stecker fest und ziehen Sie daran.
• Berühren Sie keine heißen Oberächen.
• Lassen Sie das Stromkabel keine heißen Oberächen berühren.
• Das Produkt ist nur zur Verwendung innerhalb von Gebäuden gedacht.
• Ziehen Sie immer den Netzstecker aus der Steckdose, bevor Sie
Zubehör einsetzen oder entfernen.
• Kinder müssen beaufsichtigt werden, um sicherzustellen, dass sie
nicht mit dem Produkt spielen.
• Trennen Sie das Produkt bei Nichtgebrauch und vor der Reinigung
von der Stromversorgung.
• Platzieren Sie das Produkt nicht in der Nähe von Gas, einem
Elektrobrenner oder einem aufgeheizten Ofen.
• Seien Sie vorsichtig, wenn Sie das Produkt inklusive heißen Inhalts versetzen.
• Trennen Sie das Stromkabel von der Steckdose, wenn sich der
Kocheinsatz nicht im Reiskocher bendet.
• Stecken Sie das Kabel nur direkt an einer Wandsteckdose an.
Verwenden Sie kein Verlängerungskabel.
• Verwenden Sie kein Zubehör, das nicht im Lieferumfang enthalten war.
• Lassen Sie das Stromkabel nicht über die Kante eines Tisches oder
einer Arbeitsplatte herunterhängen.
• Achten Sie darauf, dass der Einsatz und die Oberäche der Heizplatte
frei von Fremdkörpern bleiben.
• Verwenden Sie das Produkt nur wie in dieser Anleitung beschrieben.
• Verwenden Sie das Produkt nur an einer 220 V Steckdose.
Geben Sie Reis und Wasser hinzu (Abbildung B)
1. Messen Sie mit dem beigefügten Messbecher
1
und Löel
2
die
benötigte Menge Reis ab.
2. Waschen Sie den Reis in einem separaten Behälter.
3. Geben Sie den Reis in den Kocheinsatz
w
.
4. Fügen Sie Wasser gemäß der folgenden Tabelle zum Kochtopf
w
hinzu:
Roher Reis Benötigtes Wasser Gekochter Reis
2 Tassen 2 – 2 ½ Tassen 6 Tassen
4 Tassen 4 – 4 ½ Tassen 12 Tassen
6 Tassen 6 – 6 ½ Tassen 18 Tassen
8 Tassen 8 – 8 ½ Tassen 24 Tassen
10 Tassen 10 – 10 ½ Tassen 30 Tassen
Kochen Sie den Reis (Abbildung C)
1. Stellen Sie den Kocheinsatz
w
in den Kocher
4
. Drehen Sie ihn sanft
nach rechts und links.
4
Bei Verwendung des Dampfeinsatzes
q
, platzieren Sie ihn auf
w
.
2. Schließen Sie den Deckel
9
fest.
3. Schließen Sie das Stromkabel
e
am Kocher
4
an und stecken Sie es
in eine Steckdose.
4. Verwenden Sie den Ein/Aus-Schalter
8
, um das Gerät einzuschalten.
5. Schieben Sie den Funktionsschalter
8
nach unten, um den
Kochvorgang zu starten.
4
e
leuchtet auf um anzuzeigen, dass der Kochvorgang begonnen hat.
4
Drücken Sie
8
nicht übermäßig. Falls Schwierigkeiten auftreten,
setzen Sie
w
neu in
4
ein und versuchen Sie es erneut.
6.
8
kommt hoch, wenn der Reis fertig gekocht ist.
5
leuchtet auf, um
anzuzeigen, dass die Lebensmittel warm gehalten werden.
4
Lassen Sie kein Zubehör im Kocheinsatz zurück, wenn die
Warmhaltefunktion genutzt wird.
4
Wärmen Sie zuvor gekochten Reis mit der Warmhaltefunktion nicht
wieder auf.
7. Lassen Sie den Deckel für 6-8 Minuten geschlossen, um den Reis zu dämpfen.
8. Entfernen Sie den Deckel
1
, um den Reis zu servieren.
4
Schließen Sie den Deckel
9
nach dem Servieren immer vollständig,
damit der Reis nicht austrocknet oder sich verfärbt.
9. Verwenden Sie
7
, um das Gerät auszuschalten.
10. Ziehen Sie nach der Verwendung das Netzkabel
e
aus der Steckdose.
11. Lassen Sie das Produkt abkühlen.
Reinigung von Kocheinsatz und Deckel
1. Spülen Sie
9
,
q
und
w
in heißem Wasser mit Spülmittel.
2. Spülen Sie mit klarem Wasser ab.
3. Mit einem weichen Tuch abtrocknen.
Reinigung des Kochers
• Verwenden Sie keine aggressiven chemischen Reinigungsmittel wie
Ammoniak, Säuren oder Aceton zur Reinigung des Produkts.
• Reinigen Sie das Produkt regelmäßig mit einem weichen, sauberen
und trockenen Tuch. Vermeiden Sie scheuernde Reinigungsmittel,
welche die Oberäche beschädigen können.
• Tauchen Sie das Produkt nicht in Wasser.
Reinigung der Heizplatte
1. Um einen unregelmäßigen Kochvorgang zu verhindern, entfernen Sie
alle Fremdstoe, die an der Heizplatte
3
anhaften.
2. Verwenden Sie Stahlwolle, um die Kontaktäche der Heizplatte
3
zu
glätten und zu polieren.
Spezikationen
Produkt Reiskocher
Artikelnummer KARC06WT
Größe (L x B x H) 260 x 260 x 230 mm
Eingangsspannung 220 V
Maximale Leistung 300 W
Kapazität 0,6 l
b
Guide de démarrage rapide
Cuiseur à riz KARC06WT
Pour plus d'informations, consultez le manuel détaillé en ligne
: ned.is/karc06wt
Utilisation prévue
Cet appareil est conçu comme un appareil de cuisson et de cuisson à la vapeur.
Le produit n’est pas destiné à un usage professionnel.
Toute modication du produit peut avoir des conséquences sur la
sécurité, la garantie et le bon fonctionnement.
Pièces principales (image A)
1
Tasse à mesurer
2
Cuillère
3
Plaque chauante
4
Cuiseur
5
LED de fonctionnement chaud
6
LED de fonction de cuisson
7
Interrupteur de fonctionnement
8
Interrupteur
9
Couvercle
10
Pot vapeur
11
Pot de cuisson
12
Câble d'alimentation
Consignes de sécurité
-
AVERTISSEMENT
• Ne pas utiliser le produit si une pièce est endommagée ou
défectueuse. Remplacer immédiatement un appareil endommagé ou
défectueux.
• Lisez les instructions avant utilisation.
• Ne pas immerger le produit dans l’eau.
• Contactez un technicien qualié pour entretien / réparation.
• Ne débranchez pas le produit en tirant sur le câble. Saisissez toujours
la che et tirez.
• Ne pas toucher les surfaces chaudes.
• Ne pas laisser le câble d'alimentation toucher des surfaces chaudes.
• Le produit est prévu pour un usage intérieur uniquement.
• Débranchez toujours le cordon d'alimentation de la prise de courant
avant d'assembler ou de démonter des accessoires.
• Les enfants doivent être surveillés an de s’assurer qu’ils ne jouent pas
avec le produit.
• Débranchez le produit lorsque vous ne l'utilisez pas et avant de le nettoyer.
• Ne pas placer le produit à proximité d’un brûleur à gaz, d’une plaque
électrique ou d’un four chaud.
• Vous devez faire preuve d’une extrême prudence lors du déplacement
du produit au cas où il contiendrait une substance très chaude.
• Débranchez le câble d'alimentation lorsque le pot de cuisson ne se
trouve pas à l'intérieur du cuiseur à riz.
• Ne branchez le câble que dans une prise murale. Ne pas utiliser de rallonges.
• Ne pas utiliser d'accessoires non inclus.
• Ne pas laisser le câble d'alimentation pendre au bord d'une table ou
d'un comptoir.
• Assurez-vous que le pot et la surface de la plaque chauante restent
exemptes de corps étrangers.
• Utilisez le produit uniquement comme décrit dans le présent manuel.
• Utilisez ce produit uniquement sur une prise de courant de 220 V.
Ajoutez le riz et l'eau (Image B)
1. Mesurez la quantité de riz nécessaire avec la tasse à mesurer
1
et la
cuillère
2
incluses.
2. Lavez le riz dans un bol séparé.
3. Mettez le riz dans le pot de cuisson
w
.
4. Ajouter de l'eau dans le pot de cuisson
w
selon le tableau suivant :
Riz cru Besoin en eau Riz cuit
2 tasses 2 – 2 ½ tasses 6 tasses
4 tasses 4 – 4 ½ tasses 12 tasses
6 tasses 6 – 6 ½ tasses 18 tasses
8 tasses 8 – 8 ½ tasses 24 tasses
10 tasses 10 – 10 ½ tasses 30 tasses
Cuisson du riz (Image C)
1. Mettez le pot de cuisson
w
dans le cuiseur
4
. Tournez-le doucement
vers la droite et la gauche.
4
Lorsque vous utilisez le pot vapeur
q
, mettez-le sur le dessus de
w
.
2. Fermez bien le couvercle
9
.
3. Attachez le câble d'alimentation
e
au cuiseur
4
et branchez-le sur
une prise de courant.
4. Utilisez l’interrupteur d’alimentation
8
pour mettre l’appareil sous tension.
5. Faites coulisser l’interrupteur de fonctionnement
8
vers le bas pour
démarrer la cuisson.
4
e
s'allume pour indiquer que la cuisson a commencé.
4
Ne pas forcer
8
. En cas de problème, réinsérez
w
dans
4
et réessayez.
6.
8
se désenclenche une fois la cuisson du riz terminée.
5
s'allume
pour indiquer que les aliments sont maintenus au chaud.
4
Ne jamais laisser d'accessoires dans le pot lorsque vous utilisez la
fonction de maintien au chaud.
4
Ne pas réchauer du riz déjà cuit avec la fonction de maintien au chaud.
7. Laissez le couvercle pendant 6 à 8 minutes pour cuire le riz à la vapeur.
8. Enlevez le couvercle
1
pour servir le riz.
4
Fermez toujours le couvercle complètement
9
après chaque portion
pour empêcher le riz de sécher ou de se décolorer.
9. Utilisez l’
7
pour mettre l’appareil hors tension.
10. Débranchez le câble d'alimentation
e
de la prise de courant après utilisation.
11. Laissez le produit refroidir.
Nettoyage du pot de cuisson et du couvercle
1. Lavez
9
,
q
et
w
dans de l'eau chaude avec du nettoyant.
2. Rincez à l'eau claire.
3. Séchez avec un chion doux.
Nettoyage du cuiseur
• N'utilisez pas de nettoyants chimiques agressifs tels que de
l'ammoniac, de l'acide ou de l'acétone lors du nettoyage du produit.
• Nettoyez régulièrement le produit avec un chion doux, propre et sec.
Évitez les abrasifs qui peuvent endommager la surface.
• Ne pas immerger le produit dans l’eau.
Nettoyage de la plaque chauante
1. An d’éviter une cuisson inégale, enlevez tous les corps étrangers
collés à la plaque chauante.
3
.
2. Utilisez de la laine d'acier pour lisser et polir la zone de contact de la
plaque chauante
3
.
Spécications
Produit Cuiseur à riz
Article numéro KARC06WT
Dimensions (L x l x H) 260 x 260 x 230 mm
Tension d’entrée 220 V
Puissance maximale 300 W
Capacité 0,6 L
d
Verkorte handleiding
Rijstkoker KARC06WT
Zie voor meer informatie de uitgebreide handleiding online:
ned.is/karc06wt
Bedoeld gebruik
Dit apparaat is bedoeld als kook- en stoomapparaat.
Het product is niet bedoeld voor professioneel gebruik.
Elke wijziging van het product kan gevolgen hebben voor veiligheid,
garantie en correcte werking.
Belangrijkste onderdelen (afbeelding A)
1
Maatbeker
2
Lepel
3
Verwarmingsplaat
4
Koker
5
Warmhoud-functie LED
6
Kookfunctie LED
7
Functieschakelaar
8
Aan-/ uitschakelaar
9
Deksel
10
Stoompan
11
Kookpan
12
Stroomkabel
Veiligheidsvoorschriften
-
WAARSCHUWING
• Gebruik het product niet als een onderdeel beschadigd of defect is.
Vervang een beschadigd of defect apparaat onmiddellijk.
• Lees de instructies voor gebruik.
• Het product niet in water onderdompelen.
• Neem contact voor onderhoud/reparatie contact op met een
gekwaliceerde monteur.
• Trek de stekker niet uit het stopcontact door aan de kabel te trekken.
Pak altijd de stekker vast en trek eraan.
• Raak geen hete oppervlakken aan.
• Laat het netsnoer niet met hete oppervlakken in aanraking komen.
• Het product is enkel bedoeld voor gebruik binnenshuis.
• Haal altijd de stekker uit het stopcontact voordat u accessoires
monteert of verwijdert.
• Kinderen moeten onder toezicht staan om ervoor te zorgen dat ze
niet met het product spelen.
• Haal de stekker van het product uit het stopcontact als het niet in
gebruik is en voordat u het schoonmaakt.
• Plaats het product niet in de buurt van gas, een elektrische brander of
een verwarmde oven.
• Wees uiterst voorzichtig bij het verplaatsen van het product als het
een hete inhoud bevat.
• Trek de stekker van het netsnoer uit het stopcontact als de pan zich
niet in de rijstkoker bevindt.
• De kabel alleen in een wandstopcontact steken. Gebruik geen verlengsnoeren.
• Gebruik geen accessoires die niet meegeleverd worden.
• Laat het netsnoer niet over de rand van een tafel of toonbank hangen.
• Zorg ervoor dat er geen vreemde stoen op de pan en het oppervlak
van de verwarmingsplaat komen.
• Gebruik het product alleen zoals beschreven in deze handleiding.
• Gebruik dit product alleen met een 220 V stopcontact.
Voeg rijst en water toe (Afbeelding B)
1. Meet de benodigde hoeveelheid rijst af met de bijgeleverde
maatbeker
1
en lepel
2
.
2. Was de rijst in een aparte kom.
3. Plaats de rijst in de kookpan
w
.
4. Voeg water toe aan de kookpan
w
overeenkomstig onderstaande tabel:
Ongekookte rijst Benodigd water Gekookte rijst
2 kopjes 2 – 2 ½ kopjes 6 kopjes
4 kopjes 4 – 4 ½ kopjes 12 kopjes
6 kopjes 6 – 6 ½ kopjes 18 kopjes
8 kopjes 8 – 8 ½ kopjes 24 kopjes
10 kopjes 10 – 10 ½ kopjes 30 kopjes
Kook de rijst (Afbeelding C)
1. Plaats de kookpan
w
in de koker
4
. Draai deze zachtjes naar rechts
en naar links.
4
Wanneer u de stoompan
q
, gebruikt, plaats deze dan bovenop
w
.
2. Sluit het deksel
9
stevig.
3. Sluit het netsnoer
e
aan op de rijstkoker
4
en steek de stekker in
het stopcontact.
4. Gebruik de aan/uit-schakelaar
8
om het apparaat aan te zetten.
5. Schuif de functieschakelaar
8
naar beneden om met het koken te
beginnen.
4
e
gaat branden om aan te geven dat het koken is begonnen.
4
Forceer
8
niet. Als er zich problemen voordoen, plaats dan
w
opnieuw in
4
en probeer het nog een keer.
6.
8
schiet omhoog als de rijst gaar is.
5
gaat branden om aan te
geven dat het eten warm gehouden wordt.
4
Laat nooit accessoires in de pan liggen als u de warmhoud-functie
gebruikt.
4
Warm rijst die eerder gekookt is niet met de warmhoud-functie
opnieuw op.
7. Laat het deksel 6-8 minuten lang op de pan om de rijst gaar te
stomen.
8. Verwijder het deksel
1
als u de rijst wilt opdienen.
4
Sluit na het opdienen van de rijst het deksel
9
altijd helemaal af om
te voorkomen dat de rijst droogt of verkleurt.
9. Gebruik de
7
om het apparaat uit te zetten.
10. Haal het netsnoer
e
na gebruik uit het stopcontact.
11. Laat het product afkoelen.
De kookpan en het deksel reinigen
1. Was
9
,
q
en
w
met zeep in heet water.
2. Spoel met schoon water af.
3. Droog af met een zachte doek.
De pan reinigen
• Gebruik geen agressieve chemische reinigingsmiddelen zoals
ammoniak, zuur of aceton bij het schoonmaken van het product.
• Reinig het product regelmatig met een zachte, schone, droge doek.
Vermijd schuurmiddelen die het oppervlak kunnen beschadigen.
• Het product niet in water onderdompelen.
De verwarmingsplaat reinigen
1. Om ongelijkmatig koken te voorkomen, verwijder alle resten die op
de verwarmingsplaat
3
zitten.
2. Gebruik staalwol om het contactoppervlak van de verwarmingsplaat
glad te maken en te poetsen
3
.
Specicaties
Product Rijstkoker
Artikelnummer KARC06WT
Afmetingen (l x b x h) 260 x 260 x 230 mm
Ingangsspanning 220 V
Maximaal vermogen 300 W
Capaciteit 0,6 L
a
Quick start guide
Rice cooker KARC06WT
For more information see the extended manual online:
ned.is/karc06wt
Intended use
This device is intended as a cooking - and steaming device.
The product is not intended for professional use.
Any modication of the product may have consequences for safety,
warranty and proper functioning.
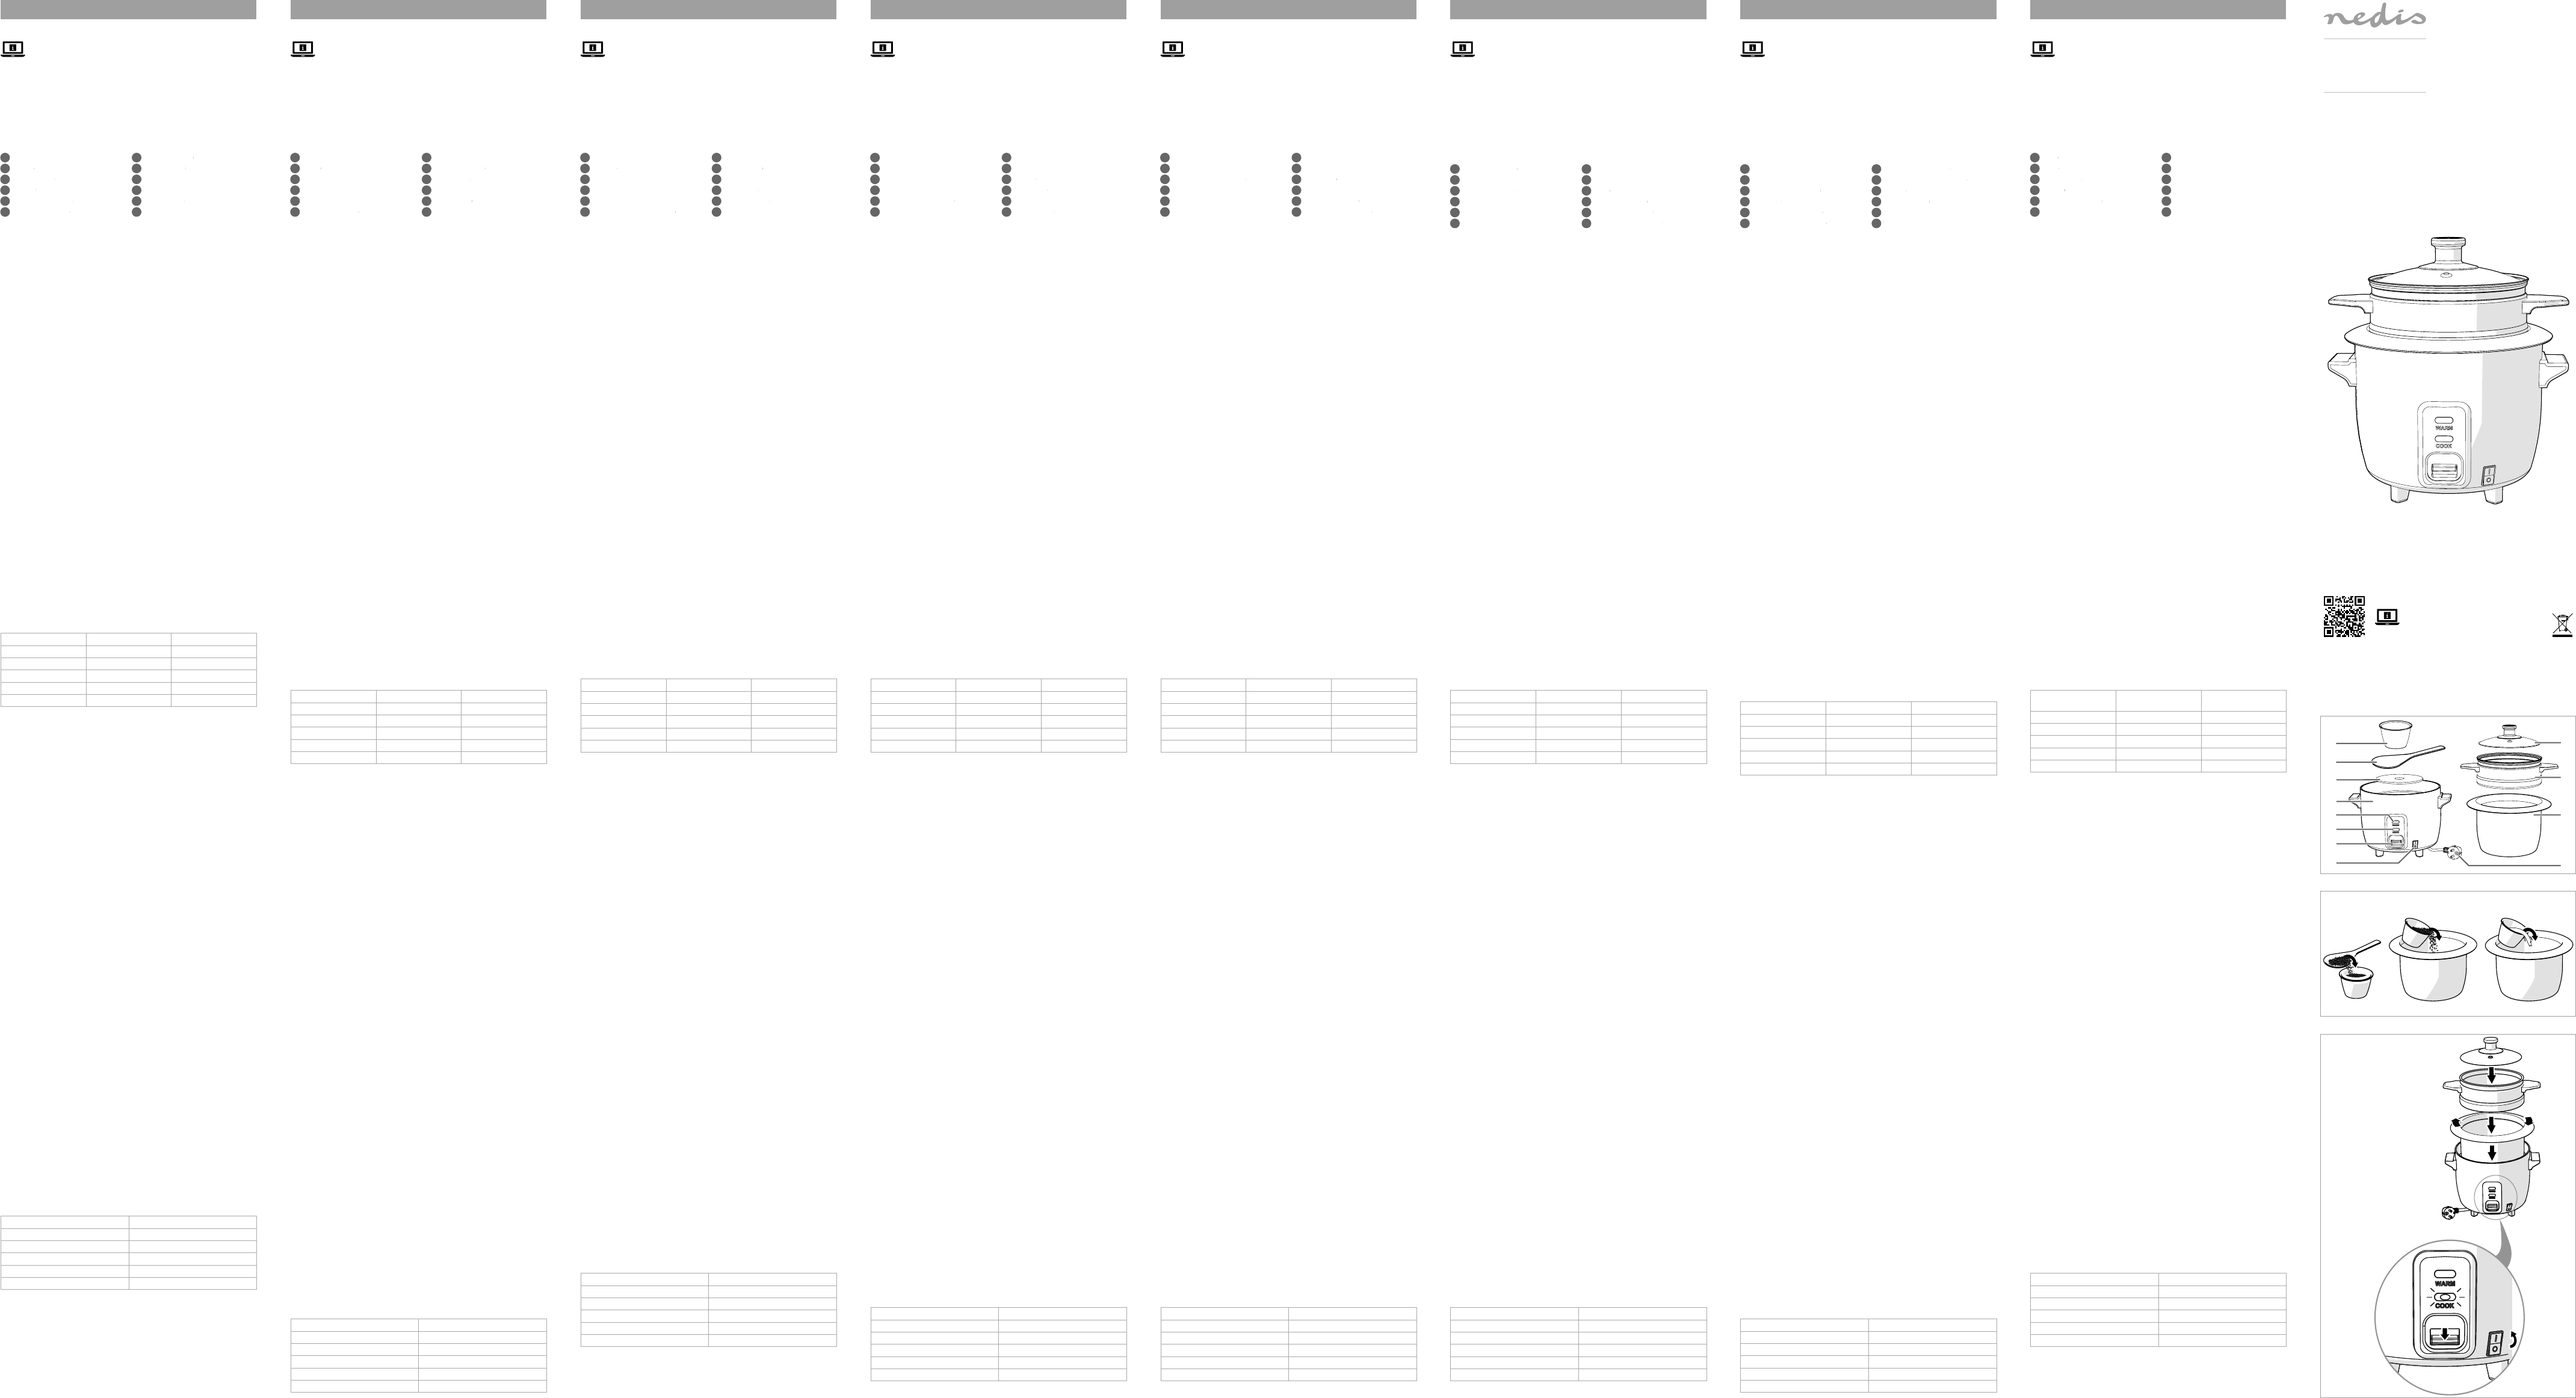
Main parts (image A)
1
Measuring cup
2
Spoon
3
Heating plate
4
Cooker
5
Warm function LED
6
Cook function LED
7
Function switch
8
Power switch
9
Lid
10
Steaming pan
11
Cooking pan
12
Power cable
Safety instructions
-
WARNING
• Do not use the product if a part is damaged or defective. Replace a
damaged or defective device immediately.
• Read the instructions before use.
• Do not immerse the product in water.
• Contact a qualied technician for service/repair.
• Do not unplug the product by pulling on the cable. Always grasp the
plug and pull.
• Do not touch any hot surfaces.
• Do not let the power cable touch hot surfaces.
• The product is intended for indoor use only.
• Always remove the power plug from the power outlet before
assembling or removing accessories.
• Children should be supervised to ensure that they do not play with
the product.
• Unplug the product when not in use and before cleaning.
• Do not place the product near gas, an electric burner or a heated oven.
• Extreme caution must be used when moving the product in case it
contains.
• Unplug the power cable when the cooking pan is not inside the rice cooker.
• Only plug the cable into a wall outlet. Do not use extension cords.
• Do not use any accessories that are not included.
• Do not let the power cable hang over the edge of a table or counter.
• Make sure the pan and surface of the heater plate remain free of
foreign matter.
• Only use the product as described in this manual.
• Only use this product with a 220 V power outlet.
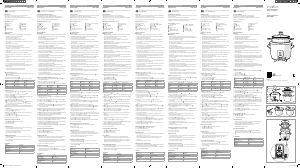
Add rice and water (Image B)
1. Measure the needed amount of rice with the included measuring cup
1
and spoon
2
.
2. Wash the rice in a separate bowl.
3. Place the rice in the cooking pan
w
.
4. Add water to the cooking pan
w
according to the following table:
Raw rice Water needed Cooked rice
2 cups 2 – 2 ½ cups 6 cups
4 cups 4 – 4 ½ cups 12 cups
6 cups 6 – 6 ½ cups 18 cups
8 cups 8 – 8 ½ cups 24 cups
10 cups 10 – 10 ½ cups 30 cups
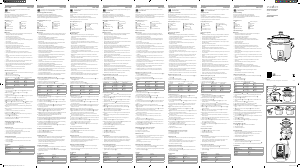
Cook the rice (Image C)
1. Place the cooking pan
w
into the cooker
4
. Gently turn it to the
right and the left.
4
When using the steaming pan
q
, place it on top of
w
.
2. Firmly close the lid
9
.
3. Attach the power cable
e
to the cooker
4
and plug it into a power outlet.
4. Use the power switch
8
to turn on the device.
5. Slide the function switch
8
down to start cooking.
4
e
lights up to indicate cooking has started.
4
Do not force
8
. If diculty occurs, reinsert
w
into
4
and try again.
6.
8
pops up when the rice has nished cooking.
5
lights up to
indicate the food is kept warm.
4
Never leave any accessories in the pan when using the keep warm
function.
4
Do not reheat rice that has been previously cooked with the keep
warm function.
7. Leave the lid on for 6-8 minutes to steam the rice.
8. Remove the lid
1
to serve the rice.
4
Always close the lid
9
completely after each serving to keep rice
from drying or discolouring.
9. Use the
7
to turn o the device.
10. Unplug the power cable
e
from the power outlet after use.
11. Allow the product to cool down.
Cleaning the cooking pan and the lid
1. Wash
9
,
q
and
w
in hot water with soap.
2. Rinse with clean water.
3. Dry with a soft cloth.
Cleaning the cooker
• Do not use aggressive chemical cleaning agents such as ammonia,
acid or acetone when cleaning the product.
• Clean the product regularly with a soft, clean, dry cloth. Avoid
abrasives that can damage the surface.
• Do not immerse the product in water.
Cleaning the heating plate
1. To prevent uneven cooking, remove all foreign matter stuck to the
heating plate
3
.
2. Use steel wool to smooth out and polish the contact area of the
heating plate
3
.
Specications
Product Rice cooker
Article number KARC06WT
Dimensions (l x w x h) 260 x 260 x 230 mm
Input voltage 220 V
Maximum power 300 W
Capacity 0.6 L
i
Guia de iniciação rápida
Arrozeira KARC06WT
Para mais informações, consulte a versão alargada do manual
on-line: ned.is/karc06wt
Utilização prevista
Este dispositivo destina-se a ser um dispositivo de cozedura e
vaporização.
O produto não se destina a utilização prossional.
Qualquer alteração do produto pode ter consequências em termos de
segurança, garantia e funcionamento adequado.
Peças principais (imagem A)
1
Copo de medição
2
Colher
3
Placa de aquecimento
4
Arrozeira
5
LED de função de calor
6
LED de função cozedura
7
Interruptor de função
8
Interruptor de alimentação
9
Tampa
10
Panela a vapor
11
Panela de cozedura
12
Cabo de alimentação
Instruções de segurança
-
AVISO
• Não utilize o produto caso uma peça esteja danicada ou defeituosa.
Substitua imediatamente um dispositivo danicado ou defeituoso.
• Leia as instruções antes de utilizar o produto.
• Não mergulhe o produto em água.
• Contacte um técnico qualicado para manutenção/reparação.
• Não desligue o produto da tomada puxando o cabo. Segure sempre
pela cha e puxe.
• Não toque nas superfícies quentes.
• Não deixe o cabo de alimentação entrar em contacto com superfícies
quentes.
• O produto destina-se apenas a utilização em interiores.
• Desligue sempre a cha da tomada elétrica antes de montar ou
remover acessórios.
• As crianças devem ser supervisionadas para garantir que não brincam
com o produto.
• Desligue o produto quando não estiver a ser utilizado e antes de
limpar.
• Não coloque o produto perto de fontes de gás, de um queimador
elétrico ou de um forno aquecido.
• Deve proceder com extrema cautela ao deslocar o produto caso
contenha recheio quente.
• Desligue o cabo de alimentação quando a panela de cozedura não
estiver dentro da arrozeira.
• Apenas ligue o cabo a uma tomada de parede. Não utilize extensões.
• Não utilize quaisquer acessórios que não estejam incluídos.
• Não deixe o cabo de alimentação pendurado no rebordo de uma
mesa ou bancada.
• Certique-se de que a panela e a superfície da placa de aquecimento
permanecem livres de corpos estranhos.
• Utilize o produto apenas conforme descrito neste manual.
• Utilize este produto apenas com uma tomada elétrica de 220 V.
Adicione arroz e água (Imagem B)
1. Meça a quantidade necessária de arroz com o copo de medição
incluído
1
e a colher
2
.
2. Lave o arroz numa tigela separada.
3. Coloque o arroz na panela
w
.
4. Adicione água na panela
w
de acordo com a seguinte tabela:
Arroz cru Água necessária Arroz cozido
2 copos 2 – 2 ½ copos 6 copos
4 copos 4 – 4 ½ copos 12 copos
6 copos 6 – 6 ½ copos 18 copos
8 copos 8 – 8 ½ copos 24 copos
10 copos 10 – 10 ½ copos 30 copos
Cozinhe o arroz (Imagem C)
1. Coloque a panela de cozedura
w
na arrozeira
4
. Rode-a
cuidadosamente para a direita e para a esquerda.
4
Ao utilizar a panela de vapor
q
, coloque-a sobre
w
.
2. Feche rmemente a tampa
9
.
3. Ligue o cabo de alimentação
e
à arrozeira
4
e ligue-o a uma
tomada elétrica.
4. Utilize o interruptor de alimentação
8
para ligar o dispositivo.
5. Deslize o interruptor de função
8
para baixo para iniciar a cozedura.
4
e
acende para indicar que a cozedura começou.
4
Não force
8
. Se tiver diculdade, volte a inserir
w
dentro de
4
e
tente novamente.
6.
8
aparece quando o arroz acaba de cozinhar.
5
acende-se para
indicar que o arroz é mantido quente.
4
Nunca deixe nenhum acessório na panela ao utilizar a função de
manter quente.
4
Não volte a aquecer arroz previamente cozinhado com a função de
manter quente.
7. Deixe a tampa colocada durante 6-8 minutos para vaporizar o arroz.
8. Retire a tampa
1
para servir o arroz.
4
Feche sempre a tampa
9
completamente depois de servir para evitar
que o arroz seque ou descolore.
9. Use o
7
para desligar o dispositivo.
10. Desligue o cabo de alimentação
e
da tomada elétrica após a
utilização.
11. Deixe o produto arrefecer.
Limpar a panela e a tampa
1. Lave
9
,
q
e
w
em água quente com sabão.
2. Enxague com água limpa.
3. Seque com um pano macio.
Limpar a arrozeira
• Não utilize agentes de limpeza químicos, tais como amoníaco, ácidos
ou acetona para limpar o produto.
• Limpe o produto regularmente com um pano macio limpo e seco.
Evite produtos abrasivos que podem danicar a superfície.
• Não mergulhe o produto em água.
Limpar a placa de aquecimento
1. Para evitar uma cozedura irregular, remova todas as matérias
estranhas coladas à placa de aquecimento
3
.
2. Utilize palha de aço para alisar e polir a área de contacto da placa de
aquecimento
3
.
Especicações
Produto Arrozeira
Número de artigo KARC06WT
Dimensões (c x l x a) 260 x 260 x 230 mm
Tensão de entrada 220 V
Potência máxima 300 W
Capacidade 0,6 L
A
B
C
Rice cooker
0.6L
KARC06WT
ned.is/karc06wt
Nedis BV
De Tweeling 28, 5215 MC ’s-Hertogenbosch – The Netherlands 08/19
KARC06WT_MAN_COMP_(1422 19409)_v01.indd 1-9 21-8-2019 09:20:18


Join the conversation about this product
Here you can share what you think about the Nedis KARC06WT Rice Cooker. If you have a question, first carefully read the manual. Requesting a manual can be done by using our contact form.
reply | This was helpful (0) (Translated by Google)