
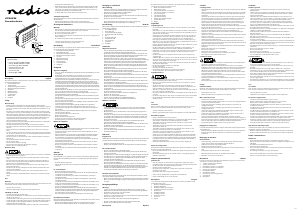
0619
Description English
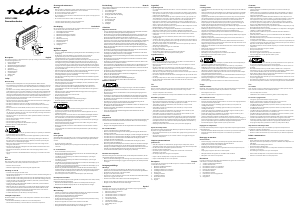
The convection heater is a device that heats a space by creating a current of warm air that
circulates throughout the area.
1. Heater/Ventilation dial
2. Thermostat dial
3. Maximum heating with ventilation
4. Minimum heating with ventilation
5. O position
6. Minimum heating
7. Maximum heating
8. On/o indicator
9. Airow outlet
10. Handgrip
Safety
General safety
• Read the manual carefully before use. Keep the manual for future reference.
• The manufacturer is not liable for consequential damages or for damages to property
or persons caused by non-observance of the safety instructions and improper use of
the device.
• The device can be used by children aged from 8 years and above and persons with
reduced physical, sensory or mental capabilities or lack of experience and knowledge
if they have been given supervision or instruction concerning use of the device in a
safe way and understand the hazards involved. Children shall not play with the device.
Cleaning and user maintenance shall not be made by children without supervision.
• Only use the device for its intended purposes. Do not use the device for other
purposes than described in the manual.
• Do not use the device if any part is damaged or defective. If the device is damaged or
defective, replace the device immediately.
• The device is suitable for indoor use only. Do not use the device outdoors.
• The device is suitable for domestic use only. Do not use the device for commercial
purposes.
• Do not use the device near bathtubs, showers, basins or other vessels containing
water.
• If you use the device in a bathroom, remove the mains plug from the wall socket after
use. The presence of water can cause a risk of personal injury or damage to the device
even when the device is switched o.
• Do not use a timer or a separate remote-control system that switches on the device
automatically.
• Do not expose the device to water or moisture.
• Do not cover the device.
• Do not block the ventilation openings.
• Do not insert foreign objects into the ventilation openings.
• Place the device on a stable, at surface.
Electrical safety
• To reduce risk of electric shock, this product should only be opened by an authorized
technician when service is required.
• Disconnect the product from the mains and other equipment if a problem should
occur.
• Do not use the device if the mains cable or mains plug is damaged or defective. If
the mains cable or mains plug is damaged or defective, it must be replaced by the
manufacturer or an authorised repair agent.
• Before use, always check that the mains voltage is the same as the voltage on the
rating plate of the device.
• Do not move the device by pulling the mains cable. Make sure that the mains cable
cannot become entangled.
• Do not immerse the device, the mains cable or the mains plug in water or other
liquids.
• Do not leave the device unattended while the mains plug is connected to the mains
supply.
Use
Initial use
Note: If you switch on the device for the rst time, the device may emit a little smoke and
a characteristic smell for a short period. This is normal operation.
• Place the device on its side.
• Mount the supplied legs to the device using the supplied screws.
Switching on and o
• Insert the mains plug into the wall socket.
• Turn the thermostat dial fully in a clockwise direction to the maximum setting. The on/
o indicator (8) comes on.
• 1200 W: To switch on the heating, set the dial (1) to the minimum heating position (6).
• 2000 W: To switch on the heating, set the dial (1) to the maximum heating position (7).
• 1200 W: To switch on the heating with ventilation, set the dial (1) to the minimum
heating position with ventilation (4).
• 2000 W: To switch on the heating with ventilation, set the dial (1) to the maximum
heating positon with ventilation (3).
• When the desired room temperature is reached, turn the thermostat dial (2) slowly
in the counterclockwise direction until the thermostat is switched o. The on/o
indicator (8) goes o. The heater keeps the air temperature in the room at the set
temperature by switching on and o automatically.
• To switch o the device, set the dial (1) to the o position (5).
Setting the temperature
The thermostat dial can be used to set the temperature at which the device is switched
o automatically.
• Turn the thermostat dial (2) clockwise to increase the temperature.
• Turn the thermostat dial (2) counterclockwise to decrease the temperature.
Cleaning and maintenance
Warning!
• Before cleaning or maintenance, always switch o the device, remove the mains plug
from the wall socket and wait until the device has cooled down.
• Do not use cleaning solvents or abrasives.
• Do not clean the inside of the device.
• Do not attempt to repair the device. If the device does not operate correctly, replace it
with a new device.
• Do not immerse the device in water or other liquids.
• Clean the outside of the device using a soft, damp cloth.
• Clean the airow outlet using a vacuum cleaner.
Beschrijving Nederlands
De convectorkachel is een apparaat dat een ruimte verwarmt door het creëren van een
stroom warme lucht die door de ruimte circuleert.
1. Draaischijf verwarming/ventilatie
2. Draaischijf thermostaat
3. Maximumverwarming met ventilatie
4. Minimumverwarming met ventilatie
5. Uit-stand
6. Minimumverwarming
7. Maximumverwarming
8. Aan/uit-indicator
9. Luchtstroomuitlaat
10. Handgreep
Veiligheid
Algemene veiligheid
• Lees voor gebruik de handleiding zorgvuldig door. Bewaar de handleiding voor latere
raadpleging.
• De fabrikant is niet aansprakelijk voor gevolgschade of voor schade aan
eigendommen of personen veroorzaakt door het niet naleven van de
veiligheidsinstructies en door verkeerd gebruik van het apparaat.
• Het apparaat kan worden gebruikt door kinderen vanaf 8 jaar en door personen met
verminderde lichamelijke, zintuiglijke of geestelijke vermogens of gebrek aan de
benodigde ervaring en kennis indien zij onder toezicht staan of instructies krijgen
over hoe het apparaat op een veilige manier kan worden gebruikt alsook de gevaren
begrijpen die met het gebruik samenhangen. Kinderen mogen niet met het apparaat
spelen. Reiniging en onderhoud mogen niet worden uitgevoerd door kinderen, tenzij
zij onder toezicht staan.
• Gebruik het apparaat uitsluitend voor de beoogde doeleinden. Gebruik het apparaat
niet voor andere doeleinden dan beschreven in de handleiding.
• Gebruik het apparaat niet als een onderdeel beschadigd of defect is. Vervang een
beschadigd of defect apparaat onmiddellijk.
• Het apparaat is uitsluitend geschikt voor gebruik binnenshuis. Gebruik het apparaat
niet buitenshuis.
• Het apparaat is uitsluitend geschikt voor huishoudelijk gebruik. Gebruik het apparaat
niet voor commerciële doeleinden.
• Gebruik het apparaat niet in de buurt van badkuipen, douches, wastafels of andere
voorzieningen die water bevatten.
• Indien u het apparaat in de badkamer gebruikt, verwijder dan na gebruik de
netstekker uit het stopcontact. De aanwezigheid van water kan een risico van
persoonlijk letsel of schade aan het apparaat vormen, zelfs wanneer het apparaat is
uitgeschakeld.
• Gebruik geen timer of afzonderlijk afstandsbedieningssysteem om het apparaat
automatisch uit te schakelen.
• Stel het apparaat niet bloot aan water of vocht.
• Bedek het apparaat niet.
• Blokkeer de ventilatieopeningen niet.
• Steek geen vreemde voorwerpen in de ventilatieopeningen.
• Plaats het apparaat op een stabiele, vlakke ondergrond.
Elektrische veiligheid
• Dit product mag voor onderhoud alleen worden geopend door een erkend technicus
om het risico op elektrische schokken te verkleinen.
• Koppel het product los van het stopcontact en van andere apparatuur als er zich
problemen voordoen.
• Gebruik het apparaat niet als het netsnoer of de netstekker beschadigd of defect is.
Indien het netsnoer of de netstekker beschadigd of defect is, moet het onderdeel
door de fabrikant of een erkend servicecentrum worden vervangen.
• Controleer voor gebruik altijd of de netspanning overeenkomt met de spanning op
het typeplaatje van het apparaat.
• Verplaats het apparaat niet door aan het netsnoer te trekken. Zorg ervoor dat het
netsnoer niet in de war kan geraken.
• Dompel het apparaat, het netsnoer of de netstekker niet onder in water of andere
vloeistoen.
• Laat het apparaat niet onbeheerd achter terwijl de netstekker op de netvoeding is
aangesloten.
Gebruik
Eerste gebruik
Opmerking: Indien u het apparaat voor de eerste keer inschakelt, kan gedurende korte
tijd een lichte rookontwikkeling ontstaan en een karakteristieke geur vrijkomen. Dit is
normaal.
• Plaats het apparaat op zijn kant.
• Monteer de meegeleverde poten op het apparaat met behulp van de meegeleverde
schroeven.
In- en uitschakelen
• Plaats de netstekker in het stopcontact.
• Draai de thermostaatdraaischijf volledig rechtsom naar de maximuminstelling. De
aan/uit-indicator (8) gaat branden.
• 1200 W: Zet om de verwarming in te schakelen de draaischijf (1) op de laagste
verwarmingsstand (6).
• 2000 W: Zet om de verwarming in te schakelen de draaischijf (1) op de hoogste
verwarmingsstand (7).
• 1200 W: Zet om de verwarming met ventilatie in te schakelen de draaischijf (1) op de
laagste verwarmingsstand met ventilatie (4).
• 2000 W: Zet om de verwarming met ventilatie in te schakelen de draaischijf (1) op de
hoogste verwarmingsstand met ventilatie (3).
• Draai als de gewenste kamertemperatuur is bereikt de thermostaatdraaischijf (2)
langzaam linksom tot de thermostaat uitschakelt. De aan/uit-indicator (8) gaat uit. De
verwarmer houdt de luchttemperatuur in de kamer op de ingestelde temperatuur
door automatisch in en uit te schakelen.
• Zet om het apparaat uit te schakelen de draaischijf (1) op de uit-stand (5).
De temperatuur instellen
De thermostaatdraaischijf kan worden gebruikt om de temperatuur in te stellen, waarbij
het apparaat automatisch uitschakelt.
• Draai de thermostaatdraaischijf (2) rechtsom om de temperatuur te verhogen.
• Draai de thermostaatdraaischijf (2) linksom om de temperatuur te verlagen.
Reiniging en onderhoud
Waarschuwing!
• Schakel voor reiniging en onderhoud altijd het apparaat uit, verwijder de netstekker
uit het stopcontact en wacht totdat het apparaat is afgekoeld.
• Gebruik geen reinigingsmiddelen of schuurmiddelen.
• Reinig niet de binnenzijde van het apparaat.
• Probeer het apparaat niet te repareren. Indien het apparaat niet juist werkt, vervang
het dan door een nieuw apparaat.
• Dompel het apparaat niet onder in water of andere vloeistoen.
• Reinig de buitenzijde van het apparaat met een zachte, vochtige doek.
• Reinig de luchtstroomuitlaat met behulp van een stofzuiger.
Beschreibung Deutsch
Das Konvektionsheizgerät heizt einen Raum mithilfe eines warmen Luftstroms auf, der im
gesamten Bereich zirkuliert.
1. Heiz-/Lüftungs-Regler
2. Thermostatregler
3. Höchste Heiz-Stufe mit Lüftung
4. Niedrigste Heiz-Stufe mit Lüftung
5. Aus
6. Niedrigste Heiz-Stufe
7. Höchste Heiz-Stufe
8. Ein-/Aus-Anzeige
9. Luftauslass
10. Handgri
Sicherheit
Allgemeine Sicherheit
• Lesen Sie die Bedienungsanleitung vor dem Gebrauch genau durch. Bitte bewahren
Sie die Bedienungsanleitung zur späteren Bezugnahme auf.
• Der Hersteller ist nicht schadensersatzpichtig für Folgeschäden, Sachschäden oder
Personenverletzungen, die durch die Nichtbeachtung der Sicherheitshinweise und
durch unsachgemäße Handhabung des Gerätes entstanden sind.
• Das Gerät darf von Kindern ab 8 Jahren sowie von Personen mit eingeschränkten
physischen, sensorischen oder geistigen Fähigkeiten oder einem Mangel an Erfahrung
und Kenntnis verwendet werden, sofern diese Personen beaufsichtigt oder in den
sicheren Gebrauch des Geräts eingewiesen wurden und die damit verbundenen
Gefahren verstehen. Kinder dürfen nicht mit dem Gerät spielen. Die Reinigung und
Pege seitens des Benutzers darf nur von Kindern durchgeführt werden, wenn diese
beaufsichtigt werden.
• Verwenden Sie das Gerät nur bestimmungsgemäß. Verwenden Sie das Gerät nur für
den in dieser Bedienungsanleitung beschriebenen Zweck.
• Verwenden Sie das Gerät nicht, falls ein Teil beschädigt oder defekt ist. Ist das Gerät
beschädigt oder defekt, erneuern Sie es unverzüglich.
• Das Gerät eignet sich nur zur Verwendung in Innenräumen. Verwenden Sie das Gerät
nicht im Freien.
• Das Gerät eignet sich nur für den Hausgebrauch. Verwenden Sie das Gerät nicht für
den gewerblichen Gebrauch.
• Verwenden Sie das Gerät nicht in der Nähe von Badewannen, Duschen, Becken oder
anderen Behältnissen, die Wasser enthalten.
• Falls Sie das Gerät in einem Badezimmer verwenden, ziehen Sie den Netzstecker nach
dem Gebrauch aus der Wandsteckdose. Das Vorhandensein von Wasser stellt eine
Gefahr von Personenverletzungen oder Schäden am Gerät dar, selbst wenn das Gerät
ausgeschaltet ist.
• Verwenden Sie keine Zeitschaltuhr und kein separates Fernbedienungssystem, das
das Gerät automatisch einschaltet.
• Setzen Sie das Gerät keinem Wasser und keiner Feuchtigkeit aus.
• Decken Sie das Gerät nicht ab.
• Blockieren Sie nicht die Lüftungsönungen.
• Stecken Sie keine Fremdkörper in die Belüftungsönungen.
• Stellen Sie das Gerät auf einer stabilen achen Oberäche auf.
Elektrische Sicherheit
• Um die Gefahr eines elektrischen Schlags zu verringern, sollte dieses Produkt bei
erforderlichen Servicearbeiten ausschließlich von einem autorisierten Techniker
geönet werden.
• Bei Problemen trennen Sie das Gerät bitte von der Spannungsversorgung und von
anderen Geräten.
• Verwenden Sie das Gerät nicht, falls das Netzkabel oder der Netzstecker beschädigt
oder defekt ist. Ist das Netzkabel oder der Netzstecker beschädigt oder defekt, muss
das Netzkabel oder der Netzstecker vom Hersteller oder einem autorisierten Service-
Partner erneuert werden.
• Vergewissern Sie sich stets vor dem Gebrauch, dass die Netzspannung mit der
Spannung auf dem Typenschild des Geräts übereinstimmt.
• Bewegen Sie das Gerät nicht durch Ziehen am Netzkabel. Achten Sie darauf, dass sich
das Netzkabel nicht verwickeln kann.
• Tauchen Sie das Gerät, das Netzkabel oder den Netzstecker nicht in Wasser oder
andere Flüssigkeiten ein.
• Lassen Sie das Gerät nicht unbeaufsichtigt, während der Netzstecker mit dem
Stromnetz verbunden ist.
Gebrauch
Erstgebrauch
Hinweis: Wenn Sie das Gerät zum ersten Mal einschalten, kann es etwas Rauch ausstoßen und
eine kurze Zeit einen charakteristischen Geruch entwickeln. Dies ist ein normaler Vorgang.
• Platzieren Sie das Gerät auf seiner Seite.
• Bringen Sie die mitgelieferten Füße mit den mitgelieferten Schrauben am Gerät an.
Ein- und Ausschalten
• Stecken Sie den Netzstecker in die Wandsteckdose.
• Drehen Sie den Thermostatregler bis zum Anschlag im Uhrzeigersinn. Die Ein-/Aus-
Anzeige (8) leuchtet auf.
• 1200 W: Stellen Sie vor dem Einschalten den Regler (1) auf die niedrigste Heiz-Stufe (6).
• 2000 W: Stellen Sie vor dem Einschalten den Regler (1) auf die höchste Heiz-Stufe (7).
• 1200 W: Stellen Sie vor dem Einschalten mit Lüfterbetrieb den Regler (1) auf die
niedrigste Heiz-Stufe mit Lüftung (4).
• 2000 W: Stellen Sie vor dem Einschalten mit Lüfterbetrieb den Regler (1) auf die
höchste Heiz-Stufe mit Lüftung (3).
• Wenn die gewünschte Raumtemperatur erreicht ist, drehen Sie den Thermostatregler
(2) langsam im Gegenuhrzeigersinn, bis das Thermostat abschaltet. Die Ein-/Aus-
Anzeige (8) erlischt. Das Heizgerät schaltet sich nach Bedarf automatisch ein bzw. aus
und hält somit die Raumlufttemperatur konstant auf einem eingestellten Niveau.
• Um das Gerät auszuschalten, drehen Sie den Regler (1) auf Aus (5).
Einstellen der Temperatur
Der Thermostatregler kann verwendet werden, um die Temperatur einzustellen, bei der
das Gerät automatisch ausgeschaltet wird.
• Drehen Sie den Thermostatregler (2) im Uhrzeigersinn, um die Temperatur zu erhöhen.
• Drehen Sie den Thermostatregler (2) gegen den Uhrzeigersinn, um die Temperatur zu
verringern.
Reinigung und Pege
Warnung!
• Schalten Sie das Gerät vor der Reinigung oder Pege immer aus, ziehen Sie den
Netzstecker aus der Wandsteckdose und warten Sie, bis sich das Gerät abgekühlt hat.
• Verwenden Sie keine Lösungs- oder Scheuermittel.
• Reinigen Sie das Gerät nicht von innen.
• Versuchen Sie nicht, das Gerät zu reparieren. Falls das Gerät nicht einwandfrei arbeitet,
tauschen Sie es gegen ein neues aus.
• Tauchen Sie das Gerät nicht in Wasser oder andere Flüssigkeiten ein.
• Reinigen Sie das Äußere des Geräts mit einem weichen feuchten Tuch.
• Reinigen Sie den Luftauslass mit einem Staubsauger.
Descripción Español
El calefactor de convección es un dispositivo que calienta un espacio generando una
corriente de aire caliente que circula por la zona.
1. Mando del calefactor/ventilación
2. Mando del termostato
3. Calentamiento máximo con ventilación
4. Calentamiento mínimo con ventilación
5. Posición de apagado
6. Calentamiento mínimo
7. Calentamiento máximo
8. Indicador de encendido/apagado
9. Salida de ujo de aire
10. Mango
Seguridad
Seguridad general
• Lea el manual detenidamente antes del uso. Conserve el manual en caso de futura
necesidad.
• El fabricante no es responsable de daños consecuentes o de daños en la propiedad o
en las personas causados por no seguir estas instrucciones de seguridad y por un uso
inadecuado de este dispositivo.
• El dispositivo puede ser utilizado por niños a partir de los 8 años y por personas con
capacidades físicas, sensoriales o mentales reducidas, o que no tengan experiencia
ni conocimientos, si son supervisados o instruidos en el uso del dispositivo de
forma segura y entienden los riesgos implicados. Los niños no pueden jugar con el
dispositivo. Los niños no podrán realizar la limpieza ni el mantenimiento reservado al
usuario a menos que cuenten con supervisión.
• Utilice el dispositivo únicamente para su uso previsto. No utilice el dispositivo con una
nalidad distinta a la descrita en el manual.
• No utilice el dispositivo si alguna pieza ha sufrido daños o tiene un defecto. Si el
dispositivo ha sufrido daños o tiene un defecto, sustitúyalo inmediatamente.
• El dispositivo sólo es apto para uso en interiores. No utilice el dispositivo en exteriores.
• El dispositivo sólo es apto para uso doméstico. No utilice el dispositivo con nes
comerciales.
• No utilice el dispositivo cerca de bañeras, duchas, lavabos u otros recipientes que
contengan agua.
• Si utiliza el dispositivo en un baño, retire el enchufe de red de la toma de pared tras el
uso. La presencia de agua puede provocar un riesgo de lesiones personales o daños al
dispositivo, incluso cuando éste está apagado.
• No utilice un temporizador o un sistema de control remoto separado que conecte el
dispositivo automáticamente.
• No exponga el dispositivo al agua ni a la humedad.
• No cubra el dispositivo.
• No bloquee las aberturas de ventilación.
• No introduzca objetos extraños en las aberturas de ventilación.
• Coloque el dispositivo sobre una supercie estable y plana.
Seguridad eléctrica
• Para reducir el peligro de descarga eléctrica, este producto sólo debería abrirlo un
técnico autorizado cuando necesite reparación.
• Desconecte el producto de la toma de corriente y de los otros equipos si ocurriera
algún problema.
• No utilice el dispositivo si el cable de red o el enchufe de red está dañado o es
defectuoso. Si el cable de red o el enchufe de red está dañado o es defectuoso, éste
debe ser sustituido por el fabricante o un servicio técnico autorizado.
• Antes del uso, compruebe siempre que la tensión de red sea la misma que se indica en
la placa de características del dispositivo.
• No mueva el dispositivo tirando del cable de red. Asegúrese de que el cable de red no
se enrede.
• No sumerja el dispositivo, el cable de red o el enchufe de red en agua ni otros líquidos.
• No deje el dispositivo desatendido cuando el enchufe de red esté conectado al
suministro de red.
Uso
Uso inicial
Nota: Si enciende el dispositivo por primera vez, éste puede desprender un poco de
humo y un olor característico durante un breve periodo. Esto es algo normal.
• Coloque el dispositivo sobre un lateral.
• Monte las patas suministradas en el dispositivo utilizando los tornillos suministrados.
Encendido y apagado
• Inserte el enchufe de red en la toma de pared.
• Gire el mando del termostato totalmente en el sentido de las agujas del reloj hasta el
ajuste máximo. El indicador de encendido/apagado (8) se enciende.
• 1200 W: Para encender el calentamiento, sitúe el mando (1) en la posición de
calentamiento mínimo (6).
• 2000 W: Para encender el calentamiento, sitúe el mando (1) en la posición de
calentamiento máximo (7).
• 1200 W: Para encender el calentamiento con ventilación, sitúe el mando (1) en la
posición de calentamiento mínimo con ventilación (4).
• 2000 W: Para encender el calentamiento con ventilación, sitúe el mando (1) en la
posición de calentamiento máximo con ventilación (3).
• Cuando se alcance la temperatura ambiente deseada, gire el mando del termostato
(2) lentamente en el sentido contrario a las agujas del reloj hasta que el termostato
se apague. El indicador de encendido/apagado (8) se apaga. El calentador mantiene
la temperatura del aire en la habitación a la temperatura ajustada encendiéndose y
apagándose automáticamente.
• Para apagar el dispositivo, sitúe el mando (1) en la posición de apagado (5).
Ajuste de la temperatura
El mando del termostato también puede utilizarse para ajustar la temperatura a la que el
dispositivo se apaga automáticamente.
• Gire el mando del termostato (2) en el sentido de las agujas del reloj para aumentar la
temperatura.
• Gire el mando del termostato (2) en el sentido contrario a las agujas del reloj para
disminuir la temperatura.
Limpieza y mantenimiento
¡Advertencia!
• Antes de la limpieza o el mantenimiento, apague siempre el dispositivo, retire el
enchufe de red de la toma de pared y espere hasta que se haya enfriado el dispositivo.
• No utilice disolventes de limpieza ni productos abrasivos.
• No limpie el interior del dispositivo.
• No intente reparar el dispositivo. Si el dispositivo no funciona correctamente,
sustitúyalo por uno nuevo.
• No sumerja el dispositivo en agua ni otros líquidos.
• Limpie el exterior del dispositivo con un paño suave humedecido.
• Limpie la salida de ujo de aire con un aspirador.
Description Français
Le convecteur est un appareil qui chaue un espace en créant un courant d’air chaud
circulant dans toute la zone.
1. Molette de Chauage/Ventilation
2. Molette de thermostat
3. Chauage maximum avec ventilation
4. Chauage minimum avec ventilation
5. Position arrêt
6. Chauage minimum
7. Chauage maximum
8. Témoin marche/arrêt
9. Sortie d’air
10. Poignée
Sécurité
Sécurité générale
• Lisez attentivement le manuel avant usage. Conservez le manuel pour toute référence
ultérieure.
• Le fabricant décline toute responsabilité pour les dommages ou blessures consécutifs
causés par le non-respect des consignes de sécurité et d’une utilisation inappropriée
de l’appareil.
• L’appareil peut être utilisé par des enfants 8 ans ou plus et des personnes présentant
des capacités physiques, sensorielles ou intellectuelles réduites, voire ne disposant
pas des connaissances et de l’expérience nécessaires en cas de surveillance ou
d’instructions sur l’usage de l’appareil en toute sécurité et de compréhension des
risques impliqués. Les enfants ne doivent pas jouer avec l’appareil. Le nettoyage et
l’entretien ne doivent pas être eectués par des enfants sans supervision.
• Utilisez l’appareil uniquement pour son usage prévu. N’utilisez pas l’appareil à d’autres
ns que celles décrites dans le manuel.
• N’utilisez pas l’appareil si une pièce quelconque est endommagée ou défectueuse. Si
l’appareil est endommagé ou défectueux, remplacez-le immédiatement.
• L’appareil est conçu exclusivement pour une utilisation en intérieur. N’utilisez pas
l’appareil à l’extérieur.
• L’appareil est conçu exclusivement pour un usage domestique. N’utilisez pas l’appareil
à des ns commerciales.
• N’utilisez pas l’appareil à proximité d’une baignoire, d’une douche, d’un lavabo ou
d’autres récipients contenant de l’eau.
• Si vous utilisez l’appareil dans une salle de bains, débranchez la che secteur de la
prise murale après usage. La présence d’eau est un facteur de risque de blessure ou de
dégâts pour l’appareil, même s’il est éteint.
• N’utilisez pas une minuterie ou une télécommande de mise en marche automatique
de l’appareil.
• N’exposez pas l’appareil à l’eau ou à l’humidité.
• Ne couvrez pas l’appareil.
• Ne bloquez aucune des ouvertures de ventilation.
• N’insérez pas de corps étrangers dans les ouvertures de ventilation.
• Placez l’appareil sur une surface stable et plane.
Sécurité électrique
• Pour réduire le risque de choc électrique, ce produit doit être ouvert uniquement par
un technicien qualié si une réparation s’impose.
• Débranchez l’appareil et les autres équipements du secteur s’il y a un problème.
• N’utilisez pas l’appareil si le cordon d’alimentation ou la che secteur est endommagé
ou défectueux. Si le cordon d’alimentation ou la che secteur est endommagé ou
défectueux, il doit être remplacé par le fabricant ou par un réparateur agréé.
• Avant toute utilisation, vériez que la tension du secteur correspond à celle indiquée
sur la plaque signalétique de l’appareil.
• Ne déplacez pas l’appareil en le tirant par le cordon d’alimentation. Assurez-vous que
le cordon d’alimentation ne s’enchevêtre pas.
• N’immergez pas l’appareil, le cordon d’alimentation ou la che secteur dans l’eau ou
d’autres liquides.
• Ne laissez pas l’appareil sans surveillance si la che secteur est branchée.
Usage
Utilisation initiale
Remarque: Pour sa première mise en marche, l’appareil peut émettre une légère fumée
et une odeur caractéristique pendant une période brève. C’est normal.
• Placez l’appareil sur le côté.
• Montez les pieds fournis sur l’appareil avec les vis prévues.
Mise en marche et arrêt
• Insérez la che secteur dans la prise murale.
• Tournez la molette de thermostat à fond dans le sens horaire sur le réglage maximum.
Le témoin marche/arrêt (8) s’allume.
• 1200 W : Pour enclencher le chauage, réglez la molette (1) sur la position de
chauage minimum (6).
• 2000 W : Pour enclencher le chauage, réglez la molette (1) sur la position de
chauage maximum (7).
• 1200 W : Pour enclencher le chauage avec ventilation, réglez la molette (1) sur la
position de chauage minimum avec ventilation (4).
• 2000 W : Pour enclencher le chauage avec ventilation, réglez la molette (1) sur la
position de chauage maximum avec ventilation (3).
• Une fois la température ambiante souhaitée atteinte, tournez la molette de
thermostat (2) lentement dans le sens antihoraire pour que le thermostat s’éteigne. Le
témoin marche/arrêt (8) s’éteint. Le chauage entretient la température de l’air dans la
pièce à la température réglée en s’allumant et s’éteignant automatiquement.
• Pour éteindre l’appareil, réglez la molette (1) sur la position arrêt.
Réglage de la température
La molette de thermostat peut servir à régler la température à laquelle l’appareil s’éteint
automatiquement.
• Tournez la molette de thermostat (2) dans le sens horaire pour élever la température.
• Tournez la molette de thermostat (2) dans le sens antihoraire pour réduire la
température.
Nettoyage et entretien
Avertissement!
• Avant le nettoyage ou l’entretien, arrêtez toujours l’appareil, débranchez la che
secteur de la prise murale et attendez que l’appareil refroidisse.
• N’utilisez pas de solvants ni de produits abrasifs.
• Ne nettoyez pas l’intérieur de l’appareil.
• Ne tentez pas de réparer l’appareil. Si l’appareil fonctionne mal, remplacez-le par un
neuf.
• Ne plongez pas l’appareil dans l’eau ou autres liquides.
• Nettoyez l’extérieur de l’appareil avec un chion doux et humide.
• Nettoyez la sortie d’air avec un aspirateur.
Descrizione Italiano
La stufa a convezione è un dispositivo di riscaldamento che genera una corrente di aria
calda messa in circolazione nell’ambiente.
1. Selettore riscaldamento/ventilazione
2. Selettore del termostato
3. Riscaldamento massimo con ventilazione
4. Riscaldamento minimo con ventilazione
5. Posizione di spegnimento
6. Riscaldamento minimo
7. Riscaldamento massimo
8. Indicatore di accensione/spegnimento
9. Uscita dell’aria
10. Impugnatura
Sicurezza
Istruzioni generali
• Leggere il manuale con attenzione prima dell’uso. Conservare il manuale per
riferimenti futuri.
• Il fabbricante non è responsabile per eventuali danni consequenziali o per danni a
cose o persone derivanti dall’inosservanza delle istruzioni sulla sicurezza o dall’uso
improprio del dispositivo.
• Il dispositivo può essere utilizzato da bambini di almeno 8 anni e da persone con
ridotte capacità siche, sensoriali o mentali, o con mancata esperienza o conoscenza,
sotto supervisione o dopo avere ricevuto adeguate istruzioni riguardo all’uso in
sicurezza del dispositivo e avere compreso i pericoli intrinseci nell’uso. I bambini
non devono giocare con il dispositivo. Le operazioni di pulizia e manutenzione non
devono essere eettuate da bambini senza supervisione.
• Utilizzare il dispositivo solo per gli scopi previsti. Non utilizzare il dispositivo per scopi
diversi da quelli descritti nel manuale.
• Non utilizzare il dispositivo se presenta parti difettose. Se il dispositivo è danneggiato
o difettoso, sostituirlo immediatamente.
• Questo dispositivo è adatto solo per uso in ambienti interni. Non utilizzare il
dispositivo all’aperto.
• Questo dispositivo è adatto solo per uso in ambienti domestici. Non utilizzare il
dispositivo per scopi commerciali.
• Non utilizzare il dispositivo in prossimità di vasche da bagno, docce, lavandini o altri
recipienti contenenti acqua.
• Se il dispositivo viene utilizzato in un bagno, dopo l’uso rimuovere la spina dalla presa
a parete. La presenza di acqua può comportare il rischio di lesioni personali o danni al
dispositivo anche quando il dispositivo è spento.
• Non utilizzare un timer o un telecomando separato per accendere automaticamente
il dispositivo.
• Non esporre il dispositivo ad acqua o umidità.
• Non coprire il dispositivo.
• Non ostruire i fori per la ventilazione.
• Non inserire oggetti estranei nelle aperture di ventilazione.
• Collocare il dispositivo su una supercie stabile e piana.
Sicurezza elettrica
• Per ridurre il rischio di scosse elettriche, il presente prodotto deve essere aperto solo
da un tecnico autorizzato, nel caso sia necessario ripararlo.
• Scollegare il prodotto dall’alimentazione e da altri apparecchi se dovesse esserci un
problema.
• Non utilizzare il dispositivo in presenza di danni o difetti al cavo o alla spina di
alimentazione. Se il cavo o la spina di alimentazione è danneggiato o difettoso, deve
essere sostituito dal fabbricante o da un centro riparazioni autorizzato.
• Prima dell’uso vericare sempre che la tensione di alimentazione corrisponda a quella
indicata sulla targhetta nominale del dispositivo.
• Non spostare il dispositivo tirandolo per il cavo di alimentazione. Vericare che il cavo
non possa aggrovigliarsi.
• Non immergere il dispositivo, il cavo o la spina di alimentazione in acqua o altri liquidi.
• Non lasciare il dispositivo incustodito con la spina collegata alla rete di alimentazione.
Uso
Uso iniziale
Nota: alla prima accensione il dispositivo può emettere per un breve periodo un po’ di
fumo e un odore caratteristico. È una condizione normale.
• Collocare il dispositivo su un lato.
• Utilizzando le viti in dotazione, installare le gambe incluse sul dispositivo.
Accensione e spegnimento
• Collegare la spina di alimentazione alla presa a parete.
• Ruotare completamente il selettore del termostato in senso orario no
all’impostazione massima. L’indicatore on/o (8) si accende.
• 1200 W: Per attivare il riscaldamento, impostare il selettore (1) sulla posizione di
riscaldamento minima (6).
• 2000 W: Per attivare il riscaldamento, impostare il selettore (1) sulla posizione di
riscaldamento massima (7).
• 1200 W: Per attivare il riscaldamento con ventilazione, impostare il selettore (1) sulla
posizione di riscaldamento minima con ventilazione (4).
• 2000 W: Per attivare il riscaldamento con ventilazione, impostare il selettore (1) sulla
posizione di riscaldamento massima con ventilazione (3).
• Quando viene raggiunta la temperatura desiderata della stanza, ruotare lentamente
il selettore del termostato (2) in senso antiorario no a spegnere il termostato.
L’indicatore on/o (8) si spegne. La stufa mantiene la temperatura dell’aria nella stanza
a una temperatura impostata accendendosi e spegnendosi automaticamente.
• Per spegnere il dispositivo, posizionare il selettore (1) sulla posizione o (5).
Impostazione della temperatura
Il selettore del termostato può essere utilizzato per impostare la temperatura di
spegnimento automatico del dispositivo.
• Ruotare il selettore del termostato (2) in senso orario per aumentare la temperatura.
• Ruotare il selettore del termostato (2) in senso antiorario per ridurre la temperatura.
Pulizia e manutenzione
Attenzione!
• Prima di qualsiasi intervento di pulizia o manutenzione, spegnere sempre il
dispositivo, rimuovere la spina dalla presa a parete e attendere che il dispositivo si sia
rareddato.
• Non utilizzare solventi detergenti o abrasivi.
• Non pulire l’interno del dispositivo.
• Non cercare di riparare il dispositivo. Se il dispositivo non funziona correttamente,
sostituirlo con uno nuovo.
• Non immergere il dispositivo in acqua o in altri liquidi.
• Pulire l’esterno del dispositivo con un panno morbido e umido.
• Pulire la bocca di uscita dell’aria con un aspirapolvere.
I
I
I
0
I
I
I
I
I
3
4
1
8
10
9
10
2
6
5
7
HTCO40FBK
Convection heater
Specifications:
• Power Consumption: Max. 2000 W
• Voltage: AC 220 - 240 V, 50 - 60 Hz
• Heat Settings: 2 (1200 / 2000 W)
• Thermostat function: Yes
• Overheat Protection: Yes
• Fan Function: Yes
• Cord Length: 1.5 M


Join the conversation about this product
Here you can share what you think about the Nedis HTCO40FBK Heater. If you have a question, first carefully read the manual. Requesting a manual can be done by using our contact form.