M-728 DR
User Manual
CAR RADIO DVD PLAYER WITH BLUETOOTH & USB/SD
Please read the instruction carefully
before operating the unit.
English
GB - 1
BEFORE YOU BEGIN
1.
2.
3.
4.
5.
6.
7.
8.
9.
10.
11.
12.
13.
14.
15.
16.
17.
Important safeguards
Be sure to connect the color coded leads according to the diagram. Incorrect
connections may cause the unit to malfunction or damage the vehicle’s electrical system.
Be sure to connect the speaker (-) leads to the speaker (-) terminal. Never connect the
left and right channel speaker cables each other or to the vehicle body.
Make sure all the connections are completely correct before turning on your unit.
When replacing the fuse(s), the replacement must be of the same amperage as shown
on the fuse holder.
Do not block vents or radiator panels. Blocking them will cause heat to build up inside
and may result in re.
After completing the installation and beginning to play the unit(including replacing the
battery), press RESET button on the base with pointed object (such as ballpoint pen) to
set the unit to initial status.
Do not attempt to modify the unit, modifying the unit may cause an accident.
Stop the vehicle before carrying out any operation that could interfere with your driving.
Do not work in extremely high or low temperature. Be sure the temperature inside the
vehicle is between +60°C and -10°C before turning on your unit.
To avoid the driver distract his attention from, please install the unit in an apt place.
Using the unit after starting the engine, otherwise the unit can not be started, because
the electric energy of battery was used up.
Do not use the unit in extreme high temperature or such low temperature conditions, and
also avoid humidity and direct sunlight, otherwise the electric energy of battery will be
wasting for the high temperature.
Take care of the magnetism of the unit. Do no put the credit card, cassette or watch
around the unit, otherwise they would be broken or some information in them loses.
To avoid disturbing the video frequency, keep far away from the unit when using your
phone.
Do not put the remote control under high temperature or where the sun strikes it, or else
the remote control can not work normally.
Please warn children not to play the motorized screen which might hurt their ngers.
When driving, cannot watch the video and the pictures, a warning would be display on
screen.
When you select or create a disc to play with this product, please note:
• Avoid long le names! It is suggested to name the le with no much than 7 characters.
• The total number of les on the disc should not exceed 1633.
• The maximum number of directories should not exceed 195.
• The maximum depth level of directories should not exceed 10.
• File system(SD & USB): FAT 32 and FAT 16.
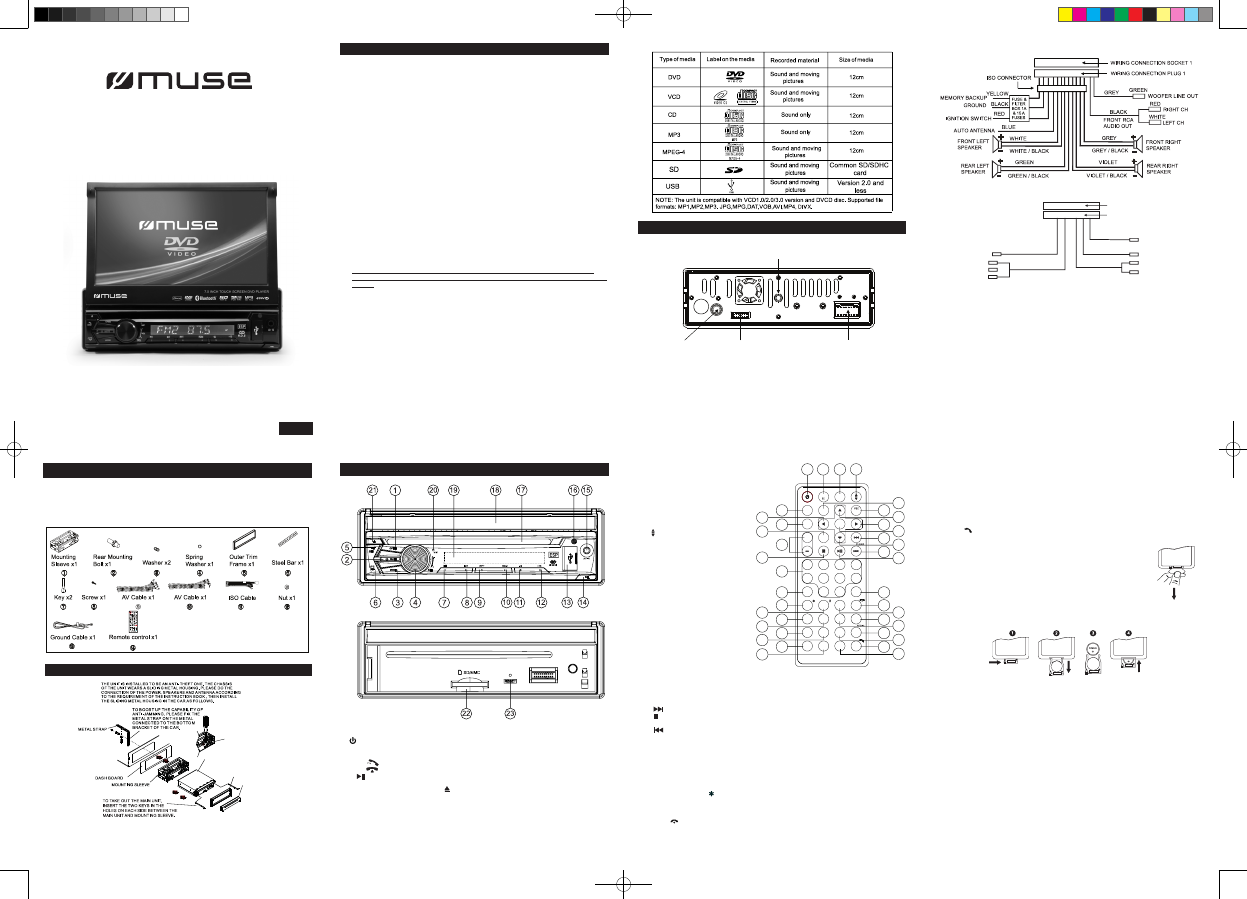
Disc and les you can play
In spite of progress made to ensure playability of all discs types, it is not possible to
guarantee playback of discs which are not in conformity with DVD, CD, VCD or SVCD
standards.
This unit may not play some recordings or files on CDs or DVDs due to differences in
recording formats, software used and disc types. The recordable discs may need a longer
reading time than normal discs.
GB - 2 GB - 3
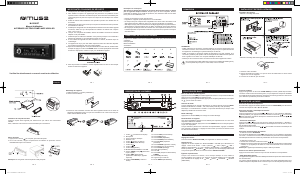
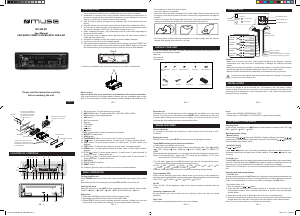
WIRING CONNECTION
The Description of the Wires Connection.
Note: Connect one clip end of the provide Ground line (black) to the xing screw bolt, and
connect the other end to the negative pole of the power source. Otherwise the video on
screen may ash.
NOTE
1. For safety reasons, connect the parking line (GREEN) to the parking brake switch. Video
will be displayed only when the car is stopped and the parking brake is on.
2. If you don’t want to use this function, connect the wire to the ground.
Wiring Connecting Socket 2Radio Antenna
Fixing Screw Bolt
Wiring Connection Socket 1
The Description of the Wiring Diagram for Socket 2
The Description of the Wiring Diagram for Socket 1
Note:
1. Only Speakers with 4 ohms impedance may be used.
2. Ensure that the blue automatic antenna cable does not make contact with any ground
connection.
3. Do not use AV IN jack on front panel & RCA terminal at the back at the same time for the
AUX source.
4. When Rear view camera function is ON, panel buttons are locked and sound is off but
music continues reading in DVD/USB/SD card.
5. Make sure to connect the color coded leads according to the diagram, incorrect connections
may cause the unit to malfunction or damage the vehicle’s electrical system.
6. Do not connect the ignition wire (red) and the battery wire (yellow), it may cause a short
circuit, even result in re.
WHITE
GREEN
YELLOW
BLACK
YELLOW
AV IN
RCA OUT
GRAY
BROWN
WHITE
WHITE
RED
RED
REVERSAL LINE
PARKING LINE
REAR VIEW CAMERA
WIRING CONNECTING SOCKET 2
WIRING CONNECTING PLUG 2
GB - 4
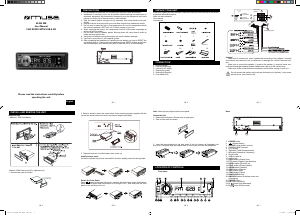
UNPACK YOUR UNIT
When you unpack your new car radio, make sure that you have removed all the accessories
and information papers:
Main unit with connector
User manual
Accessories:
INSTALLATION
DETACHABLE
FRONT PANEL
MAIN UNIT
OUTER TRIM FRAME
BEND THESE CLAWS
OUTWARD FOR A
TIGHT FIT, IF NECESSA
GB - 5 GB - 6
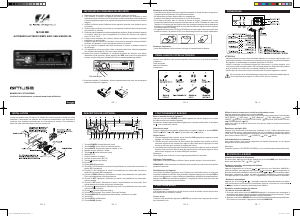
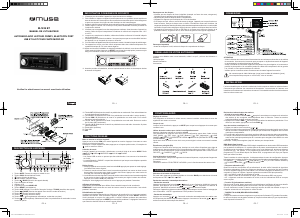
LOCATION OF THE CONTROLS
1. OPEN button
2.
/MUTE button
3. MODE button
4. SEL/ VOL KNOB
5. BND/ button
6. APS/ button
7. 1/
button
8. 2/INT button
9. 3/RPT button
10. 4/RDM button
11. 5/ - 10 button
12. 6/ +10 button
13. USB Port
14. REL button
15. AV IN socket
16. IR Remote Sensor
17. Disc Slot
18. Touch screen
19. Small LCD Screen
20. MIC (Microphone)
21. EJECT button
22. SD/MMC Card Slot
23. RESET button: to reset the unit
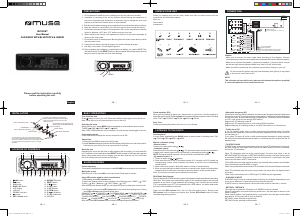
Remote control
R1. PWR (Power) button : To turn unit
on /off
R2. EQ/OPEN button: To select the
desired preset equalizer ROCK,
POP & CLASSIC. Press and hold
to open/close the touch screen.
R3. BAND button : To select band:
FM1, FM2, FM3 , MW1 or MW2.
R4. (Screen angle) button: To adjust
the screen angle.
R5. MUTE button : To mute or restore
sound.
R6. SEL (Select) button: To adjust the
sound setting.
R7. VOLUME+/- button: To adjust the
volume.
R8. MODE button: To select function
mode : RADIO, DISC, USB,
CARD, AV IN1 (rear), BT(dial),
STREAMING(Bluetooth Audio) or
AV IN (front)
R9. SETUP button: To enter the Setup
menu
R10. MENU/PBC button: To access
disc menu. To turn PBC mode
on/ off for VCD.
R11. ▲button : Move up during menu
navigation.
R12. ▼button : Move down during
menu navigation.
R13. ►button: Move right during menu navigation.
R14. ◄button: Move left during menu navigation.
R15. OK button: To conrm the selection during menu navigation.
R16. button: To directly access the next chapter (DVD) or track (CD).
R17. button: To stop playback.
R18. ►II (play/pause) button: To start or pause playback.
R19. / CLEAR button: To directly access the previous chapter (DVD) or track (CD).
To clear input.
R20. Number buttons (1,2…0/10)
TA (Trafc announcement) : To access TA mode.
AF (Alternative frequency) : To access AF mode.
6/+10: Short press for number 6. Press and hold to skip forward 10 tracks (mp3 only).
5/-10: Short press for number 5. Press and hold to skip backward 10 tracks (mp3 only).
R21. CLK (clock)button : To check the clock time.
R22. 10+/PTY button: To access PTY mode.
R23. LOC/SLOW-FWD/ button: To access LOC function. To play at slow motion.
R24. ANGLE/MO/ST/ # button: To access the camera angle function for DVD disc. To turn
ON/OFF FM stereo mode.
R25. SEARCH button: To search for a desired title, chapter or Track.
R26. APS/ (Hang up)button : To auto preset radio stations. To hang up the phone.
R27. ZOOM button: To access the zoom function
R28. INT (Intro)button: To start/ cancel intro playback.
1
5
SLOW_FWD
-10
CLK
A-B
ZOOM
LOC
PROG
SEARCH
ANGLE
MO/ST
LOUD
TITLEAUDIO
OSD
INT
SUBT
STEP
RPT RDM
APS
09
AF
+10
6
2
TA
PTY
10+
7
3
8
4
PWR
+
SEL
MUTE
SETUP
0K
BAND
MODE
MENU
OPEN
R1
R5
R14
R8
R11
R10
R2 R3 R4
R6
R7
R20
R21
R23
R27
R31
R35
R13
R16
R19
R22
R26
R30
R34
R38
R24
R28
R32
R36
R9
R17
R15
R12
R18
R25
R29
R33
R37
GB - 7
R29. RPT (Repeat)button : To repeat playback .
R30. RDM (Random)button : To start/ cancel random playback.
R31. A-B (Repeat A-B) button: To repeat section A to B
R32. AUDIO button: To change the audio setting (DVD only).
R33. TITLE button: To access the disc title menu.
R34. SUBTITLE /REDIAL button: To change the subtitle setting. To redial.
R35. PROG (Program)button: To program playback sequences.
R36. OSD button: To show status information on the screen.
R37. LOUD button (loudness): To turn ON/OFF loudness function.
R38. TEL / STEP button : To dial or answer the phone. To play frame by frame
Note: “INVALID KEY“ will be displayed if the function you select is not available.
The remote control operates on 1pc “CR2025” lithium battery (included).
To power up the remote control, remove the insulation tab from the back
of unit.
REPLACING BATTERY FOR THE REMOTE CONTROL
1. Push the button toward right.
2. Pull the battery loader out.
3. Insert one “CR2025” size battery with the positive side (+) facing up.
4. Replace the cover.
Notes on batteries
• Never recharge the batteries, apply heat to them or take them apart.
• Battery shall not be exposed to excessive heat such as sunshine, re or the like.
• Do not throw the batteries in re!
• Attention should be drawn to the environmental aspects of battery disposal.
• If the remote control is not going to be used for a long time, remove the battery to avoid
damage caused by battery leakage corrosion.
• Please respect the environment. Before throwing any batteries away, consult your distributor
who may be able to take them back for specic recycling.
CAUTION:
Danger of explosion if battery is incorrectly replaced. Replace only with the same or equivalent
type.
AR-3632 IB MUSE 001 REV0 GB.indd 1 2014/7/22 16:59:57

Join the conversation about this product
Here you can share what you think about the Muse M-728 DR Car Radio. If you have a question, first carefully read the manual. Requesting a manual can be done by using our contact form.