GB-2
GB-3 GB-4
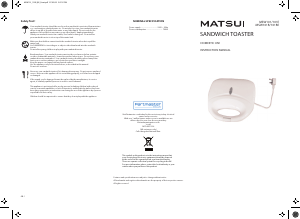
TEMPERATURE
INDICATOR LIGHT
PLUG
(For UK market)
(For EU markets)
HANDLE
HANDLE LOCKING CLIP
Get to know your sandwich maker
Before use
Please read these instructions and have a good look at the illustrations before using your
sandwich maker.
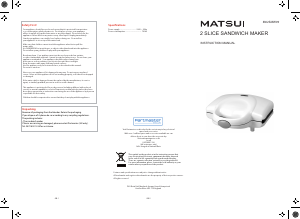
Open up your sandwich maker
by releasing the handle locking
clip and lifting up the top half of
the sandwich maker.
Clean the surface of the cooking plates with a damp cloth
and wipe dry.
Using your sandwich moaster for the rst time
Always watch your sandwich toaster when in use.
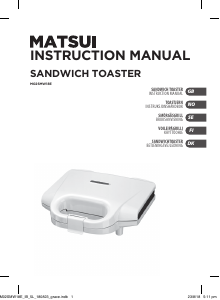
Sandwich making
Make sure the bread covers the cooking plates.
The temperature indicator light
will turn on and o whilst the
built-in thermostat maintains
the cooking temperature.
Never use a metal object
to remove your toasted
sandwich as it may
damage the cooking
plates.
Smear a layer of butter,
margarine or cooking fat
over the plates.
Turn the power on at the mains
socket. The power and
temperature indicator light
will turn on.
Connect the plug to the
mains and switch on.
Place your bread onto the lower
half of the cooking plates with
the buttered side facing down.
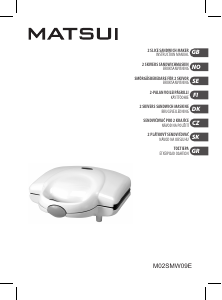
When the temperature indicator
light turns o, then remove the
mains plug from the mains socket.
Gently squeeze the handles
together and close the
handle locking clip.
Connect the plug to the
mains socket.
Do not connect to mains socket
yet.
Cleaning your Sandwich Toaster
Do not use harsh cleaners, solvents or scouring pads as they may damage the casing.
Clean the surface of the
cooking plates with a damp
cloth and wipe dry. Make sure
you do not allow water to seep
into the heating elements.
NOTE: Do not remove the cooking plates.
Wait until the sandwich toaster
has cooled down, then wrap
the cord around the cord wrap
at the bottom of the sandwich
toaster for storage.
NOTE:
1
3
2
7 8
64 5
temperature indicator light
The temperature indicator lights
will illuminate until the sandwich
maker reaches the cooking
temperature.
When the temperature indicator
light goes o, open up your
sandwich maker by releasing
the handle locking clip and
lifting up the top half of the
sandwich maker.
Gently squeeze the handles
together and close the handle
locking clip.
Adding lling to the surface of
the bread and then place
another slice of bread on top,
buttered side facing up.
Recipes for sandwich llings
Never use raw meat as sandwich llings. Do not reheat sandwiches that have a meat lling.
• Tuna mayonnaise and sweet corn
• Cheese spread, ham and apple pieces
• Pizza toppings, ham and grated cheddar cheese
• Brie with walnuts and apple
• Avacado, crab and celery
• Cheddar cheese and onion
Tip: Sweet sandwiches are very easy to prepare.
White bread is recommended. Try apple pie lling, sultana and cinnamon.
Cooking Hints:
Prepare the next sandwich whilst one is cooking.
When the temperature indicator light turns on, it is the best time to cook the next
sandwich. Always close the cooking plates to preserve the heat for the next sandwich.
1. Add a lling of your choice or choose from the suggestions that are mentioned above.
2. Place another 2 slices of bread on top of your lling (butter side up). You sandwich is now ready
to cook.
3. Enjoy your sandwich!
Oil Spray
margarine
3-4 minutes
HOT
Electrical Information
Before using this appliance ensure that the voltage of your electricity supply is
suitable for that indicated on the rating plate of the appliance.
THIS APPLIANCE MUST BE EARTHED.
The ultimate disconnection from the power source is the mains plug. Always make
sure it is easily accessible to be unplugged in the event of an emergency.
This appliance is tted with a fused three pin mains plug to BS 1363 which will be
suitable for use in all houses tted with mains sockets to current specications.
If the tted mains plug is not suitable, remove the fuse and dispose of the mains plug
safely, immediately after removing it from the mains cable.
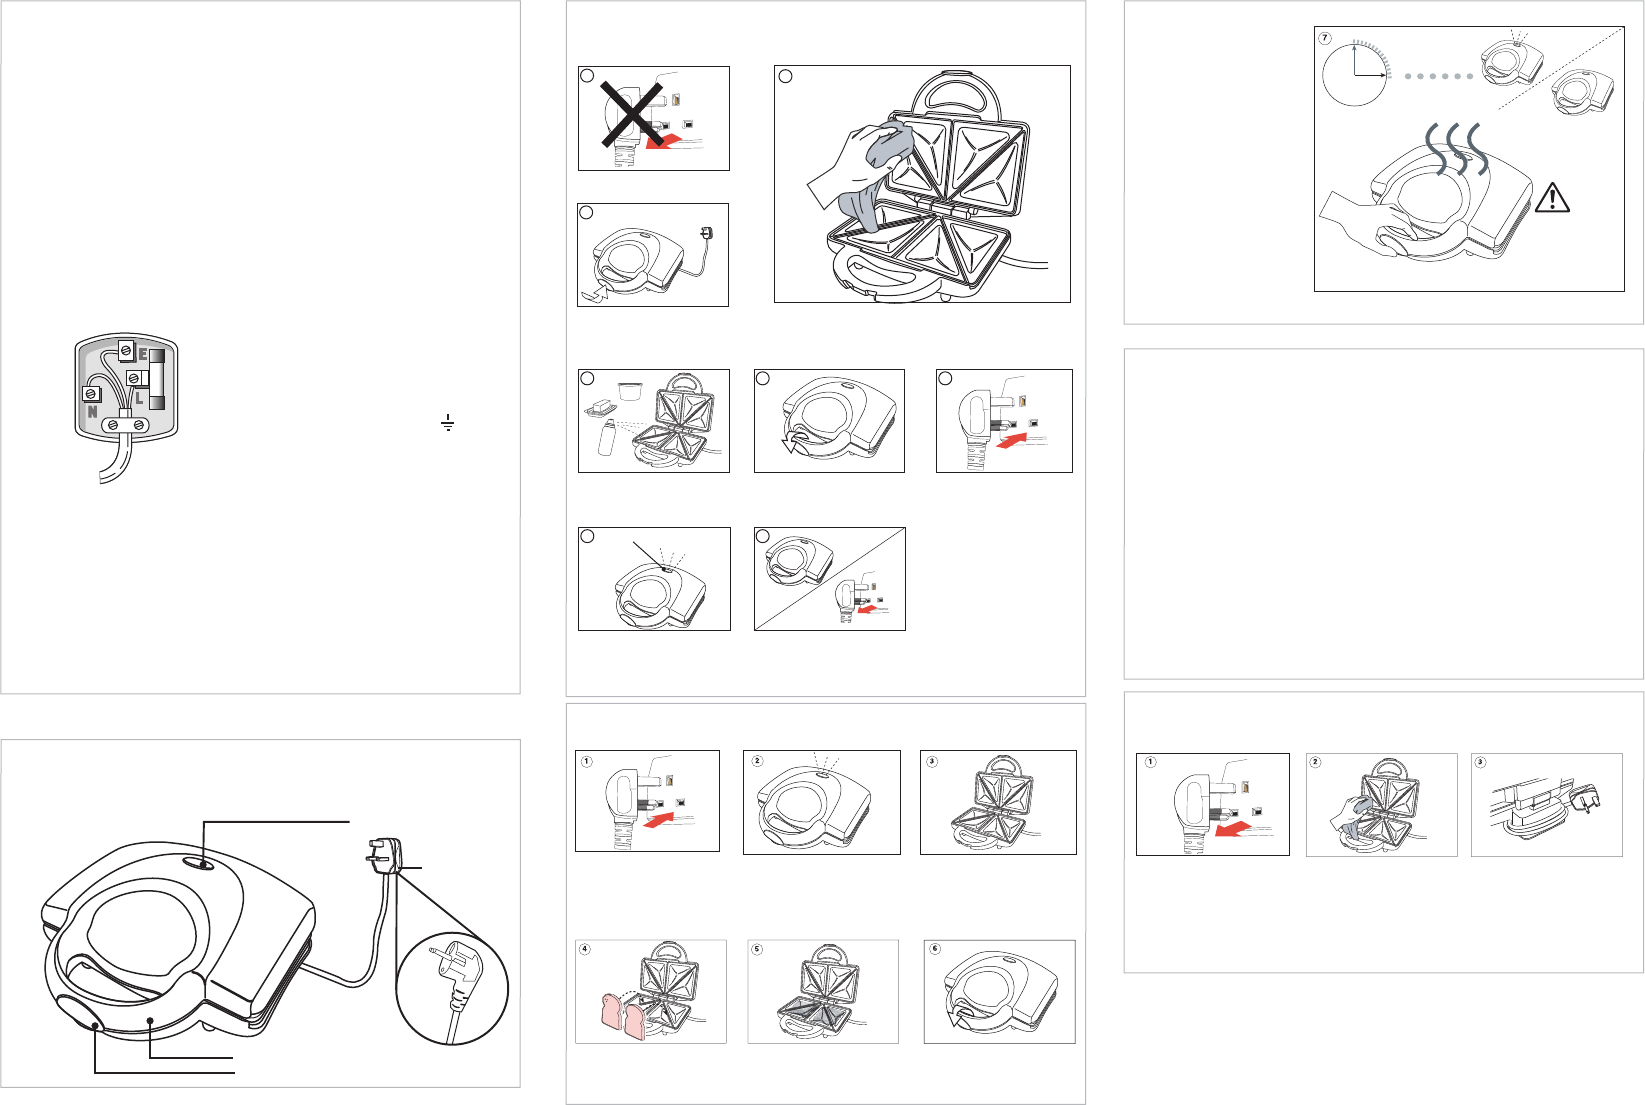
Fitting a new mains plug
If for any reason you need to t a new mains plug, the mains cable must be
connected as shown here. The wires in the mains cable tted to this appliance are
coloured in accordance with the following code:
If the colours of the wires in the mains
cable of this appliance do not correspond
with the coloured markings identifying
the terminals in your mains plug, proceed
as follows:
The wire which is coloured
• Green and Yellow: MUST be connected
to the terminal which is marked with
the letter E (Earth) or symbol or
coloured Green.
• Blue: MUST be connected to the
terminal which is marked with the letter
N (Neutral) or coloured Blue or Black.
• Brown MUST be connected to the
terminal which is marked with the letter
L (Live) or coloured Brown or Red.
Before retting the mains plug cover, check that there are no cut or stray strands of
wire inside the mains plug. Only BSI or ASTA approved 13 Amp BS1362 fuses should
be used. If you are in any way unsure which mains plug or fuse to use, always refer to
a qualied electrician.
Note: After replacing or changing a fuse on a moulded mains plug which has a fuse
cover, the cover must be retted to the mains plug, the appliance must not be used
without a fuse cover. If lost, replacement fuse covers can be obtained from an
electrical shop.
CONNECT GREEN AND YELLOW TO EARTH (E)
CONNECT
BLUE TO
NEUTRAL (N)
MAKE SURE THE OUTER
SHEATH OF THE MAINS
CABLE IS SECURELY HELD
BY THE CLAMP
CONNECT
BROWN TO
LIVE (L)
13 AMP FUSE
Your sandwich should be ready
in approximately 3-4 minutes.
When the temperature indicator
light turns o, open up the
sandwich maker with caution as
it will be hot.
CAUTION: Remember to unplug
the mains plug from the mains
socket.
Remove the plug from the
mains socket.
Matsui M02SMW09_Back_090709.pdf 09/07/09 2:11:15 PM


Join the conversation about this product
Here you can share what you think about the Matsui M02SMW09 Contact Grill. If you have a question, first carefully read the manual. Requesting a manual can be done by using our contact form.