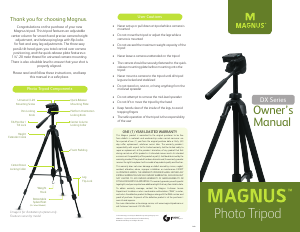
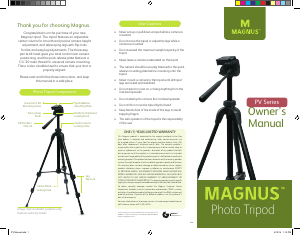
Utilizing the Pan & Tilt Head
1
To utilize the tilt
feature, loosen the pan
& tilt bar by rotating it
counterclockwise. Tilt
the tripod head to the
desired angle, and then
rotate the pan & tilt bar
clockwise to lock the
new position (Fig. G).
2
To utilize the 360°
panning feature, loosen
the panning locking
knob by rotating it
counterclockwise. Pan
as necessary, and then
rotate the panning
locking knob clockwise
to lock the new position
(Fig. H).
3
To change the camera
orientation from a
horizontal to vertical
position, loosen the
platform locking
knob by rotating it
counterclockwise. Rotate the platform 90°, and then
rotate the platform locking knob clockwise to lock
the new position (Fig. I).
Adjusting the Center Column Height
1
To raise or lower
the center column,
loosen the center
column locking
knob by rotating it
counterclockwise
(Fig. J).
2
Pull the center column
up to the desired
height, and then
rotate the center
column locking knob
clockwise to lock the
new position (Fig. K).
Utilizing the Monopod
1
To convert the center column to
a monopod, loosen the center
column locking knob by rotating
it counterclockwise, then pull
the center column up and out
of the tripod. You now have a
monopod.
2
To extend the monopod, grasp
the main body of the monopod
above the top grip with one
hand. With the other hand,
rotate the top grip 1/4 turn in
the direction indicated in photo.
Extend the top section and
rotate the grip 1/4 turn back to
lock it.
3
Grip the extended section
with one hand and loosen
the second grip by rotating it
1/4 turn. Extend the second
section and tighten the grip
by rotating it 1/4 turn back to
lock it.
4
Grip the newly extended
section and loosen the third
grip by rotating it 1/4 turn.
Extend the section and tighten
the grip by rotating it 1/4 turn
back to lock it.
5
Grip the newly extended
section and loosen the rubber
foot of the monopod and
rotate it 1/4 turn—this will
release the last section to be
extended. Lock it by rotating
the rubber foot 1/4 turn back.
Opening the Tripod
1
Always extend the legs from the top flip-locks first.
Pull out on each flip-lock and extend the legs to the
desired height. Close each flip-lock. (See Figs. A-B.)
2
Rotate the locking
collar counterclockwise
to release the center
brace, and gently pull
the legs out. Push
down on the center
brace, and then rotate
the locking collar
clockwise to lock the
legs in place (Fig. C).
Mounting the Quick-Release Plate to the
Camera
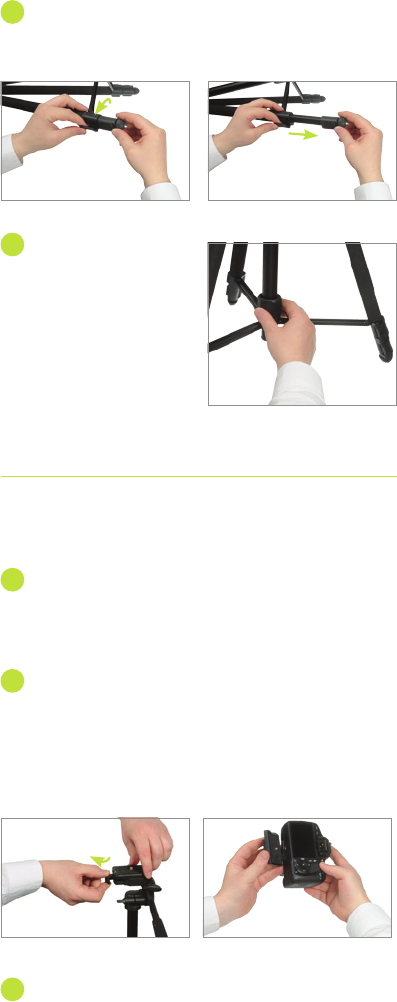
1
To remove the quick-release plate from the tripod
head, use your thumb to turn out and hold the plate
locking lever and remove the quick-release plate
(Fig. D).
2
Line up the quick-release plate lengthwise with the
bottom of the camera. Match the quick-release
plate screw to the camera’s mounting thread, and
mount the plate to the camera by flipping out the
D-ring handle to rotate the screw clockwise until
snug (Fig. E).
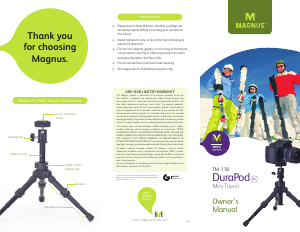
3
Press down on the D-ring so that it is flat against
the bottom of the quick-release plate. Mount the
camera/quick-release plate assembly to the tripod
Figure A Figure B
Figure E
Figure F
Figure D
Figure C
Figure G
Figure H
Figure I
head by pulling and
holding back on the
plate locking lever.
Insert the camera/
quick-release plate
assembly and push the
plate locking lever to
lock it in place (Fig. F).
Note: Be sure to collapse the monopod to its shortest length
before replacing it in the tripod.
All images are for illustration purposes only. Features vary by
model.
Note: Always extend the
monopod from the top first
and always grip the monopod
directly above the section you
are extending or retracting.
When retracting the sections of
the monopod, start by rotating
the rubber foot to loosen the
last section, gripping the section
above it. Repeat for each section.
Figure K
Figure J


Join the conversation about this product
Here you can share what you think about the Magnus DX-5330M Tripod. If you have a question, first carefully read the manual. Requesting a manual can be done by using our contact form.