■
C H A R A C T E R I S T I C S
1. Time/calendar display: Hour, minute, sec-
ond, month, date and day of the week
2. Time indication:
12-hour display format with
PM indicator and 24-hour display format are
available.
3. Stopwat ch: T he stopwatch can measure
up to 23 hours 59 minutes and 59 seconds in
1/100-second increments. Lap time measure-
ment is available. Up to 15 lap times can be
stored in memory.
Memory recall function:
Data obtained in the
Stopwatch mode can be recalled after meas-
urement.
4. Countdown timer: The countdown timer can
be set up to 23 hours 59 minutes and 59 sec-
onds.
5. Daily alarm:
The daily alarm can be set to
sound at the designated time on a 24-hour ba-
sis. Three individual daily alarms can be set.
Singl e-t ime alar m:
The Si ng le -t im e alarm
sounds only once at a designated time and it
is disengaged automatically.
Five individual
single-time alarms can be set.
6. Second Time Zone:
Time in a different time
zone can be displayed.
7.
Chime: The chime can be set to sound every
hour on the hour with a single beep.
8. Illuminating light:
The built-in electro-lumines-
cent (EL) light evenly illuminates the display for
easy viewing in darkness.
■
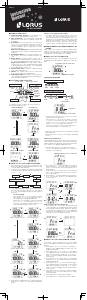
B U T T O N S A N D D I S P L AY S
■
HOW TO S E T THE TIM E / C A L ENDAR
■
H O W T O U S E S T O P WAT C H
The display mode changes in the following or-
der by pressing Button D.
1 Press Button A for 2 seconds to change the dis-
play to the
TIME/CALENDAR SETTING mode. (The
second digits start flashing.)
2 Selection of the digits to be adjusted (flash-ing)
is made in the following order by pressing But-
ton D.
3 One digit (flashing) is increased or decreased
with each pressing of Button B or C, respective-
ly. To move the digits quickly, keep the Button
pressed.
• Second setting
Press Button B or C in accordance with a
time signal. The second digits are reset to
“00” and start counting immediately.
When the second digits count any number
from “ 3 0 ” to “ 5 9 ” a nd Butt o n B o r C i s
pressed, one minute is added and the sec-
onds are immediately reset to “00.”
Choice of 12-Hour/24-Hour format
• The time display for mat in either 12-hour in-
dication or in 24-hour indication can be se-
lected alternately by pressing button B or C.
Under the 12-hour indication format, “ PM” mark
appears in the afternoon, but no AM mark ap-
pears in the morning. Under the 24-hour indi-
cation format, no mark appears on the display.
* Measurement and release of lap time can be
repeated by pressing Button C.
* When Button C is pressed, the display changes
to show the current lap time and total time from
START for 3 seconds, and then it automatically
returns to show the ongoing measurement.
* When the stopwatch is reset by pressing Button C,
the measured data is stored in memory.
Press Button D to go to the STOPWATCH mode. The
STOPWATCH mode indicator appears on the dis-
play.
STOPWATCH OPERATION
Standard Measurement
Lap Time Measurement
During the measurement, the STOPWATCH signal
keeps flashing.
Press Button D to return to the TIME/CALENDAR
mode.
1. Press Button D to go to the Memory Recall
mode. The MEMORY RECALL moce indicator
appears on the display.
Memory Recall Function
2. Press Button C to show the data of the latest
measurement. The elapsed time and the
date of measurement are displayed with a
RUN number.
3. Press Button B to read each recorded lap
time. Recorded lap time is shown in order of
each lap number.
4. Press Button C to exit the Memory Recall Func
-
tion. The display returns to the MEMORY RE-
CALL mode.
How to delete all of the memories
• Press Button A for 2 seconds. The “DELETE” indi
-
cator appears on the display when the watch
starts deleting stored data. When the deletion
is finished, the display returns to the MEMORY
RECALL mode, and after 1 second, it automati-
cally goes to the STOPWATCH mode.
Data obtained in the Stopwatch mode can be re-
called after measurement. Each time data from
START to RESET is managed as a RUN. Press Button
D to return to the TIME/CALENDAR mode.
■
E N G A G E M E N T / D I S E N G A G E M E N T OF
C H I M E
With each press of Button C in the TIME/CALEN-
DAR mode, the chime can be alter nately en-
gaged or disengaged. The CHIME signal appears
or disappears on the display accordingly.
A ( SET /LI GHT )
PM ind i-
cat or
Hou r
Day of th e w eek
Chi me
sig nal
Sto pwa tch
sig nal
Dat e
Min ute
Sec ond
Tim er sig nal
Ala rm
sig nal
B ( STA RT/ STO P)
D ( MOD E)
C (LA P/RES ET )
4 After all the adjustments are completed, press
Button A to retur n to the TI ME/CALE NDAR
mode.
TI MER
TI ME/ CAL END AR
STO PWAT CH
MEM ORY R ECA LL
LOC AL CIT Y
D
D
D
D
SEC OND S
DAT E
12/ 24- HOU R F ORM AT
MON TH
MIN UTE S
HOU RS
LOC AL CIT Y
D
D
D
D
D
D
D
DATE SETTING
MONTH SETTING
TIME/CALENDAR mode
12/24 FORMAT SETTING
LOCAL CITY SETTING
MINUTE SETTING
HOUR SETTING
SECOND SETTING
D
D
A
C
A
D
D
D
B
B
B
B
B
B
B
D
STO PWAT CH mod e i ndi cat or
STO PWAT CH sig nal
D
B
C
Loc al cit y
Mon th Ye ar
DAI LY A LAR M
D
SIN GLE -TI ME ALA RM
D
YEA R
A
D
B
YEAR SETTING
D
MEM ORY R ECA LL moc e i ndi cat or
C
B
C
A
After
1 second
A
LAP nu mbe r
Tota l t ime from STA RT
■
H O W T O U S E C O U N T D O W N T I M E R
Press Button D three times to go to the TIMER
mode. The TIMER mode indicator appears on the
display.
1. Press Button A for 2 seconds to change the
display to the TIMER SETTING mode. The hour
digits start flashing.
2. Press Button B or C
to set the second digits.
One digit (flashing) is increased or decreased
with each pressing of Button B or C, respec-
tively. To move the digits quickly, keep the But-
ton pressed.
3. Press Button D to confirm the second setting
and move on to the minute setting. The minute
digits start flashing.
4. Press Button B or C to set the minute digits.
One digit (flashing) is increased or decreased
with each pressing of Button B or C, respec-
tively. To move the digits quickly, keep the But-
ton pressed.
5. Press Button D to confirm the minute setting
and move on to the hour setting. The hour dig-
its start flashing.
6. Press Button D to set the Timer number.
7. Press Button A to complete the timer setting.
C
C
C
C
C
C
C
B
B
LAP ti me
D
B
D
C
D
C


Join the conversation about this product
Here you can share what you think about the Lorus Z010 Movement. If you have a question, first carefully read the manual. Requesting a manual can be done by using our contact form.