
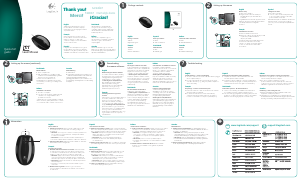
Quick start guide
Quick start guide
Quick start guide
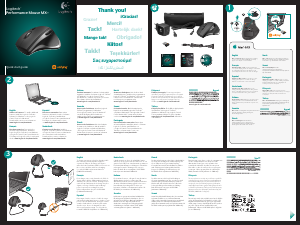
Logitech
®
Performance Mouse MX
™
1
2
Italiano
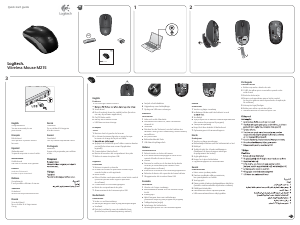
Funzioni avanzate. Per attivare le funzionalità
aggiuntive, installare il software Logitech
®
SetPoint
™
per Windows
®
o Logitech Control Center
per Macintosh
®
. Scaricare la versione più recente
del software dal sito Web all'indirizzo
www.logitech.com/downloads.
Svenska
Avancerade funktioner. Installera Logitech
®
SetPoint
™
-programmet för Windows
®
eller Logitech Control Center för Macintosh
®
om du vill få tillgång till fler funktioner.
Ladda ner den senaste programversionen
på www.logitech.com/downloads.
Dansk
Avancerede funktioner: Hvis du vil udnytte
de avancerede funktioner, skal du installere
Logitech
®
SetPoint
™
-softwaren til Windows
®
eller Logitech Control Center til Macintosh
®
.
Du kan hente den nyeste version af softwaren
på www.logitech.com/downloads.
Norsk
Avanserte funksjoner. Hvis du vil ta i bruk
ekstrafunksjonene, installerer du programvaren
Logitech
®
SetPoint
™
for Windows
®
eller Logitech
Control Center for Macintosh
®
. Du kan laste
ned den nyeste programvaren fra
www.logitech.com/downloads.
Suomi
Lisäominaisuudet. Ota lisäominaisuudet
käyttöön asentamalla Logitechin
®
SetPoint
™
-ohjelmisto Windowsille
®
tai Logitechin Control
Center Macintoshille
®
. Lataa uusin ohjelma
osoitteesta www.logitech.com/downloads.
Português
Funcionalidades avançadas. Para activar
as funcionalidades avançadas, instale o Software
Logitech
®
SetPoint
™
para Windows
®
ou
o Logitech Control Center para Macintosh
®
.
Transfira o software mais recente em
www.logitech.com/downloads.
Ελληνικά
Σύνθετες λειτουργίες. Για να ενεργοποιήσετε
πρόσθετες λειτουργίες, εγκαταστήστε το λογισμικό
Logitech® SetPoint™ για Windows® ή το Logitech
Control Center για Macintosh®. Μπορείτε να κάνετε
λήψη του πιο πρόσφατου λογισμικού από τη
διεύθυνση www.logitech.com/downloads.
Türkçe
Gelişmiş özellikler. Ek özellikleri etkinleştirmek
için Windows
®
için Logitech
®
SetPoint
™
yazılımını ve Macintosh
®
için Logitech Control
Center yazılımını yükleyin. En güncel yazılımı
www.logitech.com/downloads adresinden
edinebilirsiniz.
English
Advanced features. To enable additional
features, install the Logitech
®
SetPoint
™
Software for Windows
®
or the Logitech
Control Center for Macintosh
®
.
Download the most recent software at
www.logitech.com/downloads.
Français
Fonctions avancées. Pour activer les
fonctions supplémentaires, installez le
logiciel Logitech
®
SetPoint
™
pour Windows
®
ou Logitech Control Center pour Macintosh
®
.
Téléchargez le logiciel le plus récent à partir
du site www.logitech.com/downloads.
Español
Funciones avanzadas. Para activar
funciones adicionales, instale el software
Logitech
®
SetPoint
™
para Windows
®
o Logitech Control Center para Macintosh
®
.
Descargue el software más reciente
en www.logitech.com/downloads.
Nederlands
Geavanceerde functies. Installeer
Logitech
®
SetPoint
™
-software voor Windows
®
of Logitech Control Center voor Macintosh
®
als u extra functies wilt inschakelen.
Download de recentste software via
www.logitech.com/downloads.
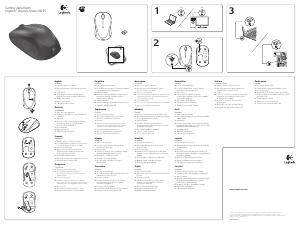
English
To charge your mouse, plug the charging cable
into either the included power supply or
a powered USB port. Recharge your mouse
when the battery indicator blinks red. Do not use
the receiver extender cable for recharging.
Use only AA NiMH replacement batteries
(1800 mAh minimum).
Français
Pour charger votre souris, branchez le câble de
charge dans le boîtier d'alimentation fourni ou
dans un port USB sous tension. Rechargez votre
souris lorsque l'indicateur de la charge des piles
clignote en rouge. N'utilisez pas la rallonge
pour récepteur pour recharger la souris.
Utilisez uniquement des piles AA R6 NiMH
(1 800 mAh minimum).
Español
Para cargar el ratón, conecte el cable de carga
a la fuente de alimentación que se incluye o a un
puerto USB con alimentación. Recargue el ratón
cuando el indicador de estado de pilas emita
destellos rojos. No use el alargador de cable
del receptor para la recarga. Use sólo pilas de
recambio NiMH R6 AA (mínimo de 1800 mAh).
Nederlands
U laadt uw muis op door de oplaadkabel aan te
sluiten op de meegeleverde stroomtoevoer of een
geactiveerde USB-poort. Laad uw muis op wanneer
het batterijstatuslampje rood knippert. Gebruik het
verlengsnoer van de ontvanger niet om op te
laden. Gebruik alleen vervangbare AA R6 NiMH-
batterijen met minimaal 1800 mAh.
Italiano
Per ricaricare il mouse, collegare il cavo di ricarica
all'alimentatore incluso o a una porta USB
alimentata. Ricaricare il mouse quando l'indicatore
di carica della batteria lampeggia di colore rosso.
Non utilizzare la prolunga del ricevitore per
la ricarica. Utilizzare esclusivamente batterie AA
R6 NiMH (con un minimo di 1800 mAh).
Svenska
Ladda musen genom att ansluta laddarkabeln
till antingen medföljande nätadapter eller en
strömförsörjd USB-port. Om batteriindikatorn
blinkar rött är det dags att ladda musen.
Använd inte mottagarens förlängningssladd
vid laddningen. Använd endast AA R6 NiMH-
ersättningsbatterier (minst 1 800 mAh).
Dansk
Du kan oplade musen ved at slutte opladerkablet
til enten den medfølgende strømforsyning eller
til en USB-port med egen strømforsyning.
Genoplad musen når batteriindikatoren blinker
rødt. Modtagerens forlængerkabel må ikke
bruges til opladning. Du må kun bruge AA
R6 NiMH-batterier (minimum 1800 mAh).
Norsk
Du lader musen ved å kople ladeledningen
til enten strømadapteren eller en usb-port med
strømforsyning. Når batterilampen på musen
blinker rødt, må du lade batteriene. Ikke bruk
forlengerledningen til mottakeren til lading.
Bruk kun batterier av typen AA R6 NiMH
(minimum 1800 mAh).
Suomi
Lataa hiiri yhdistämällä latausjohto joko mukana
tulevaan virtalähteeseen tai virtaa antavaan
USB-porttiin. Lataa hiiri, kun paristojen merkkivalo
vilkkuu punaisena. Älä käytä vastaanottimen
jatkojohtoa lataamista varten. Käytä ainoastaan AA
R6 NiMH -vaihtoparistoja (vähintään 1800 mAh).
Português
Para carregar o rato, ligue o cabo de carregamento
à fonte de alimentação ou a uma porta USB
alimentada. Recarregue o rato quando a luz
vermelha do indicador de pilhas do rato piscar.
Não utilize o cabo do extensor do receptor para
recarregar. Utilize apenas pilhas de substituição
NiMH, tamanho AA R6 (mínimo de 1800 mA).
Ελληνικά
Για να φορτίσετε το ποντίκι σας, συνδέστε το καλώδιο
φόρτισης είτε στο τροφοδοτικό που περιλαμβάνεται
είτε σε θύρα USB με τροφοδοσία. Επαναφορτίστε το
ποντίκι σας όταν η ενδεικτική λυχνία της μπαταρίας
αναβοσβήνει με κόκκινο χρώμα. Μην χρησιμοποιείτε
το καλώδιο προέκτασης δέκτη για την επαναφόρτιση.
Χρησιμοποιείτε μόνο μπαταρίες αντικατάστασης AA
R6 NiMH (1800 mAh το ελάχιστο).
Türkçe
Farenizi şarj etmek için şarj kablosunu fareyle birlikte
gelen güç kaynağına veya elektrikle beslenen USB
bağlantı noktasına takın. Pil göstergesi ışığı kırmızı
olarak yanıp sönmeye başladığında farenizi yeniden
şarj edin. Şarj için alıcının uzatma kablosunu
kullanmayın. Yalnızca AA R6 NiMH pillerle değiştirin
(en az 1800 mAh).
3
Thank you!
¡Gracias!
Σας ευχαριστούμε!
Mange tak!
Kiitos!
English
Mac® OS X Users: When plugging in the Unifying
receiver, the Keyboard Assistant dialog box may
appear. You can just close this window.
Français
Utilisateurs Mac® OS X: lorsque vous branchez
le récepteur Unifying, la boîte de dialogue de l'assistant
de configuration du clavier peut s'afficher. Vous
pouvez simplement fermer cette boîte de dialogue.
Español
Usuarios de Mac® OS X: Al conectar el receptor
Unifying, puede aparecer el cuadro de diálogo
Asistente Teclado. Puede cerrar esta ventana.
Nederlands
Gebruikers van Mac® OS X: Wanneer u de
Unifying-ontvanger aansluit, kan het dialoogvenster
met de configuratie-assistent voor het toetsenbord
verschijnen. U kunt dit venster gewoon sluiten.
Italiano
Utenti di Mac® OS X: quando si collega il ricevitore
Unifying potrebbe venire visualizzata la finestra di
dialogo dell'assistente per la tastiera. In questo caso,
chiuderla.
Svenska
Mac® OS X: Om dialogrutan Tangentbordsassistenten
visas när du ansluter Unifying-mottagaren,
kan du stänga fönstret.
Dansk
Mac® OS X-brugere: Når du tilslutter
Unifying-modtageren, vises dialogboksen
med installationsguiden til tastaturet muligvis.
Du kan ganske enkelt lukke dette vindue.
Norsk
Mac® OS X: Når du setter inn Unifying-mottakeren,
kan det hende at dialogboksen Tastaturoppsettassis-
tent kommer opp. Du kan lukke dette vinduet.
Suomi
Mac OS X -käyttäjät: Kun liität
Unifying-vastaanottimen, näppäimistön
apuohjelman valintaikkuna saattaa ilmestyä näyttöön.
Sulje tämä ikkuna.
Português
Utilizadores do Mac® OS X: Ao ligar o receptor
Unifying, pode aparecer a caixa de diálogo Keyboard
Setup Assistant (Assistente de Configuração do
Teclado). Pode fechar esta janela.
Ελληνικά
Χρήστες Mac® OS X: Όταν συνδέσετε τον δέκτη
Unifying ίσως εμφανιστεί το πλαίσιο διαλόγου του Οδηγού
πληκτρολογίου. Μπορείτε απλώς να κλείσετε αυτό
το παράθυρο.
Türkçe
Mac® OS X Kullanıcıları: Unifying alıcısı takıldığında,
Keyboard Setup Assistant (Klavye Kurulumu Yardımcısı)
iletişim kutusu görüntülenebilir. Bu pencereyi
kapatabilirsiniz.
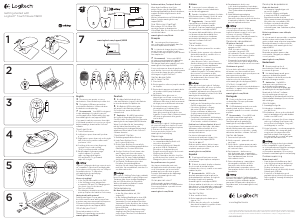
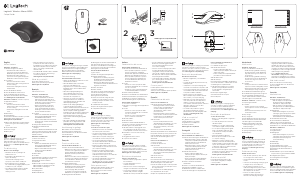
Quick start guide
Quick start guide
Quick start guide
Logitech
®
Performance Mouse MX
™
Performance MX
™
OFF ON
1
2
PULL
3
Mac® OS X:
Unifying "
". .
.
™Logitech® SetPoint
Windows® Logitech Control Center
®Macintosh.
www.logitech.com/downloads.
USB .
.
.
NiMH

Join the conversation about this product
Here you can share what you think about the Logitech Performance MX Mouse. If you have a question, first carefully read the manual. Requesting a manual can be done by using our contact form.
reply | This was helpful (2) (Translated by Google)
reply | This was helpful (0) (Translated by Google)