
1 2 3
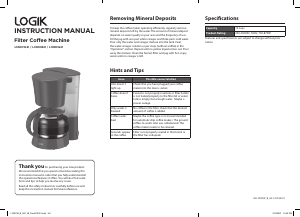
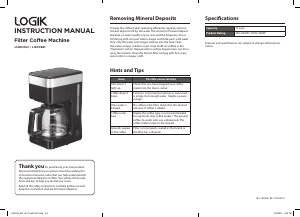
Cleaning
• Wipe the appliance’s exterior surface, the lter holder assembly
and warming plate with a soft, damp cloth to remove stains. Do
not use strong detergents or abrasive cleaners.
• Wash the lters, lter holder, drip tray and measuring spoon
after each use in hot, soapy water. Never use a dishwasher.
• Detach the water tank and wash it in water.
Cleaning the Frothing Wand
• Wait for the frothing wand to cool before cleaning. Pull down
the black frothing sleeve and wash it under running water.
• Fill a cup with some water, immerse the frothing wand into the
water, turn the Control Knob to the steam position
for a few
seconds. Then turn back to the centre position (O).
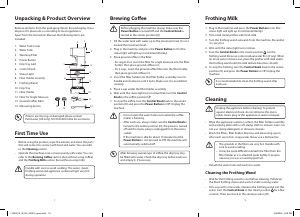
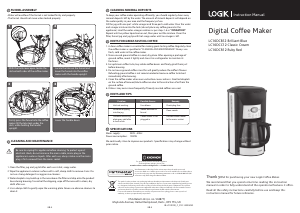
Unpacking & Product Overview
Remove all items from the packaging. Retain the packaging. If you
dispose of it please do so according to local regulations.
Apart from the Instruction Manual, the following items are
included:
First Time Use
• Before using the product, wipe the exterior and clean the parts
that will come into contact with food and water. You can refer
to the Cleaning section.
• Operate the machine once or twice purely with water. You can
refer to the Brewing Coee section (but without using coee)
and the Frothing Milk section (but without using milk).
1. Water Tank Cover
2. Water Tank
3. Warming Plate
4. Power Button
5. Drip Tray Grid
6. Control Knob
7. Status Light
8. Filter Holder Assemly
9. Frothing Wand
10. Drip Tray
11. Filter Holder
12. Filter for Single Measure
13. Ground Coee Filter
14. Measuring Spoon
Brewing Coee
1. Fill the water tank with water up to the maximum level. Do not
exceed the maximum level.
2. Plug in the machine and press the Power Button to On (the
status light will light up in red intermittently).
3. Place ground coee in the lter:
• for single shot, insert the lter for single measure into the lter
holder, then place ground coee in it;
• for 2 cups, insert the ground coee lter into the lter holder,
then place ground coee in it.
4. Insert the lter holder into the lter holder assembly, turn its
handle anti-clockwise until it locks. Make sure it is assembled
securely.
5. Place a cup under the lter holder assembly.
6. Wait until the status light turns to blue then turn the Control
Knob to the coee position
.
7. To stop the coee, turn the Control Knob back to the centre
position (O) and press the Power Button to O. Unplug the
machine.
• Do not open the water tank cover while the coee
maker is brewing.
• After each use, always make sure the Control Knob is
turned to the centre position (O), the power is turned
o and the mains plug is unplugged from the mains
socket.
• If the machine is idle for about 10 minutes but the
Power Button is not pressed to O, the machine will
automatically switched o.
• The grounds in the lters are very hot. Handle with
care to avoid scalding.
• It may be quite dicult to detach the lter from the
lter holder as it is attached quite tightly. It may be
necessary to use a round-tipped tool.
After brewing several cups of coee, the drip tray may
be lled with water. Check the drip tray before each use
and empty it, if necessary.
Frothing Milk
1. Plug in the machine and press the Power Button to On (the
status light will light up in red intermittently).
2. Fill a small metal pitcher with fresh milk.
3. Turn the frothing wand outwards from the machine. Be careful,
it is very hot.
4. Wait until the status light turns to blue.
5. Turn the Control Knob to the steam position
. Let the
frothing wand blow out some residual water rst (if any). When
no more water is blown out, place the pitcher with milk under
the frothing wand until the milk texture becomes smooth.
6. To stop the frothing, turn the Control Knob back to the centre
position (O) and press the Power Button to O. Unplug the
machine.
It is recommended to clean the frothing wand after
each use.
Unplug the appliance before cleaning. To protect
against electrical shock, do not immerse the mains
cable, mains plug or the appliance in water or liquids.
If items are missing, or damaged please contact
Partmaster (UK only). Tel: 0344 800 3456 for assistance.
12
7
8
5
2
4
6
3
1
9
10
11
13
14
Handle with care to avoid scalding. The water, steam,
frothing wand and appliance surface will get very hot
during operation.
Before plugging the machine, always make sure the
Power Button is turned O and the Control Knob is
turned to the centre position (O).
L15EXC19_IB_RC_200219_grace.indd 1-3L15EXC19_IB_RC_200219_grace.indd 1-3 19/2/2020 6:29 PM19/2/2020 6:29 PM


Join the conversation about this product
Here you can share what you think about the Logik L15EXC19 Coffee Machine. If you have a question, first carefully read the manual. Requesting a manual can be done by using our contact form.
reply | This was helpful (2)
reply | This was helpful (2)
reply | This was helpful (0)