Step 1: Choosing The Proper Location For Your Incubator
Install your incubator in a room that has a stable temperature. Avoid
setting your incubator in drafty areas like near a window or on a porch.
Avoid direct sunlight. The ideal room temperature is 70°F.
The model 10200 Circulated Air Incubator and the model 9200 Still
Air Incubator outfitted with a Circulated Air Fan Kit (sold separately)
can operate in room temperatures between 60°F- 80°F. The Still Air
Incubator without a Circulated Air Fan Kit can
operate in a room tem-
peratures between 65°F and 72°F.
Step 2: Installation and Set Up
Unpack your incubator. The top half should be
complete with windows, element, thermostat,
indicator light, and power cord. Place the wire
screen in the incubator bottom. Line up the cord
exit slot in the top half with the slot in the
bottom half. This notch is used for the
power cord when using the Automatic
Egg Turner.
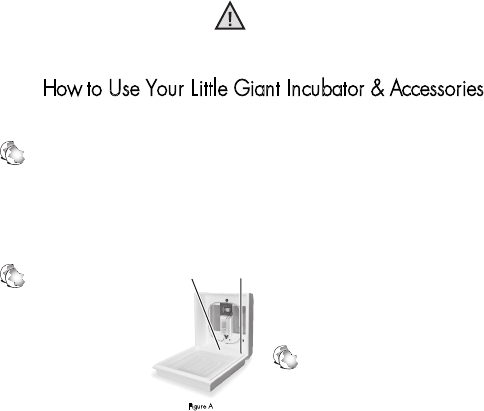
IMPORTANT: If you have a model 9200 or
10200 incubator without a model 6300 power
cord exit slot (see Figure A) you must add one. Use a screw driver or
similar shaped object, lay it across the edge of the incubator and press
down to form a slot in the location shown.
Install Circulated Air Fan Kit if purchased separately
(see separate instructions included with Fan Kit).
The Circulated Air Fan Kit converts the model 9200 Still Air Incubator
to a Circulated Air Incubator. The fan kit helps keep the temperature
uniform throughout the incubator. The fan circulates the air. It does not
regulate the temperature.
The model 6300 Automatic Egg Turner is sold separately and fits either
incubator. Six Large Egg Trays are included with the Automatic Egg
Turner. The Automatic Egg Turner makes one complete cycle (30
degrees side to side) every 4 hours.
IMPORTANT: DO NOT MOVE THE EGG TRAYS BY HAND. The
egg turner moves very slowly. It takes (4 hours to complete a 30 degree
side to side cycle. This movement may not be detected by the naked eye.
Unpack the Automatic Egg Turner from the box; holding it over the
incubator, line up the power cord exiting the motor with the side of the
incubator bottom that has a notch molded in it. Place the automatic egg
turner in the incubator so it fits flat on all four corners over the wire
mesh floor. Plug the cord into a surge protector. Plug the surge protec-
tor into a 110 volt GFCI protected outlet. On 240/400 volt model,
attach plug required by country standards.
Please calibrate the thermometer with one known to be accurate.
Step 3:Incubator Regulation
Before beginning a hatch, you need to regulate the incubator tempera-
ture. Turn the control knob fully clockwise. The red indicator light will
come on and the element will begin to heat. Watch the thermometer as
the incubator heats up. As soon as it registers to the temperature recom-
mended for the species you are hatching, turn the control knob slowly.
Adjust the control knob counter clockwise to decrease heat and clock-
wise to increase heat until you have it regulated to hold at the desired
temperature. The red indicator light may flicker off and on during this
process. This is normal and indicates that the incubator is adjusting to
changes in both internal and external air temperatures.
Run the incubator for 6-8 hours. At the end of this time, make sure the
desired temperature was maintained. If so, you are ready to incubate!
How to Use Your Little Giant Incubator & Accessories
Figure A
Note:
Due to different hatching requirements, it is recommended that you hatch only one species of egg per hatch. For example, it is
not recommended that you attempt to hatch chicken and quail eggs at the same time in the same incubator.
Please refer to your local library or the World Wide Web for additional hatching information.
Screen
•
This product must be used with a Ground Fault Circuit Interrupter (GFCI) protected outlet.
•
DO NOT connect the product to an outlet with extension cords.
•
DO NOT expose the product’s electrical parts to water.
WARNING
6200
Cord Exit Slot
6300
Cord Exit Slot


Join the conversation about this product
Here you can share what you think about the Little Giant 9200 Incubator. If you have a question, first carefully read the manual. Requesting a manual can be done by using our contact form.