C
Montaggio del piantone da interrare
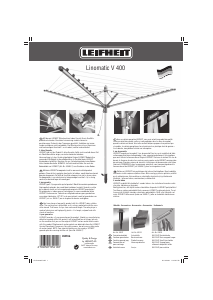
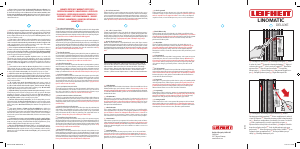
1. Cercare un luogo soleggiato e considerare la presenza di
alberi, arbusti, siepi, ecc. Lo stendibiancheria deve poter girare
liberamente, lo spazio necessario è indicato sulla confezione.
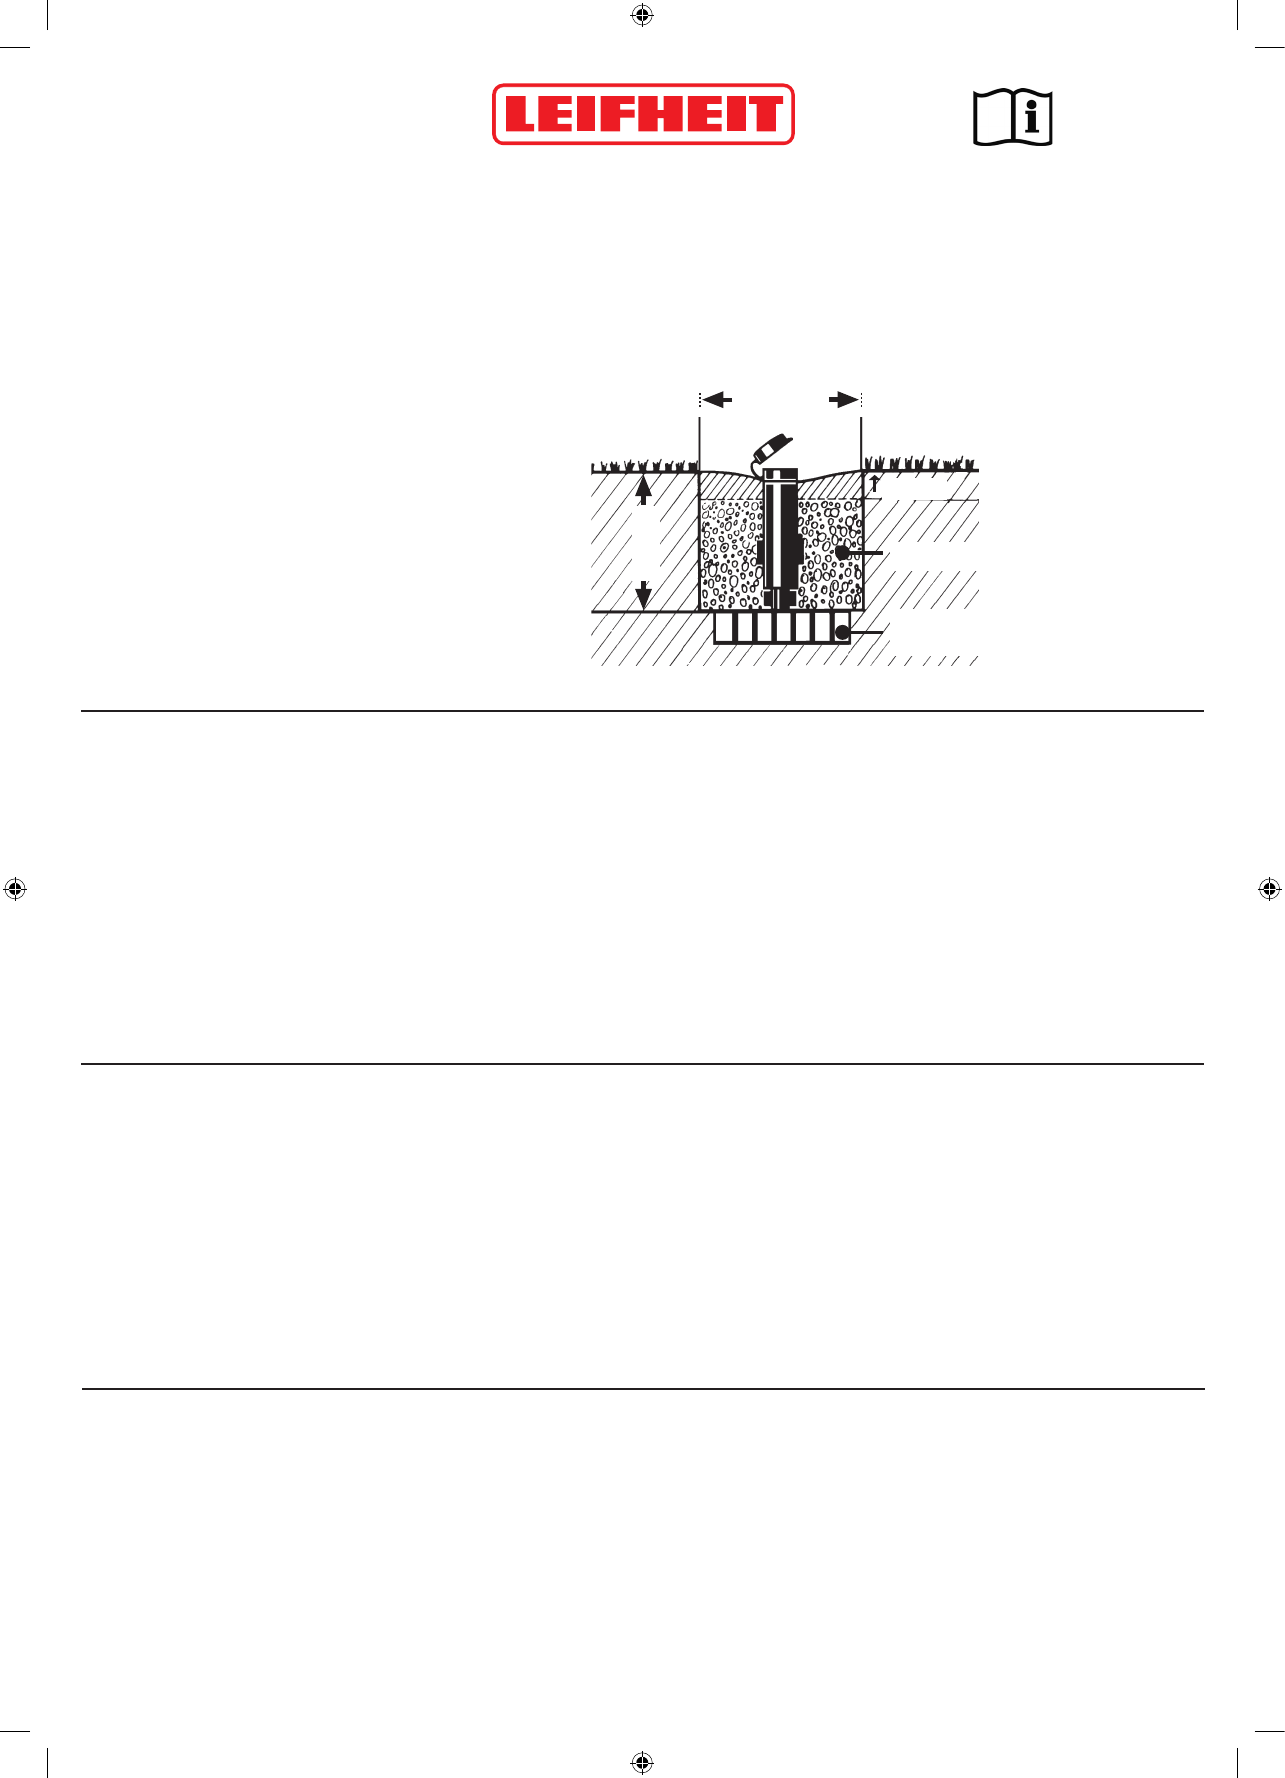
2. Praticare un foro seguendo lo schizzo.
3. Mescolare ca. 20 litri (2 secchi) di cemento con un po‘ di acqua
(umidiccio) in rapporto di 5 parti di sabbia e 1 parte di cemento
e riempire il foro.
4. Tenere il piantone da interrare in posizione verticale. Fare una prova
con lo stendibiancheria e una livella a bolla d‘aria.
5. Il piantone deve sporgere tanto da poter chiudere il coperchio.
6. Lasciar indurire il cemento un paio di giorni.
m
Montaje del casquillo de suelo
1. Busque un lugar soleado y tenga en cuenta los árboles, arbustos,
vallas, etc. El tendedero rotatorio debe poder girar libremente.
En el embalaje se indica el espacio necesario.
2. Cave un hoyo según el boceto.
3. Mezcle unos 20 litros (2 cubos) de hormigón con algo de agua
(hormigón húmedo) en una proporción de cinco partes de arena
por una de cemento y rellene el hoyo.
4. Mantenga el casquillo de suelo en posición vertical.
Compruébelo con el tendedero rotatorio y un nivel de agua.
5. El casquillo debe sobresalir lo bastante como para poder cerrar
la tapa.
6. Deje que el hormigón se endurezca durante unos días.
P
Montagem do encaixe de solo
1. Procure um local com sol e tenha em atenção árvores, arbustos, vedações, etc.
Deve ser possível rodar o estendal livremente. O espaço necessário está indicado
na embalagem.
2. Escave um buraco de acordo com o esquema.
3. Misture cerca de 20 litros (2 baldes) de betão com um pouco de água
(consistência de terra húmida), na proporção de 5 partes de areiae 1 parte
de cimento, e encha o buraco.
4. Mantenha o encaixe de solo na vertical. Faça um teste com o estendal e um
nível de bolha de ar.
5. O encaixe deve sobressair até ser possível fechar a tampa.
6. Deixe o betão endurecer durante alguns dias.
Placering af monteringsrøret
1. Find et solrigt sted og vær opmærksom på træer, buske, hegn osv. Tørrestativet
skal kunne dreje frit. På emballagen kan man se, hvor meget plads stativet skal
have.
2. Grav ud som på tegningen.
3. Bland ca. 20 liter (2 spande) beton (jordfugtigt) i forholdet 5 dele sand til 1 del
cement. Tilsæt vand. Fyld hullet op med betonen.
4. Placer monteringsrøret i betonen, så det står lodret. Juster med et vaterpas på
tørrestativet.
5. Røret skal stikke nok op til, at man kan lukke dækslet.
6. Lad betonen hærde et par dage.
U
Markhylsans montering
1. Uppsök en solig plats och se till att inte träd, buskar eller staket
skuggar. Tvättlinan måste kunna rotera fritt, platsbehovet nns
angivet på förpackningen.
2. Gräv ett hål enligt skissen.
3. Blanda ca. 20 liter (2 hinkar) betong med lite vatten (fuktigt) med
förhållande delar sand och 1 del cement och fyll hålet.
4. Håll markhylsan vertikalt. Sätt i tvättlinan och testa med vattenpass.
5. Hylsan skall synas så att man kan stänga locket.
6. Låt betongen härda under ett par dagar.
Montaż tulei wbijanej w ziemię
1. Wyznaczyć słoneczne miejsce i uwzględnić pobliskie drzewa, krzewy, płoty itp.
Konstrukcja suszarki powinna się łatwo obracać. Zapotrzebowanie wolnego
miejsca podane jest na opakowaniu.
2. Wykopać otwór w ziemi jak na rysunku.
3. Wytworzyć ok. 20 litrów (2 wiadra) betonu za pomocą niewielkiej ilości wody
(odpowiadającego wilgotnej ziemi) w stosunku: 5 części piasku na 1 część cementu
i wypełnić otwór.
4. Przy tym trzymać tuleję wbijaną w ziemię pionowo. Pozycję suszarki
skontrolować poziomicą.
5. Tuleja powinna wystawać z podłoża tak, aby można zamknąć pokrywę.
6. Beton pozostawić przez parę dni do utwardzenia.
Ø ca. 30 cm
5-10 cm
ca. 25 cm
Hormigón • Betão • Cemento • Beton • Beton • Beton
ladrillo perforado • Tijolo furado • mattone perforato •
perforeret mursten • Stabilisering (tegelsten) •
Pustak
Tendedero plegable de 50m • Estendal rotativo 50 m • Stendibiancheria ad ombrello da 50 m • 50 m sammenklappeligt tørrestative •
50 m roterande torktumlare • Suszarka na pranie o długości 50 m
85359 LinoLift 500 / 85360 LinoPush 500
85359-85360 GA-Linolift-LinoPush-500-A4.indd 2 20.10.16 15:45


Join the conversation about this product
Here you can share what you think about the Leifheit LinoLift 500 Clothes Drying Rack. If you have a question, first carefully read the manual. Requesting a manual can be done by using our contact form.